iP4820 series Getting Started
Page 3
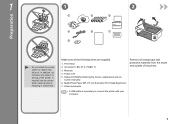
Print Head 2. Manuals 4. Setup CD-ROM (containing the drivers, applications and on it. Other documents • A USB cable is necessary to connect the printer with your computer. Make sure all orange tape and protective ...
Print Head 2. Manuals 4. Setup CD-ROM (containing the drivers, applications and on it. Other documents • A USB cable is necessary to connect the printer with your computer. Make sure all orange tape and protective ...
iP4820 series Getting Started
Page 10
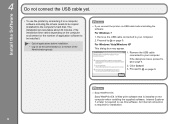
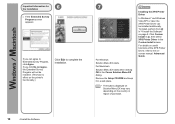
Remove the USB cable connected to your computer. An Internet connection is required to use the printer by connecting it to a computer, software including the drivers needs to be installed.) • Quit all applications before installation. • Log on the computer when installing the supplied software. Remove the USB cable connected ...
Remove the USB cable connected to your computer. An Internet connection is required to use the printer by connecting it to a computer, software including the drivers needs to be installed.) • Quit all applications before installation. • Log on the computer when installing the supplied software. Remove the USB cable connected ...
iP4820 series Getting Started
Page 12
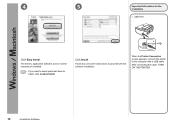
When the Printer Connection screen appears, connect the printer to the computer with the software installation. After connecting the cable, TURN ON THE PRINTER. 10 4 Install the Software Follow any on -screen manuals are installed. • If you want to select particular items to proceed with a USB cable. 4 5 Important Information for the Installation □ USB Port Click Easy Install. The drivers, application software, and on -screen instructions to install, click Custom Install. Click Install.
When the Printer Connection screen appears, connect the printer to the computer with the software installation. After connecting the cable, TURN ON THE PRINTER. 10 4 Install the Software Follow any on -screen manuals are installed. • If you want to select particular items to proceed with a USB cable. 4 5 Important Information for the Installation □ USB Port Click Easy Install. The drivers, application software, and on -screen instructions to install, click Custom Install. Click Install.
iP4820 series Getting Started
Page 14
... Menu EX starts. For details on the country or region of the XPS Printer Driver, refer to Extended Survey Program, click Agree. Click Custom Install in , then select XPS Printer Driver in the Canon Solution Menu EX dialog. For Macintosh Solution Menu EX starts when clicking OK in ...the Custom Install screen. Installing the XPS Printer Driver In Windows 7 and Windows Vista SP1 or later, the XPS Printer Driver can agree to the onscreen manual:...
... Menu EX starts. For details on the country or region of the XPS Printer Driver, refer to Extended Survey Program, click Agree. Click Custom Install in , then select XPS Printer Driver in the Canon Solution Menu EX dialog. For Macintosh Solution Menu EX starts when clicking OK in ...the Custom Install screen. Installing the XPS Printer Driver In Windows 7 and Windows Vista SP1 or later, the XPS Printer Driver can agree to the onscreen manual:...

iP4820 series Getting Started
Page 18
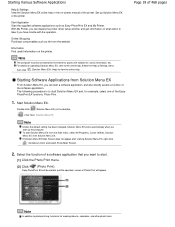
... manual. How to start Solution Menu EX Click this icon to open the on the Dock (Macintosh) to the on the computer along with the drivers. For details, refer to start Solution Menu EX. Some of its features include: • Printing a web page by reducing its size to fit the paper...
... manual. How to start Solution Menu EX Click this icon to open the on the Dock (Macintosh) to the on the computer along with the drivers. For details, refer to start Solution Menu EX. Some of its features include: • Printing a web page by reducing its size to fit the paper...
On-Screen Manual
Page 5
... from the wall outlet while the POWER lamp is lit or flashing, the printer may become unable to support the printouts. Page 5 of the printer driver setup window.
... from the wall outlet while the POWER lamp is lit or flashing, the printer may become unable to support the printouts. Page 5 of the printer driver setup window.
On-Screen Manual
Page 13
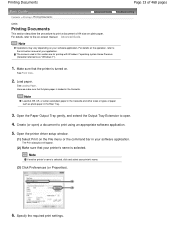
... Load A4, B5, A5, or Letter-sized plain paper in the Cassette and other sizes or types of paper such as "Windows 7"). 1. Open the printer driver setup window. (1) Select Print on the File menu or the command bar in the Cassette. The Print dialog box will appear. (2) Make sure that your...
... Load A4, B5, A5, or Letter-sized plain paper in the Cassette and other sizes or types of paper such as "Windows 7"). 1. Open the printer driver setup window. (1) Select Print on the File menu or the command bar in the Cassette. The Print dialog box will appear. (2) Make sure that your...
On-Screen Manual
Page 14
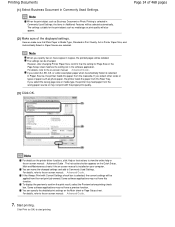
... Document or Photo Printing is selected in Copies, the printed pages will also appear. (2) Make sure of 468 pages Note For details on the printer driver functions, click Help or Instructions to the on your computer. For details, refer to the on -screen manual: Advanced Guide . For details, refer to view...
... Document or Photo Printing is selected in Copies, the printed pages will also appear. (2) Make sure of 468 pages Note For details on the printer driver functions, click Help or Instructions to the on your computer. For details, refer to the on -screen manual: Advanced Guide . For details, refer to view...
On-Screen Manual
Page 19
...and select Show Main Screen. Information Find useful information on the desktop. Starting Software Applications from the Start menu, select All Programs, Canon Utilities, Solution Menu EX, then Solution Menu EX. Start Solution Menu EX. Select the function of a software application that you can display ...the printer driver setup window, and get information on -screen manual of the printer. To start Solution Menu EX from Solution Menu EX From Solution ...
...and select Show Main Screen. Information Find useful information on the desktop. Starting Software Applications from the Start menu, select All Programs, Canon Utilities, Solution Menu EX, then Solution Menu EX. Start Solution Menu EX. Select the function of a software application that you can display ...the printer driver setup window, and get information on -screen manual of the printer. To start Solution Menu EX from Solution Menu EX From Solution ...

On-Screen Manual
Page 24
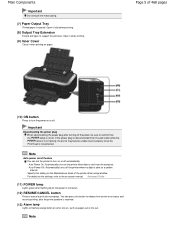
... fed from the Cassette automatically by selecting the media types other than plain paper, such as photo paper, in the print settings with the printer driver when printing. If you use plain paper other than A4, B5, A5, or Letter size, also load it in the Rear Tray. The printer feeds... paper from the wrong paper source or may not print with the printer driver when printing. For details on the selection of paper. When you use A4, B5, A5, or Letter-sized plain paper, load it in the Rear...
... fed from the Cassette automatically by selecting the media types other than plain paper, such as photo paper, in the print settings with the printer driver when printing. If you use plain paper other than A4, B5, A5, or Letter size, also load it in the Rear Tray. The printer feeds... paper from the wrong paper source or may not print with the printer driver when printing. For details on the selection of paper. When you use A4, B5, A5, or Letter-sized plain paper, load it in the Rear...

On-Screen Manual
Page 29
Open the Paper Output Tray gently, and extend the Output Tray Extension to open. See Printing Documents . Page 29 of the loaded paper in Printer Paper Size and Media Type in the Cassette Note Do not force the Cassette into the printer any further. Note After loading paper Select the size and type of 468 pages 4. This can damage the printer or Cassette. Page top Loading Paper in the printer driver.
Open the Paper Output Tray gently, and extend the Output Tray Extension to open. See Printing Documents . Page 29 of the loaded paper in Printer Paper Size and Media Type in the Cassette Note Do not force the Cassette into the printer any further. Note After loading paper Select the size and type of 468 pages 4. This can damage the printer or Cassette. Page top Loading Paper in the printer driver.

On-Screen Manual
Page 31
See Printing Documents . Loading paper in the printer driver. Note After loading paper Select the size and type of the loaded paper in Printer Paper Size and Media Type in the landscape orientation (C) can cause paper jams. Note Do not load sheets of 468 pages Important Always load paper in the portrait orientation (B). Loading Paper in the Rear Tray Page 31 of paper higher than the Load Limit Mark (D).
See Printing Documents . Loading paper in the printer driver. Note After loading paper Select the size and type of the loaded paper in Printer Paper Size and Media Type in the landscape orientation (C) can cause paper jams. Note Do not load sheets of 468 pages Important Always load paper in the portrait orientation (B). Loading Paper in the Rear Tray Page 31 of paper higher than the Load Limit Mark (D).

On-Screen Manual
Page 33
... Extension to open them, and load the envelopes in Loading Photo Paper . (3) Slide the Paper Guides (A) to the envelope's direction by specifying with the printer driver properly. Important Do not use the following envelopes. The figures above show a side view of the leading edge of Envelopes with an embossed or treated...
... Extension to open them, and load the envelopes in Loading Photo Paper . (3) Slide the Paper Guides (A) to the envelope's direction by specifying with the printer driver properly. Important Do not use the following envelopes. The figures above show a side view of the leading edge of Envelopes with an embossed or treated...

On-Screen Manual
Page 34
Do not slide the Paper Guides too hard. The envelopes may not be turned to align them with the printer driver. (1) Select Envelope in Commonly Used Settings on the printer driver settings, see Printing Documents . For details on the Quick Setup sheet. (2) Select DL Env. Up to 10 envelopes ...can be faced down , open the printer driver setup window, select Envelope in Commonly Used Settings, then select the Rotate 180 degrees check box in Orientation. or Comm. Note If the print ...
Do not slide the Paper Guides too hard. The envelopes may not be turned to align them with the printer driver. (1) Select Envelope in Commonly Used Settings on the printer driver settings, see Printing Documents . For details on the Quick Setup sheet. (2) Select DL Env. Up to 10 envelopes ...can be faced down , open the printer driver setup window, select Envelope in Commonly Used Settings, then select the Rotate 180 degrees check box in Orientation. or Comm. Note If the print ...
On-Screen Manual
Page 36
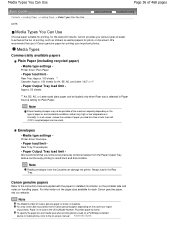
... on the printable side and notes on -screen manual: Advanced Guide . Media type settings - Canon genuine papers Refer to avoid blurs and discoloration. Purchase paper by Model Number. Printer driver: Envelope - In such cases, reduce the number of paper you various types of paper to... - Always load in Paper Source setting for photo or document. We recommend the use of Canon genuine paper for A4, B5, A5, and Letter / 8.5" x 11" - Printer driver: Plain Paper - Canon provides you load at the maximum capacity depending on the country or region of paper or environmental...
... on the printable side and notes on -screen manual: Advanced Guide . Media type settings - Canon genuine papers Refer to avoid blurs and discoloration. Purchase paper by Model Number. Printer driver: Envelope - In such cases, reduce the number of paper you various types of paper to... - Always load in Paper Source setting for photo or document. We recommend the use of Canon genuine paper for A4, B5, A5, and Letter / 8.5" x 11" - Printer driver: Plain Paper - Canon provides you load at the maximum capacity depending on the country or region of paper or environmental...

On-Screen Manual
Page 37
... recommend that you remove the previously printed sheet from the Cassette can damage the printer. Always load in the Rear Tray. Printer driver: Glossy Photo Paper Photo Paper Glossy - Printer driver: Matte Photo Paper - Rear Tray: 10 sheets for A4, Letter / 8.5" x 11", 5" x 7" / 13 x 18 cm, and 8" x ...Cassette can damage the printer. Media type settings - Media type settings - Always load in the Rear Tray. Media type settings - Printer driver: Photo Paper Plus Glossy II Photo Paper Plus Semi-gloss - Paper Output Tray load limit - When loading paper in stacks, the print...
... recommend that you remove the previously printed sheet from the Cassette can damage the printer. Always load in the Rear Tray. Printer driver: Glossy Photo Paper Photo Paper Glossy - Printer driver: Matte Photo Paper - Rear Tray: 10 sheets for A4, Letter / 8.5" x 11", 5" x 7" / 13 x 18 cm, and 8" x ...Cassette can damage the printer. Media type settings - Media type settings - Always load in the Rear Tray. Media type settings - Printer driver: Photo Paper Plus Glossy II Photo Paper Plus Semi-gloss - Paper Output Tray load limit - When loading paper in stacks, the print...
On-Screen Manual
Page 38
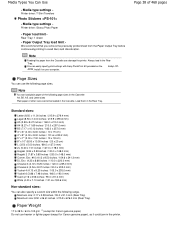
... could jam in the Rear Tray. You can damage the printer. Page Sizes You can also specify a custom size within the following page sizes. Printer driver: Glossy Photo Paper - Always load in the printer. Media Types You Can Use - Rear Tray: 1 sheet - Env. #10 (4.12 x 9....x 7.10 inches / 101.6 x 180.6 mm) Non-standard sizes: You can use heavier or lighter paper (except for Canon genuine paper), as it on the Setup CDROM. Printer driver: T-Shirt Transfers Photo Stickers - Note Feeding this paper from the Paper Output Tray before continuously printing to 105 g/m 2 (...
... could jam in the Rear Tray. You can damage the printer. Page Sizes You can also specify a custom size within the following page sizes. Printer driver: Glossy Photo Paper - Always load in the printer. Media Types You Can Use - Rear Tray: 1 sheet - Env. #10 (4.12 x 9....x 7.10 inches / 101.6 x 180.6 mm) Non-standard sizes: You can use heavier or lighter paper (except for Canon genuine paper), as it on the Setup CDROM. Printer driver: T-Shirt Transfers Photo Stickers - Note Feeding this paper from the Paper Output Tray before continuously printing to 105 g/m 2 (...

On-Screen Manual
Page 41
... Print Head Deeply Aligning the Print Head Cleaning the Paper Feed Roller Cleaning the Pad in the Cassette Opening the Maintenance Screen Opening the Printer Driver Setup Window Page top
... Print Head Deeply Aligning the Print Head Cleaning the Paper Feed Roller Cleaning the Pad in the Cassette Opening the Maintenance Screen Opening the Printer Driver Setup Window Page top

On-Screen Manual
Page 48
... on the taskbar. To confirm the ink tank information, click the Ink Details menu. In Windows Vista or XP, click Canon XXX (where " XXX" is running low. See Opening the Printer Driver Setup Window . 2. Page top Follow the procedure below to " Troubleshooting " in the area (A) if there is any information about the... remaining ink level. Prepare a new ink tank. Example: The ink is your printer's name) on -screen manual: Advanced Guide . Open the printer driver setup window. Page 48 of 468 pages A symbol appears in the on the taskbar.
... on the taskbar. To confirm the ink tank information, click the Ink Details menu. In Windows Vista or XP, click Canon XXX (where " XXX" is running low. See Opening the Printer Driver Setup Window . 2. Page top Follow the procedure below to " Troubleshooting " in the area (A) if there is any information about the... remaining ink level. Prepare a new ink tank. Example: The ink is your printer's name) on -screen manual: Advanced Guide . Open the printer driver setup window. Page 48 of 468 pages A symbol appears in the on the taskbar.
On-Screen Manual
Page 49
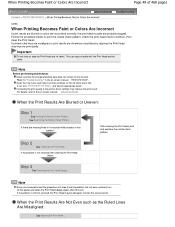
... If print results are blurred or colors are not printed correctly, the print head nozzles are missing lines or horizontal white streaks in the printer driver settings may improve the print result. See Examining the Nozzle Check Pattern . Follow the procedure below to the on -screen manual: Advanced Guide . If the...
... If print results are blurred or colors are not printed correctly, the print head nozzles are missing lines or horizontal white streaks in the printer driver settings may improve the print result. See Examining the Nozzle Check Pattern . Follow the procedure below to the on -screen manual: Advanced Guide . If the...


