
TR8500 series User Manual
Page 2
... LAN/Changing from USB to LAN Connection 55 Printing Network Settings 56 Changing LAN Connection Method/Changing Wireless LAN Connection Method 62 Handling Paper, Originals, Ink Tanks, Memory Card, etc 64 Loading Paper 65 Paper Sources 66 Loading Paper in the Rear Tray 67 Loading Paper in the Cassette 72 Loading...
... LAN/Changing from USB to LAN Connection 55 Printing Network Settings 56 Changing LAN Connection Method/Changing Wireless LAN Connection Method 62 Handling Paper, Originals, Ink Tanks, Memory Card, etc 64 Loading Paper 65 Paper Sources 66 Loading Paper in the Rear Tray 67 Loading Paper in the Cassette 72 Loading...

TR8500 series User Manual
Page 3
Before Inserting the Memory Card 92 Inserting the Memory Card 94 Removing the Memory Card 95 Replacing Ink Tanks 96 Replacing Ink Tanks 97 Checking Ink Status on the Touch Screen 102 Ink Tips 103 Maintenance 104 If Printing Is Faint or Uneven 105 Maintenance Procedure 106 Printing the Nozzle...from Your Computer (Mac OS 119 Opening Remote UI for Maintenance 120 Cleaning the Print Heads 121 Adjusting Print Head Position 123 Checking Ink Status from Your Computer 124 Cleaning 125 Cleaning Paper Feed Rollers 126 Cleaning Inside the Printer (Bottom Plate Cleaning 128 Overview 131 ...
Before Inserting the Memory Card 92 Inserting the Memory Card 94 Removing the Memory Card 95 Replacing Ink Tanks 96 Replacing Ink Tanks 97 Checking Ink Status on the Touch Screen 102 Ink Tips 103 Maintenance 104 If Printing Is Faint or Uneven 105 Maintenance Procedure 106 Printing the Nozzle...from Your Computer (Mac OS 119 Opening Remote UI for Maintenance 120 Cleaning the Print Heads 121 Adjusting Print Head Position 123 Checking Ink Status from Your Computer 124 Cleaning 125 Cleaning Paper Feed Rollers 126 Cleaning Inside the Printer (Bottom Plate Cleaning 128 Overview 131 ...

TR8500 series User Manual
Page 8
... Its Settings 398 Other Network Problems 400 Checking Network Information 401 Restoring to Factory Defaults 404 Printing Problems 405 Printing Does Not Start 406 No Ink Comes Out 408 Paper Does Not Feed Properly/"No Paper" Error 409 Print Results Are Unsatisfactory 412 Paper Is Blank/Printing Is Blurry/Colors Are...
... Its Settings 398 Other Network Problems 400 Checking Network Information 401 Restoring to Factory Defaults 404 Printing Problems 405 Printing Does Not Start 406 No Ink Comes Out 408 Paper Does Not Feed Properly/"No Paper" Error 409 Print Results Are Unsatisfactory 412 Paper Is Blank/Printing Is Blurry/Colors Are...

TR8500 series User Manual
Page 64
Handling Paper, Originals, Ink Tanks, Memory Card, etc. Loading Paper Loading Originals Inserting the Memory Card Replacing Ink Tanks 64
Handling Paper, Originals, Ink Tanks, Memory Card, etc. Loading Paper Loading Originals Inserting the Memory Card Replacing Ink Tanks 64

TR8500 series User Manual
Page 71
.... When this function is enabled, an error message is displayed, check and correct the paper settings. 71 Each media type has specific preset settings (how ink is used and sprayed, distance from nozzles, etc.), that allow you notice blurring or uneven colors, increase the print quality setting and try printing again...
.... When this function is enabled, an error message is displayed, check and correct the paper settings. 71 Each media type has specific preset settings (how ink is used and sprayed, distance from nozzles, etc.), that allow you notice blurring or uneven colors, increase the print quality setting and try printing again...

TR8500 series User Manual
Page 89
.... Supported Originals platen glass Item Types of the same size, thickness, and weight A4, Letter, Legal Duplex copying or 2-on-1/4-on documents, such as glue, ink, or correction fluid are not suitable for the ADF Size (width x height) Quantity Thickness Max. 8.5 x 11.7 inches (216 x 297 mm) One or more sheets* Max...
.... Supported Originals platen glass Item Types of the same size, thickness, and weight A4, Letter, Legal Duplex copying or 2-on-1/4-on documents, such as glue, ink, or correction fluid are not suitable for the ADF Size (width x height) Quantity Thickness Max. 8.5 x 11.7 inches (216 x 297 mm) One or more sheets* Max...

TR8500 series User Manual
Page 96
Replacing Ink Tanks Replacing Ink Tanks Checking Ink Status on the Touch Screen Ink Tips 96
Replacing Ink Tanks Replacing Ink Tanks Checking Ink Status on the Touch Screen Ink Tips 96

TR8500 series User Manual
Page 97
... to the replacement position. The print head holder moves to the message. Caution • Do not hold the print head holder to replace an ink tank, follow the procedure below. 1. Replacing Procedure When you of the error. In this state, the printer cannot print or scan. Remove the... cover. Do not touch the print head holder until it forcibly. Push the tab (A) and lift the ink tank to inform you need to stop or move it stops completely. Replacing Ink Tanks When remaining ink cautions or errors occur, the message will appear on the touch screen to remove. 97 In this...
... to the replacement position. The print head holder moves to the message. Caution • Do not hold the print head holder to replace an ink tank, follow the procedure below. 1. Replacing Procedure When you of the error. In this state, the printer cannot print or scan. Remove the... cover. Do not touch the print head holder until it forcibly. Push the tab (A) and lift the ink tank to inform you need to stop or move it stops completely. Replacing Ink Tanks When remaining ink cautions or errors occur, the message will appear on the touch screen to remove. 97 In this...

TR8500 series User Manual
Page 98
... drop or apply excessive pressure to replace ink tanks one by one when replacing two or more ink tanks at the same time. Important • Handle an ink tank carefully. Important • Do not touch other parts besides the ink tanks. • Handle the ink tank carefully to avoid staining of clothing ... film (C) completely. Be sure to it. • If the orange tape remains on the Y-shape air hole (D), ink may splash or the printer may not print properly. 5. Hold the ink tank with the orange protective cap (E) pointing up while being careful not to block the Y-shape air hole (D). 98 ...
... drop or apply excessive pressure to replace ink tanks one by one when replacing two or more ink tanks at the same time. Important • Handle an ink tank carefully. Important • Do not touch other parts besides the ink tanks. • Handle the ink tank carefully to avoid staining of clothing ... film (C) completely. Be sure to it. • If the orange tape remains on the Y-shape air hole (D), ink may splash or the printer may not print properly. 5. Hold the ink tank with the orange protective cap (E) pointing up while being careful not to block the Y-shape air hole (D). 98 ...

TR8500 series User Manual
Page 99
... print head at a slant. If you push the sides of consumables. 7. Insert the front end of the ink tank. Make sure that the position of the orange protective cap (E) or the open ink port (F). Discard it off GENTLY. Lift up the tab on the orange protective cap (E) to remove it according... to the local laws and regulations regarding disposal of the ink tank with the Y-shape air hole (D) blocked, ink may stain your hands if you touch them. • Do not reattach the protective cap (E) once you have removed it. ...
... print head at a slant. If you push the sides of consumables. 7. Insert the front end of the ink tank. Make sure that the position of the orange protective cap (E) or the open ink port (F). Discard it off GENTLY. Lift up the tab on the orange protective cap (E) to remove it according... to the local laws and regulations regarding disposal of the ink tank with the Y-shape air hole (D) blocked, ink may stain your hands if you touch them. • Do not reattach the protective cap (E) once you have removed it. ...

TR8500 series User Manual
Page 100
Be sure to get your fingers caught. 100 Important • You cannot print if the ink tank is installed in the correct position according to the label on the top of the ink tank until the ink tank snaps firmly into place. Caution • When closing the scanning unit / cover, be careful not to install all the ink tanks are installed. Be sure to install the ink tank in the wrong position. Close the scanning unit / cover. 8. Press on the print head holder. • You cannot print unless all the ink tanks. 9.
Be sure to get your fingers caught. 100 Important • You cannot print if the ink tank is installed in the correct position according to the label on the top of the ink tank until the ink tank snaps firmly into place. Caution • When closing the scanning unit / cover, be careful not to install all the ink tanks are installed. Be sure to install the ink tank in the wrong position. Close the scanning unit / cover. 8. Press on the print head holder. • You cannot print unless all the ink tanks. 9.

TR8500 series User Manual
Page 101
...be consumed even when printing a black-and-white document or when black-andwhite printing is closed, take appropriate action. When an ink tank is out of ink, replace it immediately. Do not perform any other operations until the printer completes the cleaning of the print head. • ... the print head is out of alignment, as indicated by misaligned printed ruled lines or similar symptoms, align the print head. Every ink is reinstalled. Notes on ink tanks Important • If you start printing after the scanning unit / cover is specified. An Error Occurs • When you ...
...be consumed even when printing a black-and-white document or when black-andwhite printing is closed, take appropriate action. When an ink tank is out of ink, replace it immediately. Do not perform any other operations until the printer completes the cleaning of the print head. • ... the print head is out of alignment, as indicated by misaligned printed ruled lines or similar symptoms, align the print head. Every ink is reinstalled. Notes on ink tanks Important • If you start printing after the scanning unit / cover is specified. An Error Occurs • When you ...
TR8500 series User Manual
Page 102
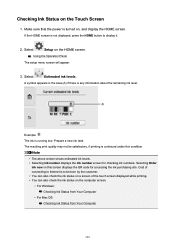
...HOME button to be satisfactory, if printing is running low. If the HOME screen is to display it. 2. Prepare a new ink tank. Selecting Order ink now on , and display the HOME screen. Using the Operation Panel The setup menu screen will appear. 3. Example: The... continued under this screen displays the QR code for checking ink numbers. Checking Ink Status on the HOME screen. Note • The above screen shows estimated ink levels. • Selecting Ink number displays the Ink number screen for accessing the ink purchasing site. Select Setup on the Touch Screen 1. The...
...HOME button to be satisfactory, if printing is running low. If the HOME screen is to display it. 2. Prepare a new ink tank. Selecting Order ink now on , and display the HOME screen. Using the Operation Panel The setup menu screen will appear. 3. Example: The... continued under this screen displays the QR code for checking ink numbers. Checking Ink Status on the HOME screen. Note • The above screen shows estimated ink levels. • Selecting Ink number displays the Ink number screen for accessing the ink purchasing site. Select Setup on the Touch Screen 1. The...

TR8500 series User Manual
Page 103
... To keep printer's performance, Canon printer performs cleaning automatically according to suck air bubbles or ink itself from not the first ink tank /ink cartridge but the succeeding ink tank /ink cartridge. Does black-and-white printing use ink other than printing? So, color ink is consumed even when printing in... the amount to maintain the optimal printing quality. When you use the Canon printer for the first time after you install the bundled ink tanks, the printer consumes a small amount of ink in black-and-white. Black-and-white printing may be consumed. [Cleaning ...
... To keep printer's performance, Canon printer performs cleaning automatically according to suck air bubbles or ink itself from not the first ink tank /ink cartridge but the succeeding ink tank /ink cartridge. Does black-and-white printing use ink other than printing? So, color ink is consumed even when printing in... the amount to maintain the optimal printing quality. When you use the Canon printer for the first time after you install the bundled ink tanks, the printer consumes a small amount of ink in black-and-white. Black-and-white printing may be consumed. [Cleaning ...

TR8500 series User Manual
Page 106
This can cause trouble with the print head and ink tank. Changing the Print Quality and Correcting Image Data When the Print Results Are Blurred or Uneven: Step1 Print the nozzle check pattern. Note • ... or horizontal white streaks in the printer driver settings may improve the print result. Important • Do not rinse or wipe the print head and ink tank. Checking Ink Status on the ink tank. • Check the ink status. misaligned printed ruled lines), perform the maintenance procedure below.
This can cause trouble with the print head and ink tank. Changing the Print Quality and Correcting Image Data When the Print Results Are Blurred or Uneven: Step1 Print the nozzle check pattern. Note • ... or horizontal white streaks in the printer driver settings may improve the print result. Important • Do not rinse or wipe the print head and ink tank. Checking Ink Status on the ink tank. • Check the ink status. misaligned printed ruled lines), perform the maintenance procedure below.

TR8500 series User Manual
Page 108
... Setup on the touch screen. If a message is low, the nozzle check pattern will not be printed. 3. Note • If the remaining ink level is displayed on . 2. Select A4 or Letter for Page size, then select Register. Open the operation panel, then pull out the paper... will appear. 6. Select Maintenance. Select Print nozzle check pattern. 108 You need to load paper in the cassette. Replace the ink tank whose ink is turned on the screen, follow the directions in the cassette. After pushing the cassette back, the paper information registration screen is...
... Setup on the touch screen. If a message is low, the nozzle check pattern will not be printed. 3. Note • If the remaining ink level is displayed on . 2. Select A4 or Letter for Page size, then select Register. Open the operation panel, then pull out the paper... will appear. 6. Select Maintenance. Select Print nozzle check pattern. 108 You need to load paper in the cassette. Replace the ink tank whose ink is turned on the screen, follow the directions in the cassette. After pushing the cassette back, the paper information registration screen is...

TR8500 series User Manual
Page 112
... prepare: a sheet of A4 or Letter-sized plain paper in the printed nozzle check pattern. The Maintenance screen will appear. 5. Cleaning the print head consumes ink, so clean the print head only when necessary. Even if you load paper on the rear tray, the nozzle check pattern is displayed on the...
... prepare: a sheet of A4 or Letter-sized plain paper in the printed nozzle check pattern. The Maintenance screen will appear. 5. Cleaning the print head consumes ink, so clean the print head only when necessary. Even if you load paper on the rear tray, the nozzle check pattern is displayed on the...
TR8500 series User Manual
Page 114
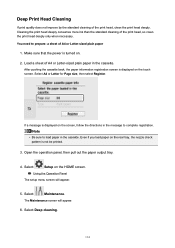
... improve by the standard cleaning of the print head, so clean the print head deeply only when necessary. Cleaning the print head deeply consumes more ink than the standard cleaning of the print head, clean the print head deeply. Load a sheet of A4 or Letter-sized plain paper 1. Select Deep cleaning...
... improve by the standard cleaning of the print head, so clean the print head deeply only when necessary. Cleaning the print head deeply consumes more ink than the standard cleaning of the print head, clean the print head deeply. Load a sheet of A4 or Letter-sized plain paper 1. Select Deep cleaning...

TR8500 series User Manual
Page 115
... that color. The nozzle check pattern will be damaged. The confirmation screen will appear. 8. Select Yes. If a particular color is not printed properly, replace the ink tank of the print head.
... that color. The nozzle check pattern will be damaged. The confirmation screen will appear. 8. Select Yes. If a particular color is not printed properly, replace the ink tank of the print head.

TR8500 series User Manual
Page 116
...screen, follow the directions in the message to complete registration. The Maintenance screen will not be printed. 3. Note • If the remaining ink level is low, the print head alignment sheet will appear. 116 Select Setup on the touch screen. Using the Operation Panel The setup menu... screen will appear. 5. Replace the ink tank whose ink is white and clean on . 2. You need to prepare: a sheet of A4 or Letter-sized plain paper in the cassette. After...
...screen, follow the directions in the message to complete registration. The Maintenance screen will not be printed. 3. Note • If the remaining ink level is low, the print head alignment sheet will appear. 116 Select Setup on the touch screen. Using the Operation Panel The setup menu... screen will appear. 5. Replace the ink tank whose ink is white and clean on . 2. You need to prepare: a sheet of A4 or Letter-sized plain paper in the cassette. After...


