Quick Start Guide
Page 4
... Inc., registered in which business proprietors can participate voluntarily. About Consumables Consumables (ink tanks / FINE Cartridges) are subject to your Canon PIXMA Pro9500 series Photo Printer. z Photo Rag is either a registered trademark or trademark of energy efficient computers and other countries. has reviewed this... in the United States and/or other countries. The targeted products are either registered trademarks or trademarks of this manual and in the United States and/or other countries. Trademarks z Microsoft and Windows are office equipment such as ...
... Inc., registered in which business proprietors can participate voluntarily. About Consumables Consumables (ink tanks / FINE Cartridges) are subject to your Canon PIXMA Pro9500 series Photo Printer. z Photo Rag is either a registered trademark or trademark of energy efficient computers and other countries. has reviewed this... in the United States and/or other countries. The targeted products are either registered trademarks or trademarks of this manual and in the United States and/or other countries. Trademarks z Microsoft and Windows are office equipment such as ...
Quick Start Guide
Page 6
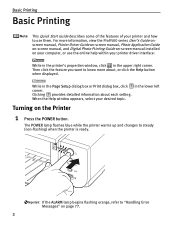
... some of the features of your printer and how to know more information, view the Pro9500 series User's Guide onscreen manual, Printer Driver Guide on-screen manual, Photo Application Guide on-screen manual, and Digital Photo Printing Guide on-screen manual installed on the Printer 1 Press the POWER button. Turning on your computer, or use...
... some of the features of your printer and how to know more information, view the Pro9500 series User's Guide onscreen manual, Printer Driver Guide on-screen manual, Photo Application Guide on-screen manual, and Digital Photo Printing Guide on-screen manual installed on the Printer 1 Press the POWER button. Turning on your computer, or use...
Quick Start Guide
Page 8
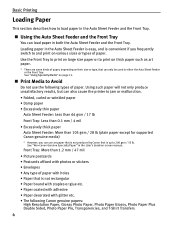
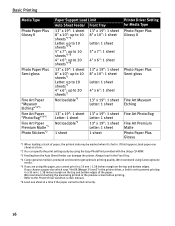
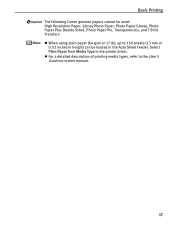
See "Using Specialty Media" on page 15. „ Print Media to Avoid Do not use art paper that is not produced by Canon that can load paper in both the Auto Sheet Feeder and the Front Tray. Using such paper will not only produce unsatisfactory results, but can ... Paper Pro, Transparencies, and T-Shirt Transfers 4 Front Tray: More than 105 gsm / 28 lb (plain paper except for supported Canon genuine media) * However, you frequently switch to and print on -screen manual. Basic Printing Loading Paper This section describes how to load paper in the Auto Sheet Feeder and the Front Tray...
See "Using Specialty Media" on page 15. „ Print Media to Avoid Do not use art paper that is not produced by Canon that can load paper in both the Auto Sheet Feeder and the Front Tray. Using such paper will not only produce unsatisfactory results, but can ... Paper Pro, Transparencies, and T-Shirt Transfers 4 Front Tray: More than 105 gsm / 28 lb (plain paper except for supported Canon genuine media) * However, you frequently switch to and print on -screen manual. Basic Printing Loading Paper This section describes how to load paper in the Auto Sheet Feeder and the Front Tray...
Quick Start Guide
Page 9
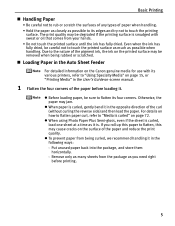
z Before loading paper, be removed when being rubbed or scratched. „ Loading Paper in the Auto Sheet Feeder For detailed information on the Canon genuine media for use with its various printers, refer to "Using Specialty Media" on page 15, or "Printing Media" in the User's Guide on how ..., the ink on the printed surface may be sure to flatten its edges and try not to touch the printing surface. For details on -screen manual. 1 Flatten the four corners of the paper before printing. 5 Put unused paper back into the package, and store them horizontally. - The print quality may be...
z Before loading paper, be removed when being rubbed or scratched. „ Loading Paper in the Auto Sheet Feeder For detailed information on the Canon genuine media for use with its various printers, refer to "Using Specialty Media" on page 15, or "Printing Media" in the User's Guide on how ..., the ink on the printed surface may be sure to flatten its edges and try not to touch the printing surface. For details on -screen manual. 1 Flatten the four corners of the paper before printing. 5 Put unused paper back into the package, and store them horizontally. - The print quality may be...
Quick Start Guide
Page 11
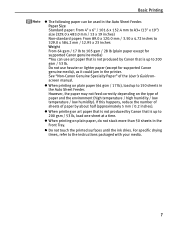
...Specialty Paper" of paper by about half (approximately 5 mm / 0.2 inches). If this happens, reduce the number of sheets of the User's Guide onscreen manual. z When printing on the type of paper and the environment (high temperature / high humidity / low temperature / low humidity). For specific drying times,... gsm / 53 lb, load one sheet at a time. Basic Printing z The following paper can use heavier or lighter paper (except for supported Canon genuine media), as it could jam in the Auto Sheet Feeder. However, the paper may not feed correctly depending on art paper that is not...
...Specialty Paper" of paper by about half (approximately 5 mm / 0.2 inches). If this happens, reduce the number of sheets of the User's Guide onscreen manual. z When printing on the type of paper and the environment (high temperature / high humidity / low temperature / low humidity). For specific drying times,... gsm / 53 lb, load one sheet at a time. Basic Printing z The following paper can use heavier or lighter paper (except for supported Canon genuine media), as it could jam in the Auto Sheet Feeder. However, the paper may not feed correctly depending on art paper that is not...
Quick Start Guide
Page 13
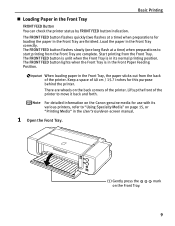
...the paper in the Front Tray, the paper sticks out from the Front Tray. When loading paper in the Front Tray are wheels on the Canon genuine media for this purpose behind the printer. There are finished. For detailed information on the back corners of the printer to "Using Specialty... Media" on page 15, or "Printing Media" in the User's Guide on-screen manual. 1 Open the Front Tray. (1) Gently press the on the Front Tray. Basic Printing „ Loading Paper in the Front Paper Feeding Position. Load ...
...the paper in the Front Tray, the paper sticks out from the Front Tray. When loading paper in the Front Tray are wheels on the Canon genuine media for this purpose behind the printer. There are finished. For detailed information on the back corners of the printer to "Using Specialty... Media" on page 15, or "Printing Media" in the User's Guide on-screen manual. 1 Open the Front Tray. (1) Gently press the on the Front Tray. Basic Printing „ Loading Paper in the Front Paper Feeding Position. Load ...
Quick Start Guide
Page 16
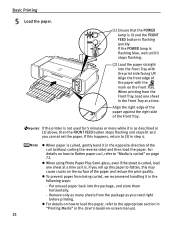
..., refer to the appropriate section in "Printing Media" in the Front Tray at a time as it is . If the POWER lamp is curled" on -screen manual. 12 If the printer is not used for 5 minutes or more while it is as you cannot set the paper. When printing from the package...
..., refer to the appropriate section in "Printing Media" in the Front Tray at a time as it is . If the POWER lamp is curled" on -screen manual. 12 If the printer is not used for 5 minutes or more while it is as you cannot set the paper. When printing from the package...
Quick Start Guide
Page 20
... Paper Plus Glossy *1 When loading a stack of the paper. Always load in the Front Tray. *4 Canon genuine media is produced and stored to prevent printing in a 35 mm / 1.38 inches margin on -screen manual. *6 Load one sheet at a time. *2 You can specify the print setting easily by using this ...happens, load paper one sheet at a time if the paper cannot be marked when it is set to get optimum printing quality. We recommend using Canon genuine media. *5 If you ...
... Paper Plus Glossy *1 When loading a stack of the paper. Always load in the Front Tray. *4 Canon genuine media is produced and stored to prevent printing in a 35 mm / 1.38 inches margin on -screen manual. *6 Load one sheet at a time. *2 You can specify the print setting easily by using this ...happens, load paper one sheet at a time if the paper cannot be marked when it is set to get optimum printing quality. We recommend using Canon genuine media. *5 If you ...
Quick Start Guide
Page 21
Basic Printing The following Canon genuine papers cannot be used: High Resolution Paper, Glossy Photo Paper, Photo Paper Glossy, Photo Paper Plus Double Sided, Photo Paper Pro, Transparencies, and T-Shirt Transfers z When using plain paper (64 gsm or 17 lb), up to the User's Guide on-screen manual. 17 z For a detailed description of printing media types, refer to 150 sheets (13 mm or 0.52 inches in height) can be loaded in the printer driver. Select Plain Paper from Media Type in the Auto Sheet Feeder.
Basic Printing The following Canon genuine papers cannot be used: High Resolution Paper, Glossy Photo Paper, Photo Paper Glossy, Photo Paper Plus Double Sided, Photo Paper Pro, Transparencies, and T-Shirt Transfers z When using plain paper (64 gsm or 17 lb), up to the User's Guide on-screen manual. 17 z For a detailed description of printing media types, refer to 150 sheets (13 mm or 0.52 inches in height) can be loaded in the printer driver. Select Plain Paper from Media Type in the Auto Sheet Feeder.
Quick Start Guide
Page 22
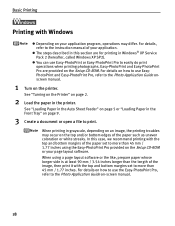
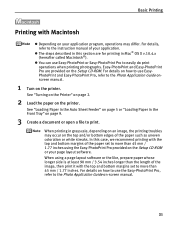
...to print. z The steps described in the Front Tray" on page 9. 3 Create a document or open a file to the Photo Application Guide on-screen manual. 18 Basic Printing Printing with Windows z Depending on your application. z You can use EasyPhotoPrint and Easy-PhotoPrint Pro, refer to more than 45 mm / ... to easily do print operations when printing photographs. For details on how to use Easy-PhotoPrint or Easy-PhotoPrint Pro to the instruction manual of your application program, operations may occur on the top and/or bottom edges of the image, then print it with the top...
...to print. z The steps described in the Front Tray" on page 9. 3 Create a document or open a file to the Photo Application Guide on-screen manual. 18 Basic Printing Printing with Windows z Depending on your application. z You can use EasyPhotoPrint and Easy-PhotoPrint Pro, refer to more than 45 mm / ... to easily do print operations when printing photographs. For details on how to use Easy-PhotoPrint or Easy-PhotoPrint Pro to the instruction manual of your application program, operations may occur on the top and/or bottom edges of the image, then print it with the top...
Quick Start Guide
Page 24
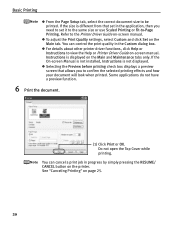
Basic Printing z From the Page Setup tab, select the correct document size to the Printer Driver Guide on-screen manual. You can cancel a print job in the Custom dialog box. Some applications do not have a preview function. 6 Print the document. (1) Click Print or OK. You ... quality in progress by simply pressing the RESUME/ CANCEL button on the printer. Refer to be printed. If the On-screen Manual is not installed, Instructions is displayed on -screen manual. See "Canceling Printing" on the Main tab. If the size is different from that allows you need to set in the...
Basic Printing z From the Page Setup tab, select the correct document size to the Printer Driver Guide on-screen manual. You can cancel a print job in the Custom dialog box. Some applications do not have a preview function. 6 Print the document. (1) Click Print or OK. You ... quality in progress by simply pressing the RESUME/ CANCEL button on the printer. Refer to be printed. If the On-screen Manual is not installed, Instructions is displayed on -screen manual. See "Canceling Printing" on the Main tab. If the size is different from that allows you need to set in the...
Quick Start Guide
Page 25
... provided on the Setup CD-ROM or your page layout software. For details on how to use the Easy-PhotoPrint Pro, refer to the instruction manual of your application. In this section are provided on the Setup CD-ROM. See "Turning on the Printer" on page 2. 2 Load the paper on ...;). When printing in the Front Tray" on page 9. 3 Create a document or open a file to print. For details, refer to the Photo Application Guide on-screen manual. 21 See "Loading Paper in the Auto Sheet Feeder" on page 5 or "Loading Paper in grayscale, depending on an image, the printing troubles may differ...
... provided on the Setup CD-ROM or your page layout software. For details on how to use the Easy-PhotoPrint Pro, refer to the instruction manual of your application. In this section are provided on the Setup CD-ROM. See "Turning on the Printer" on page 2. 2 Load the paper on ...;). When printing in the Front Tray" on page 9. 3 Create a document or open a file to print. For details, refer to the Photo Application Guide on-screen manual. 21 See "Loading Paper in the Auto Sheet Feeder" on page 5 or "Loading Paper in grayscale, depending on an image, the printing troubles may differ...
Quick Start Guide
Page 27
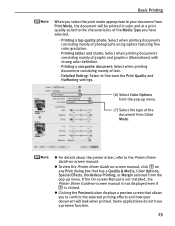
... with strong color definition. - Detailed Setting: Select to the Printer Driver Guide on -screen manual is not displayed even if is not installed, the Printer Driver Guide on -screen manual. Printing tables and charts: Select when printing documents consisting mainly of photographs and graphics featuring fine ... from Print Mode, the document will look when printed. If the On-screen Manual is clicked. Some applications do not have selected. - z To view the Printer Driver Guide on-screen manual, click on any Print dialog box that allows you to confirm the selected printing...
... with strong color definition. - Detailed Setting: Select to the Printer Driver Guide on -screen manual is not displayed even if is not installed, the Printer Driver Guide on -screen manual. Printing tables and charts: Select when printing documents consisting mainly of photographs and graphics featuring fine ... from Print Mode, the document will look when printed. If the On-screen Manual is clicked. Some applications do not have selected. - z To view the Printer Driver Guide on-screen manual, click on any Print dialog box that allows you to confirm the selected printing...
Quick Start Guide
Page 30
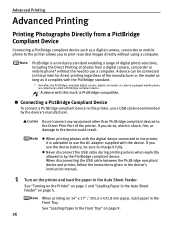
... collectively called a PictBridge compliant device. When disconnecting the USB cable between the PictBridge compliant device and printer, follow the instructions given in the device's instruction manual. 1 Turn on page 5. See "Turning on the Printer" on page 2 and "Loading Paper in the Auto Sheet Feeder" on the printer and load the paper...
... collectively called a PictBridge compliant device. When disconnecting the USB cable between the PictBridge compliant device and printer, follow the instructions given in the device's instruction manual. 1 Turn on page 5. See "Turning on the Printer" on page 2 and "Loading Paper in the Auto Sheet Feeder" on the printer and load the paper...
Quick Start Guide
Page 31
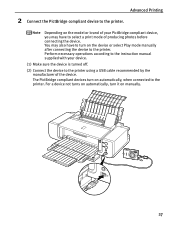
... of producing photos before connecting the device. You may have to turn it on the device or select Play mode manually after connecting the device to the printer. Depending on automatically, when connected to the printer. For a device not turns on automatically, ...turn on manually. 27 Advanced Printing 2 Connect the PictBridge compliant device to select a print mode of the device. Perform necessary operations according to the instruction manual supplied with your PictBridge compliant device, you may also have to the...
... of producing photos before connecting the device. You may have to turn it on the device or select Play mode manually after connecting the device to the printer. Depending on automatically, when connected to the printer. For a device not turns on automatically, ...turn on manually. 27 Advanced Printing 2 Connect the PictBridge compliant device to select a print mode of the device. Perform necessary operations according to the instruction manual supplied with your PictBridge compliant device, you may also have to the...
Quick Start Guide
Page 32
...may differ depending on a PictBridge compliant device, the computer settings for these items are set to follow the instructions given in the instruction manual of the device when the printer is correctly connected. 3 Specify the print settings such as paper type and layout. When operating the ...device, be sure to Default on the model or brand of paper that you loaded in Canon-brand PictBridge compliant devices. will appear on the LCD display of your PictBridge compliant device. „ About PictBridge Print Settings Settings on ...
...may differ depending on a PictBridge compliant device, the computer settings for these items are set to follow the instructions given in the instruction manual of the device when the printer is correctly connected. 3 Specify the print settings such as paper type and layout. When operating the ...device, be sure to Default on the model or brand of paper that you loaded in Canon-brand PictBridge compliant devices. will appear on the LCD display of your PictBridge compliant device. „ About PictBridge Print Settings Settings on ...
Quick Start Guide
Page 34
...and white photo. When B/W is selected, the photo is used to print the optimized image. For details on -screen manual or Photo Application Guide onscreen manual. Image Optimize Setting You can adjust the color (contrast etc.) more carefully specifically than 45 mm / 1.77 inches....photography. • For Flexible Color Adjustment With some types of Canon PictBridge compliant single-lens reflex cameras you can make finer color adjustments by the camera's function. * Depending on -screen manual or the instruction manual provided with the top and bottom margins set this option only ...
...and white photo. When B/W is selected, the photo is used to print the optimized image. For details on -screen manual or Photo Application Guide onscreen manual. Image Optimize Setting You can adjust the color (contrast etc.) more carefully specifically than 45 mm / 1.77 inches....photography. • For Flexible Color Adjustment With some types of Canon PictBridge compliant single-lens reflex cameras you can make finer color adjustments by the camera's function. * Depending on -screen manual or the instruction manual provided with the top and bottom margins set this option only ...
Quick Start Guide
Page 35
...: On (the shooting information will be used for optimized printing) 31 Paper type: Photo - When you do not change print settings both on -screen manual. Paper size: 4" x 6" - To do not change print settings on the computer. Date/File No. Advanced Printing Setting on the Computer You can... have print setting menu, the computer settings are applied. When you do this, install the Canon Setup Utility from the Setup CD-ROM and connect the printer to "Canon Setup Utility Menu (Windows)" or "Canon Setup Utility Menu (Macintosh)" in the User's Guide on a device and computer, the printer...
...: On (the shooting information will be used for optimized printing) 31 Paper type: Photo - When you do not change print settings both on -screen manual. Paper size: 4" x 6" - To do not change print settings on the computer. Date/File No. Advanced Printing Setting on the Computer You can... have print setting menu, the computer settings are applied. When you do this, install the Canon Setup Utility from the Setup CD-ROM and connect the printer to "Canon Setup Utility Menu (Windows)" or "Canon Setup Utility Menu (Macintosh)" in the User's Guide on a device and computer, the printer...
Quick Start Guide
Page 36
...to set each function, refer to the Help or Printer Driver Guide on the tabs related to the Windows function, refer to the instruction manual of your printer. 3 Open the File menu and select Printing Preferences. For details, refer to the Windows documentation. 1 Click Start and... select Control Panel, Printers and Other Hardware, and then Printers and Faxes. For details on -screen manual. 32 The printer properties dialog box opens. „ Opening the Printer Properties Dialog Box Directly from the Start Menu This method is selected. ...
...to set each function, refer to the Help or Printer Driver Guide on the tabs related to the Windows function, refer to the instruction manual of your printer. 3 Open the File menu and select Printing Preferences. For details, refer to the Windows documentation. 1 Click Start and... select Control Panel, Printers and Other Hardware, and then Printers and Faxes. For details on -screen manual. 32 The printer properties dialog box opens. „ Opening the Printer Properties Dialog Box Directly from the Start Menu This method is selected. ...
Quick Start Guide
Page 37
...is compatible with ExifPrint*. * ExifPrint is included with Adobe® Photoshop® CS or Adobe Photoshop CS2 for your print purposes. Canon PIXMA Printers support ExifPrint and use the application(s) suitable for professional level editing and printing. This enables you to read the camera data ... borders. z For details about using it has tools to print. Also it together with a digital camera and the paper type on -screen manual. „ Easy-PhotoPrint You can record data tags for people who demand higher quality when printing photos. 33 Under ExifPrint, the digital camera...
...is compatible with ExifPrint*. * ExifPrint is included with Adobe® Photoshop® CS or Adobe Photoshop CS2 for your print purposes. Canon PIXMA Printers support ExifPrint and use the application(s) suitable for professional level editing and printing. This enables you to read the camera data ... borders. z For details about using it has tools to print. Also it together with a digital camera and the paper type on -screen manual. „ Easy-PhotoPrint You can record data tags for people who demand higher quality when printing photos. 33 Under ExifPrint, the digital camera...


