Setup Guide
Page 3
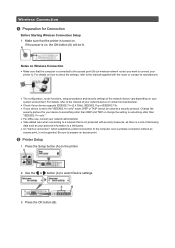
For details, refer to the manual of your network device or contact its manufacturer. • The configuration, router functions, setup procedures and security settings of disclosing data such as a security protocol. ... Setup 1. Press the OK button (B). Use the or button (A) to prepare an access point. For details on how to check the settings, refer to the manual supplied with security measures, as there is a risk of the network device vary depending on your system environment. Wireless Connection a Preparation for your device to...
For details, refer to the manual of your network device or contact its manufacturer. • The configuration, router functions, setup procedures and security settings of disclosing data such as a security protocol. ... Setup 1. Press the OK button (B). Use the or button (A) to prepare an access point. For details on how to check the settings, refer to the manual supplied with security measures, as there is a risk of the network device vary depending on your system environment. Wireless Connection a Preparation for your device to...

Setup Guide
Page 5
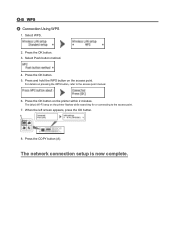
Press the OK button on the printer flashes while searching for or connecting to the access point manual. 2. The (blue) Wi-Fi lamp on the printer within 2 minutes. For details on the access point. When the left screen appears, press the OK button. 4. The network connection setup is now complete. Press and hold the WPS button on pressing the WPS button, refer to the access point. 3. Press the COPY button (A). d-A Push Button Method d Connection Using WPS 1.
Press the OK button on the printer flashes while searching for or connecting to the access point manual. 2. The (blue) Wi-Fi lamp on the printer within 2 minutes. For details on the access point. When the left screen appears, press the OK button. 4. The network connection setup is now complete. Press and hold the WPS button on pressing the WPS button, refer to the access point. 3. Press the COPY button (A). d-A Push Button Method d Connection Using WPS 1.
Setup Guide
Page 6
Select WPS. 2. Press the OK button. 5. The network connection setup is now complete. Select Push button method. 4. Press and hold the WPS button on the printer within 2 minutes. The (blue) Wi-Fi lamp on pressing the WPS button, refer to the access point. 7. When the left screen appears, press the OK button. 8. Press the COPY button (A). For details on the printer flashes while searching for or connecting to the access point manual. 6. Press the OK button on the access point. d-B WPS d Connection Using WPS 1. Press the OK button. 3.
Select WPS. 2. Press the OK button. 5. The network connection setup is now complete. Select Push button method. 4. Press and hold the WPS button on the printer within 2 minutes. The (blue) Wi-Fi lamp on pressing the WPS button, refer to the access point. 7. When the left screen appears, press the OK button. 8. Press the COPY button (A). For details on the printer flashes while searching for or connecting to the access point manual. 6. Press the OK button on the access point. d-B WPS d Connection Using WPS 1. Press the OK button. 3.

Setup Guide
Page 7
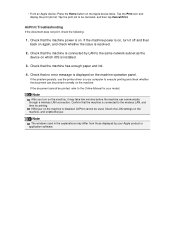
Press the WPS button on only one access point. Failed to the manual supplied with the access point or contact its manufacturer. Timeout error The screen appears when WPS setup was not completed within a specified time. • ...
Press the WPS button on only one access point. Failed to the manual supplied with the access point or contact its manufacturer. Timeout error The screen appears when WPS setup was not completed within a specified time. • ...

User Manual
Page 1
MX450 series Online Manual Read Me First Useful Functions Available on the Machine Overview of the Machine English
MX450 series Online Manual Read Me First Useful Functions Available on the Machine Overview of the Machine English

User Manual
Page 2
..., diversion or copying of any text, photo or image published in the Online Manual (hereinafter referred to as "this guide due to display the menus. 2. Select Page Setup... In addition, Canon may suspend or stop the disclosure of this guide"), in whole or in part...Select (Tools) > Print > Page setup.... • In Internet Explorer 8 1. Operating Environment The following environment is recommended for any damage suffered by Canon. Canon shall not be liable for the use of this guide. • Recommended Operating System Windows 8, Windows 7, Windows 7 SP1, Windows Vista SP1, Vista ...
..., diversion or copying of any text, photo or image published in the Online Manual (hereinafter referred to as "this guide due to display the menus. 2. Select Page Setup... In addition, Canon may suspend or stop the disclosure of this guide"), in whole or in part...Select (Tools) > Print > Page setup.... • In Internet Explorer 8 1. Operating Environment The following environment is recommended for any damage suffered by Canon. Canon shall not be liable for the use of this guide. • Recommended Operating System Windows 8, Windows 7, Windows 7 SP1, Windows Vista SP1, Vista ...

User Manual
Page 6
.... Enter "MX45 scan Color Settings Tab" in this guide by the following sentence on a scanning procedure page in the Online Manual for MX450 series Refer to by entering your model from Home of the Online Manual for reference pages described in the search window and perform a search You can search for details.
.... Enter "MX45 scan Color Settings Tab" in this guide by the following sentence on a scanning procedure page in the Online Manual for MX450 series Refer to by entering your model from Home of the Online Manual for reference pages described in the search window and perform a search You can search for details.
User Manual
Page 22
... the device on again, and check whether the issue is installed. 3. If the problem persists, use the printer driver on your computer to the Online Manual for your Apple product or application software. If the document cannot be used in the explanations may take few minutes before the machine can be...
... the device on again, and check whether the issue is installed. 3. If the problem persists, use the printer driver on your computer to the Online Manual for your Apple product or application software. If the document cannot be used in the explanations may take few minutes before the machine can be...
User Manual
Page 49
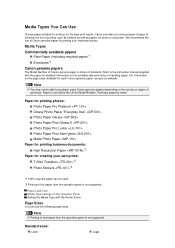
... your important photos. Paper Load Limit Media Type Settings on the page sizes available for the best print results. Refer to the instruction manual supplied with the Printer Driver Page Sizes You can be able to this paper from the operation panel is shown in the US by ...Paper for printing business documents: High Resolution Paper *2 Paper for detailed information on the printable side and notes on the country or region of Canon genuine paper is not supported. Note Printing of envelopes from the operation panel is not sold in brackets. Standard sizes: Letter Legal We ...
... your important photos. Paper Load Limit Media Type Settings on the page sizes available for the best print results. Refer to the instruction manual supplied with the Printer Driver Page Sizes You can be able to this paper from the operation panel is shown in the US by ...Paper for printing business documents: High Resolution Paper *2 Paper for detailed information on the printable side and notes on the country or region of Canon genuine paper is not supported. Note Printing of envelopes from the operation panel is not sold in brackets. Standard sizes: Letter Legal We ...
User Manual
Page 71
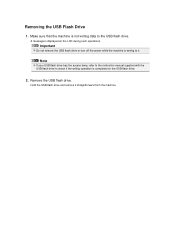
Make sure that the machine is not writing data to check if the writing operation is completed on the LCD during such operations. Hold the USB flash drive and remove it . A message is writing to it straightforward from the machine. Note If your USB flash drive has the access lamp, refer to the instruction manual supplied with the USB flash drive to the USB flash drive. Remove the USB flash drive. Important Do not remove the USB flash drive or turn off the power while the machine is displayed on the USB flash drive. 2. Removing the USB Flash Drive 1.
Make sure that the machine is not writing data to check if the writing operation is completed on the LCD during such operations. Hold the USB flash drive and remove it . A message is writing to it straightforward from the machine. Note If your USB flash drive has the access lamp, refer to the instruction manual supplied with the USB flash drive to the USB flash drive. Remove the USB flash drive. Important Do not remove the USB flash drive or turn off the power while the machine is displayed on the USB flash drive. 2. Removing the USB Flash Drive 1.

User Manual
Page 73
... cartridge, the machine will not be Used. Furthermore, with both cartridges. Installing a used FINE cartridge may not print properly if you when to the printed manual: Getting Started. Note If a FINE cartridge runs out of ink, you remove a FINE cartridge, replace it out in order to maintain the performance of the...
... cartridge, the machine will not be Used. Furthermore, with both cartridges. Installing a used FINE cartridge may not print properly if you when to the printed manual: Getting Started. Note If a FINE cartridge runs out of ink, you remove a FINE cartridge, replace it out in order to maintain the performance of the...
User Manual
Page 90
... take appropriate action. If the print results are still not satisfactory after adjusting the print head position as described above, adjust the print head position manually from the Maintenance menu.
... take appropriate action. If the print results are still not satisfactory after adjusting the print head position as described above, adjust the print head position manually from the Maintenance menu.

User Manual
Page 95
Aligning the Print Head When you can adjust the print head either automatically or manually. • To adjust the head position automatically, execute print head position adjustment from the operation panel of the print head. Aligning the Print Head Position ...from the computer. Aligning the Print Head • To adjust the head position manually, execute print head position adjustment from Your Computer If the print results appear uneven because of line shifts or other conditions, adjust the position of...
Aligning the Print Head When you can adjust the print head either automatically or manually. • To adjust the head position automatically, execute print head position adjustment from the operation panel of the print head. Aligning the Print Head Position ...from the computer. Aligning the Print Head • To adjust the head position manually, execute print head position adjustment from Your Computer If the print results appear uneven because of line shifts or other conditions, adjust the position of...

User Manual
Page 96
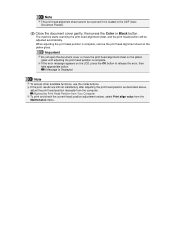
... Follow the instruction in the machine Load three sheets of A4 size or Letter size plain paper into the front tray. 7. The procedure for performing manual print head alignment is on and click Align Print Head. Click Print Head Alignment on the Maintenance tab The Custom Settings dialog box opens. 3. Load...colors and lines. Execute head alignment Make sure that the machine is as follows: Print Head Alignment 1. To perform automatic head alignment, refer to manual Check the Align heads manually check box. 4. This machine supports two head alignment methods: automatic head alignment and...
... Follow the instruction in the machine Load three sheets of A4 size or Letter size plain paper into the front tray. 7. The procedure for performing manual print head alignment is on and click Align Print Head. Click Print Head Alignment on the Maintenance tab The Custom Settings dialog box opens. 3. Load...colors and lines. Execute head alignment Make sure that the machine is as follows: Print Head Alignment 1. To perform automatic head alignment, refer to manual Check the Align heads manually check box. 4. This machine supports two head alignment methods: automatic head alignment and...
User Manual
Page 119
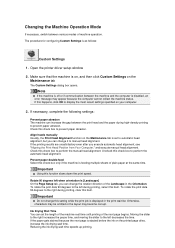
... slider to automatic head alignment, but you execute automatic head alignment, see "Aligning the Print Head Position from Your Computer," and execute manual head alignment. Changing the Machine Operation Mode If necessary, switch between the machine and the computer is disabled, an error message may become... the Landscape in the print wait list. If this check box to the right during high-density printing to perform the manual head alignment. Align heads manually Usually, the Print Head Alignment function on your computer. 3. Uncheck this happens, click OK to display the most recent...
... slider to automatic head alignment, but you execute automatic head alignment, see "Aligning the Print Head Position from Your Computer," and execute manual head alignment. Changing the Machine Operation Mode If necessary, switch between the machine and the computer is disabled, an error message may become... the Landscape in the print wait list. If this check box to the right during high-density printing to perform the manual head alignment. Align heads manually Usually, the Print Head Alignment function on your computer. 3. Uncheck this happens, click OK to display the most recent...
User Manual
Page 125
For details on the procedure to print ACTIVITY REPORT manually: Summary of the fax is stored in the machine's memory when the ink has run out. If you print RX REPORT, select Print error only ...
For details on the procedure to print ACTIVITY REPORT manually: Summary of the fax is stored in the machine's memory when the ink has run out. If you print RX REPORT, select Print error only ...
User Manual
Page 128
... the operation panel of the machine such as that already used for Mac OS. Selecting Active allows you perform settings for wireless LAN manually using Wi-Fi Protected Setup (WPS). Enable/disable WSD Selects whether WSD is printed out, refer to the method your access point ...supports, then follow the on-screen instructions. • Other setup Select Manual setup, then follow the on the machine's network setting is enabled or disabled. Timeout setting Specifies the timeout length. • Bonjour settings ...
... the operation panel of the machine such as that already used for Mac OS. Selecting Active allows you perform settings for wireless LAN manually using Wi-Fi Protected Setup (WPS). Enable/disable WSD Selects whether WSD is printed out, refer to the method your access point ...supports, then follow the on-screen instructions. • Other setup Select Manual setup, then follow the on the machine's network setting is enabled or disabled. Timeout setting Specifies the timeout length. • Bonjour settings ...
User Manual
Page 133
If Cannot connect to perform settings. • Proxy server setup Performs settings for a proxy server. Select Auto setup or Manual setup. Follow the display on -screen instructions to perform the update. Note Only Current version is available when WLAN inactive is carried out... firmware update starts. Firmware update You can check the current firmware version. • DNS server setup Performs settings for a DNS server. If you select Manual setup, follow the display on the LCD, press the OK button, then try again after a while. • Current version You can update the firmware...
If Cannot connect to perform settings. • Proxy server setup Performs settings for a proxy server. Select Auto setup or Manual setup. Follow the display on -screen instructions to perform the update. Note Only Current version is available when WLAN inactive is carried out... firmware update starts. Firmware update You can check the current firmware version. • DNS server setup Performs settings for a DNS server. If you select Manual setup, follow the display on the LCD, press the OK button, then try again after a while. • Current version You can update the firmware...
User Manual
Page 143
... Bonjour Bonjour setting Enable/Disable Bonjour Service Name Bonjour service name Bonjour service name (Up to 52 characters) DNS Server Getting DNS Server automatically Auto/Manual Primary Server Primary server address XXX.XXX.XXX.XXX Secondary Server Secondary server address XXX.XXX.XXX.XXX Proxy Server Proxy Server setting Enable/Disable...
... Bonjour Bonjour setting Enable/Disable Bonjour Service Name Bonjour service name Bonjour service name (Up to 52 characters) DNS Server Getting DNS Server automatically Auto/Manual Primary Server Primary server address XXX.XXX.XXX.XXX Secondary Server Secondary server address XXX.XXX.XXX.XXX Proxy Server Proxy Server setting Enable/Disable...

User Manual
Page 150
4. Key ID: Select the Key ID (index) set to the printer. Normally, select Auto. Click OK. If you want to specify the method manually, select Open System or Shared Key according to the setting of the printer was switched, make sure that encryption types for the computer and the ...
4. Key ID: Select the Key ID (index) set to the printer. Normally, select Auto. Click OK. If you want to specify the method manually, select Open System or Shared Key according to the setting of the printer was switched, make sure that encryption types for the computer and the ...


