
Manual
Page 2
Scanning Scanning from a Computer Scanning with IJ Scan Utility Scanning with Application Software that You are Using (ScanGear) Useful Information on Scanning Other Scanning Methods Placing Items (When Scanning from a Computer) Scanning from the Operation Panel of the Machine Forwarding Scanned Data to the Computer Using the Operation Panel of the Machine Setting Items on the Operation Panel of the Machine Selecting a Response to Commands from the Operation Panel Using IJ Scan Utility Basic
Scanning Scanning from a Computer Scanning with IJ Scan Utility Scanning with Application Software that You are Using (ScanGear) Useful Information on Scanning Other Scanning Methods Placing Items (When Scanning from a Computer) Scanning from the Operation Panel of the Machine Forwarding Scanned Data to the Computer Using the Operation Panel of the Machine Setting Items on the Operation Panel of the Machine Selecting a Response to Commands from the Operation Panel Using IJ Scan Utility Basic

Manual
Page 4
Scanning from the Operation Panel of the Machine Forwarding Scanned Data to the Computer Using the Operation Panel of the Machine Setting Items on the Operation Panel of the Machine Selecting a Response to Commands from the Operation Panel Using IJ Scan Utility Basic
Scanning from the Operation Panel of the Machine Forwarding Scanned Data to the Computer Using the Operation Panel of the Machine Setting Items on the Operation Panel of the Machine Selecting a Response to Commands from the Operation Panel Using IJ Scan Utility Basic
Manual
Page 5
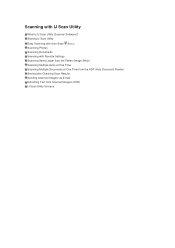
Starting IJ Scan Utility Easy Scanning with Auto Scan Basic Scanning Photos Scanning Documents Scanning with IJ Scan Utility What Is IJ Scan Utility (Scanner Software)? Scanning with Favorite Settings Scanning Items Larger than the Platen (Image Stitch) Scanning Multiple Items at One Time Scanning Multiple Documents at One Time from the ADF (Auto Document Feeder) Saving after Checking Scan Results Sending Scanned Images via E-mail Extracting Text from Scanned Images (OCR) IJ Scan Utility Screens
Starting IJ Scan Utility Easy Scanning with Auto Scan Basic Scanning Photos Scanning Documents Scanning with IJ Scan Utility What Is IJ Scan Utility (Scanner Software)? Scanning with Favorite Settings Scanning Items Larger than the Platen (Image Stitch) Scanning Multiple Items at One Time Scanning Multiple Documents at One Time from the ADF (Auto Document Feeder) Saving after Checking Scan Results Sending Scanned Images via E-mail Extracting Text from Scanned Images (OCR) IJ Scan Utility Screens

Manual
Page 6
...clicking the corresponding icon in your purpose. Windows 7: My Documents folder Windows Vista: Documents folder Windows XP: My Documents folder See "Settings Dialog Box" for details on the IJ Scan Utility main screen. display scanned images in the IJ Scan Utility main screen. Note See...Do with IJ Scan Utility Scan Easily according to sharpen text in a preset folder. You can utilize scanned images through integration with settings suitable for photos, or Document to Purposes You can change the folder as follows. Save Scanned Images Automatically Scanned images are as ...
...clicking the corresponding icon in your purpose. Windows 7: My Documents folder Windows Vista: Documents folder Windows XP: My Documents folder See "Settings Dialog Box" for details on the IJ Scan Utility main screen. display scanned images in the IJ Scan Utility main screen. Note See...Do with IJ Scan Utility Scan Easily according to sharpen text in a preset folder. You can utilize scanned images through integration with settings suitable for photos, or Document to Purposes You can change the folder as follows. Save Scanned Images Automatically Scanned images are as ...
Manual
Page 7
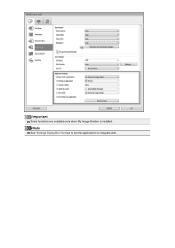
Note See "Settings Dialog Box" for how to set the applications to integrate with. Important Some functions are available only when My Image Garden is installed.
Note See "Settings Dialog Box" for how to set the applications to integrate with. Important Some functions are available only when My Image Garden is installed.

Manual
Page 9
...Click Cancel to the following types of your scanner or printer is turned on white paper, hand-written documents, business cards, etc. In the Settings (Auto Scan) dialog box, you can scan easily by automatically detecting the item type. Thin items Thick items Adjusting Cropping Frames (IJ Scan ...Utility) When scanning two or more documents from a Computer) 3. Place items on the item type, click Settings..., then select the Apply recommended image correction checkbox in whole image view of the same size. 1. Starting IJ Scan Utility 4. Scanning starts...
...Click Cancel to the following types of your scanner or printer is turned on white paper, hand-written documents, business cards, etc. In the Settings (Auto Scan) dialog box, you can scan easily by automatically detecting the item type. Thin items Thick items Adjusting Cropping Frames (IJ Scan ...Utility) When scanning two or more documents from a Computer) 3. Place items on the item type, click Settings..., then select the Apply recommended image correction checkbox in whole image view of the same size. 1. Starting IJ Scan Utility 4. Scanning starts...
Manual
Page 10
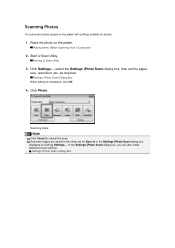
... Scan Utility 3. Scanning starts. Note Click Cancel to cancel the scan. Placing Items (When Scanning from a Computer) 2. Settings (Photo Scan) Dialog Box Start IJ Scan Utility. Click Settings..., select the Settings (Photo Scan) dialog box, then set for photos. 1. Settings (Photo Scan) Dialog Box When setting is completed, click OK. 4. Scanned images are saved in the...
... Scan Utility 3. Scanning starts. Note Click Cancel to cancel the scan. Placing Items (When Scanning from a Computer) 2. Settings (Photo Scan) Dialog Box Start IJ Scan Utility. Click Settings..., select the Settings (Photo Scan) dialog box, then set for photos. 1. Settings (Photo Scan) Dialog Box When setting is completed, click OK. 4. Scanned images are saved in the...
Manual
Page 11
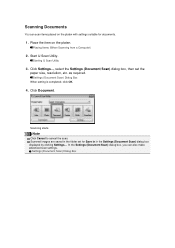
..., click OK. 4. Place the item on the platen with settings suitable for Save in in the folder set the paper size, resolution, etc. Scanned images are saved in the Settings (Document Scan) dialog box displayed by clicking Settings.... Placing Items (When Scanning from a Computer) 2. Settings (Document Scan) Dialog Box as required. Scanning Documents You can...
..., click OK. 4. Place the item on the platen with settings suitable for Save in in the folder set the paper size, resolution, etc. Scanned images are saved in the Settings (Document Scan) dialog box displayed by clicking Settings.... Placing Items (When Scanning from a Computer) 2. Settings (Document Scan) Dialog Box as required. Scanning Documents You can...
Manual
Page 12
... Click Cancel to cancel the scan. Scanned images are made, you can also make advanced scan settings. In the Settings (Custom Scan) dialog box, you can scan with the same settings from a Computer) 4. Settings (Custom Scan) Dialog Box When setting is convenient for Save in in detail. 1. Place the item on the platen with your...
... Click Cancel to cancel the scan. Scanned images are made, you can also make advanced scan settings. In the Settings (Custom Scan) dialog box, you can scan with the same settings from a Computer) 4. Settings (Custom Scan) Dialog Box When setting is convenient for Save in in detail. 1. Place the item on the platen with your...
Manual
Page 13
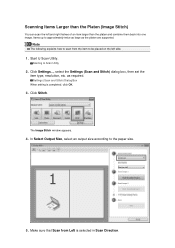
... and Stitch) dialog box, then set the item type, resolution, etc. The Image Stitch window appears. 4. Make sure that Scan from the item to scan from Left is completed, click OK. 3. ... paper size. 5. Click Stitch. In Select Output Size, select an output size according to approximately twice as large as required. as the platen are supported. Settings (Scan and Stitch) Dialog Box When setting is selected in Scan Direction. Scanning Items Larger than the Platen (Image Stitch) You can scan the left side. 1.
... and Stitch) dialog box, then set the item type, resolution, etc. The Image Stitch window appears. 4. Make sure that Scan from the item to scan from Left is completed, click OK. 3. ... paper size. 5. Click Stitch. In Select Output Size, select an output size according to approximately twice as large as required. as the platen are supported. Settings (Scan and Stitch) Dialog Box When setting is selected in Scan Direction. Scanning Items Larger than the Platen (Image Stitch) You can scan the left side. 1.
Manual
Page 16
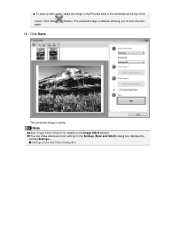
The combined image is deleted, allowing you to scan the item 11. Settings (Scan and Stitch) Dialog Box Note See "Image Stitch Window" for details on the Image Stitch window. You can make advanced scan settings in the Preview area or the thumbnail at the top of the screen, then click again. (Delete). The selected image is saved. Click Save. To scan an item again, select the image in the Settings (Scan and Stitch) dialog box displayed by clicking Settings....
The combined image is deleted, allowing you to scan the item 11. Settings (Scan and Stitch) Dialog Box Note See "Image Stitch Window" for details on the Image Stitch window. You can make advanced scan settings in the Preview area or the thumbnail at the top of the screen, then click again. (Delete). The selected image is saved. Click Save. To scan an item again, select the image in the Settings (Scan and Stitch) dialog box displayed by clicking Settings....

Manual
Page 17
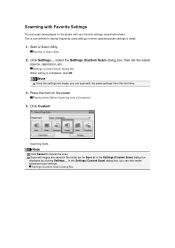
... The following descriptions. 1. Place the items on the platen. Placing Items (When Scanning from Home of the Online Manual for scanning with favorite settings are multiple items or not is detected automatically. Start IJ Scan Utility. In that have a whitish background Items printed on white paper, hand-... Whether there are used as examples in whole image view of items may not be cropped correctly. Note The screens for details. Click Settings.... Starting IJ Scan Utility 3. Scanning Multiple Items at One Time You can scan two or more photos (small items) placed on the...
... The following descriptions. 1. Place the items on the platen. Placing Items (When Scanning from Home of the Online Manual for scanning with favorite settings are multiple items or not is detected automatically. Start IJ Scan Utility. In that have a whitish background Items printed on white paper, hand-... Whether there are used as examples in whole image view of items may not be cropped correctly. Note The screens for details. Click Settings.... Starting IJ Scan Utility 3. Scanning Multiple Items at One Time You can scan two or more photos (small items) placed on the...
Manual
Page 19
Scanned images are scanned at one time. Settings (Photo Scan) Dialog Box Settings (Document Scan) Dialog Box Settings (Custom Scan) Dialog Box 7. Note Click Cancel to cancel the scan. Note See the following pages for Save in in the Settings dialog box. Multiple items are saved in the folder set for details on the setting items in the corresponding Settings dialog box displayed by clicking Settings.... Click Custom. In each Settings dialog box, you can also make advanced scan settings. The IJ Scan Utility main screen appears.
Scanned images are scanned at one time. Settings (Photo Scan) Dialog Box Settings (Document Scan) Dialog Box Settings (Custom Scan) Dialog Box 7. Note Click Cancel to cancel the scan. Note See the following pages for Save in in the Settings dialog box. Multiple items are saved in the folder set for details on the setting items in the corresponding Settings dialog box displayed by clicking Settings.... Click Custom. In each Settings dialog box, you can also make advanced scan settings. The IJ Scan Utility main screen appears.
Manual
Page 20
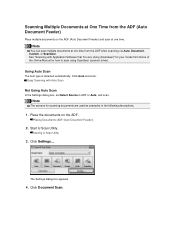
... Auto, Document, Custom, or ScanGear. Placing Documents (ADF (Auto Document Feeder)) 2. The Settings dialog box appears. 4. See "Scanning with Auto Scan Not Using Auto Scan In the Settings dialog box, set Select Source to scan using ScanGear (scanner driver). Click Settings.... Easy Scanning with Application Software that You are used as examples in the...
... Auto, Document, Custom, or ScanGear. Placing Documents (ADF (Auto Document Feeder)) 2. The Settings dialog box appears. 4. See "Scanning with Auto Scan Not Using Auto Scan In the Settings dialog box, set Select Source to scan using ScanGear (scanner driver). Click Settings.... Easy Scanning with Application Software that You are used as examples in the...
Manual
Page 21
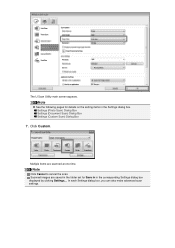
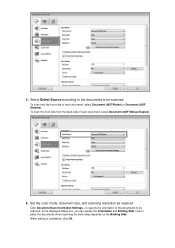
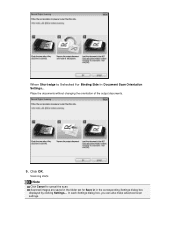
... box, you can specify the Orientation and Binding Side. Select Select Source according to the documents to be scanned. Click Document Scan Orientation Settings... How to be scanned. When setting is completed, click OK. 5. To scan only the front side of each document, select Document (ADF/Platen) or Document (ADF Simplex). to... specify the orientation of the documents to place the documents when scanning the back sides depends on the Binding Side. Set the color mode, document size, and scanning resolution as required.
... box, you can specify the Orientation and Binding Side. Select Select Source according to the documents to be scanned. Click Document Scan Orientation Settings... How to be scanned. When setting is completed, click OK. 5. To scan only the front side of each document, select Document (ADF/Platen) or Document (ADF Simplex). to... specify the orientation of the documents to place the documents when scanning the back sides depends on the Binding Side. Set the color mode, document size, and scanning resolution as required.
Manual
Page 22
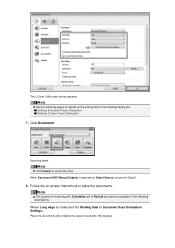
... Select Source, proceed to Portrait are used as examples in the Settings dialog box. Note The screens for details on -screen instructions to cancel the scan. Click Document. Settings (Document Scan) Dialog Box Settings (Custom Scan) Dialog Box 7. Scanning starts. Note See the ...following descriptions. When Long edge is selected for Binding Side in Document Scan Orientation Settings... Place the documents after rotating the output...
... Select Source, proceed to Portrait are used as examples in the Settings dialog box. Note The screens for details on -screen instructions to cancel the scan. Click Document. Settings (Document Scan) Dialog Box Settings (Custom Scan) Dialog Box 7. Scanning starts. Note See the ...following descriptions. When Long edge is selected for Binding Side in Document Scan Orientation Settings... Place the documents after rotating the output...
Manual
Page 23
Scanning starts. Note Click Cancel to cancel the scan. In each Settings dialog box, you can also make advanced scan settings. Scanned images are saved in the folder set for Binding Side in the corresponding Settings dialog box displayed by clicking Settings.... When Short edge is Selected for Save in in Document Scan Orientation Settings... Click OK. Place the documents without changing the orientation of the output documents. 9.
Scanning starts. Note Click Cancel to cancel the scan. In each Settings dialog box, you can also make advanced scan settings. Scanned images are saved in the folder set for Binding Side in the corresponding Settings dialog box displayed by clicking Settings.... When Short edge is Selected for Save in in Document Scan Orientation Settings... Click OK. Place the documents without changing the orientation of the output documents. 9.
Manual
Page 24
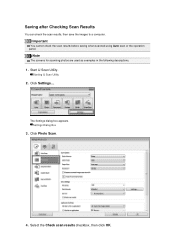
Start IJ Scan Utility. The Settings dialog box appears. Important You cannot check the scan results before saving when scanned using Auto scan or the operation panel. Starting IJ Scan Utility 2. Settings Dialog Box 3. Click Photo Scan. 4. Click Settings.... Select the Check scan results checkbox, then click OK. Note The screens for scanning photos are used as examples in the following descriptions. 1. Saving after Checking Scan Results You can check the scan results, then save the images to a computer.
Start IJ Scan Utility. The Settings dialog box appears. Important You cannot check the scan results before saving when scanned using Auto scan or the operation panel. Starting IJ Scan Utility 2. Settings Dialog Box 3. Click Photo Scan. 4. Click Settings.... Select the Check scan results checkbox, then click OK. Note The screens for scanning photos are used as examples in the following descriptions. 1. Saving after Checking Scan Results You can check the scan results, then save the images to a computer.
Manual
Page 25
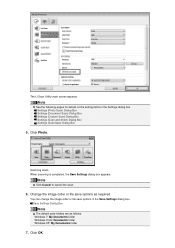
When scanning is completed, the Save Settings dialog box appears. Save Settings Dialog Box Note The default save options as follows. Settings (Photo Scan) Dialog Box Settings (Document Scan) Dialog Box Settings (Custom Scan) Dialog Box Settings (Scan and Stitch) Dialog Box Settings (ScanGear) Dialog Box 5. Click OK... 6. Scanning starts. The IJ Scan Utility main screen appears. Note See the following pages for details on the setting items in the Save Settings dialog box. Click Photo. Windows 7: My Documents folder Windows Vista: Documents folder Windows XP: My Documents folder ...
When scanning is completed, the Save Settings dialog box appears. Save Settings Dialog Box Note The default save options as follows. Settings (Photo Scan) Dialog Box Settings (Document Scan) Dialog Box Settings (Custom Scan) Dialog Box Settings (Scan and Stitch) Dialog Box Settings (ScanGear) Dialog Box 5. Click OK... 6. Scanning starts. The IJ Scan Utility main screen appears. Note See the following pages for details on the setting items in the Save Settings dialog box. Click Photo. Windows 7: My Documents folder Windows Vista: Documents folder Windows XP: My Documents folder ...

Manual
Page 26
Scanned images are saved according to the settings.
Scanned images are saved according to the settings.


