Quick Start Guide
Page 2
www.canontechsupport.com For quick and comprehensive self-help in an intuitively guided interactive troubleshooting environment, the place to your Canon service and support, call (1-800-385-2155), or visit our Web site at (1-866-251-3752). 4. Toll-Free Live...Internet - CarePAK offers toll-free Canon technical support and includes Canon's superb InstantExchange product replacement program. Getting Help from Canon Help Us Help You Better Before you contact Canon, please record the following information. Email Tech Support - www.canonesp.com Canon CarePAK Extended Service Plan is our ...
www.canontechsupport.com For quick and comprehensive self-help in an intuitively guided interactive troubleshooting environment, the place to your Canon service and support, call (1-800-385-2155), or visit our Web site at (1-866-251-3752). 4. Toll-Free Live...Internet - CarePAK offers toll-free Canon technical support and includes Canon's superb InstantExchange product replacement program. Getting Help from Canon Help Us Help You Better Before you contact Canon, please record the following information. Email Tech Support - www.canonesp.com Canon CarePAK Extended Service Plan is our ...
Quick Start Guide
Page 4
..., Inc., registered in order that it will be an easy-to-use of products with all rights reserved. z Macintosh and Mac are licensed to your Canon PIXMA MP810 Photo All-in the U.S. z SmartMedia is a global program that effectively reduce energy consumption. and are trademarks of Microsoft Corporation in -One. Disclaimer...
..., Inc., registered in order that it will be an easy-to-use of products with all rights reserved. z Macintosh and Mac are licensed to your Canon PIXMA MP810 Photo All-in the U.S. z SmartMedia is a global program that effectively reduce energy consumption. and are trademarks of Microsoft Corporation in -One. Disclaimer...
Quick Start Guide
Page 5
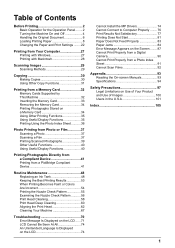
Table of Contents Before Printing 2 Basic Operation for the Operation Panel ........2 Turning the Machine On and Off 4 Handling the Original Document 6 Loading Printing Paper 8 Changing the Paper and Print Settings ........22 Printing from Your Computer 27 Printing with Windows 27 Printing with Macintosh 28 Scanning Images 29 Scanning Methods 29 Copying 30 Making Copies 30 Using Other Copy Functions 31 Printing from a Memory Card 32 Memory Cards Supported by This Machine 32 Inserting the Memory Card 33 Removing the Memory Card 34 Printing Photographs Stored on a Memory Card 34...
Table of Contents Before Printing 2 Basic Operation for the Operation Panel ........2 Turning the Machine On and Off 4 Handling the Original Document 6 Loading Printing Paper 8 Changing the Paper and Print Settings ........22 Printing from Your Computer 27 Printing with Windows 27 Printing with Macintosh 28 Scanning Images 29 Scanning Methods 29 Copying 30 Making Copies 30 Using Other Copy Functions 31 Printing from a Memory Card 32 Memory Cards Supported by This Machine 32 Inserting the Memory Card 33 Removing the Memory Card 34 Printing Photographs Stored on a Memory Card 34...
Quick Start Guide
Page 6
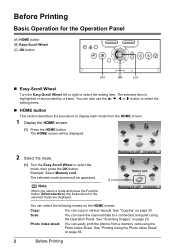
Example: Select Memory card. See "Copying" on page 36. 2 Before Printing See "Printing Using the Photo Index Sheet" on page 30. You can easily print the photos from the HOME screen. 1 Display the HOME screen. (1) Press the HOME button. You can select the following modes on page 29. Photo index sheet: You can also use the {, }, [ or ] button to select the setting items. „ HOME button This section describes the procedure to a connected computer using the Photo Index Sheet. Before Printing Basic Operation for the selected mode are displayed. The selected item is ...
Example: Select Memory card. See "Copying" on page 36. 2 Before Printing See "Printing Using the Photo Index Sheet" on page 30. You can easily print the photos from the HOME screen. 1 Display the HOME screen. (1) Press the HOME button. You can select the following modes on page 29. Photo index sheet: You can also use the {, }, [ or ] button to select the setting items. „ HOME button This section describes the procedure to a connected computer using the Photo Index Sheet. Before Printing Basic Operation for the selected mode are displayed. The selected item is ...
Quick Start Guide
Page 7
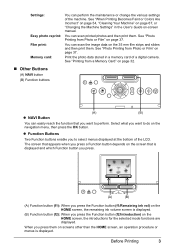
Before Printing 3 Select what you want to perform. The screen that appears when you press a Function button depends on the screen that you to do on page 67, or "Changing the Machine Settings" in a memory card of a digital camera. See "When Printing Becomes Faint or Colors Are Incorrect" on page 54, "Cleaning Your Machine" on the navigation menu, then press the OK button. z Function Buttons Two Function buttons enable you want to select menus displayed at the bottom of the machine. See "Photo Printing from a Memory Card" on page 32. „ Other Buttons (A) NAVI ...
Before Printing 3 Select what you want to perform. The screen that appears when you press a Function button depends on the screen that you to do on page 67, or "Changing the Machine Settings" in a memory card of a digital camera. See "When Printing Becomes Faint or Colors Are Incorrect" on page 54, "Cleaning Your Machine" on the navigation menu, then press the OK button. z Function Buttons Two Function buttons enable you want to select menus displayed at the bottom of the machine. See "Photo Printing from a Memory Card" on page 32. „ Other Buttons (A) NAVI ...

Quick Start Guide
Page 8
Note If preparatory operations above are using the machine connected to turn off the Machine 1 To turn on your computer (or a compatible device). If you are installed. See "Keeping the Best Printing Results" on the machine, confirm the following . z The machine is displayed on the LCD, see "Error Message Is Displayed on the LCD" on page 71. 2 If you are not complete, follow the Easy Setup Instructions to complete them. 1 Open the Operation Panel and press the ON/ OFF button to a computer, turn on the machine. z The MP Drivers are using the machine connected ...
Note If preparatory operations above are using the machine connected to turn off the Machine 1 To turn on your computer (or a compatible device). If you are installed. See "Keeping the Best Printing Results" on the machine, confirm the following . z The machine is displayed on the LCD, see "Error Message Is Displayed on the LCD" on page 71. 2 If you are not complete, follow the Easy Setup Instructions to complete them. 1 Open the Operation Panel and press the ON/ OFF button to a computer, turn on the machine. z The MP Drivers are using the machine connected ...
Quick Start Guide
Page 9
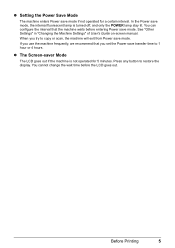
When you set the Power save transfer time to 1 hour or 4 hours. See "Other Settings" in "Changing the Machine Settings" of User's Guide on-screen manual. z The Screen-saver Mode The LCD goes out if the machine is turned off, and only the POWER lamp stay lit. You can configure the interval that you try to restore the display. Press any button to copy or scan, the machine will exit from Power save mode. You cannot change the wait time before entering Power save mode. Before Printing 5 z Setting the Power Save Mode The machine enters Power save mode, the internal ...
When you set the Power save transfer time to 1 hour or 4 hours. See "Other Settings" in "Changing the Machine Settings" of User's Guide on-screen manual. z The Screen-saver Mode The LCD goes out if the machine is turned off, and only the POWER lamp stay lit. You can configure the interval that you try to restore the display. Press any button to copy or scan, the machine will exit from Power save mode. You cannot change the wait time before entering Power save mode. Before Printing 5 z Setting the Power Save Mode The machine enters Power save mode, the internal ...

Quick Start Guide
Page 10
Max. 8.5 x 11.7 inches / 216 x 297 mm Max. 0.98 inches / 25 mm „ Loading Original Documents Load originals to load a photo, see "Photo Printing from Photo or Film" on the upper left corner of the Platen Glass. (2) 6 Before Printing For details on how to copy or scan on the Platen Glass. Handling the Original Document This section describes how to load the original document on the Platen Glass. „ Original Document Requirements The original documents you load on the Platen Glass for copying or scanning must meet these requirements: Document type Size (W x L) ...
Max. 8.5 x 11.7 inches / 216 x 297 mm Max. 0.98 inches / 25 mm „ Loading Original Documents Load originals to load a photo, see "Photo Printing from Photo or Film" on the upper left corner of the Platen Glass. (2) 6 Before Printing For details on how to copy or scan on the Platen Glass. Handling the Original Document This section describes how to load the original document on the Platen Glass. „ Original Document Requirements The original documents you load on the Platen Glass for copying or scanning must meet these requirements: Document type Size (W x L) ...
Quick Start Guide
Page 11
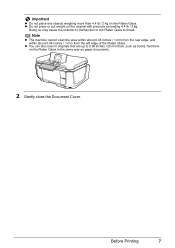
Doing so may cause the scanner to malfunction or the Platen Glass to 0.98 inches / 25 mm thick, such as paper documents. 2 Gently close the Document Cover. Before Printing 7 z You can also scan in the same way as books. Note z The machine cannot scan the area within about 0.04 inches / 1 mm from the rear edge, and within about 0.04 inches / 1 mm from the left edge of the Platen Glass. Set them on the original with pressure exceeding 4.4 lb / 2 kg. z Do not press or put weight on the Platen Glass in originals that are up to break. Important z Do not place any objects ...
Doing so may cause the scanner to malfunction or the Platen Glass to 0.98 inches / 25 mm thick, such as paper documents. 2 Gently close the Document Cover. Before Printing 7 z You can also scan in the same way as books. Note z The machine cannot scan the area within about 0.04 inches / 1 mm from the rear edge, and within about 0.04 inches / 1 mm from the left edge of the Platen Glass. Set them on the original with pressure exceeding 4.4 lb / 2 kg. z Do not press or put weight on the Platen Glass in originals that are up to break. Important z Do not place any objects ...
Quick Start Guide
Page 12
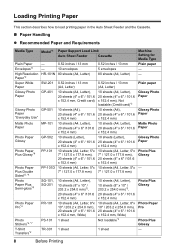
HR-101N SW-201 GP-401 GP-501 MP-101 GP-502 PP-101 PP-101D SG-101, SG-201 PR-101 PS-101 TR-301 Paper Support Load Limit Auto Sheet Feeder Cassette 0.52 inches / 13 mm 10 envelopes 80 sheets (A4, Letter) 0.52 inches / 13 mm 5 envelopes 80 sheets (A4, Letter) 0.52 inches / 13 mm (A4, Letter) 10 sheets (A4, Letter), 20 sheets (4" x 6" / 101.6 x 152.4 mm, Credit card) 10 sheets (A4), 20 sheets (4" x 6" / 101.6 x 152.4 mm) 10 sheets (A4, Letter), 20 sheets (4" x 6" /101.6 x 152.4 mm) 10 sheets (Letter), 20 sheets (4" x 6" / 101.6 x 152.4 mm) 10 sheets (A4, Letter, 5"x 7" / 127.0 x 177.8 mm...
HR-101N SW-201 GP-401 GP-501 MP-101 GP-502 PP-101 PP-101D SG-101, SG-201 PR-101 PS-101 TR-301 Paper Support Load Limit Auto Sheet Feeder Cassette 0.52 inches / 13 mm 10 envelopes 80 sheets (A4, Letter) 0.52 inches / 13 mm 5 envelopes 80 sheets (A4, Letter) 0.52 inches / 13 mm (A4, Letter) 10 sheets (A4, Letter), 20 sheets (4" x 6" / 101.6 x 152.4 mm, Credit card) 10 sheets (A4), 20 sheets (4" x 6" / 101.6 x 152.4 mm) 10 sheets (A4, Letter), 20 sheets (4" x 6" /101.6 x 152.4 mm) 10 sheets (Letter), 20 sheets (4" x 6" / 101.6 x 152.4 mm) 10 sheets (A4, Letter, 5"x 7" / 127.0 x 177.8 mm...

Quick Start Guide
Page 13
You may become marked when it is fed in the User's Guide on-screen manual. Refer to purchase some Canon genuine papers depending on your country. *1 Paper is Canon specialty media. z To specify the page size and media type when printing from the Cassette can specify the print setting easily by name. *2 Available...
You may become marked when it is fed in the User's Guide on-screen manual. Refer to purchase some Canon genuine papers depending on your country. *1 Paper is Canon specialty media. z To specify the page size and media type when printing from the Cassette can specify the print setting easily by name. *2 Available...
Quick Start Guide
Page 14
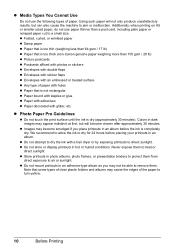
... / 17 lb) z Paper that is completely dry. We recommend to allow the ink to dry for 24 hours before the ink is too thick (non-Canon genuine paper weighing more than 105 gsm / 28 lb) z Picture postcards z Postcards affixed with photos or stickers z Envelopes with double flaps z Envelopes with sticker flaps...
... / 17 lb) z Paper that is completely dry. We recommend to allow the ink to dry for 24 hours before the ink is too thick (non-Canon genuine paper weighing more than 105 gsm / 28 lb) z Picture postcards z Postcards affixed with photos or stickers z Envelopes with double flaps z Envelopes with sticker flaps...
Quick Start Guide
Page 15
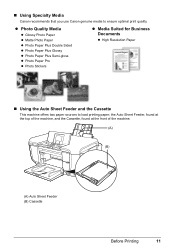
... top of the machine, and the Cassette, found at the front of the machine. (A) (B) (A) Auto Sheet Feeder (B) Cassette Before Printing 11 „ Using Specialty Media Canon recommends that you use Canon genuine media to load printing paper;
... top of the machine, and the Cassette, found at the front of the machine. (A) (B) (A) Auto Sheet Feeder (B) Cassette Before Printing 11 „ Using Specialty Media Canon recommends that you use Canon genuine media to load printing paper;
Quick Start Guide
Page 16
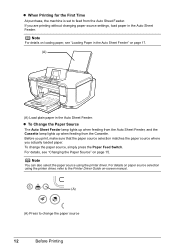
To change the paper source 12 Before Printing z To Change the Paper Source The Auto Sheet Feeder lamp lights up when feeding from the Auto Sheet Feeder, and the Cassette lamp lights up when feeding from the Auto Sheet Feeder. If you actually loaded paper. Note For details on loading paper, see "Changing the Paper Source" on page 17. (A) (A) Load plain paper in the Auto Sheet Feeder. For details, see "Loading Paper in the Auto Sheet Feeder" on page 15. For details on -screen manual. (A) (A) Press to feed from the Cassette. Before you print, make sure that the paper ...
To change the paper source 12 Before Printing z To Change the Paper Source The Auto Sheet Feeder lamp lights up when feeding from the Auto Sheet Feeder, and the Cassette lamp lights up when feeding from the Auto Sheet Feeder. If you actually loaded paper. Note For details on loading paper, see "Changing the Paper Source" on page 17. (A) (A) Load plain paper in the Auto Sheet Feeder. For details, see "Loading Paper in the Auto Sheet Feeder" on page 15. For details on -screen manual. (A) (A) Press to feed from the Cassette. Before you print, make sure that the paper ...
Quick Start Guide
Page 17
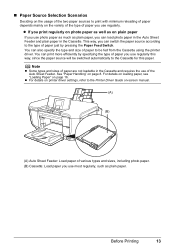
z For details on printer driver settings, refer to the Printer Driver Guide on page 16. This way, you can print more efficiently by pressing the Paper Feed Switch. You can load photo paper in the Auto Sheet Feeder and plain paper in the Cassette and requires the use of the Auto Sheet Feeder. For details on loading paper, see "Loading Paper" on -screen manual. (A) (B) (A) Auto Sheet Feeder: Load paper of various types and sizes, including photo paper. (B) Cassette: Load paper you use regularly this paper. Before Printing 13 You can switch the paper source according ...
z For details on printer driver settings, refer to the Printer Driver Guide on page 16. This way, you can print more efficiently by pressing the Paper Feed Switch. You can load photo paper in the Auto Sheet Feeder and plain paper in the Cassette and requires the use of the Auto Sheet Feeder. For details on loading paper, see "Loading Paper" on -screen manual. (A) (B) (A) Auto Sheet Feeder: Load paper of various types and sizes, including photo paper. (B) Cassette: Load paper you use regularly this paper. Before Printing 13 You can switch the paper source according ...
Quick Start Guide
Page 18
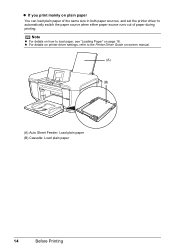
Note z For details on how to load paper, see "Loading Paper" on plain paper You can load plain paper of the same size in both paper sources, and set the printer driver to the Printer Driver Guide on-screen manual. (A) (B) (A) Auto Sheet Feeder: Load plain paper (B) Cassette: Load plain paper 14 Before Printing z If you print mainly on page 16. z For details on printer driver settings, refer to automatically switch the paper source when either paper source runs out of paper during printing.
Note z For details on how to load paper, see "Loading Paper" on plain paper You can load plain paper of the same size in both paper sources, and set the printer driver to the Printer Driver Guide on-screen manual. (A) (B) (A) Auto Sheet Feeder: Load plain paper (B) Cassette: Load plain paper 14 Before Printing z If you print mainly on page 16. z For details on printer driver settings, refer to automatically switch the paper source when either paper source runs out of paper during printing.
Quick Start Guide
Page 19
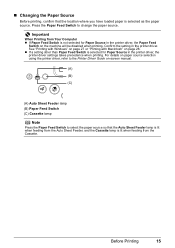
Press the Paper Feed Switch to select the paper source so that the location where you have loaded paper is selected for Paper Source in the printer driver, the Paper Feed Switch on the machine will be disabled when printing. For details on paper source selection using the printer driver, refer to the Printer Driver Guide on page 28. See "Printing with Windows" on page 27 or "Printing with Macintosh" on -screen manual. (A) (B) (C) (A) Auto Sheet Feeder lamp (B) Paper Feed Switch (C) Cassette lamp Note Press the Paper Feed Switch to change the paper source. Confirm the setting in ...
Press the Paper Feed Switch to select the paper source so that the location where you have loaded paper is selected for Paper Source in the printer driver, the Paper Feed Switch on the machine will be disabled when printing. For details on paper source selection using the printer driver, refer to the Printer Driver Guide on page 28. See "Printing with Windows" on page 27 or "Printing with Macintosh" on -screen manual. (A) (B) (C) (A) Auto Sheet Feeder lamp (B) Paper Feed Switch (C) Cassette lamp Note Press the Paper Feed Switch to change the paper source. Confirm the setting in ...
Quick Start Guide
Page 20
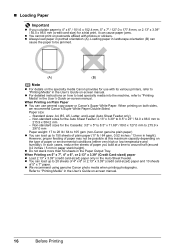
... Important z If you load at this maximum capacity depending on the type of paper may not be jammed. (A) (B) Note z For details on the specialty media Canon provides for the Cassette: 3.5" x 5" to 8.5" x 11.69" / 89.0 x 127.0 mm to 215.9 x 297.0 mm Paper weight: 17 to 28 lb / 64 to 105 gsm (non...-Canon genuine plain paper) z You can load up to 20 sheets of 4" x 6" or 2.13" x 3.39" (credit card-sized) paper and 10 sheets of plain paper (17 ...
... Important z If you load at this maximum capacity depending on the type of paper may not be jammed. (A) (B) Note z For details on the specialty media Canon provides for the Cassette: 3.5" x 5" to 8.5" x 11.69" / 89.0 x 127.0 mm to 215.9 x 297.0 mm Paper weight: 17 to 28 lb / 64 to 105 gsm (non...-Canon genuine plain paper) z You can load up to 20 sheets of 4" x 6" or 2.13" x 3.39" (credit card-sized) paper and 10 sheets of plain paper (17 ...
Quick Start Guide
Page 21
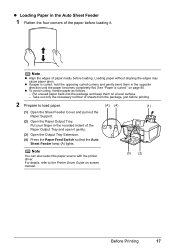
Note z Align the edges of paper neatly before printing. 2 Prepare to the Printer Driver Guide on a level surface. - Loading paper without aligning the edges may cause paper jams. z If paper is curled." z To avoid curling, handle paper as follows. - Take out only the necessary number of sheets from the package, just before loading. Put your finger in the opposite direction until the paper becomes completely flat. Put unused paper back into the package and keep them in the rounded indent of the Paper Output Tray and open it . Note You can also select the paper source with the ...
Note z Align the edges of paper neatly before printing. 2 Prepare to the Printer Driver Guide on a level surface. - Loading paper without aligning the edges may cause paper jams. z If paper is curled." z To avoid curling, handle paper as follows. - Take out only the necessary number of sheets from the package, just before loading. Put your finger in the opposite direction until the paper becomes completely flat. Put unused paper back into the package and keep them in the rounded indent of the Paper Output Tray and open it . Note You can also select the paper source with the ...
Quick Start Guide
Page 22
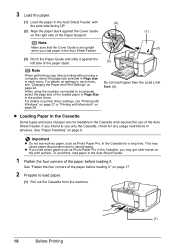
Do not load higher than the Load Limit Mark (A). If you load paper in the Auto Sheet Feeder. (1) (2) (3) Pinch the Paper Guide and slide it ." See "Paper Handling" on page 8. z Loading Paper in the Cassette Some types and sizes of the Auto Sheet Feeder. Note Make sure that the Cover Guide is set upright when you intend to natural aging. This may get roller traces on the print surface. z If you may cause paper discoloration due to use of paper are not loadable in advance. For details on settings in each menu. When using a computer, select the page size selected in...
Do not load higher than the Load Limit Mark (A). If you load paper in the Auto Sheet Feeder. (1) (2) (3) Pinch the Paper Guide and slide it ." See "Paper Handling" on page 8. z Loading Paper in the Cassette Some types and sizes of the Auto Sheet Feeder. Note Make sure that the Cover Guide is set upright when you intend to natural aging. This may get roller traces on the print surface. z If you may cause paper discoloration due to use of paper are not loadable in advance. For details on settings in each menu. When using a computer, select the page size selected in...