Quick Start Guide
Page 5
...Off 4 Handling the Original Document 6 Loading Printing Paper 8 Changing the Paper and Print Settings ........22 Printing from Your Computer 27 Printing with Windows 27 Printing with Macintosh 28 Scanning Images 29 Scanning Methods 29 Copying 30 Making Copies 30 Using Other Copy Functions 31 Printing from a Memory...the LCD ......71 LCD Cannot Be Seen At All 74 An Unintended Language Is Displayed on the LCD 74 Cannot Install the MP Drivers 74 Cannot Connect to Computer Properly ........ 76 Print Results Not Satisfactory 77 Printing Does Not Start 81 Paper Does Not Feed Properly ...
...Off 4 Handling the Original Document 6 Loading Printing Paper 8 Changing the Paper and Print Settings ........22 Printing from Your Computer 27 Printing with Windows 27 Printing with Macintosh 28 Scanning Images 29 Scanning Methods 29 Copying 30 Making Copies 30 Using Other Copy Functions 31 Printing from a Memory...the LCD ......71 LCD Cannot Be Seen At All 74 An Unintended Language Is Displayed on the LCD 74 Cannot Install the MP Drivers 74 Cannot Connect to Computer Properly ........ 76 Print Results Not Satisfactory 77 Printing Does Not Start 81 Paper Does Not Feed Properly ...
Quick Start Guide
Page 19
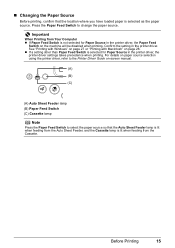
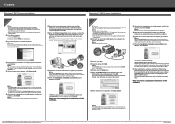
... the Cassette lamp is lit when feeding from Your Computer z If Paper Feed Switch is not selected for Paper Source in the printer driver, the Paper Feed Switch on the machine will be disabled when printing. Important When Printing from the Cassette. Before Printing 15 z If... a setting other than Paper Feed Switch is selected as the paper source. See "Printing with Windows" on page 27 or "Printing with Macintosh" on -screen manual. (A) (B) (C) (A) Auto Sheet Feeder lamp (B) Paper Feed Switch (C) Cassette lamp Note...
... the Cassette lamp is lit when feeding from Your Computer z If Paper Feed Switch is not selected for Paper Source in the printer driver, the Paper Feed Switch on the machine will be disabled when printing. Important When Printing from the Cassette. Before Printing 15 z If... a setting other than Paper Feed Switch is selected as the paper source. See "Printing with Windows" on page 27 or "Printing with Macintosh" on -screen manual. (A) (B) (C) (A) Auto Sheet Feeder lamp (B) Paper Feed Switch (C) Cassette lamp Note...
Quick Start Guide
Page 22
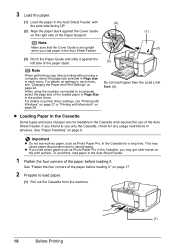
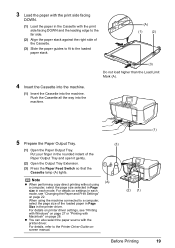
For details on settings in each menu. Do not load higher than the Load Limit Mark (A). on page 22. For details on printer driver settings, see "Changing the Paper and Print Settings" on page 17. 2 Prepare to a computer, select the page size of the paper before loading it. See... the Auto Sheet Feeder with Macintosh" on page 8. When using a computer, select the page size selected in Page size in each menu, see "Printing with Windows" on page 27 or "Printing with (A) the print side facing UP. (2) Align the paper stack against the left side of the paper stack. (3) Note...
For details on settings in each menu. Do not load higher than the Load Limit Mark (A). on page 22. For details on printer driver settings, see "Changing the Paper and Print Settings" on page 17. 2 Prepare to a computer, select the page size of the paper before loading it. See... the Auto Sheet Feeder with Macintosh" on page 8. When using a computer, select the page size selected in Page size in each menu, see "Printing with Windows" on page 27 or "Printing with (A) the print side facing UP. (2) Align the paper stack against the left side of the paper stack. (3) Note...
Quick Start Guide
Page 23
For details on printer driver settings, see "Changing the Paper and Print Settings" on page 22. For details, refer to the loaded paper stack. (A) (1) ...loaded paper in Page Size in the printer driver. z You can also select the paper source with the printer driver. When using a computer, select the page size selected in Page size in each mode, see "Printing with Windows" on page 27 or "Printing with Macintosh... stack against the right side of the Cassette. (3) Slide the paper guides to fit to the Printer Driver Guide onscreen manual. (3) (A) (2) (1) Before Printing (1) 19
For details on printer driver settings, see "Changing the Paper and Print Settings" on page 22. For details, refer to the loaded paper stack. (A) (1) ...loaded paper in Page Size in the printer driver. z You can also select the paper source with the printer driver. When using a computer, select the page size selected in Page size in each mode, see "Printing with Windows" on page 27 or "Printing with Macintosh... stack against the right side of the Cassette. (3) Slide the paper guides to fit to the Printer Driver Guide onscreen manual. (3) (A) (2) (1) Before Printing (1) 19
Quick Start Guide
Page 24
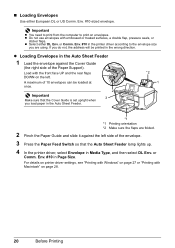
... If you do not, the address will be loaded at once. For details on printer driver settings, see "Printing with Windows" on envelopes. Env. #10-sized envelope. z Loading Envelopes in the printer driver according to print on page 27 or "Printing with embossed or treated surfaces, a double flap... of 10 envelopes can be printed in Page Size. or Comm. Important Make sure that the Auto Sheet Feeder lamp lights up. 4 In the printer driver, select Envelope in the Auto Sheet Feeder. 2 3 *2 1 *1 *1 Printing orientation *2 Make sure the flaps are using. Important z You need ...
... If you do not, the address will be loaded at once. For details on printer driver settings, see "Printing with Windows" on envelopes. Env. #10-sized envelope. z Loading Envelopes in the printer driver according to print on page 27 or "Printing with embossed or treated surfaces, a double flap... of 10 envelopes can be printed in Page Size. or Comm. Important Make sure that the Auto Sheet Feeder lamp lights up. 4 In the printer driver, select Envelope in the Auto Sheet Feeder. 2 3 *2 1 *1 *1 Printing orientation *2 Make sure the flaps are using. Important z You need ...
Quick Start Guide
Page 25
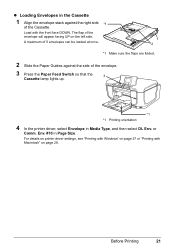
...the right side *1 of the envelope. 3 Press the Paper Feed Switch so that the 3 Cassette lamp lights up. *1 *1 Printing orientation 4 In the printer driver, select Envelope in Page Size. Env. #10 in Media Type, and then select DL Env. z Loading Envelopes in the Cassette 1 Align the envelope stack ...against the side of the Cassette. For details on printer driver settings, see "Printing with Windows" on page 27 or "Printing with the front face DOWN. Load with Macintosh" on the left side.
...the right side *1 of the envelope. 3 Press the Paper Feed Switch so that the 3 Cassette lamp lights up. *1 *1 Printing orientation 4 In the printer driver, select Envelope in Page Size. Env. #10 in Media Type, and then select DL Env. z Loading Envelopes in the Cassette 1 Align the envelope stack ...against the side of the Cassette. For details on printer driver settings, see "Printing with Windows" on page 27 or "Printing with the front face DOWN. Load with Macintosh" on the left side.
Quick Start Guide
Page 31
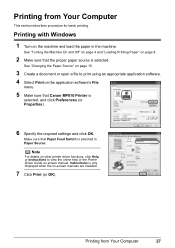
... 3 Create a document or open a file to view the online help or the Printer Driver Guide on -screen manuals are installed. 7 Click Print (or OK). Note For details on other printer driver functions, click Help or Instructions to print using an appropriate application software. 4 Select Print on... Printing Paper" on the machine and load the paper in Paper Source. Instructions is selected in the machine. Printing with Windows 1 Turn on page 8. 2 Make sure that Canon MP810 Printer is selected. Make sure that Paper Feed Switch is only displayed when the on -screen manual.
... 3 Create a document or open a file to view the online help or the Printer Driver Guide on -screen manuals are installed. 7 Click Print (or OK). Note For details on other printer driver functions, click Help or Instructions to print using an appropriate application software. 4 Select Print on... Printing Paper" on the machine and load the paper in Paper Source. Instructions is selected in the machine. Printing with Windows 1 Turn on page 8. 2 Make sure that Canon MP810 Printer is selected. Make sure that Paper Feed Switch is only displayed when the on -screen manual.
Quick Start Guide
Page 74
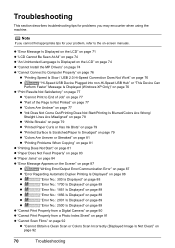
... 71 z "LCD Cannot Be Seen At All" on page 74 z "An Unintended Language Is Displayed on the LCD" on page 74 z "Cannot Install the MP Drivers" on page 74 z "Cannot Connect to Computer Properly" on page 76 z "Printing Speed Is Slow / USB 2.0 Hi-Speed Connection Does Not Work" on page... 76 z ""Hi-Speed USB Device Plugged into non-Hi-Speed USB Hub" or "This Device Can Perform Faster" Message Is Displayed (Windows XP Only)" on page 76 z "Print Results Not Satisfactory" on page 77 z "Cannot Print to the on page 92 70 Troubleshooting Troubleshooting This section describes...
... 71 z "LCD Cannot Be Seen At All" on page 74 z "An Unintended Language Is Displayed on the LCD" on page 74 z "Cannot Install the MP Drivers" on page 74 z "Cannot Connect to Computer Properly" on page 76 z "Printing Speed Is Slow / USB 2.0 Hi-Speed Connection Does Not Work" on page... 76 z ""Hi-Speed USB Device Plugged into non-Hi-Speed USB Hub" or "This Device Can Perform Faster" Message Is Displayed (Windows XP Only)" on page 76 z "Print Results Not Satisfactory" on page 77 z "Cannot Print to the on page 92 70 Troubleshooting Troubleshooting This section describes...
Quick Start Guide
Page 79
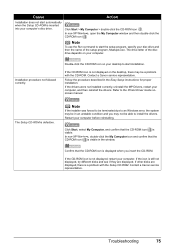
...> My Computer > double-click the CD-ROM icon . If the drivers were not installed correctly, uninstall the MP Drivers, restart your computer before reinstalling. Contact a Canon service representative. Note To use the Run command to an Windows error, the system may not be in the Easy Setup Instructions for ... be able to the Printer Driver Guide onscreen manual. Troubleshooting 75 If the icon is still not displayed, try different disks and see if they are displayed, there is inserted into your computer. In non-XP Windows, open the My Computer window and then double-click the ...
...> My Computer > double-click the CD-ROM icon . If the drivers were not installed correctly, uninstall the MP Drivers, restart your computer before reinstalling. Contact a Canon service representative. Note To use the Run command to an Windows error, the system may not be in the Easy Setup Instructions for ... be able to the Printer Driver Guide onscreen manual. Troubleshooting 75 If the icon is still not displayed, try different disks and see if they are displayed, there is inserted into your computer. In non-XP Windows, open the My Computer window and then double-click the ...
Quick Start Guide
Page 80
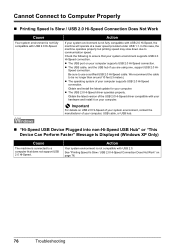
... hub. „ "Hi-Speed USB Device Plugged into non-Hi-Speed USB Hub" or "This Device Can Perform Faster" Message Is Displayed (Windows XP Only) Cause The machine is not fully compatible with USB 2.0 Hi-Speed, the machine will operate at a lower speed provided under USB ...76 Troubleshooting Speed connection. Obtain the latest version of the USB 2.0 Hi-Speed driver compatible with USB 2.0. Cannot Connect to be no longer than around 10 feet (3 meters). z The USB 2.0 Hi-Speed driver operates properly. In this case, the machine operates properly but printing speed may slow...
... hub. „ "Hi-Speed USB Device Plugged into non-Hi-Speed USB Hub" or "This Device Can Perform Faster" Message Is Displayed (Windows XP Only) Cause The machine is not fully compatible with USB 2.0 Hi-Speed, the machine will operate at a lower speed provided under USB ...76 Troubleshooting Speed connection. Obtain the latest version of the USB 2.0 Hi-Speed driver compatible with USB 2.0. Cannot Connect to be no longer than around 10 feet (3 meters). z The USB 2.0 Hi-Speed driver operates properly. In this case, the machine operates properly but printing speed may slow...
Quick Start Guide
Page 81
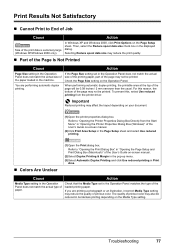
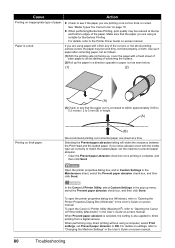
...narrower than the usual. When performing automatic duplex printing, the printable area at the top of the print data is extremely large (Windows XP/Windows 2000 only). Important Reduced printing may reduce the quality of the User's Guide on-screen manual. (2)Select Duplex Printing & Margin in... duplex printing. Refer to "Opening the Printer Properties Dialog Box Directly from the printer driver. Check that the Media Type set in "Opening the Printer Properties Dialog Box (Windows)" of printout color may not be reduced in Print Area. Selecting Reduce spool data ...
...narrower than the usual. When performing automatic duplex printing, the printable area at the top of the print data is extremely large (Windows XP/Windows 2000 only). Important Reduced printing may reduce the quality of the User's Guide on-screen manual. (2)Select Duplex Printing & Margin in... duplex printing. Refer to "Opening the Printer Properties Dialog Box Directly from the printer driver. Check that the Media Type set in "Opening the Printer Properties Dialog Box (Windows)" of printout color may not be reduced in Print Area. Selecting Reduce spool data ...
Quick Start Guide
Page 84
...complete, and then click Send. When performing copy direct printing without using a computer, select Print settings, set the machine to the Printer Driver Guide on-screen manual. For details on settings, refer to ON. Cause Action Printing on inappropriate type of the paper. z When ...on-screen manual. 80 Troubleshooting z Check to "Opening the Printer Properties Dialog Box (Windows)" in the Maintenance sheet, select the Prevent paper abrasion check box, and then click Send. To open the Canon IJ Printer Utility (Macintosh®), refer to direct printing from a digital camera. ...
...complete, and then click Send. When performing copy direct printing without using a computer, select Print settings, set the machine to the Printer Driver Guide on-screen manual. For details on settings, refer to ON. Cause Action Printing on inappropriate type of the paper. z When ...on-screen manual. 80 Troubleshooting z Check to "Opening the Printer Properties Dialog Box (Windows)" in the Maintenance sheet, select the Prevent paper abrasion check box, and then click Send. To open the Canon IJ Printer Utility (Macintosh®), refer to direct printing from a digital camera. ...
Quick Start Guide
Page 91
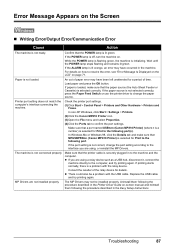
... not match the computer's interface connecting the machine. z If you are not installed properly. z There could also be installed properly. MP Drivers are using a relay device such as a USB hub, disconnect it, connect the machine directly to the following port(s). While the POWER lamp... an error may have been left unattended for Print to the computer, and try printing again. In non-XP Windows, click Start > Settings > Printers. (2)Click the Canon MP810 Printer icon. (3)Open the File menu and select Properties. (4)Click the Ports tab to the machine and the computer...
... not match the computer's interface connecting the machine. z If you are not installed properly. z There could also be installed properly. MP Drivers are using a relay device such as a USB hub, disconnect it, connect the machine directly to the following port(s). While the POWER lamp... an error may have been left unattended for Print to the computer, and try printing again. In non-XP Windows, click Start > Settings > Printers. (2)Click the Canon MP810 Printer icon. (3)Open the File menu and select Properties. (4)Click the Ports tab to the machine and the computer...
Quick Start Guide
Page 92
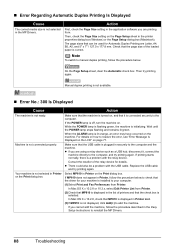
.... z If you are printing from Printer. (2)Check that MP810 is displayed in the MP Drivers. In Mac OS X v.10.2.8 or 10.3.x, select Edit Printer List from . Check that the driver for your machine is connected securely to the computer, and ... is off, turn the machine on page 71. The page sizes that the check box is correct. Select MP810 in Printer on the Page Setup sheet in the application software you cannot add the machine, follow the procedure below... First, check the Page Size setting in the printer properties dialog box (Windows) or the Page Setup dialog box (Macintosh).
.... z If you are printing from Printer. (2)Check that MP810 is displayed in the MP Drivers. In Mac OS X v.10.2.8 or 10.3.x, select Edit Printer List from . Check that the driver for your machine is connected securely to the computer, and ... is off, turn the machine on page 71. The page sizes that the check box is correct. Select MP810 in Printer on the Page Setup sheet in the application software you cannot add the machine, follow the procedure below... First, check the Page Size setting in the printer properties dialog box (Windows) or the Page Setup dialog box (Macintosh).
Quick Start Guide
Page 98
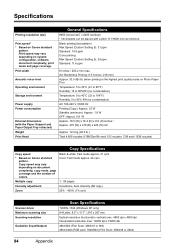
Specifications Printing resolution (dpi) Print speed* * Based on Canon standard pattern. Black printing (text pattern) Max Speed (Custom Setting 5): 31 ppm Standard: 14.8 ppm Color printing Max Speed (Custom Setting 5): 24 ppm ... 24 cpm Multiple copy 1 - 99 pages Intensity adjustment 9 positions, Auto intensity (AE copy) Zoom 25% - 400% (1% unit) Scanner driver Maximum scanning size Scanning resolution Gradation (Input/Output) Scan Specifications TWAIN / WIA (Windows XP only) A4/Letter, 8.5" x 11.7" / 216 x 297 mm Optical resolution (horizontal x vertical) max: 4800 dpi x 4800 dpi ...
Specifications Printing resolution (dpi) Print speed* * Based on Canon standard pattern. Black printing (text pattern) Max Speed (Custom Setting 5): 31 ppm Standard: 14.8 ppm Color printing Max Speed (Custom Setting 5): 24 ppm ... 24 cpm Multiple copy 1 - 99 pages Intensity adjustment 9 positions, Auto intensity (AE copy) Zoom 25% - 400% (1% unit) Scanner driver Maximum scanning size Scanning resolution Gradation (Input/Output) Scan Specifications TWAIN / WIA (Windows XP only) A4/Letter, 8.5" x 11.7" / 216 x 297 mm Optical resolution (horizontal x vertical) max: 4800 dpi x 4800 dpi ...
Easy Setup Instructions
Page 2
... shown in Thailand. Adobe and Adobe RGB (1998) are using . • For Windows XP or Windows 2000, log on the inside of the software. Windows® MP Drivers Installation Macintosh® MP Drivers Installation Windows Note • The screens below refer to restart your computer appears, click OK. b...3 minuets, refer to install the MP Drivers, on -screen instructions to add the device. For more detailed instructions, refer to register your confirmation to Mac OS X v.10.4.x installation. QT5-0786-V01 © 2006 Canon Inc. Printed in Printer List. Important If...
... shown in Thailand. Adobe and Adobe RGB (1998) are using . • For Windows XP or Windows 2000, log on the inside of the software. Windows® MP Drivers Installation Macintosh® MP Drivers Installation Windows Note • The screens below refer to restart your computer appears, click OK. b...3 minuets, refer to install the MP Drivers, on -screen instructions to add the device. For more detailed instructions, refer to register your confirmation to Mac OS X v.10.4.x installation. QT5-0786-V01 © 2006 Canon Inc. Printed in Printer List. Important If...


