User's Guide
Page 2
...environment, the place to your product's 1 year limited warranty period. Email Tech Support - CarePAK offers toll-free Canon technical support and includes Canon's superb InstantExchange product replacement program. For further information about extending your product's warranty period. Internet - www.canontechsupport....product information, and "where to three full years of the product Setup CD-ROM number (located on the CD-ROM Purchase Date Customer Technical Support Sequence* 1. www.canonesp.com Canon CarePAK Extended Service Plan is available at www.canontechsupport.com. * ...
...environment, the place to your product's 1 year limited warranty period. Email Tech Support - CarePAK offers toll-free Canon technical support and includes Canon's superb InstantExchange product replacement program. For further information about extending your product's warranty period. Internet - www.canontechsupport....product information, and "where to three full years of the product Setup CD-ROM number (located on the CD-ROM Purchase Date Customer Technical Support Sequence* 1. www.canonesp.com Canon CarePAK Extended Service Plan is available at www.canontechsupport.com. * ...
User's Guide
Page 6
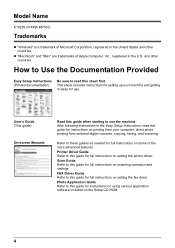
...registered in the United States and other countries. Model Name K10269 (PIXMA MP530) Trademarks z "Windows" is a trademark of Microsoft Corporation, registered in the U.S. How to Use the Documentation Provided Easy Setup Instructions (Printed documentation) Be sure to this sheet first. After ...following instructions in the Easy Setup Instructions, read this guide for full instructions on printing from your machine ...
...registered in the United States and other countries. Model Name K10269 (PIXMA MP530) Trademarks z "Windows" is a trademark of Microsoft Corporation, registered in the U.S. How to Use the Documentation Provided Easy Setup Instructions (Printed documentation) Be sure to this sheet first. After ...following instructions in the Easy Setup Instructions, read this guide for full instructions on printing from your machine ...
User's Guide
Page 17
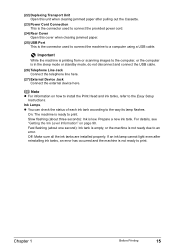
... on page 98. For details, see "Getting the Ink Level Information" on how to install the Print Head and ink tanks, refer to the Easy Setup Instructions. Fast flashing (about three seconds): Ink is not ready due to an error. (22) Duplexing Transport Unit Open this unit when clearing jammed paper...
... on page 98. For details, see "Getting the Ink Level Information" on how to install the Print Head and ink tanks, refer to the Easy Setup Instructions. Fast flashing (about three seconds): Ink is not ready due to an error. (22) Duplexing Transport Unit Open this unit when clearing jammed paper...
User's Guide
Page 20
Note If preparatory operations above are not yet finished, follow the Easy Setup Instructions to print. z The machine goes into the Power Saver Mode as follows: 18 Before Printing Chapter 1 Note The power cannot be turned OFF while ...
Note If preparatory operations above are not yet finished, follow the Easy Setup Instructions to print. z The machine goes into the Power Saver Mode as follows: 18 Before Printing Chapter 1 Note The power cannot be turned OFF while ...
User's Guide
Page 25
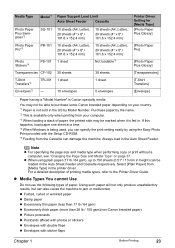
... than 17 lb / 64 gsm) z Excessively thick paper (more than 28 lb / 105 gsm)(non-Canon branded paper) z Picture postcards z Postcards affixed with photos or stickers z Envelopes with double flaps z Envelopes with the Setup CD-ROM. *5 Feeding from [Media Type] in the Auto Sheet Feeder. Media Type Model*1 Paper Support... not sold in the US by using plain paper (17 lb / 64 gsm), up to purchase some Canon branded paper depending on page 37. You may be marked when it is Canon specialty media. Select [Plain Paper] from the Cassette can also cause the machine to the Printer Driver Guide...
... than 17 lb / 64 gsm) z Excessively thick paper (more than 28 lb / 105 gsm)(non-Canon branded paper) z Picture postcards z Postcards affixed with photos or stickers z Envelopes with double flaps z Envelopes with the Setup CD-ROM. *5 Feeding from [Media Type] in the Auto Sheet Feeder. Media Type Model*1 Paper Support... not sold in the US by using plain paper (17 lb / 64 gsm), up to purchase some Canon branded paper depending on page 37. You may be marked when it is Canon specialty media. Select [Plain Paper] from the Cassette can also cause the machine to the Printer Driver Guide...
User's Guide
Page 31
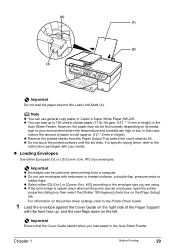
... printing onto special envelopes, open the printer properties dialog box then select the [Rotate 180 degrees] check box on the [Page Setup] tab. z Do not use general copy paper or Canon's Super White Paper SW-201. z Loading Envelopes Use either [DL Env.] or [Comm. For information on the printer driver settings, refer...
... printing onto special envelopes, open the printer properties dialog box then select the [Rotate 180 degrees] check box on the [Page Setup] tab. z Do not use general copy paper or Canon's Super White Paper SW-201. z Loading Envelopes Use either [DL Env.] or [Comm. For information on the printer driver settings, refer...
User's Guide
Page 36
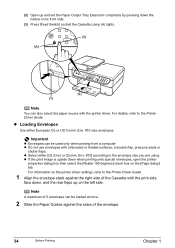
... by pressing down when printing onto special envelopes, open the printer properties dialog box then select the [Rotate 180 degrees] check box on the [Page Setup] tab. Important z Envelopes can also select the paper source with embossed or treated surfaces, a double flap, pressure seals or sticker flaps. z Loading Envelopes Use either...
... by pressing down when printing onto special envelopes, open the printer properties dialog box then select the [Rotate 180 degrees] check box on the [Page Setup] tab. Important z Envelopes can also select the paper source with embossed or treated surfaces, a double flap, pressure seals or sticker flaps. z Loading Envelopes Use either...
User's Guide
Page 56
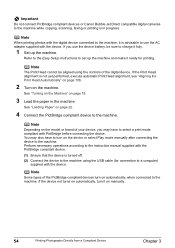
Important Do not connect PictBridge compliant devices or Canon Bubble Jet Direct compatible digital cameras to a computer) supplied with the device. If you use the AC adapter supplied with the PictBridge compliant device. (1) Ensure ... connecting the device. You may have to the machine. Perform necessary operations according to the instruction manual supplied with the device. Refer to the Easy Setup Instructions to set up the machine. See "Loading Paper" on manually. 54 Printing Photographs Directly from a Compliant Device Chapter 3 Note The Print Head cannot be...
Important Do not connect PictBridge compliant devices or Canon Bubble Jet Direct compatible digital cameras to a computer) supplied with the device. If you use the AC adapter supplied with the PictBridge compliant device. (1) Ensure ... connecting the device. You may have to the machine. Perform necessary operations according to the instruction manual supplied with the device. Refer to the Easy Setup Instructions to set up the machine. See "Loading Paper" on manually. 54 Printing Photographs Directly from a Compliant Device Chapter 3 Note The Print Head cannot be...
User's Guide
Page 57
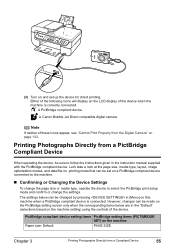
... compliant device is correctly connected. (3) Turn on the machine Paper size: Default PAGE SIZE Chapter 3 Printing Photographs Directly from a Compliant Device 55 A Canon Bubble Jet Direct compatible digital camera. Either of the device. A PictBridge compliant device. Let's take a look at the page size, media type, layout... can be made on the PictBridge setting screen only when the corresponding items below can be sure to select the PictBridge print setup mode and confirm or change the page size or media type, operate the device to follow the instructions given in the instruction...
... compliant device is correctly connected. (3) Turn on the machine Paper size: Default PAGE SIZE Chapter 3 Printing Photographs Directly from a Compliant Device 55 A Canon Bubble Jet Direct compatible digital camera. Either of the device. A PictBridge compliant device. Let's take a look at the page size, media type, layout... can be made on the PictBridge setting screen only when the corresponding items below can be sure to select the PictBridge print setup mode and confirm or change the page size or media type, operate the device to follow the instructions given in the instruction...
User's Guide
Page 88
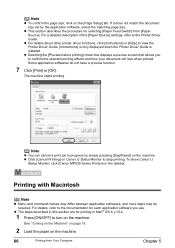
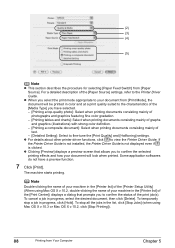
...look when printed. z Selecting the [Preview before printing] check box displays a preview screen that allows you use. To show Canon IJ Status Monitor, click [Canon MP530 Series Printer] on the machine. 86 Printing from [Paper Source]. z This section describes the procedure for selecting [Paper Feed...displayed when the Printer Driver Guide is installed. z Click [Cancel Printing] on the [Page Setup] tab. The machine starts printing. Note z To confirm the page size, click on Canon IJ Status Monitor to the documentation for each application software you to the Printer Driver Guide....
...look when printed. z Selecting the [Preview before printing] check box displays a preview screen that allows you use. To show Canon IJ Status Monitor, click [Canon MP530 Series Printer] on the machine. 86 Printing from [Paper Source]. z This section describes the procedure for selecting [Paper Feed...displayed when the Printer Driver Guide is installed. z Click [Cancel Printing] on the [Page Setup] tab. The machine starts printing. Note z To confirm the page size, click on Canon IJ Status Monitor to the documentation for each application software you to the Printer Driver Guide....
User's Guide
Page 89
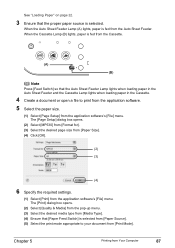
... media type from [Media Type]. (4) Ensure that the proper paper source is selected. Chapter 5 Printing from the application software's [File] menu. The [Page Setup] dialog box opens. (2) Select [MP530] from [Format for]. (3) Select the desired page size from [Paper Size]. (4) Click [OK]. (2) (3) (4) 6 Specify the required settings. (1) Select [Print] from Your Computer 87... [Paper Feed Switch] is selected from [Paper Source]. (5) Select the print mode appropriate to print from the application software. 5 Select the paper size. (1) Select [Page Setup] from the Auto Sheet Feeder.
... media type from [Media Type]. (4) Ensure that the proper paper source is selected. Chapter 5 Printing from the application software's [File] menu. The [Page Setup] dialog box opens. (2) Select [MP530] from [Format for]. (3) Select the desired page size from [Paper Size]. (4) Click [OK]. (2) (3) (4) 6 Specify the required settings. (1) Select [Print] from Your Computer 87... [Paper Feed Switch] is selected from [Paper Source]. (5) Select the print mode appropriate to print from the application software. 5 Select the paper size. (1) Select [Page Setup] from the Auto Sheet Feeder.
User's Guide
Page 90
... effects and how your machine in the [Printer list] of the [Print Center]) displays a dialog that allows you to confirm the status of the [Printer Setup Utility] (When using Mac OS X v.10.3 or Mac OS X v.10.2, click [Stop Printing]). 88 Printing from [Paper Source].
... effects and how your machine in the [Printer list] of the [Print Center]) displays a dialog that allows you to confirm the status of the [Printer Setup Utility] (When using Mac OS X v.10.3 or Mac OS X v.10.2, click [Stop Printing]). 88 Printing from [Paper Source].
User's Guide
Page 91
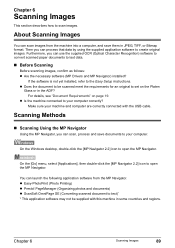
... with this machine in the ADF? z Easy-PhotoPrint (Photo Printing) z Presto! PageManager (Organizing photos and documents) z ScanSoft OmniPage SE (Converting scanned document to the Easy Setup Instructions. Chapter 6 Scanning Images This section describes how to create original images. If the software is not yet installed, refer to text)* * This application software...
... with this machine in the ADF? z Easy-PhotoPrint (Photo Printing) z Presto! PageManager (Organizing photos and documents) z ScanSoft OmniPage SE (Converting scanned document to the Easy Setup Instructions. Chapter 6 Scanning Images This section describes how to create original images. If the software is not yet installed, refer to text)* * This application software...
User's Guide
Page 115
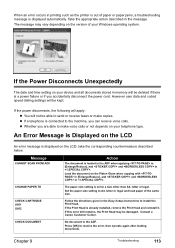
.... CHECK DOCUMENT No document in the message. z Whether you are able to make copies. Follow the directions given in the Easy Setup Instructions to resolve the error, then operate again after loading documents. The message may be able to the machine, you accidentally disconnect... the power cord. Contact a Canon Customer Center. Chapter 9 Troubleshooting 113 If the Power Disconnects Unexpectedly The date and time setting on the LCD An error message is connected...
.... CHECK DOCUMENT No document in the message. z Whether you are able to make copies. Follow the directions given in the Easy Setup Instructions to resolve the error, then operate again after loading documents. The message may be able to the machine, you accidentally disconnect... the power cord. Contact a Canon Customer Center. Chapter 9 Troubleshooting 113 If the Power Disconnects Unexpectedly The date and time setting on the LCD An error message is connected...
User's Guide
Page 123
.... 5. Click [Display Print Queue]. 4. The machine has been printing continuously over a long period. Chapter 9 Troubleshooting 121 Use Canon IJ Status Monitor in Windows or Printer Setup Utility (or Print Center) in the [Printer] menu. If you are printing a document with a large printing area (with ...is deleted. 1. Select [Cancel All Documents] in progress. If so, the Print Head will appear to have stopped depending on the [Page Setup] tab in the machine: z Check the page size setting from within your computer. Click the [Maintenance] tab and then [View Printer Status...
.... 5. Click [Display Print Queue]. 4. The machine has been printing continuously over a long period. Chapter 9 Troubleshooting 121 Use Canon IJ Status Monitor in Windows or Printer Setup Utility (or Print Center) in the [Printer] menu. If you are printing a document with a large printing area (with ...is deleted. 1. Select [Cancel All Documents] in progress. If so, the Print Head will appear to have stopped depending on the [Page Setup] tab in the machine: z Check the page size setting from within your computer. Click the [Maintenance] tab and then [View Printer Status...
User's Guide
Page 124
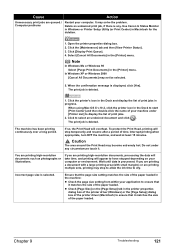
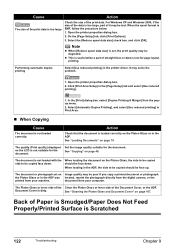
...on the Platen Glass or in the ADF, the side to be face up. Performing automatic duplex printing Select [Use reduced printing] in the [Page Setup] tab and select [Use reduced printing]. 1. Open the printer properties dialog box. 2. Action Check that the document is set on page 19. ... Smudged/Paper Does Not Feed Properly/Printed Surface is not suitable for page layout printing. It may be lost for the document. Click [Print Area Setup] in the printer driver. In the [Print] dialog box, select [Duplex Printing & Margin] from your computer. See "Loading Documents" on Image ...
...on the Platen Glass or in the ADF, the side to be face up. Performing automatic duplex printing Select [Use reduced printing] in the [Page Setup] tab and select [Use reduced printing]. 1. Open the printer properties dialog box. 2. Action Check that the document is set on page 19. ... Smudged/Paper Does Not Feed Properly/Printed Surface is not suitable for page layout printing. It may be lost for the document. Click [Print Area Setup] in the printer driver. In the [Print] dialog box, select [Duplex Printing & Margin] from your computer. See "Loading Documents" on Image ...

User's Guide
Page 136
... Head according to hold the ink used during Print Head cleaning, for example. The machine has a built-in waste ink absorber to the Easy Setup Instructions. You will need to replace a particular part of an ink lamp indicates that is low. Error Message On Camera No paper/Paper Error ...Paper jam Action z Load paper in either the Auto Sheet Feeder or Cassette which you are recommended to contact the Canon Customer Care Center as early as possible. You can continue printing by the camera. However, because printing is disabled once the waste ink absorber...
... Head according to hold the ink used during Print Head cleaning, for example. The machine has a built-in waste ink absorber to the Easy Setup Instructions. You will need to replace a particular part of an ink lamp indicates that is low. Error Message On Camera No paper/Paper Error ...Paper jam Action z Load paper in either the Auto Sheet Feeder or Cassette which you are recommended to contact the Canon Customer Care Center as early as possible. You can continue printing by the camera. However, because printing is disabled once the waste ink absorber...
User's Guide
Page 138
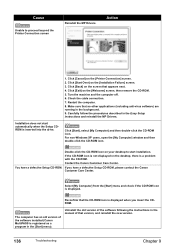
... 136 Troubleshooting Chapter 9 If the CD-ROM icon is not displayed on the [Printer Connection] screen. 2. You have a defective Setup CD-ROM, please contact the Canon Customer Care Center. Select [My Computer] from the [Start] menu and check if the CD-ROM icon is displayed when you ...have a defective Setup CD-ROM. Click [Cancel] on the desktop, there is registered as a program in the [Start] menu). Click [Start Over] on your desktop to proceed beyond the Printer Connection screen Reinstall the MP Drivers. Check the cable connection. 7. Contact the Canon Customer Care Center....
... 136 Troubleshooting Chapter 9 If the CD-ROM icon is not displayed on the [Printer Connection] screen. 2. You have a defective Setup CD-ROM, please contact the Canon Customer Care Center. Select [My Computer] from the [Start] menu and check if the CD-ROM icon is displayed when you ...have a defective Setup CD-ROM. Click [Cancel] on the desktop, there is registered as a program in the [Start] menu). Click [Start Over] on your desktop to proceed beyond the Printer Connection screen Reinstall the MP Drivers. Check the cable connection. 7. Contact the Canon Customer Care Center....
User's Guide
Page 139
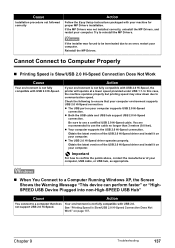
... operates properly. Chapter 9 Troubleshooting 137 Important For how to use a certified USB 2.0 Hi-Speed cable. Cause Installation procedure not followed correctly Action Follow the Easy Setup Instructions packaged with your computer. Check the following to communication speed. not support USB 2.0 Hi-Speed.
... operates properly. Chapter 9 Troubleshooting 137 Important For how to use a certified USB 2.0 Hi-Speed cable. Cause Installation procedure not followed correctly Action Follow the Easy Setup Instructions packaged with your computer. Check the following to communication speed. not support USB 2.0 Hi-Speed.
User's Guide
Page 140
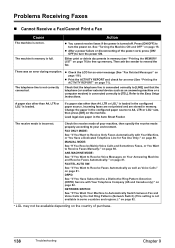
... Machine and Receive Faxes Automatically:" on page 118). The receive mode is not correctly connected. ANS.MACHINE MODE: See "If You Want to the Easy Setup Instructions. The telephone line is incorrect. There was an error during reception. z Print the ACTIVITY REPORT and check for an error message (See "Fax Related...
... Machine and Receive Faxes Automatically:" on page 118). The receive mode is not correctly connected. ANS.MACHINE MODE: See "If You Want to the Easy Setup Instructions. The telephone line is incorrect. There was an error during reception. z Print the ACTIVITY REPORT and check for an error message (See "Fax Related...


