
MP470 series Quick Start Guide
Page 17
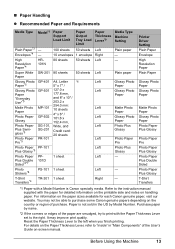
... Sided*4*7 1 sheet Left - Refer to the right. Printer Driver Setting Plain Paper Envelope High Resolution Paper Plain Paper... Photo Paper Plus Double Sided Photo Paper Plus Glossy T-Shirt Transfers *1 Paper with the paper for each Canon genuine paper, visit our website. High HR- 80 sheets 50 sheets Left - For information on -screen... manual. Purchase paper by Model Number. Reset the Paper Thickness Lever to purchase some Canon genuine papers depending on handling paper. For details on the Paper Thickness Lever, refer to "Inside" in ...
... Sided*4*7 1 sheet Left - Refer to the right. Printer Driver Setting Plain Paper Envelope High Resolution Paper Plain Paper... Photo Paper Plus Double Sided Photo Paper Plus Glossy T-Shirt Transfers *1 Paper with the paper for each Canon genuine paper, visit our website. High HR- 80 sheets 50 sheets Left - For information on -screen... manual. Purchase paper by Model Number. Reset the Paper Thickness Lever to purchase some Canon genuine papers depending on handling paper. For details on the Paper Thickness Lever, refer to "Inside" in ...
MP470 series Quick Start Guide
Page 19
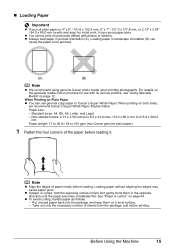
...neatly before loading. Loading paper without aligning the edges may cause paper jams. z If paper is curled." For details on the specialty media Canon provides for a trial print, it . When printing on a level surface. - See "Paper is curled, hold the opposing curled corners and... until the paper becomes completely flat. on postcards affixed with its various printers, see "Using Specialty Media" on Plain Paper z You can cause the paper to be jammed. (A) (B) Note z We recommend using genuine Canon photo media when printing photographs. „ Loading Paper Important z If ...
...neatly before loading. Loading paper without aligning the edges may cause paper jams. z If paper is curled." For details on the specialty media Canon provides for a trial print, it . When printing on a level surface. - See "Paper is curled, hold the opposing curled corners and... until the paper becomes completely flat. on postcards affixed with its various printers, see "Using Specialty Media" on Plain Paper z You can cause the paper to be jammed. (A) (B) Note z We recommend using genuine Canon photo media when printing photographs. „ Loading Paper Important z If ...
MP470 series Quick Start Guide
Page 20
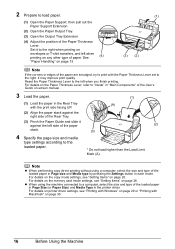
...of the loaded paper in Page Size (or Paper Size) and Media Type in the Rear Tray (A) with Macintosh" on page 26. For details on printer driver settings, see "Setting Items" on page 30. 16 Before Using the Machine For details on the memory card mode settings, see "Printing with ... the right when printing on envelopes or T-shirt transfers, and left when printing on -screen manual. 3 Load the paper. (1) (1) Load the paper in the printer driver. z When using a computer, select the size and type of the loaded paper in Page size and Media type by pressing the Settings button in...
...of the loaded paper in Page Size (or Paper Size) and Media Type in the Rear Tray (A) with Macintosh" on page 26. For details on printer driver settings, see "Setting Items" on page 30. 16 Before Using the Machine For details on the memory card mode settings, see "Printing with ... the right when printing on envelopes or T-shirt transfers, and left when printing on -screen manual. 3 Load the paper. (1) (1) Load the paper in the printer driver. z When using a computer, select the size and type of the loaded paper in Page size and Media type by pressing the Settings button in...
MP470 series Quick Start Guide
Page 22
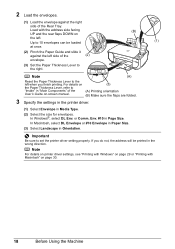
... Select the size for envelopes. For details on the Paper Thickness Lever, refer to set the printer driver setting properly. In Windows®, select DL Env. Note For details on printer driver settings, see "Printing with Windows" on page 29 or "Printing with the address side facing... Orientation. Load with Macintosh" on -screen manual. (3) (A) Printing orientation (B) Make sure the flaps are folded. 3 Specify the settings in the printer driver. (1) Select Envelope in "Main Components" of the User's Guide on page 30. 18 Before Using the Machine If you finish printing.
... Select the size for envelopes. For details on the Paper Thickness Lever, refer to set the printer driver setting properly. In Windows®, select DL Env. Note For details on printer driver settings, see "Printing with Windows" on page 29 or "Printing with the address side facing... Orientation. Load with Macintosh" on -screen manual. (3) (A) Printing orientation (B) Make sure the flaps are folded. 3 Specify the settings in the printer driver. (1) Select Envelope in "Main Components" of the User's Guide on page 30. 18 Before Using the Machine If you finish printing.
MP470 series Quick Start Guide
Page 23
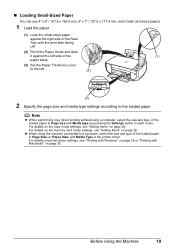
... a computer, select the size and type of the loaded paper in Page Size (or Paper Size) and Media Type in each mode. For details on printer driver settings, see "Setting Items" on page 20. „ Loading Small-Sized Paper You can use 4" x 6" / 101.6 x 152.4 mm, 5" x 7" / 127.0 x 177.8 mm, and Credit card... z When using a computer, select the size and type of the loaded paper in Page size and Media type by pressing the Settings button in the printer driver. Note z When performing copy direct printing without using the machine connected to the loaded paper.
... a computer, select the size and type of the loaded paper in Page Size (or Paper Size) and Media Type in each mode. For details on printer driver settings, see "Setting Items" on page 20. „ Loading Small-Sized Paper You can use 4" x 6" / 101.6 x 152.4 mm, 5" x 7" / 127.0 x 177.8 mm, and Credit card... z When using a computer, select the size and type of the loaded paper in Page size and Media type by pressing the Settings button in the printer driver. Note z When performing copy direct printing without using the machine connected to the loaded paper.
MP470 series Quick Start Guide
Page 33
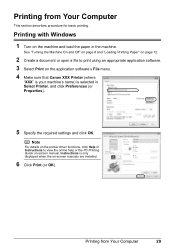
...Printing with Windows 1 Turn on the machine and load the paper in Select Printer, and click Preferences (or Properties). 5 Specify the required settings and click OK. Note For details on the printer driver functions, click Help or Instructions to print using an appropriate application software. ...3 Select Print on the application software's File menu. 4 Make sure that Canon XXX Printer (where "XXX" is your machine's name) is only displayed when the on -screen manual. Printing from Your Computer This section describes...
...Printing with Windows 1 Turn on the machine and load the paper in Select Printer, and click Preferences (or Properties). 5 Specify the required settings and click OK. Note For details on the printer driver functions, click Help or Instructions to print using an appropriate application software. ...3 Select Print on the application software's File menu. 4 Make sure that Canon XXX Printer (where "XXX" is your machine's name) is only displayed when the on -screen manual. Printing from Your Computer This section describes...
MP470 series Quick Start Guide
Page 34
Note For details on the printer driver functions, click to print using an appropriate application software. 3 Select Page Setup on the application software's File menu. 4 Make sure that your machine's name ...
Note For details on the printer driver functions, click to print using an appropriate application software. 3 Select Page Setup on the application software's File menu. 4 Make sure that your machine's name ...
MP470 series Quick Start Guide
Page 42
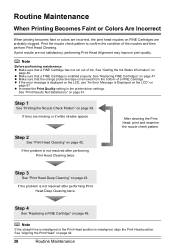
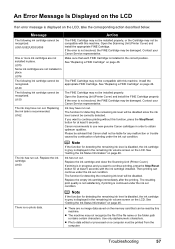
See "Getting the Ink Status Information" on page 42. z Increase the Print Quality setting in the printer driver settings. Step 2 See "Print Head Cleaning" on page 46. Step 1 See "Printing the Nozzle Check Pattern" on page 61. If the problem is removed ...
See "Getting the Ink Status Information" on page 42. z Increase the Print Quality setting in the printer driver settings. Step 2 See "Print Head Cleaning" on page 46. Step 1 See "Printing the Nozzle Check Pattern" on page 61. If the problem is removed ...
MP470 series Quick Start Guide
Page 52
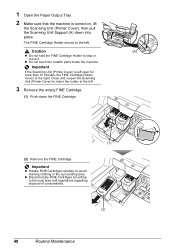
...or the surrounding area. Caution (A) z Do not hold the FINE Cartridge Holder to stop or move it. Close and reopen the Scanning Unit (Printer Cover) to return the holder to the left . The FINE Cartridge Holder moves to the left . 3 Remove the empty FINE Cartridge. (1) Push... down into place. Important If the Scanning Unit (Printer Cover) is turned on, lift the Scanning Unit (Printer Cover), then pull the Scanning Unit Support (A) down the FINE Cartridge. (1) (2) Remove the FINE Cartridge. 1 Open the Paper ...
...or the surrounding area. Caution (A) z Do not hold the FINE Cartridge Holder to stop or move it. Close and reopen the Scanning Unit (Printer Cover) to return the holder to the left . The FINE Cartridge Holder moves to the left . 3 Remove the empty FINE Cartridge. (1) Push... down into place. Important If the Scanning Unit (Printer Cover) is turned on, lift the Scanning Unit (Printer Cover), then pull the Scanning Unit Support (A) down the FINE Cartridge. (1) (2) Remove the FINE Cartridge. 1 Open the Paper ...
MP470 series Quick Start Guide
Page 54
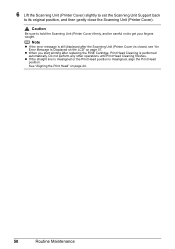
...or the Print Head position is performed automatically. See "Aligning the Print Head" on page 57. z When you start printing after the Scanning Unit (Printer Cover) is closed, see "An Error Message Is Displayed on the LCD" on page 44. 50 Routine Maintenance 6 Lift the Scanning Unit... Unit Support back to get your fingers caught. Caution Be sure to hold the Scanning Unit (Printer Cover) firmly, and be careful not to its original position, and then gently close the Scanning Unit (Printer Cover). Note z If the error message is still displayed after replacing the FINE Cartridge, Print...
...or the Print Head position is performed automatically. See "Aligning the Print Head" on page 57. z When you start printing after the Scanning Unit (Printer Cover) is closed, see "An Error Message Is Displayed on the LCD" on page 44. 50 Routine Maintenance 6 Lift the Scanning Unit... Unit Support back to get your fingers caught. Caution Be sure to hold the Scanning Unit (Printer Cover) firmly, and be careful not to its original position, and then gently close the Scanning Unit (Printer Cover). Note z If the error message is still displayed after replacing the FINE Cartridge, Print...
MP470 series Quick Start Guide
Page 61
... The FINE Cartridge may not be installed properly, or the Cartridge may be recognized. Open the Scanning Unit (Printer Cover) and install the appropriate FINE Cartridge. If the error is recommended. Contact your Canon Service representative. The following ink cartridge cannot be damaged. U140 The FINE Cartridge may be recognized. Install the...
... The FINE Cartridge may not be installed properly, or the Cartridge may be recognized. Open the Scanning Unit (Printer Cover) and install the appropriate FINE Cartridge. If the error is recommended. Contact your Canon Service representative. The following ink cartridge cannot be damaged. U140 The FINE Cartridge may be recognized. Install the...
MP470 series Quick Start Guide
Page 63
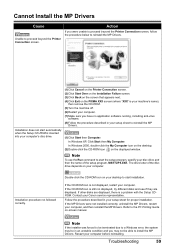
...restart your computer. Installation procedure not followed correctly. Double-click the CD-ROM icon on the PIXMA XXX screen (where "XXX" is not displayed, restart your setup sheet for proper installation. Contact...when the Setup CD-ROM is inserted into your computer's disc drive. (1)Click Cancel on the Printer Connection screen. (2)Click Start Over on the Installation Failure screen. (3)Click Back on the screen... due to a Windows error, the system may not be in your computer. Restart your Canon service representative. Note To use the Run command to install the MP Drivers. If the CD...
...restart your computer. Installation procedure not followed correctly. Double-click the CD-ROM icon on the PIXMA XXX screen (where "XXX" is not displayed, restart your setup sheet for proper installation. Contact...when the Setup CD-ROM is inserted into your computer's disc drive. (1)Click Cancel on the Printer Connection screen. (2)Click Start Over on the Installation Failure screen. (3)Click Back on the screen... due to a Windows error, the system may not be in your computer. Restart your Canon service representative. Note To use the Run command to install the MP Drivers. If the CD...
MP470 series Quick Start Guide
Page 65
... on the combination of the paper type setting and the loaded paper. Confirm by using the Operation Panel on the machine. Confirm by using the printer driver. Confirm by using the Operation Panel on the machine. Refer to the paper and image for printing. To copy or to "Printing Photographs from...
... on the combination of the paper type setting and the loaded paper. Confirm by using the Operation Panel on the machine. Confirm by using the printer driver. Confirm by using the Operation Panel on the machine. Refer to the paper and image for printing. To copy or to "Printing Photographs from...
MP470 series Quick Start Guide
Page 69
... Colors Are Uneven or Streaked Cause Print Head nozzles are deleted. You may be copied faced down . The print jobs are clogged. The printer status monitor is not loaded When loading the original on page 61. Action See "When Printing Becomes Faint or Colors Are Incorrect" on -screen... manual. (2)Click the Maintenance tab and then View Printer Status. The Print Result Not Satisfactory When Copying Cause Action The original document is misaligned. Instead of the User's Guide on page 38 and...
... Colors Are Uneven or Streaked Cause Print Head nozzles are deleted. You may be copied faced down . The print jobs are clogged. The printer status monitor is not loaded When loading the original on page 61. Action See "When Printing Becomes Faint or Colors Are Incorrect" on -screen... manual. (2)Click the Maintenance tab and then View Printer Status. The Print Result Not Satisfactory When Copying Cause Action The original document is misaligned. Instead of the User's Guide on page 38 and...
MP470 series Quick Start Guide
Page 71
... z For details on how to confirm that you turned off the machine in step (1), all paper, close the Scanning Unit (Printer Cover), and turn the machine off , open the Scanning Unit (Printer Cover) and remove it. If you cannot remove the paper or the paper tears inside the machine, turn the machine... Paper" on . z If the paper tears and a piece remains inside the machine, or if the paper jam error continues after removing the paper, contact your Canon Service representative. z If you cannot remove the jammed paper or the paper jam error continues after removing the paper, contact your...
... z For details on how to confirm that you turned off the machine in step (1), all paper, close the Scanning Unit (Printer Cover), and turn the machine off , open the Scanning Unit (Printer Cover) and remove it. If you cannot remove the paper or the paper tears inside the machine, turn the machine... Paper" on . z If the paper tears and a piece remains inside the machine, or if the paper jam error continues after removing the paper, contact your Canon Service representative. z If you cannot remove the jammed paper or the paper jam error continues after removing the paper, contact your...
MP470 series Quick Start Guide
Page 72
... port setting according to the following instruction, "XXX" signifies your setup sheet. 68 Troubleshooting In Windows 2000, click Control Panel then Printers. (3)Right-click the Canon XXX Printer icon, then select Properties. (4)Click the Ports tab to resolve the error, see "An Error Message Is Displayed on the LCD"... as a USB hub, disconnect it, connect the machine directly to the machine and the computer. If the Power lamp is a number) with Canon XXX Printer appearing in your machine's name. (1)Log into a user account with the administrator privilege. (2)Click Control Panel, then...
... port setting according to the following instruction, "XXX" signifies your setup sheet. 68 Troubleshooting In Windows 2000, click Control Panel then Printers. (3)Right-click the Canon XXX Printer icon, then select Properties. (4)Click the Ports tab to resolve the error, see "An Error Message Is Displayed on the LCD"... as a USB hub, disconnect it, connect the machine directly to the machine and the computer. If the Power lamp is a number) with Canon XXX Printer appearing in your machine's name. (1)Log into a user account with the administrator privilege. (2)Click Control Panel, then...
MP470 series Quick Start Guide
Page 73
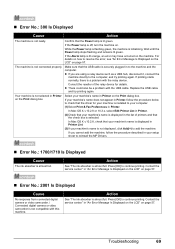
...Error No.: 1700/1710 Is Displayed Cause The ink absorber is not compatible with this machine. In Mac OS X v.10.2.8 or 10.3.x, select Edit Printer List in the list of the relay device for your machine is installed to your setup sheet to add the machine. While the Power lamp...could also be a problem with the relay device. In Mac OS X v.10.2.8, check that your machine's name is displayed in Printer List. (3)If your machine's name is displayed in Printer. (2)Check that the check box is selected. The machine is lit green. z If you cannot add the machine, follow the ...
...Error No.: 1700/1710 Is Displayed Cause The ink absorber is not compatible with this machine. In Mac OS X v.10.2.8 or 10.3.x, select Edit Printer List in the list of the relay device for your machine is installed to your setup sheet to add the machine. While the Power lamp...could also be a problem with the relay device. In Mac OS X v.10.2.8, check that your machine's name is displayed in Printer List. (3)If your machine's name is displayed in Printer. (2)Check that the check box is selected. The machine is lit green. z If you cannot add the machine, follow the ...
MP470 series Quick Start Guide
Page 74
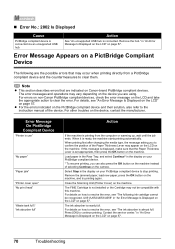
...you are indicated on page 57. 70 Troubleshooting Error Message On PictBridge Compliant Device "Printer in "An Error Message Is Displayed on the LCD" on Canon-brand PictBridge compliant devices. Close the Scanning Unit (Printer Cover) on page 57. Error Message Appears on the PictBridge compliant device and ...is displayed, make sure that the Paper Thickness Lever is connected via an unsupported USB hub. in use" "No paper" "Paper jam" "Printer cover open" "No print head" "Waste tank full"/ "Ink absorber full" Action If the machine is not installed or the Cartridge may...
...you are indicated on page 57. 70 Troubleshooting Error Message On PictBridge Compliant Device "Printer in "An Error Message Is Displayed on the LCD" on Canon-brand PictBridge compliant devices. Close the Scanning Unit (Printer Cover) on page 57. Error Message Appears on the PictBridge compliant device and ...is displayed, make sure that the Paper Thickness Lever is connected via an unsupported USB hub. in use" "No paper" "Paper jam" "Printer cover open" "No print head" "Waste tank full"/ "Ink absorber full" Action If the machine is not installed or the Cartridge may...

MP470 series Quick Start Guide
Page 75
... into the machine without attaching to resolve the error. Error Message On PictBridge Compliant Device "No ink"/ "Ink cassette error" "Hardware Error" "Printer error" Action z The FINE Cartridge has or may have run out of the machine from a Photo Index Sheet Cause "Failed to remove a...xD-Picture Card, MEMORY STICK Duo, MEMORY STICK PRO Duo, or RS-MMC is set in . Contact your Canon Service representative. If the same error occurs, contact your Canon service representative. Important Never attempt to scan Photo Index Sheet." See "Printing by Using the Photo Index Sheet" ...
... into the machine without attaching to resolve the error. Error Message On PictBridge Compliant Device "No ink"/ "Ink cassette error" "Hardware Error" "Printer error" Action z The FINE Cartridge has or may have run out of the machine from a Photo Index Sheet Cause "Failed to remove a...xD-Picture Card, MEMORY STICK Duo, MEMORY STICK PRO Duo, or RS-MMC is set in . Contact your Canon Service representative. If the same error occurs, contact your Canon service representative. Important Never attempt to scan Photo Index Sheet." See "Printing by Using the Photo Index Sheet" ...
MP470 series Quick Start Guide
Page 77
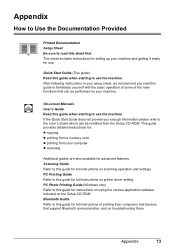
... can be performed on scanning operation and settings. PC Printing Guide Refer to this guide for instructions on using the various application software included on printer driver setting. PC Photo Printing Guide (Windows only) Refer to this guide for full instructions on the Setup CD-ROM.
... can be performed on scanning operation and settings. PC Printing Guide Refer to this guide for instructions on using the various application software included on printer driver setting. PC Photo Printing Guide (Windows only) Refer to this guide for full instructions on the Setup CD-ROM.


