MP210 series Quick Start Guide
Page 7
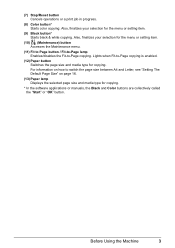
... button Switches the page size and media type for the menu or setting item. (9) Black button* Starts black & white copying. Before Using the Machine 3 (7) Stop/Reset button Cancels operations or a print job in progress. (8) Color button* Starts color copying.
... button Switches the page size and media type for the menu or setting item. (9) Black button* Starts black & white copying. Before Using the Machine 3 (7) Stop/Reset button Cancels operations or a print job in progress. (8) Color button* Starts color copying.
MP210 series Quick Start Guide
Page 12
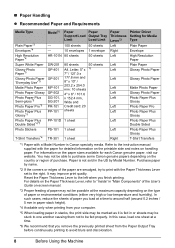
... 1 sheet Paper Thickness Lever*2 Left Right Left Left Left Left Left Left Left Left Left Left Left Right Printer Driver Setting for each Canon genuine paper, visit our website. Refer to the instruction manual supplied with the paper for detailed information on the printable side and notes on...causing them not to avoid blurs and discoloration. 8 Before Using the Machine For information on handling paper. Purchase paper by Model Number. Reset the Paper Thickness Lever to the left when you remove the previously printed sheet from the Paper Output Tray before continuously printing to be ...
... 1 sheet Paper Thickness Lever*2 Left Right Left Left Left Left Left Left Left Left Left Left Left Right Printer Driver Setting for each Canon genuine paper, visit our website. Refer to the instruction manual supplied with the paper for detailed information on the printable side and notes on...causing them not to avoid blurs and discoloration. 8 Before Using the Machine For information on handling paper. Purchase paper by Model Number. Reset the Paper Thickness Lever to the left when you remove the previously printed sheet from the Paper Output Tray before continuously printing to be ...
MP210 series Quick Start Guide
Page 15
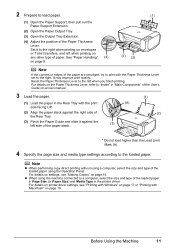
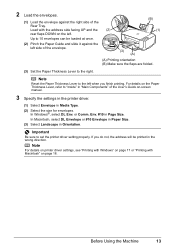
..." on page 18. For details on printer driver settings, see "Making Copies" on -screen manual. 3 Load the paper. (1) Load the paper in the printer driver. Reset the Paper Thickness Lever to the left when printing on page 8. (3) (2) Note If the corners or edges of the paper are smudged, try to print...
..." on page 18. For details on printer driver settings, see "Making Copies" on -screen manual. 3 Load the paper. (1) Load the paper in the printer driver. Reset the Paper Thickness Lever to the left when printing on page 8. (3) (2) Note If the corners or edges of the paper are smudged, try to print...
MP210 series Quick Start Guide
Page 17
Note Reset the Paper Thickness Lever to the left side of the envelope. (3) (A) (A) Printing orientation (B) Make sure the flaps are folded. (3) Set the Paper Thickness Lever to "...
Note Reset the Paper Thickness Lever to the left side of the envelope. (3) (A) (A) Printing orientation (B) Make sure the flaps are folded. (3) Set the Paper Thickness Lever to "...
MP210 series Quick Start Guide
Page 49
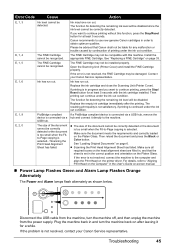
... the remaining ink level will be disabled since the ink level cannot be compatible with this function, press the Stop/Reset button for any malfunction or trouble caused by continuation of the document cannot be recognized. Make sure all required boxes ... without this machine. Error Code Cause Action E, 1, 3 E, 1, 4 E, 1, 5 E, 1, 6 E, 1, 9 E, 2, 0 Ink level cannot be installed properly. Contact your Canon Service representative. Replace the ink cartridge and close the Scanning Unit (Printer Cover). Please be advised that the sheet is connected via a hub and connect...
... the remaining ink level will be disabled since the ink level cannot be compatible with this function, press the Stop/Reset button for any malfunction or trouble caused by continuation of the document cannot be recognized. Make sure all required boxes ... without this machine. Error Code Cause Action E, 1, 3 E, 1, 4 E, 1, 5 E, 1, 6 E, 1, 9 E, 2, 0 Ink level cannot be installed properly. Contact your Canon Service representative. Replace the ink cartridge and close the Scanning Unit (Printer Cover). Please be advised that the sheet is connected via a hub and connect...
MP210 series Quick Start Guide
Page 55
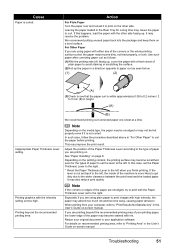
..., the paper may become dirty, not feed properly, or both. Printing graphics with the Paper Thickness Lever set the Paper Thickness Lever to the right. * Reset the Paper Thickness Lever to "Printing Area" in your printing paper, the lower edge of the paper may become stained with either any of the...
..., the paper may become dirty, not feed properly, or both. Printing graphics with the Paper Thickness Lever set the Paper Thickness Lever to the right. * Reset the Paper Thickness Lever to "Printing Area" in your printing paper, the lower edge of the paper may become stained with either any of the...


