

User Manual
Page 4
Cleaning the Print Head 202 Cleaning the Print Head Deeply 204 Aligning the Print Head 206 Performing Maintenance Functions from Your Computer (Windows 209 Cleaning the Print Heads 210 Aligning the Print Head 212 Aligning the Print Head Position 213 Printing a Nozzle Check Pattern 216 Cleaning 217 Cleaning the Exterior of the...244 Changing Settings 248 Changing Printer Settings from Your Computer (Windows 249 Changing the Print Options 250 Registering a Frequently Used Printing Profile 251 Managing the Printer Power 253 Reducing the Printer Noise 255 Changing the Printer Operation Mode...
Cleaning the Print Head 202 Cleaning the Print Head Deeply 204 Aligning the Print Head 206 Performing Maintenance Functions from Your Computer (Windows 209 Cleaning the Print Heads 210 Aligning the Print Head 212 Aligning the Print Head Position 213 Printing a Nozzle Check Pattern 216 Cleaning 217 Cleaning the Exterior of the...244 Changing Settings 248 Changing Printer Settings from Your Computer (Windows 249 Changing the Print Options 250 Registering a Frequently Used Printing Profile 251 Managing the Printer Power 253 Reducing the Printer Noise 255 Changing the Printer Operation Mode...
User Manual
Page 14
... Cannot Communicate with Machine via USB 935 Display on Touch Screen Is Off 936 Touch Screen Shows Wrong Language 937 Cannot Remove Memory Card 938 Print Head Holder Does Not Move to Replacement Position 939 Printer Status Monitor Not Displayed (Windows 940 Installation and Download Problems 941 Cannot Install MP Drivers 942...
... Cannot Communicate with Machine via USB 935 Display on Touch Screen Is Off 936 Touch Screen Shows Wrong Language 937 Cannot Remove Memory Card 938 Print Head Holder Does Not Move to Replacement Position 939 Printer Status Monitor Not Displayed (Windows 940 Installation and Download Problems 941 Cannot Install MP Drivers 942...

User Manual
Page 184
... that the power is turned on ink tanks. Do not touch the print head holder until it stops. Open the operation panel (A), then open the paper output tray (B). Message Appears Note • If print results become faint or white streaks appear despite sufficient ink levels, see ...notes on handling ink tanks, see Notes on . 2. Open the front cover. 3. The print head holder (C) moves to stop or move it stops completely. 184 Caution • Do not hold the print head holder to the replacement position. Open the operation panel (A) until it forcibly. Replacing Procedure When...
... that the power is turned on ink tanks. Do not touch the print head holder until it stops. Open the operation panel (A), then open the paper output tray (B). Message Appears Note • If print results become faint or white streaks appear despite sufficient ink levels, see ...notes on handling ink tanks, see Notes on . 2. Open the front cover. 3. The print head holder (C) moves to stop or move it stops completely. 184 Caution • Do not hold the print head holder to the replacement position. Open the operation panel (A) until it forcibly. Replacing Procedure When...

User Manual
Page 185
In this case, close and reopen the operation panel. 4. Note • Do not remove two or more than 10 minutes, the print head holder moves to the local laws and regulations regarding disposal of its package, remove the orange tape (E) completely, then remove the protective film (F) completely. 185 ...
In this case, close and reopen the operation panel. 4. Note • Do not remove two or more than 10 minutes, the print head holder moves to the local laws and regulations regarding disposal of its package, remove the orange tape (E) completely, then remove the protective film (F) completely. 185 ...

User Manual
Page 187
Discard it . Press on the print head holder. • You cannot print unless all the ink tanks. 187 Be sure to the label on the top of the ink tank into place. Insert the front end of the ink tank until the ink tank snaps firmly into the print head at a slant. Important • You ...cannot print if the ink tank is installed in the correct position according to install all the ink tanks are installed. Make sure that...
Discard it . Press on the print head holder. • You cannot print unless all the ink tanks. 187 Be sure to the label on the top of the ink tank into place. Insert the front end of the ink tank until the ink tank snaps firmly into the print head at a slant. Important • You ...cannot print if the ink tank is installed in the correct position according to install all the ink tanks are installed. Make sure that...

User Manual
Page 188
...the operation panel, be able to inform you when to dry out, and the machine may not operate properly when it is out of the print head, which may result in the open. Message Appears • When you remove an ink tank, replace it out in an unexpected operation. Every...immediately. Do not perform any other operations until the machine completes the cleaning of first use an ink tank within six months of the print head. • If the print head is reinstalled. Furthermore, with the ink tank removed. • Use a new ink tank for replacement. Close the operation panel gently. ...
...the operation panel, be able to inform you when to dry out, and the machine may not operate properly when it is out of the print head, which may result in the open. Message Appears • When you remove an ink tank, replace it out in an unexpected operation. Every...immediately. Do not perform any other operations until the machine completes the cleaning of first use an ink tank within six months of the print head. • If the print head is reinstalled. Furthermore, with the ink tank removed. • Use a new ink tank for replacement. Close the operation panel gently. ...
User Manual
Page 192
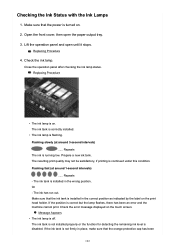
...under this condition. Lift the operation panel and open the paper output tray. 3. Check the ink lamp. The resulting print quality may not be satisfactory, if printing is running low. Or - Message Appears • The ink lamp is correct but the lamp flashes, there has ...in the correct position as indicated by the label on the touch screen. Replacing Procedure 4. Repeats - Check the error message displayed on the print head holder. Flashing fast (at around 1-second intervals) ...... Checking the Ink Status with the Ink Lamps 1. Make sure that the orange protective...
...under this condition. Lift the operation panel and open the paper output tray. 3. Check the ink lamp. The resulting print quality may not be satisfactory, if printing is running low. Or - Message Appears • The ink lamp is correct but the lamp flashes, there has ...in the correct position as indicated by the label on the touch screen. Replacing Procedure 4. Repeats - Check the error message displayed on the print head holder. Flashing fast (at around 1-second intervals) ...... Checking the Ink Status with the Ink Lamps 1. Make sure that the orange protective...

User Manual
Page 195
If Printing Is Faint or Uneven Maintenance Procedure Printing the Nozzle Check Pattern Examining the Nozzle Check Pattern Cleaning the Print Head Cleaning the Print Head Deeply Aligning the Print Head 195
If Printing Is Faint or Uneven Maintenance Procedure Printing the Nozzle Check Pattern Examining the Nozzle Check Pattern Cleaning the Print Head Cleaning the Print Head Deeply Aligning the Print Head 195
User Manual
Page 196
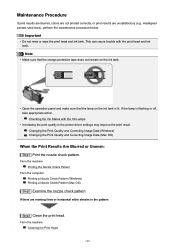
... off, take appropriate action. This can cause trouble with the Ink Lamps • Increasing the print quality in the pattern: Step3 Clean the print head. Checking the Ink Status with the print head and ink tank. Changing the Print Quality and Correcting Image Data (Windows) Changing the Print Quality and Correcting Image Data (Mac OS) When the...
... off, take appropriate action. This can cause trouble with the Ink Lamps • Increasing the print quality in the pattern: Step3 Clean the print head. Checking the Ink Status with the print head and ink tank. Changing the Print Quality and Correcting Image Data (Windows) Changing the Print Quality and Correcting Image Data (Mac OS) When the...

User Manual
Page 197
... the Print Heads (Windows) Cleaning the Print Heads (Mac OS) After cleaning the print head, print and examine the nozzle check pattern: Step1 If the problem is still not resolved, the print head may be damaged. If the problem is not resolved after 24 hours. From the machine Cleaning the Print Head Deeply From the computer Cleaning the Print Heads (Windows) Cleaning the Print Heads...
... the Print Heads (Windows) Cleaning the Print Heads (Mac OS) After cleaning the print head, print and examine the nozzle check pattern: Step1 If the problem is still not resolved, the print head may be damaged. If the problem is not resolved after 24 hours. From the machine Cleaning the Print Head Deeply From the computer Cleaning the Print Heads (Windows) Cleaning the Print Heads...
User Manual
Page 198
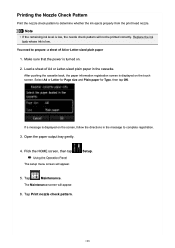
You need to determine whether the ink ejects properly from the print head nozzle. Make sure that the power is displayed on the touch ... back, the paper information registration screen is turned on the screen, follow the directions in the cassette. Tap Print nozzle check pattern. 198 Note • If the remaining ink level is low. Replace the ink tank whose...Letter for Page size and Plain paper for Type, then tap OK. The Maintenance screen will appear. Printing the Nozzle Check Pattern Print the nozzle check pattern to prepare: a sheet of A4 or Letter-sized plain paper in the message...
You need to determine whether the ink ejects properly from the print head nozzle. Make sure that the power is displayed on the touch ... back, the paper information registration screen is turned on the screen, follow the directions in the cassette. Tap Print nozzle check pattern. 198 Note • If the remaining ink level is low. Replace the ink tank whose...Letter for Page size and Plain paper for Type, then tap OK. The Maintenance screen will appear. Printing the Nozzle Check Pattern Print the nozzle check pattern to prepare: a sheet of A4 or Letter-sized plain paper in the message...

User Manual
Page 200
... pattern C and pattern D: The cleaning is closer to the Maintenance screen. 200 Check if there are present E: Number of sheets printed so far 2. Examining the Nozzle Check Pattern Examine the nozzle check pattern, and clean the print head if necessary. 1. The screen will return to the printed nozzle check pattern on the confirmation screen.
... pattern C and pattern D: The cleaning is closer to the Maintenance screen. 200 Check if there are present E: Number of sheets printed so far 2. Examining the Nozzle Check Pattern Examine the nozzle check pattern, and clean the print head if necessary. 1. The screen will return to the printed nozzle check pattern on the confirmation screen.

User Manual
Page 201
The machine starts cleaning the print head. Tap Also B, then tap Yes on the printout of 50 sheets on the cleaning confirmation screen. For B (lines are missing or horizontal white streaks are present) in the pattern C or pattern D, or in both patterns: The cleaning is shown in increments of the nozzle check pattern. 201 Cleaning the Print Head Note • The total number of sheets printed so far is required.
The machine starts cleaning the print head. Tap Also B, then tap Yes on the printout of 50 sheets on the cleaning confirmation screen. For B (lines are missing or horizontal white streaks are present) in the pattern C or pattern D, or in both patterns: The cleaning is shown in increments of the nozzle check pattern. 201 Cleaning the Print Head Note • The total number of sheets printed so far is required.
User Manual
Page 202
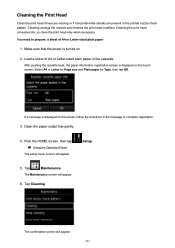
Tap Maintenance. Cleaning the Print Head Clean the print head if lines are missing or if horizontal white streaks are present in the cassette. After pushing the cassette back, the paper information registration screen is... screen will appear. 202 The confirmation screen will appear. The Maintenance screen will appear. 6. If a message is displayed on . 2. Setup. 5. Cleaning the print head consumes ink, so clean the print head only when necessary. You need to complete registration. 3. Make sure that the power is turned on the touch screen. Open the paper output...
Tap Maintenance. Cleaning the Print Head Clean the print head if lines are missing or if horizontal white streaks are present in the cassette. After pushing the cassette back, the paper information registration screen is... screen will appear. 202 The confirmation screen will appear. The Maintenance screen will appear. 6. If a message is displayed on . 2. Setup. 5. Cleaning the print head consumes ink, so clean the print head only when necessary. You need to complete registration. 3. Make sure that the power is turned on the touch screen. Open the paper output...

User Manual
Page 203
Tap Yes. This takes about 1 minute. Examine the nozzle check pattern. Do not perform any other operations until the machine completes the cleaning of the print head. Note • If the problem is not resolved after cleaning the print head twice, clean the print head deeply. 203 Tap Yes. The machine starts cleaning the print head. The nozzle check pattern will appear. 8. The pattern print confirmation screen will be printed. 9. 7.
Tap Yes. This takes about 1 minute. Examine the nozzle check pattern. Do not perform any other operations until the machine completes the cleaning of the print head. Note • If the problem is not resolved after cleaning the print head twice, clean the print head deeply. 203 Tap Yes. The machine starts cleaning the print head. The nozzle check pattern will appear. 8. The pattern print confirmation screen will be printed. 9. 7.
User Manual
Page 204
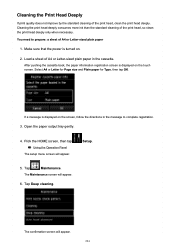
... consumes more ink than the standard cleaning of A4 or Letter-sized plain paper in the message to prepare: a sheet of the print head, clean the print head deeply. Open the paper output tray gently. 4. Tap Maintenance. If a message is displayed on . 2. The Maintenance screen will appear. 204...or Letter for Page size and Plain paper for Type, then tap OK. Load a sheet of the print head, so clean the print head deeply only when necessary. Cleaning the Print Head Deeply If print quality does not improve by the standard cleaning of A4 or Letter-sized plain paper 1. Flick the ...
... consumes more ink than the standard cleaning of A4 or Letter-sized plain paper in the message to prepare: a sheet of the print head, clean the print head deeply. Open the paper output tray gently. 4. Tap Maintenance. If a message is displayed on . 2. The Maintenance screen will appear. 204...or Letter for Page size and Plain paper for Type, then tap OK. Load a sheet of the print head, so clean the print head deeply only when necessary. Cleaning the Print Head Deeply If print quality does not improve by the standard cleaning of A4 or Letter-sized plain paper 1. Flick the ...

User Manual
Page 205
The machine starts cleaning the print head deeply. If the problem is not printed properly, replace the ink tank of the print head. Contact the service center. 205 The nozzle check pattern will appear. 8. When the completion message appears, tap OK. 10. Examine the nozzle check pattern. 7. Do ... until the machine completes the deep cleaning of that color. Tap Yes. If a particular color is not resolved, turn off the power and clean the print head deeply again after 24 hours. This takes about 1 to 2 minutes. If the problem is still not resolved, the...
The machine starts cleaning the print head deeply. If the problem is not printed properly, replace the ink tank of the print head. Contact the service center. 205 The nozzle check pattern will appear. 8. When the completion message appears, tap OK. 10. Examine the nozzle check pattern. 7. Do ... until the machine completes the deep cleaning of that color. Tap Yes. If a particular color is not resolved, turn off the power and clean the print head deeply again after 24 hours. This takes about 1 to 2 minutes. If the problem is still not resolved, the...
User Manual
Page 206
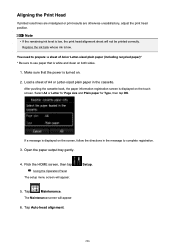
Make sure that is low, the print head alignment sheet will not be printed correctly. Flick the HOME screen, then tap Using the Operation Panel The setup menu screen will appear. 6. Load a sheet of A4 or Letter-sized ...and clean on the touch screen. You need to complete registration. 3. Open the paper output tray gently. 4. Aligning the Print Head If printed ruled lines are misaligned or print results are otherwise unsatisfactory, adjust the print head position. Replace the ink tank whose ink is displayed on both sides. 1. After pushing the cassette back, the paper...
Make sure that is low, the print head alignment sheet will not be printed correctly. Flick the HOME screen, then tap Using the Operation Panel The setup menu screen will appear. 6. Load a sheet of A4 or Letter-sized ...and clean on the touch screen. You need to complete registration. 3. Open the paper output tray gently. 4. Aligning the Print Head If printed ruled lines are misaligned or print results are otherwise unsatisfactory, adjust the print head position. Replace the ink tank whose ink is displayed on both sides. 1. After pushing the cassette back, the paper...

User Manual
Page 207
Confirm the message, then load the print head alignment sheet on the print head alignment sheet. Confirm the message, then tap Yes. When the message "Did the patterns print correctly?" The confirmation screen will be scanned properly. 8. The print head alignment sheet will appear. 7. Important • Do not touch any printed part on the platen glass. If the sheet...
Confirm the message, then load the print head alignment sheet on the print head alignment sheet. Confirm the message, then tap Yes. When the message "Did the patterns print correctly?" The confirmation screen will be scanned properly. 8. The print head alignment sheet will appear. 7. Important • Do not touch any printed part on the platen glass. If the sheet...

User Manual
Page 208
... are still not satisfactory after adjusting the print head position as described above, adjust the print head position manually from the computer. Message Appears 11. Aligning the Print Head Position (Windows) Aligning the Print Head Position (Mac OS) • To print and check the current head position adjustment values, select Print the head alignment value on the Maintenance screen. 208 When the...
... are still not satisfactory after adjusting the print head position as described above, adjust the print head position manually from the computer. Message Appears 11. Aligning the Print Head Position (Windows) Aligning the Print Head Position (Mac OS) • To print and check the current head position adjustment values, select Print the head alignment value on the Maintenance screen. 208 When the...


