
User Manual
Page 6
... Accessible IP Address Screen/Add Accessible IP Address Screen 333 IJ Network Tool (Other Screens 334 Canon IJ Network Tool Screen 335 Status Screen 339 Connection Performance Measurement Screen 340 Maintenance Screen 342 Network Setup of the Card Slot Screen 343 Associate Port Screen 345 Network Information Screen 346 Network Communication Tips...
... Accessible IP Address Screen/Add Accessible IP Address Screen 333 IJ Network Tool (Other Screens 334 Canon IJ Network Tool Screen 335 Status Screen 339 Connection Performance Measurement Screen 340 Maintenance Screen 342 Network Setup of the Card Slot Screen 343 Associate Port Screen 345 Network Information Screen 346 Network Communication Tips...
User Manual
Page 7
... 386 List of Function for Each Model 387 Printing 388 Printing from Computer 389 Printing from Application Software (Windows Printer Driver 390 Printing with Easy Setup 391 Paper Settings on the Printer Driver and the Printer (Media Type 394 Paper Settings on the Printer Driver and the Printer (Paper Size 396...
... 386 List of Function for Each Model 387 Printing 388 Printing from Computer 389 Printing from Application Software (Windows Printer Driver 390 Printing with Easy Setup 391 Paper Settings on the Printer Driver and the Printer (Media Type 394 Paper Settings on the Printer Driver and the Printer (Paper Size 396...
User Manual
Page 8
...(Printer Driver 466 Overview of the Printer Driver 470 Canon IJ Printer Driver 471 How to Open the Printer Driver Setup Window 472 Canon IJ Status Monitor 473 Checking the Ink Status from Your Computer 474 Canon IJ Preview 475 Deleting the Undesired Print Job 476 ...Use (Printer Driver 477 Printer Driver Description 479 Quick Setup tab Description 480 Main tab Description 486 Page Setup tab Description 492 Maintenance tab Description 504 Canon IJ Preview Description 510 Canon IJ XPS Preview Description 513 Canon IJ Status Monitor Description 521 Updating the MP Drivers ...
...(Printer Driver 466 Overview of the Printer Driver 470 Canon IJ Printer Driver 471 How to Open the Printer Driver Setup Window 472 Canon IJ Status Monitor 473 Checking the Ink Status from Your Computer 474 Canon IJ Preview 475 Deleting the Undesired Print Job 476 ...Use (Printer Driver 477 Printer Driver Description 479 Quick Setup tab Description 480 Main tab Description 486 Page Setup tab Description 492 Maintenance tab Description 504 Canon IJ Preview Description 510 Canon IJ XPS Preview Description 513 Canon IJ Status Monitor Description 521 Updating the MP Drivers ...

User Manual
Page 12
...Scanning Using Operation Panel 821 Setting Up Operation Panel with IJ Scan Utility (Windows 823 Scanning Using Smartphone/Tablet 827 Using PIXMA/MAXIFY Cloud Link 58 Troubleshooting 829 Network Communication Problems 831 Cannot Find Machine on Network 832 Cannot Find Machine on Check ...Is Slow 857 Ink Level Not Shown on Printer Status Monitor (Windows 858 Other Network Problems 859 Message Appears on Computer During Setup 860 Packets Are Sent Constantly (Windows 862 Checking Network Information 863 Restoring to Factory Defaults 866 Problems while Printing/Scanning from Smartphone...
...Scanning Using Operation Panel 821 Setting Up Operation Panel with IJ Scan Utility (Windows 823 Scanning Using Smartphone/Tablet 827 Using PIXMA/MAXIFY Cloud Link 58 Troubleshooting 829 Network Communication Problems 831 Cannot Find Machine on Network 832 Cannot Find Machine on Check ...Is Slow 857 Ink Level Not Shown on Printer Status Monitor (Windows 858 Other Network Problems 859 Message Appears on Computer During Setup 860 Packets Are Sent Constantly (Windows 862 Checking Network Information 863 Restoring to Factory Defaults 866 Problems while Printing/Scanning from Smartphone...
User Manual
Page 18
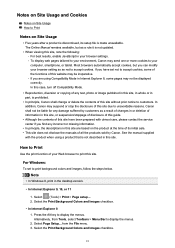
... of changes in or deletion of all the products sold by customers as not to customers. Canon shall not be liable for any damage suffered by Canon. Select (Tools) > Print > Page setup.... 2. Select the Print Background Colors and Images checkbox. 18 In this case, turn off ...In principle, the descriptions in this site are using a product that is prohibited. • In principle, Canon shall change or delete the contents of this site. Select Page Setup... from Tools, select Toolbars > Menu Bar to display the menus. Most browsers automatically accept cookies, but as...
... of changes in or deletion of all the products sold by customers as not to customers. Canon shall not be liable for any damage suffered by Canon. Select (Tools) > Print > Page setup.... 2. Select the Print Background Colors and Images checkbox. 18 In this case, turn off ...In principle, the descriptions in this site are using a product that is prohibited. • In principle, Canon shall change or delete the contents of this site. Select Page Setup... from Tools, select Toolbars > Menu Bar to display the menus. Most browsers automatically accept cookies, but as...
User Manual
Page 19
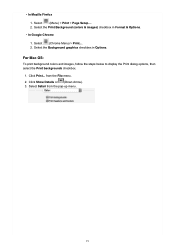
Select (Chrome Menu) > Print.... 2. Select the Background graphics checkbox in Format & Options. • In Google Chrome 1. Click Show Details or (Down Arrow). 3. • In Mozilla Firefox 1. Select the Print Background (colors & images) checkbox in Options. Select Safari from the File menu. 2. Select (Menu) > Print > Page Setup.... 2. Click Print... from the pop-up menu. 19 For Mac OS: To print background colors and images, follow the steps below to display the Print dialog options, then select the Print backgrounds checkbox. 1.
Select (Chrome Menu) > Print.... 2. Select the Background graphics checkbox in Format & Options. • In Google Chrome 1. Click Show Details or (Down Arrow). 3. • In Mozilla Firefox 1. Select the Print Background (colors & images) checkbox in Options. Select Safari from the File menu. 2. Select (Menu) > Print > Page Setup.... 2. Click Print... from the pop-up menu. 19 For Mac OS: To print background colors and images, follow the steps below to display the Print dialog options, then select the Print backgrounds checkbox. 1.

User Manual
Page 52
Proceed with the setup. 52 When connection is complete, click Back until the screen below appears. 12. Enter the Password (Network key), then click Connect. 13.
Proceed with the setup. 52 When connection is complete, click Back until the screen below appears. 12. Enter the Password (Network key), then click Connect. 13.
User Manual
Page 53
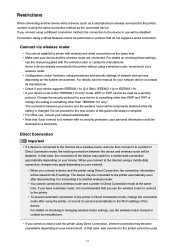
... and the wireless router are connected. If you have a wireless router, it is connected to the Internet via a wireless router. • Configuration, router functions, setup procedures and security settings of the device may be connected to the device in the Wi-Fi settings of this guide until... setup is changed. For details, see the manual supplied with wireless and wired connections at the same time. Restrictions When connecting another wireless router. • ...
... and the wireless router are connected. If you have a wireless router, it is connected to the Internet via a wireless router. • Configuration, router functions, setup procedures and security settings of the device may be connected to the device in the Wi-Fi settings of this guide until... setup is changed. For details, see the manual supplied with wireless and wired connections at the same time. Restrictions When connecting another wireless router. • ...

User Manual
Page 72
Cloud Troubleshooting 72 Note • To leave a usage history of this service, from the Home window on the operation panel, select Setup -> Web service setup -> Web service connection setup -> IJ Cloud Printing Center setup -> History setting for this service -> Save.
Cloud Troubleshooting 72 Note • To leave a usage history of this service, from the Home window on the operation panel, select Setup -> Web service setup -> Web service connection setup -> IJ Cloud Printing Center setup -> History setting for this service -> Save.
User Manual
Page 76
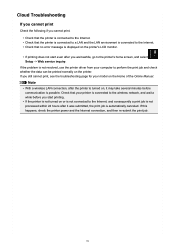
... to the Internet, and consequently a print job is not processed within 24 hours after you wait awhile, go to the printer's home screen, and select Setup -> Web service inquiry. Check that no error message is displayed on , it was submitted, the print job is automatically canceled. Note • With a wireless LAN...
... to the Internet, and consequently a print job is not processed within 24 hours after you wait awhile, go to the printer's home screen, and select Setup -> Web service inquiry. Check that no error message is displayed on , it was submitted, the print job is automatically canceled. Note • With a wireless LAN...

User Manual
Page 83
... registered a different e-mail address by mistake, you can cancel the registration by going to the printer's Home screen and selecting Setup -> Web service setup -> Web service connection setup -> IJ Cloud Printing Center setup -> Delete from certain domains, be no error display even if you could not receive the e-mail because of single-byte alphanumeric...
... registered a different e-mail address by mistake, you can cancel the registration by going to the printer's Home screen and selecting Setup -> Web service setup -> Web service connection setup -> IJ Cloud Printing Center setup -> Delete from certain domains, be no error display even if you could not receive the e-mail because of single-byte alphanumeric...

User Manual
Page 88
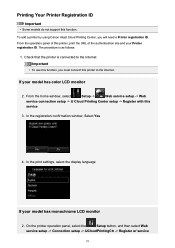
... been registered, you need to follow the steps described below and register My account information. Registering User Information to Canon Inkjet Cloud Printing Center (Monochrome LCD Monitor) To use the Back button of the authentication site and the Printer ... within 60 minutes. In the print settings, select the display language 4. On the printer operation panel, select the Setup button, and then select Web service setup -> Connection setup -> IJCloudPrintingCtr -> Register w/ service 2. Follow the instructions displayed in the e-mail, and register a different e-mail address...
... been registered, you need to follow the steps described below and register My account information. Registering User Information to Canon Inkjet Cloud Printing Center (Monochrome LCD Monitor) To use the Back button of the authentication site and the Printer ... within 60 minutes. In the print settings, select the display language 4. On the printer operation panel, select the Setup button, and then select Web service setup -> Connection setup -> IJCloudPrintingCtr -> Register w/ service 2. Follow the instructions displayed in the e-mail, and register a different e-mail address...

User Manual
Page 90
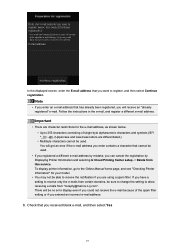
In the License agreement and Privacy statement windows of Canon Inkjet Cloud Printing Center, read the statements, and select Agree if you are differentiated.) • Multibyte characters cannot be used. There will get an error ... receive the e-mail because of the spam filter setting or if you can cancel the registration by selecting the Setup button on the printer operation panel, and then selecting Web service setup -> Connection setup -> IJCloudPrintingCtr -> Delete from "[email protected]". Check that cannot be used. • If you registered a different e-mail...
In the License agreement and Privacy statement windows of Canon Inkjet Cloud Printing Center, read the statements, and select Agree if you are differentiated.) • Multibyte characters cannot be used. There will get an error ... receive the e-mail because of the spam filter setting or if you can cancel the registration by selecting the Setup button on the printer operation panel, and then selecting Web service setup -> Connection setup -> IJCloudPrintingCtr -> Delete from "[email protected]". Check that cannot be used. • If you registered a different e-mail...
User Manual
Page 94
...LCD monitor 2. In the registration confirmation window, Select Yes 4. From the home window, select Setup -> Web service setup -> Web service connection setup -> IJ Cloud Printing Center setup -> Register with this function. The procedure is connected to the Internet. If your model ... monochrome LCD monitor 2. On the printer operation panel, select the Setup button, and then select Web service setup -> Connection setup -> IJCloudPrintingCtr -> Register w/ service 94 To add a printer by using Canon Inkjet Cloud Printing Center, you must connect this printer to the ...
...LCD monitor 2. In the registration confirmation window, Select Yes 4. From the home window, select Setup -> Web service setup -> Web service connection setup -> IJ Cloud Printing Center setup -> Register with this function. The procedure is connected to the Internet. If your model ... monochrome LCD monitor 2. On the printer operation panel, select the Setup button, and then select Web service setup -> Connection setup -> IJCloudPrintingCtr -> Register w/ service 94 To add a printer by using Canon Inkjet Cloud Printing Center, you must connect this printer to the ...
User Manual
Page 96
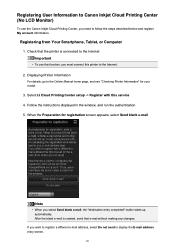
Select IJ Cloud Printing Center setup -> Register with this printer to the Online Manual home page, and ...blank e-mail is created, send that the printer is connected to the Internet Important • To use the Canon Inkjet Cloud Printing Center, you need to display the E-mail address entry screen. 96 Displaying Printer Information For ..., select Do not send to follow the steps described below and register My account information. Registering User Information to Canon Inkjet Cloud Printing Center (No LCD Monitor) To use this function, you must connect this service 4. Registering from...
Select IJ Cloud Printing Center setup -> Register with this printer to the Online Manual home page, and ...blank e-mail is created, send that the printer is connected to the Internet Important • To use the Canon Inkjet Cloud Printing Center, you need to display the E-mail address entry screen. 96 Displaying Printer Information For ..., select Do not send to follow the steps described below and register My account information. Registering User Information to Canon Inkjet Cloud Printing Center (No LCD Monitor) To use this function, you must connect this service 4. Registering from...
User Manual
Page 97
... e-mails from certain domains, be no error display even if you can cancel the registration by Displaying Printer Information and selecting IJ Cloud Printing Center setup -> Delete from "[email protected]". Note • If you have a setting to allow receiving e-mails from this service.
... e-mails from certain domains, be no error display even if you can cancel the registration by Displaying Printer Information and selecting IJ Cloud Printing Center setup -> Delete from "[email protected]". Note • If you have a setting to allow receiving e-mails from this service.

User Manual
Page 113
.... • Add group Add a group to 20 groups. • Apps available on printers that meets this condition, this setup screen does not appear. Note • If only the following printer is registered in Canon Inkjet Cloud Printing Center. Note • You can register up to be displayed when a user selects Cloud from...
.... • Add group Add a group to 20 groups. • Apps available on printers that meets this condition, this setup screen does not appear. Note • If only the following printer is registered in Canon Inkjet Cloud Printing Center. Note • You can register up to be displayed when a user selects Cloud from...

User Manual
Page 114
This setting is linked with a monochrome LCD. • The check box does not appear for printer users and apps that do not support Multiuser mode. 114 Note • The list does not display models without an LCD or models with Multiuser mode on the Mng. Advanced management screen The Advanced management screen allows you to the setup screen, select . • Require security code Each user can be used. To go to set the management method for models that can set a Security code, start the app, and perform printing and other operations. printer screen.
This setting is linked with a monochrome LCD. • The check box does not appear for printer users and apps that do not support Multiuser mode. 114 Note • The list does not display models without an LCD or models with Multiuser mode on the Mng. Advanced management screen The Advanced management screen allows you to the setup screen, select . • Require security code Each user can be used. To go to set the management method for models that can set a Security code, start the app, and perform printing and other operations. printer screen.

User Manual
Page 124
The screen for checking the management method change appears To complete the setup and return to the Advanced management window, select OK. All registered users can register and delete apps freely. 124 The father sets Manage app availability by user and selects OK 4. 3.
The screen for checking the management method change appears To complete the setup and return to the Advanced management window, select OK. All registered users can register and delete apps freely. 124 The father sets Manage app availability by user and selects OK 4. 3.

User Manual
Page 128
...name. • The group name can be The chief clerk enters "Office" here because the clerk is setting up a group that everyone in group setup screen, check that all registered users belong to the same group. 8. In the Group management screen, the senior clerk selects the renamed 9. Note ...• With the default settings, the group is Group management. To complete the setup and display the Group management screen, select OK. Select Settings, and in the office will use. This appears only if the selected mode is named...
...name. • The group name can be The chief clerk enters "Office" here because the clerk is setting up a group that everyone in group setup screen, check that all registered users belong to the same group. 8. In the Group management screen, the senior clerk selects the renamed 9. Note ...• With the default settings, the group is Group management. To complete the setup and display the Group management screen, select OK. Select Settings, and in the office will use. This appears only if the selected mode is named...


