MG3100 series Specifications
Page 1
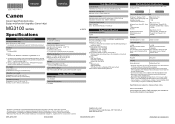
...Mac OS Extended. • Macintosh: After upgrading from Mac OS X v.10.5 or lower to Mac OS X v.10.6, install software bundled with the Canon inkjet printer. • Internet Explorer 7 or 8 (Windows), or Safari 4 or later (for 5 years after production has stopped. • Windows is a ... only be guaranteed on a PC with Windows 7, Windows Vista or Windows XP pre-installed. • Windows: Uninstall software bundled with the Canon inkjet printer before upgrading from Windows Vista to install Easy-WebPrint EX. and other countries. • Windows Vista is required. Weight Approx. 5.5 kg...
...Mac OS Extended. • Macintosh: After upgrading from Mac OS X v.10.5 or lower to Mac OS X v.10.6, install software bundled with the Canon inkjet printer. • Internet Explorer 7 or 8 (Windows), or Safari 4 or later (for 5 years after production has stopped. • Windows is a ... only be guaranteed on a PC with Windows 7, Windows Vista or Windows XP pre-installed. • Windows: Uninstall software bundled with the Canon inkjet printer before upgrading from Windows Vista to install Easy-WebPrint EX. and other countries. • Windows Vista is required. Weight Approx. 5.5 kg...
Network Installation Guide
Page 6
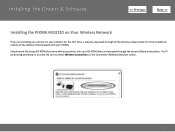
Installing the Drivers & Software > Installing the PIXMA MG3120 on Your Wireless Network If you are installing your printer on the Connection Method Selection screen. 6 Simply insert the Setup CD-ROM that came with your printer into your CD-ROM drive and proceed through the easy to the installation routine of the software that shipped with your network for the first time, a step-by-step walk through of the wireless setup is built in no time. You'll be printing wirelessly in to follow instructions. Be sure to select Wireless Connection on your PIXMA.
Installing the Drivers & Software > Installing the PIXMA MG3120 on Your Wireless Network If you are installing your printer on the Connection Method Selection screen. 6 Simply insert the Setup CD-ROM that came with your printer into your CD-ROM drive and proceed through the easy to the installation routine of the software that shipped with your network for the first time, a step-by-step walk through of the wireless setup is built in no time. You'll be printing wirelessly in to follow instructions. Be sure to select Wireless Connection on your PIXMA.

Quick Menu Guide
Page 8
...Image Display. 2. Internet connection is required for products supporting Quick Menu. • Available functions and settings vary depending on your scanner or printer. The screen for selecting the folders to be used. Keep these points in Image Display. 1. Internet connection is required depending on the ...Display for the first time, you must agree to image analysis of My Image Garden will appear in mind. • Refer to the Canon website for downloading. Internet connection fees apply. 8 General Notes (Quick Menu) Quick Menu is subject to the following the procedure below,...
...Image Display. 2. Internet connection is required for products supporting Quick Menu. • Available functions and settings vary depending on your scanner or printer. The screen for selecting the folders to be used. Keep these points in Image Display. 1. Internet connection is required depending on the ...Display for the first time, you must agree to image analysis of My Image Garden will appear in mind. • Refer to the Canon website for downloading. Internet connection fees apply. 8 General Notes (Quick Menu) Quick Menu is subject to the following the procedure below,...

Quick Menu Guide
Page 23
Add to Shortcut Menu Adds the selected function to display the Preferences dialog box. (4) Button Area (Preferences Dialog Box) Displays the Preferences dialog box. (Help) Opens this guide. (Close) Closes the Main Menu. 23 Click to the Shortcut Menu. (3) Model Name Area The printer/scanner model name registered in the Preferences dialog box is displayed. Start Starts the selected application, opens the selected manual, or accesses the Canon website. The model name display format varies depending on the registered printer/scanner.
Add to Shortcut Menu Adds the selected function to display the Preferences dialog box. (4) Button Area (Preferences Dialog Box) Displays the Preferences dialog box. (Help) Opens this guide. (Close) Closes the Main Menu. 23 Click to the Shortcut Menu. (3) Model Name Area The printer/scanner model name registered in the Preferences dialog box is displayed. Start Starts the selected application, opens the selected manual, or accesses the Canon website. The model name display format varies depending on the registered printer/scanner.
Quick Menu Guide
Page 30
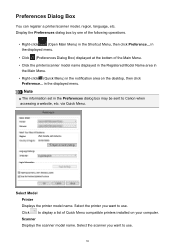
... name. Select the scanner you want to Canon when accessing a website, etc. Note The information set in the notification area on your computer. Display the Preferences dialog box by one of the Main Menu. • Click the printer/scanner model name displayed in the Registered Model...Quick Menu) in the Preferences dialog box may be sent to use . Click to use . 30 Select the printer you want to display a list of Quick Menu compatible printers installed on the desktop, then click Preference... in the Shortcut Menu, then click Preference... Scanner Displays the scanner model...
... name. Select the scanner you want to Canon when accessing a website, etc. Note The information set in the notification area on your computer. Display the Preferences dialog box by one of the Main Menu. • Click the printer/scanner model name displayed in the Registered Model...Quick Menu) in the Preferences dialog box may be sent to use . Click to use . 30 Select the printer you want to display a list of Quick Menu compatible printers installed on the desktop, then click Preference... in the Shortcut Menu, then click Preference... Scanner Displays the scanner model...
Quick Menu Guide
Page 31
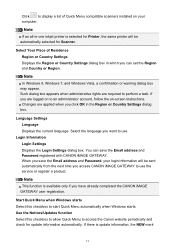
... inkjet printer is update information, the NEW mark 31 Such dialog box appears when administrative rights are applied when you want to perform a task. Select Your Place of Quick Menu compatible scanners installed on -screen instructions. If you have already completed the CANON iMAGE GATEWAY...Quick Menu automatically when Windows starts. Start Quick Menu when Windows starts Select this checkbox to allow Quick Menu to access the Canon website periodically and check for update information automatically. Click to display a list of Residence Region or Country Settings Displays the ...
... inkjet printer is update information, the NEW mark 31 Such dialog box appears when administrative rights are applied when you want to perform a task. Select Your Place of Quick Menu compatible scanners installed on -screen instructions. If you have already completed the CANON iMAGE GATEWAY...Quick Menu automatically when Windows starts. Start Quick Menu when Windows starts Select this checkbox to allow Quick Menu to access the Canon website periodically and check for update information automatically. Click to display a list of Residence Region or Country Settings Displays the ...
Quick Menu Guide
Page 33
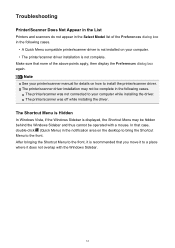
...Make sure that you move it is recommended that none of the Preferences dialog box in the following cases. • A Quick Menu compatible printer/scanner driver is not complete. The Shortcut Menu is Hidden In Windows Vista, if the Windows Sidebar is displayed, the Shortcut Menu may not... the Shortcut Menu to a place where it does not overlap with a mouse. The printer/scanner was not connected to install the printer/scanner driver. Troubleshooting Printer/Scanner Does Not Appear in the List Printers and scanners do not appear in the Select Model list of the above points apply, ...
...Make sure that you move it is recommended that none of the Preferences dialog box in the following cases. • A Quick Menu compatible printer/scanner driver is not complete. The Shortcut Menu is Hidden In Windows Vista, if the Windows Sidebar is displayed, the Shortcut Menu may not... the Shortcut Menu to a place where it does not overlap with a mouse. The printer/scanner was not connected to install the printer/scanner driver. Troubleshooting Printer/Scanner Does Not Appear in the List Printers and scanners do not appear in the Select Model list of the above points apply, ...
Quick Menu Guide
Page 34
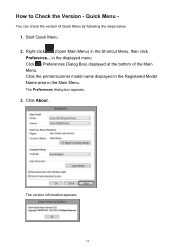
Start Quick Menu. 2. Click About. Right-click (Open Main Menu) in the Main Menu. The version information appears. 34 The Preferences dialog box appears. 3. Click (Preferences Dialog Box) displayed at the bottom of Quick Menu by following the steps below. 1. You can check the version of the Main Menu. Click the printer/scanner model name displayed in the Registered Model Name area in the Shortcut Menu, then click Preference... How to Check the Version - Quick Menu - in the displayed menu.
Start Quick Menu. 2. Click About. Right-click (Open Main Menu) in the Main Menu. The version information appears. 34 The Preferences dialog box appears. 3. Click (Preferences Dialog Box) displayed at the bottom of Quick Menu by following the steps below. 1. You can check the version of the Main Menu. Click the printer/scanner model name displayed in the Registered Model Name area in the Shortcut Menu, then click Preference... How to Check the Version - Quick Menu - in the displayed menu.
Network Guide
Page 4
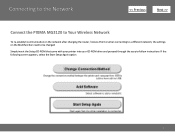
Connecting to the Network > Connect the PIXMA MG3120 to Your Wireless Network To re-establish communication on the network after changing the router / Access Point or when connecting to a different network, the settings on the Multifunction need to be changed Simply insert the Setup CD-ROM that came with your printer into your CD-ROM drive and proceed through the easy to follow instructions If the following screen appears, select the Start Setup Again option 4
Connecting to the Network > Connect the PIXMA MG3120 to Your Wireless Network To re-establish communication on the network after changing the router / Access Point or when connecting to a different network, the settings on the Multifunction need to be changed Simply insert the Setup CD-ROM that came with your printer into your CD-ROM drive and proceed through the easy to follow instructions If the following screen appears, select the Start Setup Again option 4


