
MP610 series Quick Start Guide
Page 76
... connect it directly to the following ink tank cannot be displayed according to the machine. After a while, plug the power cord of the machine from the power supply. Select the language you want to Readonly mode again. Set to select , then press the OK button. (3)Press ...error has occurred. "The card is not installed. Action z The ink tank is currently write-enabled. If the same error occurs, contact a Canon service representative. The machine will display a message. If problem persists, see the manual." If the Bluetooth unit is connected to the machine, press...
... connect it directly to the following ink tank cannot be displayed according to the machine. After a while, plug the power cord of the machine from the power supply. Select the language you want to Readonly mode again. Set to select , then press the OK button. (3)Press ...error has occurred. "The card is not installed. Action z The ink tank is currently write-enabled. If the same error occurs, contact a Canon service representative. The machine will display a message. If problem persists, see the manual." If the Bluetooth unit is connected to the machine, press...
MP610 series Quick Start Guide
Page 93
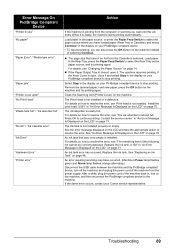
... absorber is not installed. An ink tank that cannot be correctly detected. Replace the ink tank. After a while, plug the power cord of the machine from the power supply. Error Message On PictBridge Compliant Device "Printer in the display on your PictBridge compliant device. * To resume printing, you have ...is selected. Install the print head. U051" in "An Error Message Is Displayed on the LCD" on page 70. For details on your Canon service representative. Contact the service center." See "An Error Message Is Displayed on the LCD" on page 70. For details on page 46...
... absorber is not installed. An ink tank that cannot be correctly detected. Replace the ink tank. After a while, plug the power cord of the machine from the power supply. Error Message On PictBridge Compliant Device "Printer in the display on your PictBridge compliant device. * To resume printing, you have ...is selected. Install the print head. U051" in "An Error Message Is Displayed on the LCD" on page 70. For details on your Canon service representative. Contact the service center." See "An Error Message Is Displayed on the LCD" on page 70. For details on page 46...
MP610 series Quick Start Guide
Page 98
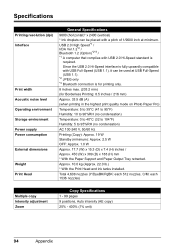
Specifications Printing resolution (dpi) Interface Print width Acoustic noise level Operating environment Storage environment Power supply Power consumption External dimensions Weight Print Head General Specifications 9600 (horizontal)* x 2400 (vertical) * Ink droplets can be placed with a pitch of 1/9600 inch at USB Full-...
Specifications Printing resolution (dpi) Interface Print width Acoustic noise level Operating environment Storage environment Power supply Power consumption External dimensions Weight Print Head General Specifications 9600 (horizontal)* x 2400 (vertical) * Ink droplets can be placed with a pitch of 1/9600 inch at USB Full-...

MP610 series Quick Start Guide
Page 101
... not place the machine close to a lot of these safety precautions. If you hear thunder, disconnect the power supply of the machine and refrain from the power supply when your doctor. If the machine is bundled or knotted. Warning z This product emits low level magnetic flux. If you use a ...a dry cloth to ensure that is shared with the machine. Never plug the machine into the power outlet. Never attempt to use the machine if the power cord is placed at the power supply and call for service. Leaving the machine plugged in or unplug the machine from using it. Never...
... not place the machine close to a lot of these safety precautions. If you hear thunder, disconnect the power supply of the machine and refrain from the power supply when your doctor. If the machine is bundled or knotted. Warning z This product emits low level magnetic flux. If you use a ...a dry cloth to ensure that is shared with the machine. Never plug the machine into the power outlet. Never attempt to use the machine if the power cord is placed at the power supply and call for service. Leaving the machine plugged in or unplug the machine from using it. Never...

MP610 series Quick Start Guide
Page 102
... maintenance procedure not described in a location that is kept clear at all times so you ignore any of these safety precautions. Choosing a location Power supply Do not install the machine in this guide. Do not place the machine on while cleaning it could cause a fire or electric shock if ... cause a fire or electric shock. Do not install the machine in locations that the area around the machine Always unplug the machine from the power outlet before cleaning the machine. To avoid the risk of 10% to a heating source. Do not place the machine with an ambient temperature...
... maintenance procedure not described in a location that is kept clear at all times so you ignore any of these safety precautions. Choosing a location Power supply Do not install the machine in this guide. Do not place the machine on while cleaning it could cause a fire or electric shock if ... cause a fire or electric shock. Do not install the machine in locations that the area around the machine Always unplug the machine from the power outlet before cleaning the machine. To avoid the risk of 10% to a heating source. Do not place the machine with an ambient temperature...
MP610 series Easy Setup Instructions
Page 1
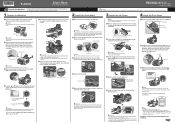
... open for the LCD, then press the OK button. (1) Press the { or } button to the color guide on the machine. Do not press! Electrical Contacts Important • Do not touch the electrical contacts....stack. Print Head Ink Tanks Important The Print Head and ink tanks are complete. b Plug the power cord in , or the inside of the ink tank. Note Print Head alignment takes about 2 ...effect on the right side, then slide the Paper Guide against the illustration printed on the lid of supplied paper (MP-101) into place. 4 Align the Print Head a Pinch the Paper Guide and ...
... open for the LCD, then press the OK button. (1) Press the { or } button to the color guide on the machine. Do not press! Electrical Contacts Important • Do not touch the electrical contacts....stack. Print Head Ink Tanks Important The Print Head and ink tanks are complete. b Plug the power cord in , or the inside of the ink tank. Note Print Head alignment takes about 2 ...effect on the right side, then slide the Paper Guide against the illustration printed on the lid of supplied paper (MP-101) into place. 4 Align the Print Head a Pinch the Paper Guide and ...


