LV-X2 Brochure
Page 1
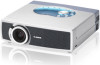
...) and incredibly short throw distances, and consistently produce images with Canon projectors. MAXIMUM IMPACT IN MINIMUM SPACES 100" Display 8.2' Throw ...Manual Optional Projector Lenses for the conference room. This is its optics. a sTimheplcea,rgdrsalpohtiaccucsoemr minotedrafatecse. q Replacement Lamp LV-LP18 (LV-7215/LV-7210) q Replacement Lamp LV-LP19 (LV-5210) q Component Video Cable LV-CA32 q Ceiling Mount Adapter LV-CL08 For the LV-S3 q Replacement Lamp LV-LP20 q Component Video Cable LV-CA32 q Ceiling Mount Adapter LV-CL09 For the LV-X2 q Replacement Lamp LV...
...) and incredibly short throw distances, and consistently produce images with Canon projectors. MAXIMUM IMPACT IN MINIMUM SPACES 100" Display 8.2' Throw ...Manual Optional Projector Lenses for the conference room. This is its optics. a sTimheplcea,rgdrsalpohtiaccucsoemr minotedrafatecse. q Replacement Lamp LV-LP18 (LV-7215/LV-7210) q Replacement Lamp LV-LP19 (LV-5210) q Component Video Cable LV-CA32 q Ceiling Mount Adapter LV-CL08 For the LV-S3 q Replacement Lamp LV-LP20 q Component Video Cable LV-CA32 q Ceiling Mount Adapter LV-CL09 For the LV-X2 q Replacement Lamp LV...
LV-X2 Brochure
Page 2
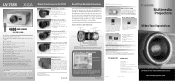
... Presentation Kit (Remote Control with USB Remote Receiver) q Power Cable q VGA Computer Cable q Lens Cap q Soft Carrying Case q Warranty Card q User's Manual 2000 ANSI LUMENS 6.4 LBS (2.9 KG) Specifications q Native SVGA Resolution (800 x 600) q 2000 ANSI Lumens (85% Uniformity) q Lens: f=20.0 to... Included) q Power Cable q Computer Cable (DVI-VGA) q Mouse Control Cable (USB) q Lens Cap q Soft carrying Case q Warranty Card q User's Manual Kit Contents q Projector q Wireless Remote Control (AA Batteries Included) q Power Cable q Computer Cable (DVI-VGA) q Mouse Control Cable (USB) q Lens Cap...
... Presentation Kit (Remote Control with USB Remote Receiver) q Power Cable q VGA Computer Cable q Lens Cap q Soft Carrying Case q Warranty Card q User's Manual 2000 ANSI LUMENS 6.4 LBS (2.9 KG) Specifications q Native SVGA Resolution (800 x 600) q 2000 ANSI Lumens (85% Uniformity) q Lens: f=20.0 to... Included) q Power Cable q Computer Cable (DVI-VGA) q Mouse Control Cable (USB) q Lens Cap q Soft carrying Case q Warranty Card q User's Manual Kit Contents q Projector q Wireless Remote Control (AA Batteries Included) q Power Cable q Computer Cable (DVI-VGA) q Mouse Control Cable (USB) q Lens Cap...
Owners Manual
Page 2
...PRESENT WITHIN THIS UNIT. THIS SYMBOL INDICATES THAT THERE ARE IMPORTANT OPERATING AND MAINTENANCE INSTRUCTIONS IN THE OWNER'S MANUAL WITH THIS UNIT. 2 TO THE OWNER Before operating this projector, read this manual again, check operations and cable connections and try the solutions in the "TROUBLESHOOTING" section in the end...into the lens as it may result in the way indicated. Do not stare directly into the beam. READ AND KEEP THIS OWNER'S MANUAL FOR LATER USE. Heat build-up can reduce the service life of the projector cabinet for an extended time, unplug the projector from the...
...PRESENT WITHIN THIS UNIT. THIS SYMBOL INDICATES THAT THERE ARE IMPORTANT OPERATING AND MAINTENANCE INSTRUCTIONS IN THE OWNER'S MANUAL WITH THIS UNIT. 2 TO THE OWNER Before operating this projector, read this manual again, check operations and cable connections and try the solutions in the "TROUBLESHOOTING" section in the end...into the lens as it may result in the way indicated. Do not stare directly into the beam. READ AND KEEP THIS OWNER'S MANUAL FOR LATER USE. Heat build-up can reduce the service life of the projector cabinet for an extended time, unplug the projector from the...
Owners Manual
Page 5
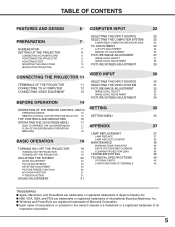
...XGA, and PS/2 are registered trademarks of International Business Machines, Inc. G Each name of corporations or products in the owner's manual is a trademark or a registered trademark of Apple Computer,Inc. TABLE OF CONTENTS FEATURES AND DESIGN 6 COMPUTER INPUT 22 PREPARATION NOMENCHTOR... THE INPUT SOURCE 22 7 SELECTING THE COMPUTER SYSTEM COMPATIBLE COMPUTER SPECIFICATIONS 22 23 PC ADJUSTMENT 24 7 AUTO PC ADJUSTMENT 24 8 MANUAL PC ADJUSTMENT 25 8 PICTURE IMAGE ADJUSTMENT 27 9 IMAGE LEVEL SELECT 27 9 IMAGE LEVEL ADJUSTMENT 28 10 PICTURE SCREEN ADJUSTMENT 29 ...
...XGA, and PS/2 are registered trademarks of International Business Machines, Inc. G Each name of corporations or products in the owner's manual is a trademark or a registered trademark of Apple Computer,Inc. TABLE OF CONTENTS FEATURES AND DESIGN 6 COMPUTER INPUT 22 PREPARATION NOMENCHTOR... THE INPUT SOURCE 22 7 SELECTING THE COMPUTER SYSTEM COMPATIBLE COMPUTER SPECIFICATIONS 22 23 PC ADJUSTMENT 24 7 AUTO PC ADJUSTMENT 24 8 MANUAL PC ADJUSTMENT 25 8 PICTURE IMAGE ADJUSTMENT 27 9 IMAGE LEVEL SELECT 27 9 IMAGE LEVEL ADJUSTMENT 28 10 PICTURE SCREEN ADJUSTMENT 29 ...
Owners Manual
Page 6
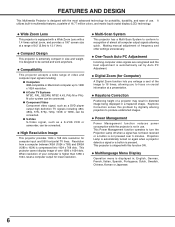
... projector is not pressed over 1280 x 1024 dots. G 6 Color TV Systems NTSC, PAL, SECAM, NTSC 4.43, PAL-M or PALN color system can be connected. Making manual adjustment of almost all computer output signals allowing quick. N One-Touch Auto PC Adjustment Incoming computer video signals are recognized and the best adjustment is...
... projector is not pressed over 1280 x 1024 dots. G 6 Color TV Systems NTSC, PAL, SECAM, NTSC 4.43, PAL-M or PALN color system can be connected. Making manual adjustment of almost all computer output signals allowing quick. N One-Touch Auto PC Adjustment Incoming computer video signals are recognized and the best adjustment is...
Owners Manual
Page 22
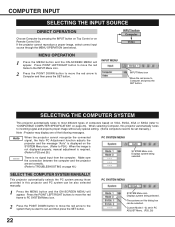
... PC SYSTEM Menu icon. 2 Press the POINT DOWN button to move the red arrow to TROUBLESHOOTING on this dialog box can be also selected manually. 1 Press the MENU button and the ON-SCREEN MENU will appear. The systems on page 40.) PC SYSTEM MENU SYSTEM Menu icon Displays... system being selected. SELECT THE COMPUTER SYSTEM MANUALLY This projector automatically selects the PC system among those provided in PC ADJUST Menu. (P25, 26) 22 When the projector cannot recognize the ...
... PC SYSTEM Menu icon. 2 Press the POINT DOWN button to move the red arrow to TROUBLESHOOTING on this dialog box can be also selected manually. 1 Press the MENU button and the ON-SCREEN MENU will appear. The systems on page 40.) PC SYSTEM MENU SYSTEM Menu icon Displays... system being selected. SELECT THE COMPUTER SYSTEM MANUALLY This projector automatically selects the PC system among those provided in PC ADJUST Menu. (P25, 26) 22 When the projector cannot recognize the ...
Owners Manual
Page 24
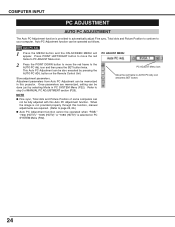
... PC Adjustment function can not be operated when "RGB," "720p (HDTV)," "1035i (HDTV)" or "1080i (HDTV)" is not provided properly through this function, manual adjustments are memorized, setting can be done just by pressing the AUTO PC ADJ. This Auto PC Adjustment can be also executed by selecting Mode... in this Auto PC Adjustment function. NOTE G Fine sync, Total dots and Picture Position of MANUAL PC ADJUSTMENT section (P26). button on PC SYSTEM Menu (P22). Press POINT LEFT/RIGHT button to move the red frame to PC ADJUST ...
... PC Adjustment function can not be operated when "RGB," "720p (HDTV)," "1035i (HDTV)" or "1080i (HDTV)" is not provided properly through this function, manual adjustments are memorized, setting can be done just by pressing the AUTO PC ADJ. This Auto PC Adjustment can be also executed by selecting Mode... in this Auto PC Adjustment function. NOTE G Fine sync, Total dots and Picture Position of MANUAL PC ADJUSTMENT section (P26). button on PC SYSTEM Menu (P22). Press POINT LEFT/RIGHT button to move the red frame to PC ADJUST ...
Owners Manual
Page 25
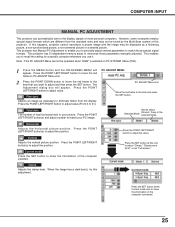
...ON-SCREEN MENU will appear. When the image has a dark bar(s), try this icon to the item and press the SET button. COMPUTER INPUT MANUAL PC ADJUSTMENT This projector can automatically tune to the display signals of the selected Mode. The Adjustment dialog box will appear. Press the POINT LEFT...LEFT/RIGHT button to adjust the value. Current mode Press the SET button to adjust and then press the SET button. This projector has Manual PC Adjustment to enable you to precisely adjust several parameters to the item that you use it. Total dots The number of the computer ...
...ON-SCREEN MENU will appear. When the image has a dark bar(s), try this icon to the item and press the SET button. COMPUTER INPUT MANUAL PC ADJUSTMENT This projector can automatically tune to the display signals of the selected Mode. The Adjustment dialog box will appear. Press the POINT LEFT...LEFT/RIGHT button to adjust the value. Current mode Press the SET button to adjust and then press the SET button. This projector has Manual PC Adjustment to enable you to precisely adjust several parameters to the item that you use it. Total dots The number of the computer ...
Owners Manual
Page 29
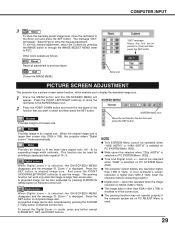
...mode automatically. Zoom -" is used for providing a squeezed video signal at 16 : 9. G Digital zoom - COMPUTER INPUT 3 Store To store the manually preset image level, move the red frame to fit screen size. SCREEN Menu icon Normal Provides image to the Store icon and press the SET... button. G True and Digital zoom +/- cannot be selected when "720p (HDTV)" is larger than screen size (1024 x 768), this manual adjustment, select the Custom by expanding image width uniformly. The message "OK?" Reset Reset all adjustment to [Yes] and then press the SET ...
...mode automatically. Zoom -" is used for providing a squeezed video signal at 16 : 9. G Digital zoom - COMPUTER INPUT 3 Store To store the manually preset image level, move the red frame to fit screen size. SCREEN Menu icon Normal Provides image to the Store icon and press the SET... button. G True and Digital zoom +/- cannot be selected when "720p (HDTV)" is larger than screen size (1024 x 768), this manual adjustment, select the Custom by expanding image width uniformly. The message "OK?" Reset Reset all adjustment to [Yes] and then press the SET ...
Owners Manual
Page 31
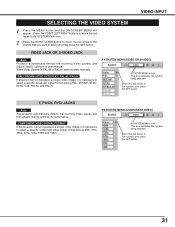
... 4.43, PAL-M, and PAL-N. PAL / SECAM / NTSC / NTSC4.43 / PAL-M / PAL-N If projector cannot reproduce a proper video image, it is PAL-M or PAL-N, select system manually.
... 4.43, PAL-M, and PAL-N. PAL / SECAM / NTSC / NTSC4.43 / PAL-M / PAL-N If projector cannot reproduce a proper video image, it is PAL-M or PAL-N, select system manually.
Owners Manual
Page 34
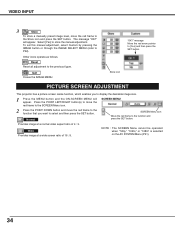
..., select Custom by pressing the IMAGE button or through the IMAGE SELECT MENU (refer to store the manual adjustment. Other icons operate as follows. Quit Closes the IMAGE MENU. Provides image at a wide screen ratio of 4 : 3. NOTE : The SCREEN Menu cannot be operated ... select and then press the SET button. Reset Reset all adjustment to [Yes] and then press the SET button. "OK?" VIDEO INPUT 3 Store To store a manually preset image level, move the red frame to the SCREEN Menu icon. message Move the red arrow pointer to the previous figure. Normal SCREEN Menu...
..., select Custom by pressing the IMAGE button or through the IMAGE SELECT MENU (refer to store the manual adjustment. Other icons operate as follows. Quit Closes the IMAGE MENU. Provides image at a wide screen ratio of 4 : 3. NOTE : The SCREEN Menu cannot be operated ... select and then press the SET button. Reset Reset all adjustment to [Yes] and then press the SET button. "OK?" VIDEO INPUT 3 Store To store a manually preset image level, move the red frame to the SCREEN Menu icon. message Move the red arrow pointer to the previous figure. Normal SCREEN Menu...
Owners Manual
Page 38
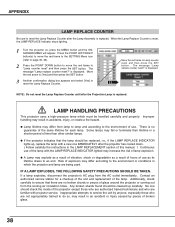
... must be cleaned up , replace the lamp with a new one should check the inside of the projector except those who are no guarantee of this manual. ) Continuous use . G Lamp lifetime may differ according to the environment or conditions in the LAMP REPLACEMENT section of the same lifetime for a checkup of the...
... must be cleaned up , replace the lamp with a new one should check the inside of the projector except those who are no guarantee of this manual. ) Continuous use . G Lamp lifetime may differ according to the environment or conditions in the LAMP REPLACEMENT section of the same lifetime for a checkup of the...
Owners Manual
Page 42
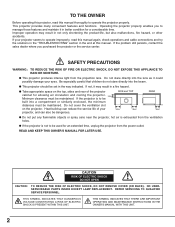
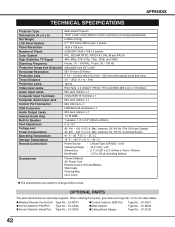
...Type (CR2025 / 3.0V) : 16.4' (5m) / ±30˚ : 2.1" x 0.28" x 5.3" (54mm x 7mm x 135mm) : 1.27oz (36 g) (including battery) Accessories Owner's Manual AC Power Cord Remote Control Unit and Battery VGA Cable Carrying Bag Lens Cover G The specifications are optionally supplied. G Wireless Remote Control Unit Type No.... : LV-RC01 G Control Cable for PS/2Port Type No. : LV-CA25 G Control Cable for Serial Port Type No.: LV-CA26 G Control Cable for ADB Port G MAC Adapter G Ceiling Mount Hanger Type No.: LV-CA27 Type No.: LV-AD02 Type No.: LV-CL06 42 When ordering those...
...Type (CR2025 / 3.0V) : 16.4' (5m) / ±30˚ : 2.1" x 0.28" x 5.3" (54mm x 7mm x 135mm) : 1.27oz (36 g) (including battery) Accessories Owner's Manual AC Power Cord Remote Control Unit and Battery VGA Cable Carrying Bag Lens Cover G The specifications are optionally supplied. G Wireless Remote Control Unit Type No.... : LV-RC01 G Control Cable for PS/2Port Type No. : LV-CA25 G Control Cable for Serial Port Type No.: LV-CA26 G Control Cable for ADB Port G MAC Adapter G Ceiling Mount Hanger Type No.: LV-CA27 Type No.: LV-AD02 Type No.: LV-CL06 42 When ordering those...


