LV-X2 Brochure
Page 1
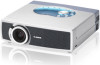
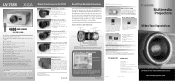
...6x) and incredibly short throw distances, and consistently produce images with Canon projectors. s Optional Accessories For the LV-7215 • LV-7210 • LV-5210 Multi Card Imager LV-MI01 This multi-function accessory allows you to 25.0 m) Lens changes...the conference room. q Replacement Lamp LV-LP18 (LV-7215/LV-7210) q Replacement Lamp LV-LP19 (LV-5210) q Component Video Cable LV-CA32 q Ceiling Mount Adapter LV-CL08 For the LV-S3 q Replacement Lamp LV-LP20 q Component Video Cable LV-CA32 q Ceiling Mount Adapter LV-CL09 For the LV-X2 q Replacement Lamp LV-LP15 q Remote Control with...
...6x) and incredibly short throw distances, and consistently produce images with Canon projectors. s Optional Accessories For the LV-7215 • LV-7210 • LV-5210 Multi Card Imager LV-MI01 This multi-function accessory allows you to 25.0 m) Lens changes...the conference room. q Replacement Lamp LV-LP18 (LV-7215/LV-7210) q Replacement Lamp LV-LP19 (LV-5210) q Component Video Cable LV-CA32 q Ceiling Mount Adapter LV-CL08 For the LV-S3 q Replacement Lamp LV-LP20 q Component Video Cable LV-CA32 q Ceiling Mount Adapter LV-CL09 For the LV-X2 q Replacement Lamp LV-LP15 q Remote Control with...
Owners Manual
Page 2
... OF ELECTRIC SHOCK DO NOT OPEN CAUTION : TO REDUCE THE RISK OF ELECTRIC SHOCK, DO NOT REMOVE COVER (OR BACK). NO USERSERVICEABLE PARTS INSIDE EXCEPT LAMP REPLACEMENT. TO THE OWNER Before operating this projector, read this manual again, check operations and cable connections and try the solutions in the "TROUBLESHOOTING" section...
... OF ELECTRIC SHOCK DO NOT OPEN CAUTION : TO REDUCE THE RISK OF ELECTRIC SHOCK, DO NOT REMOVE COVER (OR BACK). NO USERSERVICEABLE PARTS INSIDE EXCEPT LAMP REPLACEMENT. TO THE OWNER Before operating this projector, read this manual again, check operations and cable connections and try the solutions in the "TROUBLESHOOTING" section...
Owners Manual
Page 5
... MENU 17 HOW TO OPERATE THE ON-SCREEN MENU 17 APPENDIX 37 FLOW OF ON-SCREEN MENU OPERATION 17 MENU BAR 18 LAMP REPLACEMENT 37 LAMP REPLACE 37 BASIC OPERATION 19 LAMP REPLACE COUNTER MAINTENANCE 38 39 WARNING TEMP. INDICATOR 39 TURNING ON / OFF THE PROJECTOR 19 AIR FILTER CARE AND CLEANING 39...
... MENU 17 HOW TO OPERATE THE ON-SCREEN MENU 17 APPENDIX 37 FLOW OF ON-SCREEN MENU OPERATION 17 MENU BAR 18 LAMP REPLACEMENT 37 LAMP REPLACE 37 BASIC OPERATION 19 LAMP REPLACE COUNTER MAINTENANCE 38 39 WARNING TEMP. INDICATOR 39 TURNING ON / OFF THE PROJECTOR 19 AIR FILTER CARE AND CLEANING 39...
Owners Manual
Page 6
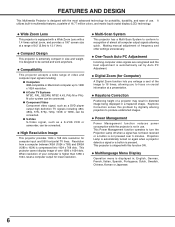
...consumption while the projector is compressed into 1024 x 768 dots. This projector is automatically turned on crucial information at a range of use . Projection Lamp is shipped with a 1.4 times optical zoom, and provides a 100" screen size at a presentation. It utilizes built-in multimedia features, a...you to focus on again when a projector detects a signal or a button is automatically set by digitally altering projection to turn the Projection Lamp off when a signal has not been received or a button is equipped with a Wide Zoom Lens with this problem by Auto PC ...
...consumption while the projector is compressed into 1024 x 768 dots. This projector is automatically turned on crucial information at a range of use . Projection Lamp is shipped with a 1.4 times optical zoom, and provides a 100" screen size at a presentation. It utilizes built-in multimedia features, a...you to focus on again when a projector detects a signal or a button is automatically set by digitally altering projection to turn the Projection Lamp off when a signal has not been received or a button is equipped with a Wide Zoom Lens with this problem by Auto PC ...
Owners Manual
Page 7
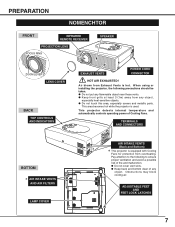
... blown from Exhaust Vents is equipped with Cooling Fans for protection from any object. TERMINALS AND CONNECTORS BOTTOM ✽ AIR INTAKE VENTS AND AIR FILTERS LAMP COVER AIR INTAKE VENTS (Back and Bottom) ✽ This projector is hot. G Keep back and bottom clear of any object, especially heat-sensitive objects. G Do...
... blown from Exhaust Vents is equipped with Cooling Fans for protection from any object. TERMINALS AND CONNECTORS BOTTOM ✽ AIR INTAKE VENTS AND AIR FILTERS LAMP COVER AIR INTAKE VENTS (Back and Bottom) ✽ This projector is hot. G Keep back and bottom clear of any object, especially heat-sensitive objects. G Do...
Owners Manual
Page 9
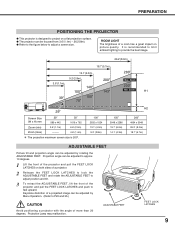
... x 3048 26.2' (8.0m) 18.7' (5.7m) ADJUSTABLE FEET Picture tilt and projection angle can be adjusted by Menu Operation. (Refer to project on picture quality. Projection Lamp may malfunction. ADJUSTABLE FEET FEET LOCK LATCHES 9 Zoom 200" Min. ROOM LIGHT The brightness of a room has a great impact on a flat projection surface. PREPARATION POSITIONING...
... x 3048 26.2' (8.0m) 18.7' (5.7m) ADJUSTABLE FEET Picture tilt and projection angle can be adjusted by Menu Operation. (Refer to project on picture quality. Projection Lamp may malfunction. ADJUSTABLE FEET FEET LOCK LATCHES 9 Zoom 200" Min. ROOM LIGHT The brightness of a room has a great impact on a flat projection surface. PREPARATION POSITIONING...
Owners Manual
Page 16
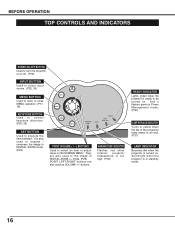
... Becomes dim when the projector is in stand-by mode. 16 And bright when the projector is turned on. LAMP READY LAMP REPLACE SET BUTTON Used to execute the item selected. It is ready to be turned on or off. (P19) INPUT BUTTON Used to select input ...
... Becomes dim when the projector is in stand-by mode. 16 And bright when the projector is turned on. LAMP READY LAMP REPLACE SET BUTTON Used to execute the item selected. It is ready to be turned on or off. (P19) INPUT BUTTON Used to select input ...
Owners Manual
Page 18
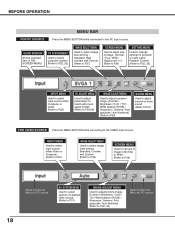
... MENU Used to adjust size of image. [Normal / True / Wide / Digital zoom +/-] (Refer to P29) SETTING MENU Used to change settings of projector or reset Lamp Replace Counter. (Refer to P35, 36) INPUT MENU Used to select input source either Video or Computer. (Refer to P30) IMAGE SELECT MENU Used to...
... MENU Used to adjust size of image. [Normal / True / Wide / Digital zoom +/-] (Refer to P29) SETTING MENU Used to change settings of projector or reset Lamp Replace Counter. (Refer to P35, 36) INPUT MENU Used to select input source either Video or Computer. (Refer to P30) IMAGE SELECT MENU Used to...
Owners Manual
Page 19
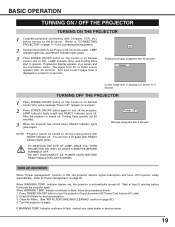
...the projector has cooled down starts. Turn the projector on screen for dust accumulation. 3. Indicator continues to flash, follow the procedures below: 1. LAMP Indicator dims, and Cooling Fans start to turn off ?" And then current image level is ON, the projector detects signal interruption and turns off...on the projector again. Preparation Display appears on Remote Control Unit to turn the projector off . Press POWER ON-OFF button to operate. LAMP Indicator lights red, and READY Indicator lights green. 3 Press POWER ON-OFF button on Top Control or on a screen and the count-...
...the projector has cooled down starts. Turn the projector on screen for dust accumulation. 3. Indicator continues to flash, follow the procedures below: 1. LAMP Indicator dims, and Cooling Fans start to turn off ?" And then current image level is ON, the projector detects signal interruption and turns off...on the projector again. Preparation Display appears on Remote Control Unit to turn the projector off . Press POWER ON-OFF button to operate. LAMP Indicator lights red, and READY Indicator lights green. 3 Press POWER ON-OFF button on Top Control or on a screen and the count-...
Owners Manual
Page 36
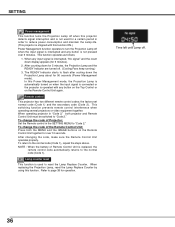
... on when the input signal is connected or the projector is operated with this function ON.) Power Management function operates to turn the Projection Lamp off . (Cooling Fans keep running.) 3. To change the code of the Remote Control Unit; After changing the code, make sure the... any button is not pressed over 10 seconds. Remote control This projector has two different remote control codes; When replacing the Projection Lamp, reset the Lamp Replace Counter by using this function. Refer to flash after cooling down for over 5 minutes. SETTING Power management This function turns ...
... on when the input signal is connected or the projector is operated with this function ON.) Power Management function operates to turn the Projection Lamp off . (Cooling Fans keep running.) 3. To change the code of the Remote Control Unit; After changing the code, make sure the... any button is not pressed over 10 seconds. Remote control This projector has two different remote control codes; When replacing the Projection Lamp, reset the Lamp Replace Counter by using this function. Refer to flash after cooling down for over 5 minutes. SETTING Power management This function turns ...
Owners Manual
Page 37
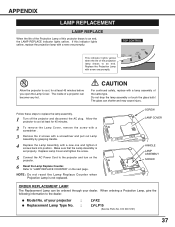
...CONTROL RNING EMP. CAUTION For continued safety, replace with a new one promptly. The glass can be ordered through your projector : G Replacement Lamp Type No. : LV-X2 LV-LP15 (Service Parts No. 610 300 7267) 37 Follow these steps to an end. Refer to the projector and turn on the next... page . G Model No. SCREW LAMP COVER HANDLE LAMP ASSEMBLY SCREW ORDER REPLACEMENT LAMP The Replacement Lamp can shatter and may cause injury. The inside of...
...CONTROL RNING EMP. CAUTION For continued safety, replace with a new one promptly. The glass can be ordered through your projector : G Replacement Lamp Type No. : LV-X2 LV-LP15 (Service Parts No. 610 300 7267) 37 Follow these steps to an end. Refer to the projector and turn on the next... page . G Model No. SCREW LAMP COVER HANDLE LAMP ASSEMBLY SCREW ORDER REPLACEMENT LAMP The Replacement Lamp can shatter and may cause injury. The inside of...
Owners Manual
Page 38
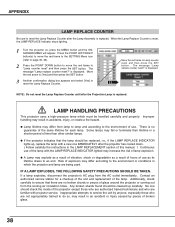
... INDICATOR lights up carefully. Inappropriate attempts to service the unit by pieces of broken glass. 38 APPENDIX LAMP REPLACE COUNTER Be sure to reset the Lamp Replace Counter after the Projection Lamp is replaced. Press the POINT LEFT/RIGHT button(s) to move the red frame to the SETTING Menu icon (refer to page... 35, 36). 2 Press the POINT DOWN button to move the red frame to reset the Lamp Replace Counter. Move the red arrow to [Yes] and then press the SET button. 3 Another confirmation dialog box appears and select [Yes] to...
... INDICATOR lights up carefully. Inappropriate attempts to service the unit by pieces of broken glass. 38 APPENDIX LAMP REPLACE COUNTER Be sure to reset the Lamp Replace Counter after the Projection Lamp is replaced. Press the POINT LEFT/RIGHT button(s) to move the red frame to the SETTING Menu icon (refer to page... 35, 36). 2 Press the POINT DOWN button to move the red frame to reset the Lamp Replace Counter. Move the red arrow to [Yes] and then press the SET button. 3 Another confirmation dialog box appears and select [Yes] to...
Owners Manual
Page 40
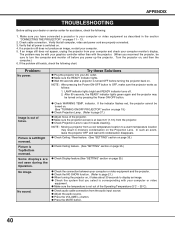
Try these Solutions G Plug the projector into your computer. 5. LAMP indicator lights bright and READY indicator turns off before turning the projector back on. G Check Ceiling / Rear feature. (See "SETTING" section on page 35.) G Check ...Ceiling feature. (See "SETTING" section on page 35.) G Check Display feature.(See "SETTING" section on page 19.) G Check Projection Lamp. (Refer to your computer or video equipment as follows: 1. G Press the VOLUME (+) button. Make sure you have connected a projector to page 37.) G Adjust focus of...
Try these Solutions G Plug the projector into your computer. 5. LAMP indicator lights bright and READY indicator turns off before turning the projector back on. G Check Ceiling / Rear feature. (See "SETTING" section on page 35.) G Check ...Ceiling feature. (See "SETTING" section on page 35.) G Check Display feature.(See "SETTING" section on page 19.) G Check Projection Lamp. (Refer to your computer or video equipment as follows: 1. G Press the VOLUME (+) button. Make sure you have connected a projector to page 37.) G Adjust focus of...
Owners Manual
Page 42
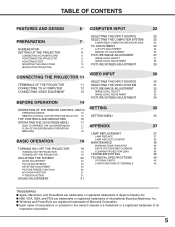
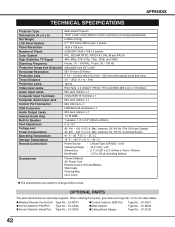
...Control Unit Type No. : LV-RC01 G Control Cable for PS/2Port Type No. : LV-CA25 G Control Cable for Serial Port Type No.: LV-CA26 G Control Cable for ADB Port G MAC Adapter G Ceiling Mount Hanger Type No.: LV-CA27 Type No.: LV-AD02 Type No.: LV-CL06 42 APPENDIX TECHNICAL SPECIFICATIONS ... Color System High Definition TV Signal Scanning Frequency Projection Image size (Diagonal) Horizontal Resolution Projection Lens Throw Distance Projection Lamp Video Input Jacks Audio Input Jacks Computer Input Terminals Computer Audio Input Jack Control Port Connector USB Connector Audio Output Jacks...
...Control Unit Type No. : LV-RC01 G Control Cable for PS/2Port Type No. : LV-CA25 G Control Cable for Serial Port Type No.: LV-CA26 G Control Cable for ADB Port G MAC Adapter G Ceiling Mount Hanger Type No.: LV-CA27 Type No.: LV-AD02 Type No.: LV-CL06 42 APPENDIX TECHNICAL SPECIFICATIONS ... Color System High Definition TV Signal Scanning Frequency Projection Image size (Diagonal) Horizontal Resolution Projection Lens Throw Distance Projection Lamp Video Input Jacks Audio Input Jacks Computer Input Terminals Computer Audio Input Jack Control Port Connector USB Connector Audio Output Jacks...
Command List
Page 2
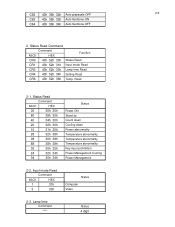
... HEX Function CR0 43h 52h 30h Status Read CR1 43h 52h 31h Input mode Read CR3 43h 52h 33h Lamp time Read CR4 43h 52h 34h Setting Read CR6 43h 52h 36h Temp. Lamp time Command **** Status 4 digit C62 43h 36h 32h Auto grayscale OFF 2/3 C63 43h 36h 33h Auto fleshtone ON...
... HEX Function CR0 43h 52h 30h Status Read CR1 43h 52h 31h Input mode Read CR3 43h 52h 33h Lamp time Read CR4 43h 52h 34h Setting Read CR6 43h 52h 36h Temp. Lamp time Command **** Status 4 digit C62 43h 36h 32h Auto grayscale OFF 2/3 C63 43h 36h 33h Auto fleshtone ON...


