Owners Manual
Page 6
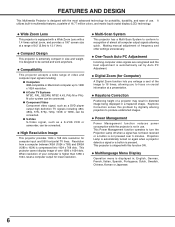
... to focus on again when a projector detects a signal or a button is displayed in size and weight. N Compact Design This projector is higher than 1280 x 1024, reset a computer output for Computer) A Digital Zoom function lets you to turn the Projection Lamp off when a signal has not been received or a button is equipped...
... to focus on again when a projector detects a signal or a button is displayed in size and weight. N Compact Design This projector is higher than 1280 x 1024, reset a computer output for Computer) A Digital Zoom function lets you to turn the Projection Lamp off when a signal has not been received or a button is equipped...
Owners Manual
Page 11
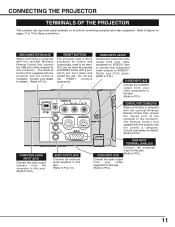
...need to this jack. (Refer to 13 for these connections. Consult your dealer for connecting computer and video equipment. This can be reset. Refer to figures on its side for details. (Refer to P12.) COMPUTER AUDIO INPUT JACK Connect the audio output (stereo) from....) CONTROL PORT CONNECTOR When controlling a computer with the projector can not control a computer. Consult your video equipment to this connector. VIDEO IN RESET Y -- USB CONNECTOR (Series B) When controlling a computer with the optional Wireless Remote Control Unit, connect the USB port of the computer to...
...need to this jack. (Refer to 13 for these connections. Consult your dealer for connecting computer and video equipment. This can be reset. Refer to figures on its side for details. (Refer to P12.) COMPUTER AUDIO INPUT JACK Connect the audio output (stereo) from....) CONTROL PORT CONNECTOR When controlling a computer with the projector can not control a computer. Consult your video equipment to this connector. VIDEO IN RESET Y -- USB CONNECTOR (Series B) When controlling a computer with the optional Wireless Remote Control Unit, connect the USB port of the computer to...
Owners Manual
Page 12
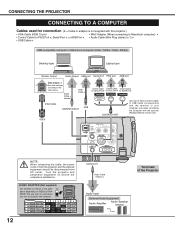
RGB IN VIDEO IN RESET Y -- N MAC ADAPTER (Not supplied) Set switches as shown in the table ON below depending on RESOLUTION MODE that you want to the chart below. OFF ...
RGB IN VIDEO IN RESET Y -- N MAC ADAPTER (Not supplied) Set switches as shown in the table ON below depending on RESOLUTION MODE that you want to the chart below. OFF ...

Owners Manual
Page 13
VIDEO IN RESET Y -- Pb / Cb -- Cr/Pr S-VIDEO IN Use any of both VIDEO jack and S- Pr / Cr COMPUTER AUDIO IN CONTROL AV AUDIO IN S-VIDEO IN AUDIO ...
VIDEO IN RESET Y -- Pb / Cb -- Cr/Pr S-VIDEO IN Use any of both VIDEO jack and S- Pr / Cr COMPUTER AUDIO IN CONTROL AV AUDIO IN S-VIDEO IN AUDIO ...
Owners Manual
Page 18
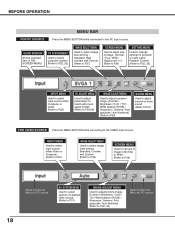
... image. [Normal / True / Wide / Digital zoom +/-] (Refer to P29) SETTING MENU Used to the VIDEO input source. GUIDE WINDOW Shows selected item of projector or reset Lamp Replace Counter. (Refer to P35, 36) INPUT MENU Used to select input source either Video or Computer. (Refer to P30) IMAGE SELECT MENU Used...
... image. [Normal / True / Wide / Digital zoom +/-] (Refer to P29) SETTING MENU Used to the VIDEO input source. GUIDE WINDOW Shows selected item of projector or reset Lamp Replace Counter. (Refer to P35, 36) INPUT MENU Used to select input source either Video or Computer. (Refer to P30) IMAGE SELECT MENU Used...
Owners Manual
Page 26
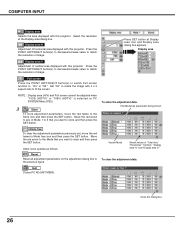
... POINT LEFT/RIGHT button(s) to decrease/increase value to any of vertical area displayed with 4 x 3 aspect ratio to clear and then press the SET button. Reset Reset all adjustment parameters on PC SYSTEM Menu (P22). 3 Store To store adjustment parameters, move the red frame to match the resolution of image. Quit Closes...
... POINT LEFT/RIGHT button(s) to decrease/increase value to any of vertical area displayed with 4 x 3 aspect ratio to clear and then press the SET button. Reset Reset all adjustment parameters on PC SYSTEM Menu (P22). 3 Store To store adjustment parameters, move the red frame to match the resolution of image. Quit Closes...
Owners Manual
Page 29
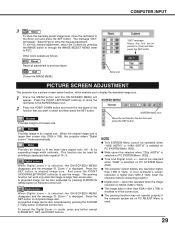
... button except D.ZOOM W/T, SET, and POINT buttons. COMPUTER INPUT 3 Store To store the manually preset image level, move the red frame to pan the image. Reset Reset all adjustment to fit screen size. "OK?" SCREEN Menu icon Normal Provides image to previous figure. Wide Provides an image to fit the wide video...
... button except D.ZOOM W/T, SET, and POINT buttons. COMPUTER INPUT 3 Store To store the manually preset image level, move the red frame to pan the image. Reset Reset all adjustment to fit screen size. "OK?" SCREEN Menu icon Normal Provides image to previous figure. Wide Provides an image to fit the wide video...
Owners Manual
Page 34
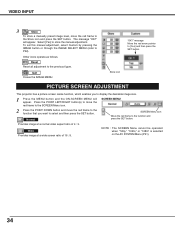
... the red frame to the previous figure. Other icons operate as follows. Normal SCREEN Menu icon Move the red frame to P32). The message "OK?" Reset Reset all adjustment to the Store icon and press the SET button. NOTE : The SCREEN Menu cannot be operated when "720p," "1035i," or "1080i" is selected...
... the red frame to the previous figure. Other icons operate as follows. Normal SCREEN Menu icon Move the red frame to P32). The message "OK?" Reset Reset all adjustment to the Store icon and press the SET button. NOTE : The SCREEN Menu cannot be operated when "720p," "1035i," or "1080i" is selected...
Owners Manual
Page 36
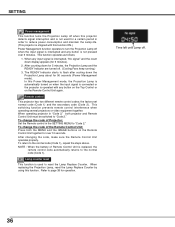
... operating projector in "Code 2," both the MENU and the IMAGE buttons on the Remote Control Unit again. When replacing the Projection Lamp, reset the Lamp Replace Counter by using this function. To change the code of Projector; To change the code of the Remote Control Unit; ... 10 seconds. NOTE : When the battery of Remote Control Unit is replaced, the remote control code automatically returns to reset the Lamp Replace Counter. Lamp counter reset This function is used for a certain period in order to reduce power consumption and maintain the Lamp-life. (This ...
... operating projector in "Code 2," both the MENU and the IMAGE buttons on the Remote Control Unit again. When replacing the Projection Lamp, reset the Lamp Replace Counter by using this function. To change the code of Projector; To change the code of the Remote Control Unit; ... 10 seconds. NOTE : When the battery of Remote Control Unit is replaced, the remote control code automatically returns to reset the Lamp Replace Counter. Lamp counter reset This function is used for a certain period in order to reduce power consumption and maintain the Lamp-life. (This ...
Owners Manual
Page 37
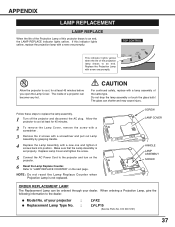
...to the projector and turn on the next page . NOTE : Do not reset the Lamp Replace Counter when Projection Lamp is set properly. The glass can be ordered through your projector : G Replacement Lamp Type No. : LV-X2 LV-LP15 (Service Parts No. 610 300 7267) 37 Replace Lamp Cover and .... Allow the projector to an end. When ordering a Projection Lamp, give the following information to "LAMP REPLACE COUNTER" on the projector. 6 Reset the Lamp Replace Counter. This indicator lights yellow when the life of a projector can become very hot. The inside of the projection lamp draws ...
...to the projector and turn on the next page . NOTE : Do not reset the Lamp Replace Counter when Projection Lamp is set properly. The glass can be ordered through your projector : G Replacement Lamp Type No. : LV-X2 LV-LP15 (Service Parts No. 610 300 7267) 37 Replace Lamp Cover and .... Allow the projector to an end. When ordering a Projection Lamp, give the following information to "LAMP REPLACE COUNTER" on the projector. 6 Reset the Lamp Replace Counter. This indicator lights yellow when the life of a projector can become very hot. The inside of the projection lamp draws ...
Owners Manual
Page 38
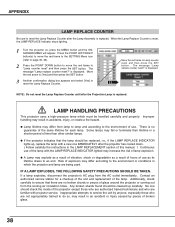
...anyone, especially those who are authorized trained technicians and who are being used. is displayed. is displayed. Move the red frame to "Lamp counter reset" and then press the SET button. Risk of the lamp. When the Lamp Replace Counter is replaced. There is no broken shards or pieces ... frame to the SETTING Menu icon (refer to page 35, 36). 2 Press the POINT DOWN button to move the red frame to Lamp counter reset and then press the SET button. IF A LAMP EXPLODES, THE FOLLOWING SAFETY PRECAUTIONS SHOULD BE TAKEN. Contact an authorized service station for each lamp....
...anyone, especially those who are authorized trained technicians and who are being used. is displayed. is displayed. Move the red frame to "Lamp counter reset" and then press the SET button. Risk of the lamp. When the Lamp Replace Counter is replaced. There is no broken shards or pieces ... frame to the SETTING Menu icon (refer to page 35, 36). 2 Press the POINT DOWN button to move the red frame to Lamp counter reset and then press the SET button. IF A LAMP EXPLODES, THE FOLLOWING SAFETY PRECAUTIONS SHOULD BE TAKEN. Contact an authorized service station for each lamp....

