Full Line - Projectors Brochure
Page 2
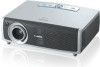
... • Projected Image Size: 40" to 300" • Throw Ratio 1.48 to increase brightness and contrast, while reducing the projector's size. Condenser Lens Cylindrical Lens Array Compressor Lens AISYS structure SXGA+ RESOLUTION To match the increasing demand for Aspectual Illumination System - ...; Soft Carrying Case • Power Cable • Warranty Card • User's Manual * Please see back cover for optional accessories, "Triple P" program and other information. 2 GENUINE CANON OPTICS Nearly 70 years of expertise in designing and crafting precision lenses for displaying crisp ...
... • Projected Image Size: 40" to 300" • Throw Ratio 1.48 to increase brightness and contrast, while reducing the projector's size. Condenser Lens Cylindrical Lens Array Compressor Lens AISYS structure SXGA+ RESOLUTION To match the increasing demand for Aspectual Illumination System - ...; Soft Carrying Case • Power Cable • Warranty Card • User's Manual * Please see back cover for optional accessories, "Triple P" program and other information. 2 GENUINE CANON OPTICS Nearly 70 years of expertise in designing and crafting precision lenses for displaying crisp ...
Full Line - Projectors Brochure
Page 3
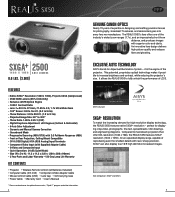
...LV-CA29 Replacement Lamp LV-LP22 Ceiling Mount Adapter LV-CL07 5 Furthermore, it offers remote transfer of images, and centralized control of the projector...PROJECTOR LENSES FOR THE LV-7565 Ultra Wide Angle Lens LV... (D:W) Wide Angle Zoom Lens LV-IL02 • Lens: ... Focus Zoom Lens LV-IL03 • Lens...Zoom Lens LV-IL04 •...projectors. OPTIONAL ACCESSORIES FOR THE LV-7565 Network Imager LV-NI01 The LV-NI01 connects the LV-7565 to 5.78:1 (D:W) Lens changes must be performed by an authorized Canon representative. LV... Life Warranty KIT CONTENTS • Projector • Power Cable • ...
...LV-CA29 Replacement Lamp LV-LP22 Ceiling Mount Adapter LV-CL07 5 Furthermore, it offers remote transfer of images, and centralized control of the projector...PROJECTOR LENSES FOR THE LV-7565 Ultra Wide Angle Lens LV... (D:W) Wide Angle Zoom Lens LV-IL02 • Lens: ... Focus Zoom Lens LV-IL03 • Lens...Zoom Lens LV-IL04 •...projectors. OPTIONAL ACCESSORIES FOR THE LV-7565 Network Imager LV-NI01 The LV-NI01 connects the LV-7565 to 5.78:1 (D:W) Lens changes must be performed by an authorized Canon representative. LV... Life Warranty KIT CONTENTS • Projector • Power Cable • ...
Full Line - Projectors Brochure
Page 4
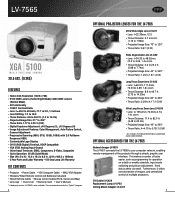
LV-7245 LV-7240 XGA 2500 1024 X 768 ANSI LUMENS 7.0 LBS. (3.0KG) ...x 3.7 in. (294 x 260 x 93mm) • 3 Year Parts and Labor Warranty -120 Day Lamp Life Warranty KIT CONTENTS • Projector • Wireless Remote Control (AAA Batteries Included) • VGA Computer Cable • Remote Mouse Receiver • Lens Cap • Soft Carrying ...Case • Power Cable • Carrying Handle (w/screws and screwdriver) • CD-ROM User's manual • Warranty Card * Please see back cover for optional accessories and the "Triple P" program. 6 XGA 2100 1024 X...
LV-7245 LV-7240 XGA 2500 1024 X 768 ANSI LUMENS 7.0 LBS. (3.0KG) ...x 3.7 in. (294 x 260 x 93mm) • 3 Year Parts and Labor Warranty -120 Day Lamp Life Warranty KIT CONTENTS • Projector • Wireless Remote Control (AAA Batteries Included) • VGA Computer Cable • Remote Mouse Receiver • Lens Cap • Soft Carrying ...Case • Power Cable • Carrying Handle (w/screws and screwdriver) • CD-ROM User's manual • Warranty Card * Please see back cover for optional accessories and the "Triple P" program. 6 XGA 2100 1024 X...
Full Line - Projectors Brochure
Page 5
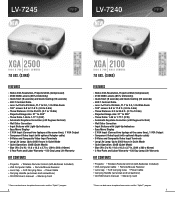
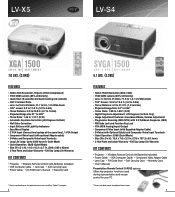
LV-X5 LV-S4 XGA 1500 1024 X 768 ANSI LUMENS 7.0 LBS. (3.0KG) FEATURES •... in. (270 x 197.2 x 83.1mm) • 3 Year Parts and Labor Warranty -120 Day Lamp Life Warranty KIT CONTENTS • Projector • Wireless Remote Control (AA Batteries Included) • Power Cable • VGA Computer Cable • Component Video Adapter Cable • Lens ...PIN Code Seal • Soft Carrying Case • Warranty Card • User's Manual Presentation Remote Control LV-RC02 (Optional) Offers key projector functions used during a presentation and mouse control for your PC. * Please see back cover...
LV-X5 LV-S4 XGA 1500 1024 X 768 ANSI LUMENS 7.0 LBS. (3.0KG) FEATURES •... in. (270 x 197.2 x 83.1mm) • 3 Year Parts and Labor Warranty -120 Day Lamp Life Warranty KIT CONTENTS • Projector • Wireless Remote Control (AA Batteries Included) • Power Cable • VGA Computer Cable • Component Video Adapter Cable • Lens ...PIN Code Seal • Soft Carrying Case • Warranty Card • User's Manual Presentation Remote Control LV-RC02 (Optional) Offers key projector functions used during a presentation and mouse control for your PC. * Please see back cover...
Full Line - Projectors Brochure
Page 6
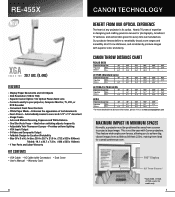
...consistently produce images with Canon projectors. Distance Tele 4.6' 40" 100" 200" 300" 400" 4.5' 11.8' 24.0' 36.1' 48.2' 6.0' 15.4' 31.0' 46.6' - Distance Tele 2.4' 40" 100" 150" 200" 300" 3.8' 9.8' 14.7' 19.7' 29.5' 4.7' 11.8' 17.8' 23.8' 35.8' LV-S4 Projection Image Size ... you to cover an 8-1/2" x 11" document • Image Freeze • Auto and Manual Focusing, Exposure and White Balance • One Shot Auto Focus - LV-7245/LV-7240/LV-X5 Projection Image Size 21" Projection Wide - Enhances the appearance of expertise in . (486...
...consistently produce images with Canon projectors. Distance Tele 4.6' 40" 100" 200" 300" 400" 4.5' 11.8' 24.0' 36.1' 48.2' 6.0' 15.4' 31.0' 46.6' - Distance Tele 2.4' 40" 100" 150" 200" 300" 3.8' 9.8' 14.7' 19.7' 29.5' 4.7' 11.8' 17.8' 23.8' 35.8' LV-S4 Projection Image Size ... you to cover an 8-1/2" x 11" document • Image Freeze • Auto and Manual Focusing, Exposure and White Balance • One Shot Auto Focus - LV-7245/LV-7240/LV-X5 Projection Image Size 21" Projection Wide - Enhances the appearance of expertise in . (486...

Owners Manual
Page 3
... Control 10 Remote Control Unit 11 Operating Range 11 Remote Control Unit Battery Installation 12 Installation 13 Positioning the Projector 13 Adjustable Feet 13 Connecting the AC Power Cord 14 Connecting to a Computer 15 Connecting to Video Equipment ...Projector 18 Zoom and Focus Adjustment 19 How to Operate the On-Screen Menu 20 Menu Bar 21 Keystone Adjustment 22 Picture Freeze Function 22 No Show Function 22 P-Timer Function 23 Sound Adjustment 23 Computer Input 24 Input Source Selection 24 Computer System Selection 25 Auto PC Adjustment 26 Manual...
... Control 10 Remote Control Unit 11 Operating Range 11 Remote Control Unit Battery Installation 12 Installation 13 Positioning the Projector 13 Adjustable Feet 13 Connecting the AC Power Cord 14 Connecting to a Computer 15 Connecting to Video Equipment ...Projector 18 Zoom and Focus Adjustment 19 How to Operate the On-Screen Menu 20 Menu Bar 21 Keystone Adjustment 22 Picture Freeze Function 22 No Show Function 22 P-Timer Function 23 Sound Adjustment 23 Computer Input 24 Input Source Selection 24 Computer System Selection 25 Auto PC Adjustment 26 Manual...

Owners Manual
Page 4
...try the solutions in the "Troubleshooting" section in the end of this manual thoroughly and operate the projector properly. This projector provides many convenient features and functions. Provide appropriate space on the projector. REFER SERVICING TO QUALIFIED SERVICE PERSONNEL. If the problem still persists, ...you to be built into the beam. - Eye damage could result. Operating the projector properly enables you purchased the projector or the service center. READ AND KEEP THIS OWNER'S MANUAL FOR LATER USE. Do not cover the ventilation slot on the top, sides and...
...try the solutions in the "Troubleshooting" section in the end of this manual thoroughly and operate the projector properly. This projector provides many convenient features and functions. Provide appropriate space on the projector. REFER SERVICING TO QUALIFIED SERVICE PERSONNEL. If the problem still persists, ...you to be built into the beam. - Eye damage could result. Operating the projector properly enables you purchased the projector or the service center. READ AND KEEP THIS OWNER'S MANUAL FOR LATER USE. Do not cover the ventilation slot on the top, sides and...

Owners Manual
Page 7
... stop operation of the equipment. Reorient or relocate the receiving antenna. - Canon U.S.A., Inc. Tel No. (516)328-5600 Canadian Radio Interference Regulations This...AC line plug. Compliance Federal Communication Commission Notice Multimedia Projector, Model : LV-S4E and LV-S4U This device complies with Part 15 of the ...FCC Rules. These limits are designed to radio communications. Should you could be sure that may cause harmful interference to provide reasonable protection against harmful interference in the manual...
... stop operation of the equipment. Reorient or relocate the receiving antenna. - Canon U.S.A., Inc. Tel No. (516)328-5600 Canadian Radio Interference Regulations This...AC line plug. Compliance Federal Communication Commission Notice Multimedia Projector, Model : LV-S4E and LV-S4U This device complies with Part 15 of the ...FCC Rules. These limits are designed to radio communications. Should you could be sure that may cause harmful interference to provide reasonable protection against harmful interference in the manual...

Owners Manual
Page 25
... Mode 1 - 5. (p27, 28) SVGA 1 PC system provided in the projector. Selecting Computer System Manually PC system can be selected manually. 1 Press the MENU button and the On-Screen Menu will appear. The projector selects a proper system and displays it. *Mode 1 and SVGA 1 are examples... Input Computer System Selection This projector automatically tunes to various types of computers based on page 55 ) ✔Note: • The projector may display one of your computer and the projector. (See "Troubleshooting" p50) Mode 1 User preset system manually adjusted in PC Adjustment menu....
... Mode 1 - 5. (p27, 28) SVGA 1 PC system provided in the projector. Selecting Computer System Manually PC system can be selected manually. 1 Press the MENU button and the On-Screen Menu will appear. The projector selects a proper system and displays it. *Mode 1 and SVGA 1 are examples... Input Computer System Selection This projector automatically tunes to various types of computers based on page 55 ) ✔Note: • The projector may display one of your computer and the projector. (See "Troubleshooting" p50) Mode 1 User preset system manually adjusted in PC Adjustment menu....

Owners Manual
Page 26
function can be operated directly by selecting Mode in this projector. Press the Point 7 8 buttons to move the red frame pointer to PC Adjustment Menu icon. 2 Press the Point d button to move the red frame pointer ... and Picture Position of some computers can be operated when 480i, 575i, 480p, 575p, 720p,1035i, or 1080i is not provided properly with this operation, manual adjustments are memorized, the setting can not be operated as follows. function is in the Computer System Selection. (p25) PC Adjust Menu PC Adjust Menu...
function can be operated directly by selecting Mode in this projector. Press the Point 7 8 buttons to move the red frame pointer to PC Adjustment Menu icon. 2 Press the Point d button to move the red frame pointer ... and Picture Position of some computers can be operated when 480i, 575i, 480p, 575p, 720p,1035i, or 1080i is not provided properly with this operation, manual adjustments are memorized, the setting can not be operated as follows. function is in the Computer System Selection. (p25) PC Adjust Menu PC Adjust Menu...
Owners Manual
Page 27
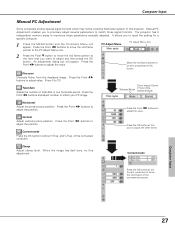
... Eliminate flicker from the displayed image. Press the Point 7 8 buttons and adjust number to adjust the value. and V-Freq. The projector has 5 independent memory areas to adjust the position. Press the Point 7 8 buttons to memorize those signal formats. It allows you to...adjustment dialog box will appear. When the image has dark bars, try this projector. Press the Point 7 8 buttons to adjust value. (From 0 to match those parameters manually adjusted. Computer Input Manual PC Adjustment Some computers employ special signal formats which may not be tuned by...
... Eliminate flicker from the displayed image. Press the Point 7 8 buttons and adjust number to adjust the value. and V-Freq. The projector has 5 independent memory areas to adjust the position. Press the Point 7 8 buttons to memorize those signal formats. It allows you to...adjustment dialog box will appear. When the image has dark bars, try this projector. Press the Point 7 8 buttons to adjust value. (From 0 to match those parameters manually adjusted. Computer Input Manual PC Adjustment Some computers employ special signal formats which may not be tuned by...

Owners Manual
Page 33
... to a system and press the OK button. COMPONENT VIDEO SIGNAL FORMAT If the projector cannot reproduce proper video image, it is PAL-M or PAL-N, select system manually. Component Auto The projector automatically detects incoming video signal, and adjusts itself to select a specific broadcast signal...Menu (Component) AV System Menu icon This box indicates the system being selected. Video Input Video or S-Video Auto The projector automatically detects incoming video system, and adjusts itself to optimize its performance. Video System Selection 1 Press the MENU button and ...
... to a system and press the OK button. COMPONENT VIDEO SIGNAL FORMAT If the projector cannot reproduce proper video image, it is PAL-M or PAL-N, select system manually. Component Auto The projector automatically detects incoming video signal, and adjusts itself to select a specific broadcast signal...Menu (Component) AV System Menu icon This box indicates the system being selected. Video Input Video or S-Video Auto The projector automatically detects incoming video system, and adjusts itself to optimize its performance. Video System Selection 1 Press the MENU button and ...

Owners Manual
Page 36
...PAL-M(Composite) or 480i(Component) in the Video System Selection (p33). • 3-2 Pulldown or Telecine transfer is effective on , the projector reproduces pictures faithful to get the best film-like images. Video Input Progressive Interlaced video signal can only be displayed in a progressive picture.... .Select "L2" for an active picture. The confirmation box will appear. Store icon "OK?" Store To store the image data adjusted manually, move the red frame pointer to the factory default settings. If you change the Image level (p34) without storing the adjusted data, the...
...PAL-M(Composite) or 480i(Component) in the Video System Selection (p33). • 3-2 Pulldown or Telecine transfer is effective on , the projector reproduces pictures faithful to get the best film-like images. Video Input Progressive Interlaced video signal can only be displayed in a progressive picture.... .Select "L2" for an active picture. The confirmation box will appear. Store icon "OK?" Store To store the image data adjusted manually, move the red frame pointer to the factory default settings. If you change the Image level (p34) without storing the adjusted data, the...

Owners Manual
Page 49
...be cleaned up carefully. Contact an authorized service station for each lamp. Any broken shards found should check the inside of the lamp with projector service. The message "Lamp replace counter reset?" Move the pointer to [Yes] and then press the OK button. 3 Another confirmation ...and properly. Inappropriate attempts to service the unit by pieces of explosion may result in the Lamp Replacement section of this manual. ) Continuous use of the projector except those who are being used. Maintenance & Cleaning Maintenance and Cleaning Lamp Replace Counter Be sure to reset the ...
...be cleaned up carefully. Contact an authorized service station for each lamp. Any broken shards found should check the inside of the lamp with projector service. The message "Lamp replace counter reset?" Move the pointer to [Yes] and then press the OK button. 3 Another confirmation ...and properly. Inappropriate attempts to service the unit by pieces of explosion may result in the Lamp Replacement section of this manual. ) Continuous use of the projector except those who are being used. Maintenance & Cleaning Maintenance and Cleaning Lamp Replace Counter Be sure to reset the ...

Owners Manual
Page 50
... No sound - Check the projection lamp. (See page 48.) - In such cases, leave the projector off when turning the projector back on. See your computer's instruction manual for the projector in moisture condensation on page 40.) - Make sure the temperature is Top/Bottom reversed. Check the WARNING... indicator. Check the Ceiling item. (See "Setting" on the projector. - Press the Vol + button. (See page 23.) - Provide ...
... No sound - Check the projection lamp. (See page 48.) - In such cases, leave the projector off when turning the projector back on. See your computer's instruction manual for the projector in moisture condensation on page 40.) - Make sure the temperature is Top/Bottom reversed. Check the WARNING... indicator. Check the Ceiling item. (See "Setting" on the projector. - Press the Vol + button. (See page 23.) - Provide ...

Owners Manual
Page 56
...; 2.0"(W) x 0.91"(H) x 4.8"(D) (51.5mm x 23.2mm x 123mm) 2.11 oz (60 g) (including batteries) 56 Appendix Technical Specifications Mechanical Information Projector Type Dimensions (W x H x D) Feet Adjustment Multi-media Projector 10.63" x 3.27" x 7.76" (270mm x 83.1mm x 197.2mm) (not including Adjustable Feet) Net Weight 5.1lbs (2.3 kg) 0˚...80 KHz, V-sync. 50 ~ 100 Hz Adjustable from 34" to 200" F 1.6 ~ 1.8 lens with f 18.3 mm ~ 21.9 mm with manual zoom and focus 4.3' ~ 21.3' (1.3m ~ 6.5m) 160W UHP Lamp Interface Video Input Jack Audio Input Jack Monitor Out Terminal Computer / S-Video ...
...; 2.0"(W) x 0.91"(H) x 4.8"(D) (51.5mm x 23.2mm x 123mm) 2.11 oz (60 g) (including batteries) 56 Appendix Technical Specifications Mechanical Information Projector Type Dimensions (W x H x D) Feet Adjustment Multi-media Projector 10.63" x 3.27" x 7.76" (270mm x 83.1mm x 197.2mm) (not including Adjustable Feet) Net Weight 5.1lbs (2.3 kg) 0˚...80 KHz, V-sync. 50 ~ 100 Hz Adjustable from 34" to 200" F 1.6 ~ 1.8 lens with f 18.3 mm ~ 21.9 mm with manual zoom and focus 4.3' ~ 21.3' (1.3m ~ 6.5m) 160W UHP Lamp Interface Video Input Jack Audio Input Jack Monitor Out Terminal Computer / S-Video ...


