
FAXPHONE L80 User's Guide
Page 9
... the FAXPHONE to Your PC 2-10 Main Components of the FAXPHONE 2-11 Operation Panel 2-12 Special Function Buttons 2-12 LCD (Standby Mode 2-12 Installing the Cartridge 2-13 Loading Paper ...2-16 Testing the FAXPHONE 2-18 Chapter 3: Registering Information Guidelines for Entering Numbers, Letters, and Symbols 3-2 Correcting a Mistake 3-4 Registering Required Sender Information 3-5 What...
... the FAXPHONE to Your PC 2-10 Main Components of the FAXPHONE 2-11 Operation Panel 2-12 Special Function Buttons 2-12 LCD (Standby Mode 2-12 Installing the Cartridge 2-13 Loading Paper ...2-16 Testing the FAXPHONE 2-18 Chapter 3: Registering Information Guidelines for Entering Numbers, Letters, and Symbols 3-2 Correcting a Mistake 3-4 Registering Required Sender Information 3-5 What...

FAXPHONE L80 User's Guide
Page 12
... 11-5 Chapter 12: Maintenance Periodic Cleaning 12-2 Cleaning the Machine's Exterior 12-2 Cleaning the Machine's Interior 12-2 Cleaning the Scanner Components 12-5 Replacing the FX-3 Cartridge 12-7 Chapter 13: Troubleshooting Clearing Jams...13-2 Jams in the ADF 13-2 Paper Jams...13-3 Jams in the Paper Delivery Slots 13-3 Jams Inside the...
... 11-5 Chapter 12: Maintenance Periodic Cleaning 12-2 Cleaning the Machine's Exterior 12-2 Cleaning the Machine's Interior 12-2 Cleaning the Scanner Components 12-5 Replacing the FX-3 Cartridge 12-7 Chapter 13: Troubleshooting Clearing Jams...13-2 Jams in the ADF 13-2 Paper Jams...13-3 Jams in the Paper Delivery Slots 13-3 Jams Inside the...
FAXPHONE L80 User's Guide
Page 17
...for high resolution text and graphics • Print speed of approximately 6 letter-size pages* per minute • Easy installation of the cartridge • Convenient multi-purpose tray for loading a variety of paper and other print media • Toner saving feature for less toner consumption ... transmission speed with super G3 technology encoding-up to approximately 3 seconds* per page • 350-page* memory for storing faxes • Canon's Ultra High Quality (UHQ™) Image Processing System for enhanced definition in faxed photos • Error Correction Mode (ECM) to reduce transmission...
...for high resolution text and graphics • Print speed of approximately 6 letter-size pages* per minute • Easy installation of the cartridge • Convenient multi-purpose tray for loading a variety of paper and other print media • Toner saving feature for less toner consumption ... transmission speed with super G3 technology encoding-up to approximately 3 seconds* per page • 350-page* memory for storing faxes • Canon's Ultra High Quality (UHQ™) Image Processing System for enhanced definition in faxed photos • Error Correction Mode (ECM) to reduce transmission...
FAXPHONE L80 User's Guide
Page 18
How to Use This Guide To make the best use of your machine. • FAXPHONE L80 User's Guide (this guide): Refer to this chapter to learn about the reports and lists that can be automatically or manually printed from your PC. ..., to become familiar with the basic operation of all functions of this guide to familiarize yourself with procedures for cleaning the machine and replacing the cartridge. 1-4 Introduction Chapter 1 There is also information on selecting and loading print media and documents, instructions on machine maintenance, and a troubleshooting section to refer to if...
How to Use This Guide To make the best use of your machine. • FAXPHONE L80 User's Guide (this guide): Refer to this chapter to learn about the reports and lists that can be automatically or manually printed from your PC. ..., to become familiar with the basic operation of all functions of this guide to familiarize yourself with procedures for cleaning the machine and replacing the cartridge. 1-4 Introduction Chapter 1 There is also information on selecting and loading print media and documents, instructions on machine maintenance, and a troubleshooting section to refer to if...

FAXPHONE L80 User's Guide
Page 21
...cloth to prevent exposure to light. • Always lift the machine as shown below. Chapter 1 Introduction 1-7 For all service, contact the Canon Customer Care Center. ■ Handling and Maintenance • Follow all warnings and instructions marked on the machine since they may touch dangerous ...tray while printing. • When transporting the machine, be sure to dangerous voltages and other risks. If you to remove the cartridge from operating properly. Never attempt to disassemble the machine: opening and removing its interior covers will expose you spill liquid or if...
...cloth to prevent exposure to light. • Always lift the machine as shown below. Chapter 1 Introduction 1-7 For all service, contact the Canon Customer Care Center. ■ Handling and Maintenance • Follow all warnings and instructions marked on the machine since they may touch dangerous ...tray while printing. • When transporting the machine, be sure to dangerous voltages and other risks. If you to remove the cartridge from operating properly. Never attempt to disassemble the machine: opening and removing its interior covers will expose you spill liquid or if...
FAXPHONE L80 User's Guide
Page 25
... the Handset to Your Machine 2-7 Making Connections 2-8 Connecting the Telephone Line Cord and External Devices 2-8 Connecting the Power Cord 2-9 Connecting the FAXPHONE to install the cartridge and load paper. Setting Up Chapter 2 Setting Up This chapter explains all the necessary steps to get your machine, and learn how to Your PC... 2-10 Main Components of the FAXPHONE 2-11 Operation Panel 2-12 Special Function Buttons 2-12 LCD (Standby Mode 2-12 Installing the Cartridge 2-13 Loading Paper 2-16 Testing the FAXPHONE 2-18 Chapter 2 Setting Up 2-1
... the Handset to Your Machine 2-7 Making Connections 2-8 Connecting the Telephone Line Cord and External Devices 2-8 Connecting the Power Cord 2-9 Connecting the FAXPHONE to install the cartridge and load paper. Setting Up Chapter 2 Setting Up This chapter explains all the necessary steps to get your machine, and learn how to Your PC... 2-10 Main Components of the FAXPHONE 2-11 Operation Panel 2-12 Special Function Buttons 2-12 LCD (Standby Mode 2-12 Installing the Cartridge 2-13 Loading Paper 2-16 Testing the FAXPHONE 2-18 Chapter 2 Setting Up 2-1

FAXPHONE L80 User's Guide
Page 27
...the machine in case you need to make sure you hold the box while you have all the following items: MACHINE FX-3 S CARTRIDGE SUPPORT TRAYS MULTI-PURPOSE TRAY MULTI-PURPOSE TRAY COVER DOCUMENT SUPPORT POWER CORD REGISTRATION CARD (for USA only) TELEPHONE LINE CORD WARRANTY ...DOCUMENTATIONS and LABELS FX-3 CARTRIDGE WARRANTY SOFTWARE USER'S CD-ROM Chapter 2 Setting Up 2-3 Make sure you have all items from the recessed areas on the sides of...
...the machine in case you need to make sure you hold the box while you have all the following items: MACHINE FX-3 S CARTRIDGE SUPPORT TRAYS MULTI-PURPOSE TRAY MULTI-PURPOSE TRAY COVER DOCUMENT SUPPORT POWER CORD REGISTRATION CARD (for USA only) TELEPHONE LINE CORD WARRANTY ...DOCUMENTATIONS and LABELS FX-3 CARTRIDGE WARRANTY SOFTWARE USER'S CD-ROM Chapter 2 Setting Up 2-3 Make sure you have all items from the recessed areas on the sides of...

FAXPHONE L80 User's Guide
Page 33
... Up 2-9 Follow this message alternates with the standby mode display. Such devices generate electrical noise that can interfere with a third (grounding) pin. PUT IN CARTRIDGE If the cartridge has not been installed, this procedure to connect the power cord: Setting Up Connect the supplied power cord to send and receive faxes. Then...
... Up 2-9 Follow this message alternates with the standby mode display. Such devices generate electrical noise that can interfere with a third (grounding) pin. PUT IN CARTRIDGE If the cartridge has not been installed, this procedure to connect the power cord: Setting Up Connect the supplied power cord to send and receive faxes. Then...

FAXPHONE L80 User's Guide
Page 35
FX-3 CARTRIDGE COMPARTMENT PAPER RELEASE LEVER DOCUMENT SUPPORT RINGER VOLUME SWITCH Use a pen or other pointed object to select the ring volume of the handset (HI, LO, ...
FX-3 CARTRIDGE COMPARTMENT PAPER RELEASE LEVER DOCUMENT SUPPORT RINGER VOLUME SWITCH Use a pen or other pointed object to select the ring volume of the handset (HI, LO, ...

FAXPHONE L80 User's Guide
Page 37
... to direct sunlight or bright light for the very first time. If toner becomes caked in the cartridge, it may harm these items. • Do not store the cartridge in temperature. The magnet inside the cartridge may prove impossible to high temperature, high humidity, or rapid changes in direct sunlight. • Avoid locations...
... to direct sunlight or bright light for the very first time. If toner becomes caked in the cartridge, it may harm these items. • Do not store the cartridge in temperature. The magnet inside the cartridge may prove impossible to high temperature, high humidity, or rapid changes in direct sunlight. • Avoid locations...

FAXPHONE L80 User's Guide
Page 38
... its protective bag. • Save the protective bag in case you need to repack the cartridge at a later date. 4 Gently rock the cartridge from side to side a few times to install the cartridge in . 2 Lift the latch and open the front cover. c Do not try to open the front cover without lifting the...
... its protective bag. • Save the protective bag in case you need to repack the cartridge at a later date. 4 Gently rock the cartridge from side to side a few times to install the cartridge in . 2 Lift the latch and open the front cover. c Do not try to open the front cover without lifting the...

FAXPHONE L80 User's Guide
Page 39
Chapter 2 Setting Up 2-15 Setting Up 5 Place and support the cartridge on a flat, clean surface, then gently pull on the plastic tab to remove the plastic seal. • Use a firm, even pull to close the front cover. SIDE VIEW TOP VIEW 6 Hold the cartridge by its handle and insert it into the machine as far as it will go, making sure that its tabs are aligned with the rails inside the machine. • Always hold the cartridge by its handle. PULL WITHIN THIS RANGE PULL WITHIN THIS RANGE 7 Use both hands to avoid breaking the seal.
Chapter 2 Setting Up 2-15 Setting Up 5 Place and support the cartridge on a flat, clean surface, then gently pull on the plastic tab to remove the plastic seal. • Use a firm, even pull to close the front cover. SIDE VIEW TOP VIEW 6 Hold the cartridge by its handle and insert it into the machine as far as it will go, making sure that its tabs are aligned with the rails inside the machine. • Always hold the cartridge by its handle. PULL WITHIN THIS RANGE PULL WITHIN THIS RANGE 7 Use both hands to avoid breaking the seal.
FAXPHONE L80 User's Guide
Page 42
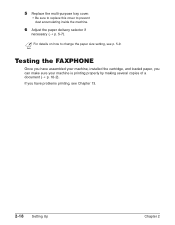
If you have assembled your machine is printing properly by making several copies of a document (1 p. 10-2). Testing the FAXPHONE Once you can make sure your machine, installed the cartridge, and loaded paper, you have problems printing, see p. 5-9. n For details on how to prevent dust accumulating inside the machine. 6 Adjust the paper delivery selector if necessary (1 p. 5-7). 5 Replace the multi-purpose tray cover. • Be sure to replace this cover to change the paper size setting, see Chapter 13. 2-18 Setting Up Chapter 2
If you have assembled your machine is printing properly by making several copies of a document (1 p. 10-2). Testing the FAXPHONE Once you can make sure your machine, installed the cartridge, and loaded paper, you have problems printing, see p. 5-9. n For details on how to prevent dust accumulating inside the machine. 6 Adjust the paper delivery selector if necessary (1 p. 5-7). 5 Replace the multi-purpose tray cover. • Be sure to replace this cover to change the paper size setting, see Chapter 13. 2-18 Setting Up Chapter 2
FAXPHONE L80 User's Guide
Page 65
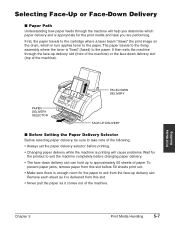
..., remove paper from this slot before changing paper delivery. • The face-down delivery slot (top of the machine. First, the paper travels to the cartridge where a laser beam "draws" the print image on the drum, which paper delivery slot is delivered from this slot. • Never pull the paper as...
..., remove paper from this slot before changing paper delivery. • The face-down delivery slot (top of the machine. First, the paper travels to the cartridge where a laser beam "draws" the print image on the drum, which paper delivery slot is delivered from this slot. • Never pull the paper as...
FAXPHONE L80 User's Guide
Page 69
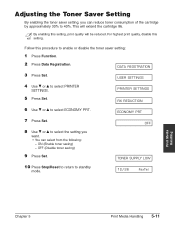
... enable or disable the toner saver setting: 1 Press Function. 2 Press Data Registration. DATA REGSTRATION 3 Press Set. n By enabling this setting, print quality will extend the cartridge life. PRINTER SETTINGS RX REDUCTION 6 Use ∂ or ¨ to select PRINTER SETTINGS. 5 Press Set. ECONOMY PRT 7 Press Set. USER SETTINGS 4 Use ∂ or ¨... 5 Print Media Handling 5-11 Adjusting the Toner Saver Setting By enabling the toner saver setting, you want. • You can reduce toner consumption of the cartridge by approximately 30% to 40%. This will be reduced.
... enable or disable the toner saver setting: 1 Press Function. 2 Press Data Registration. DATA REGSTRATION 3 Press Set. n By enabling this setting, print quality will extend the cartridge life. PRINTER SETTINGS RX REDUCTION 6 Use ∂ or ¨ to select PRINTER SETTINGS. 5 Press Set. ECONOMY PRT 7 Press Set. USER SETTINGS 4 Use ∂ or ¨... 5 Print Media Handling 5-11 Adjusting the Toner Saver Setting By enabling the toner saver setting, you want. • You can reduce toner consumption of the cartridge by approximately 30% to 40%. This will be reduced.

FAXPHONE L80 User's Guide
Page 151
Periodic Cleaning 12-2 Cleaning the Machine's Exterior 12-2 Cleaning the Machine's Interior 12-2 Cleaning the Scanner Components 12-5 Replacing the FX-3 Cartridge 12-7 Maintenance Chapter 12 Maintenance 12-1 Chapter 12 Maintenance This chapter describes the steps you need to follow to keep your machine clean. You will also find instructions for replacing the cartridge.
Periodic Cleaning 12-2 Cleaning the Machine's Exterior 12-2 Cleaning the Machine's Interior 12-2 Cleaning the Scanner Components 12-5 Replacing the FX-3 Cartridge 12-7 Maintenance Chapter 12 Maintenance 12-1 Chapter 12 Maintenance This chapter describes the steps you need to follow to keep your machine clean. You will also find instructions for replacing the cartridge.
FAXPHONE L80 User's Guide
Page 153
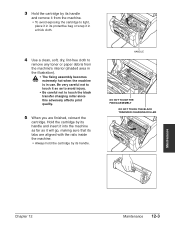
...THE FIXING ASSEMBLY DO NOT TOUCH THE BLACK TRANSFER CHARGING ROLLER Maintenance Chapter 12 Maintenance 12-3 3 Hold the cartridge by its handle. Hold the cartridge by its tabs are finished, reinsert the cartridge. c • The fixing assembly becomes extremely hot when the machine is in the illustration). Be very ... quality. 5 When you are aligned with the rails inside the machine. • Always hold the cartridge by its handle and remove it from the machine. • To avoid exposing the cartridge to light, place it in its protective bag or wrap it will go, making sure that its...
...THE FIXING ASSEMBLY DO NOT TOUCH THE BLACK TRANSFER CHARGING ROLLER Maintenance Chapter 12 Maintenance 12-3 3 Hold the cartridge by its handle. Hold the cartridge by its tabs are finished, reinsert the cartridge. c • The fixing assembly becomes extremely hot when the machine is in the illustration). Be very ... quality. 5 When you are aligned with the rails inside the machine. • Always hold the cartridge by its handle and remove it from the machine. • To avoid exposing the cartridge to light, place it in its protective bag or wrap it will go, making sure that its...

FAXPHONE L80 User's Guide
Page 157
...you will need to replace the cartridge. To purchase this procedure to replace the cartridge: 1 Remove any documents and printouts from side to side a few times to open the front cover. Before replacing the cartridge, follow this cartridge, contact the Canon Customer Care Center, or your ...business machine retailer/dealer. If after following the procedure above, CHANGE CARTRIDGE remains in . 3 Lift the latch and open the front cover...
...you will need to replace the cartridge. To purchase this procedure to replace the cartridge: 1 Remove any documents and printouts from side to side a few times to open the front cover. Before replacing the cartridge, follow this cartridge, contact the Canon Customer Care Center, or your ...business machine retailer/dealer. If after following the procedure above, CHANGE CARTRIDGE remains in . 3 Lift the latch and open the front cover...

FAXPHONE L80 User's Guide
Page 158
...VIEW TOP VIEW PULL WITHIN THIS RANGE PULL WITHIN THIS RANGE 12-8 Maintenance Chapter 12 To recycle your used cartridge, simply follow the instructions included with your new FX-3 cartridge. 5 Remove the new FX-3 cartridge from its handle and remove it . • Poor print quality may result if the toner is unequally... distributed. HANDLE 7 Place and support the cartridge on a flat, clean surface, then gently pull on the plastic tab to remove the plastic seal. • Use a firm, even pull to ...
...VIEW TOP VIEW PULL WITHIN THIS RANGE PULL WITHIN THIS RANGE 12-8 Maintenance Chapter 12 To recycle your used cartridge, simply follow the instructions included with your new FX-3 cartridge. 5 Remove the new FX-3 cartridge from its handle and remove it . • Poor print quality may result if the toner is unequally... distributed. HANDLE 7 Place and support the cartridge on a flat, clean surface, then gently pull on the plastic tab to remove the plastic seal. • Use a firm, even pull to ...

FAXPHONE L80 User's Guide
Page 159
Maintenance Chapter 12 Maintenance 12-9 8 Hold the cartridge by its handle and insert it into the machine as far as it will go, making sure that its tabs are aligned with the rails inside the machine. • Always hold the cartridge by its handle. 9 Use both hands to close the front cover.
Maintenance Chapter 12 Maintenance 12-9 8 Hold the cartridge by its handle and insert it into the machine as far as it will go, making sure that its tabs are aligned with the rails inside the machine. • Always hold the cartridge by its handle. 9 Use both hands to close the front cover.


