FS30 / FS31 / FS300 Instruction Manual
Page 2
... RAIN OR MOISTURE. TO REDUCE THE RISK OF ELECTRIC SHOCK AND TO REDUCE ANNOYING INTERFERENCE, USE THE RECOMMENDED ACCESSORIES ONLY. Digital Video Camcorder, FS31 A/FS30 A/FS300 A systems This device complies with class B limits in Subpart B of Part 15 of the following two conditions: ...may cause undesired operation. Do not make any interference received, including interference that interference will not occur in a residential installation. One Canon Plaza, Lake Success, NY 11042, U.S.A. Note: This equipment has been tested and found to correct the interference by turning the ...
... RAIN OR MOISTURE. TO REDUCE THE RISK OF ELECTRIC SHOCK AND TO REDUCE ANNOYING INTERFERENCE, USE THE RECOMMENDED ACCESSORIES ONLY. Digital Video Camcorder, FS31 A/FS30 A/FS300 A systems This device complies with class B limits in Subpart B of Part 15 of the following two conditions: ...may cause undesired operation. Do not make any interference received, including interference that interference will not occur in a residential installation. One Canon Plaza, Lake Success, NY 11042, U.S.A. Note: This equipment has been tested and found to correct the interference by turning the ...
FS30 / FS31 / FS300 Instruction Manual
Page 4
... to your home, consult your product dealer or local power company. IMPORTANT SAFETY INSTRUCTIONS In these safety instructions the word "product" refers to the Canon Digital Video Camcorder FS31 A/FS30 A/ FS300 A and all its accessories. 1 Read these instructions. 2 Keep these instructions. 3 Heed all warnings. 4 Follow all servicing to qualified service personnel. A grounding type...
... to your home, consult your product dealer or local power company. IMPORTANT SAFETY INSTRUCTIONS In these safety instructions the word "product" refers to the Canon Digital Video Camcorder FS31 A/FS30 A/ FS300 A and all its accessories. 1 Read these instructions. 2 Keep these instructions. 3 Heed all warnings. 4 Follow all servicing to qualified service personnel. A grounding type...
FS30 / FS31 / FS300 Instruction Manual
Page 6
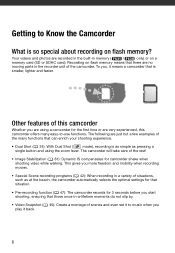
...• Video Snapshot ( 45): Create a montage of the rest! • Image Stabilization ( 81): Dynamic IS compensates for the first time or are very experienced, this camcorder Whether you are recorded in the built-in the recorder unit of the many easy-to music when you play it back. 6 Getting to Know... the Camcorder What is so special about recording on a memory card (SD or SDHC card). This gives you more freedom and mobility when recording movies. •...
...• Video Snapshot ( 45): Create a montage of the rest! • Image Stabilization ( 81): Dynamic IS compensates for the first time or are very experienced, this camcorder Whether you are recorded in the built-in the recorder unit of the many easy-to music when you play it back. 6 Getting to Know... the Camcorder What is so special about recording on a memory card (SD or SDHC card). This gives you more freedom and mobility when recording movies. •...

FS30 / FS31 / FS300 Instruction Manual
Page 7
...19 Charging the Battery Pack 21 Preparing the Accessories 22 Adjusting the Position and Brightness of the LCD Screen 24 Basic Operation of the Camcorder 24 Operating Modes 25 Joystick and Joystick Guide 26 Using the Menus 27 First Time Settings 27 Setting the Date and Time 28 Changing... the Language 28 Changing the Time Zone 29 Using a Memory Card 29 Memory Cards Compatible for Use with the Camcorder 30 Inserting and Removing a Memory Card 30 / Selecting the Memory for the Recordings 31 Initializing the Built-In Memory ( / only) or Memory...
...19 Charging the Battery Pack 21 Preparing the Accessories 22 Adjusting the Position and Brightness of the LCD Screen 24 Basic Operation of the Camcorder 24 Operating Modes 25 Joystick and Joystick Guide 26 Using the Menus 27 First Time Settings 27 Setting the Date and Time 28 Changing... the Language 28 Changing the Time Zone 29 Using a Memory Card 29 Memory Cards Compatible for Use with the Camcorder 30 Inserting and Removing a Memory Card 30 / Selecting the Memory for the Recordings 31 Initializing the Built-In Memory ( / only) or Memory...
FS30 / FS31 / FS300 Instruction Manual
Page 9
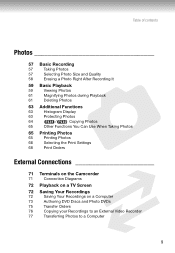
... Can Use When Taking Photos 65 Printing Photos 65 Printing Photos 66 Selecting the Print Settings 68 Print Orders External Connections 71 Terminals on the Camcorder 71 Connection Diagrams 72 Playback on a TV Screen 72 Saving Your Recordings 72 Saving Your Recordings on a Computer 73 Authoring DVD Discs and Photo DVDs...
... Can Use When Taking Photos 65 Printing Photos 65 Printing Photos 66 Selecting the Print Settings 68 Print Orders External Connections 71 Terminals on the Camcorder 71 Connection Diagrams 72 Playback on a TV Screen 72 Saving Your Recordings 72 Saving Your Recordings on a Computer 73 Authoring DVD Discs and Photo DVDs...

FS30 / FS31 / FS300 Instruction Manual
Page 10
Additional Information 79 Appendix: Menu Options Lists 79 FUNC. Menu 81 Setup Menus 87 Trouble? 87 Troubleshooting 91 List of Messages 99 Do's and Don'ts 99 Handling Precautions 102 Maintenance/Others 102 Using the Camcorder Abroad 103 Music Files 104 General Information 104 System Diagram 105 Optional Accessories 107 Product Codes 108 Specifications 111 Index 10
Additional Information 79 Appendix: Menu Options Lists 79 FUNC. Menu 81 Setup Menus 87 Trouble? 87 Troubleshooting 91 List of Messages 99 Do's and Don'ts 99 Handling Precautions 102 Maintenance/Others 102 Using the Camcorder Abroad 103 Music Files 104 General Information 104 System Diagram 105 Optional Accessories 107 Product Codes 108 Specifications 111 Index 10
FS30 / FS31 / FS300 Instruction Manual
Page 11
.... • NOTES: Additional topics that applies only to the model shown in this manual. Should your camcorder fail to operate correctly, refer to the . 11 This will need to refer also to the instruction manual of the relevant chapter or section. • : ... menu icons refer to Troubleshooting ( 87). To complete some operations, you will be indicated with a still camera. About this manual carefully before you use the camcorder and retain it for purchasing the Canon FS31/FS30/FS300. Please read this Manual Thank you for future reference.
.... • NOTES: Additional topics that applies only to the model shown in this manual. Should your camcorder fail to operate correctly, refer to the . 11 This will need to refer also to the instruction manual of the relevant chapter or section. • : ... menu icons refer to Troubleshooting ( 87). To complete some operations, you will be indicated with a still camera. About this manual carefully before you use the camcorder and retain it for purchasing the Canon FS31/FS30/FS300. Please read this Manual Thank you for future reference.

FS30 / FS31 / FS300 Instruction Manual
Page 12
... other information here and retain this manual, the arrow is shown in case of your purchase to aid identification in boldface. Introduction Names of the camcorder. For example [ON], [OFF]. For a detailed explanation refer to display the Special Scene (SCN) recording programs Desired recording program FUNC. The...bright ski resort or capturing the full colors of Purchase: Serial No.: Purchased From: Dealer Address: Dealer Phone No.: 12 Model Name: FS31 A/FS30 A/FS300 A Date of a sunset or a fireworks display becomes as easy as they are indicated within a "button" frame.
... other information here and retain this manual, the arrow is shown in case of your purchase to aid identification in boldface. Introduction Names of the camcorder. For example [ON], [OFF]. For a detailed explanation refer to display the Special Scene (SCN) recording programs Desired recording program FUNC. The...bright ski resort or capturing the full colors of Purchase: Serial No.: Purchased From: Dealer Address: Dealer Phone No.: 12 Model Name: FS31 A/FS30 A/FS300 A Date of a sunset or a fireworks display becomes as easy as they are indicated within a "button" frame.

FS30 / FS31 / FS300 Instruction Manual
Page 13
...movies. - ImageMixer 3 SE Transfer Utility - For transferring music files that can be played back on a CD player. Contains the full-length camcorder instruction manual (electronic version on PDF file) and music files that can be used during playback. Disc 1 CD-ROM. * The CD-ROM...are supplied with the supplied PIXELA applications, Music Transfer Utility and ImageMixer 3 SE Video Tools. Music Transfer Utility - The music files on the camcorder. • PIXELA Application - For managing, editing, and playing back movies. • Instruction Manual/Music Data Disc CD-ROM - CA-570...
...movies. - ImageMixer 3 SE Transfer Utility - For transferring music files that can be played back on a CD player. Contains the full-length camcorder instruction manual (electronic version on PDF file) and music files that can be used during playback. Disc 1 CD-ROM. * The CD-ROM...are supplied with the supplied PIXELA applications, Music Transfer Utility and ImageMixer 3 SE Video Tools. Music Transfer Utility - The music files on the camcorder. • PIXELA Application - For managing, editing, and playing back movies. • Instruction Manual/Music Data Disc CD-ROM - CA-570...

FS30 / FS31 / FS300 Instruction Manual
Page 17
... memory card / In the built-in memory Self timer ( 48) AF frame ( 82) Joystick guide ( 25) Mini video light ( 45) Focus and exposure lock ( 57) Camcorder shake warning ( 82) Photo number ( 18, 86) Current photo / Total number of photos Histogram ( 63) Date and time of recording Photo protection mark ( 63) Manual...
... memory card / In the built-in memory Self timer ( 48) AF frame ( 82) Joystick guide ( 25) Mini video light ( 45) Focus and exposure lock ( 57) Camcorder shake warning ( 82) Photo number ( 18, 86) Current photo / Total number of photos Histogram ( 63) Date and time of recording Photo protection mark ( 63) Manual...
FS30 / FS31 / FS300 Instruction Manual
Page 18
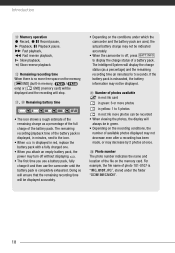
...: 1 to display the charge status of photo 101-0107 is "IMG_0107.JPG", stored under which the camcorder and the battery pack are used, the actual battery charge may not be indicated accurately. • When the camcorder is off without displaying . • The first time you attach an empty battery pack, the power... always be in red, replace the battery pack with a fully charged one. • When you use a battery pack, fully charge it and then use the camcorder until the battery pack is completely exhausted.
...: 1 to display the charge status of photo 101-0107 is "IMG_0107.JPG", stored under which the camcorder and the battery pack are used, the actual battery charge may not be indicated accurately. • When the camcorder is off without displaying . • The first time you attach an empty battery pack, the power... always be in red, replace the battery pack with a fully charged one. • When you use a battery pack, fully charge it and then use the camcorder until the battery pack is completely exhausted.

FS30 / FS31 / FS300 Instruction Manual
Page 19
...to the tables on pages 105-106. 2 Plug the power cord into the compartment and press gently until you learn more about your camcorder. For approximate charging times and recording/playback times with a battery pack or directly using the compact power adapter. Preparations This chapter describes... basic operations, such as navigating the menus, and first time settings to the camcorder's DC IN terminal. DC IN terminal 4 Slide the battery compartment cover away from the lens and open it toward the lens until...
...to the tables on pages 105-106. 2 Plug the power cord into the compartment and press gently until you learn more about your camcorder. For approximate charging times and recording/playback times with a battery pack or directly using the compact power adapter. Preparations This chapter describes... basic operations, such as navigating the menus, and first time settings to the camcorder's DC IN terminal. DC IN terminal 4 Slide the battery compartment cover away from the lens and open it toward the lens until...
FS30 / FS31 / FS300 Instruction Manual
Page 20
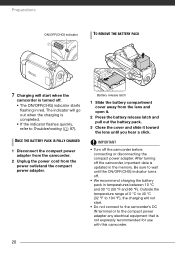
... to Troubleshooting ( 87). Preparations ON/OFF(CHG) indicator TO REMOVE THE BATTERY PACK 7 Charging will start . • Do not connect to the camcorder's DC IN terminal or to the compact power adapter any electrical equipment that is turned off . • We recommend charging the battery pack in temperatures...°C and 30 °C (50 °F and 86 °F). ONCE THE BATTERY PACK IS FULLY CHARGED 1 Disconnect the compact power adapter from the camcorder. 2 Unplug the power cord from the lens and open it. 2 Press the battery release latch and pull out the battery pack. 3 Close the cover...
... to Troubleshooting ( 87). Preparations ON/OFF(CHG) indicator TO REMOVE THE BATTERY PACK 7 Charging will start . • Do not connect to the camcorder's DC IN terminal or to the compact power adapter any electrical equipment that is turned off . • We recommend charging the battery pack in temperatures...°C and 30 °C (50 °F and 86 °F). ONCE THE BATTERY PACK IS FULLY CHARGED 1 Disconnect the compact power adapter from the camcorder. 2 Unplug the power cord from the lens and open it. 2 Press the battery release latch and pull out the battery pack. 3 Close the cover...

FS30 / FS31 / FS300 Instruction Manual
Page 21
... on the day of use, or the day before charging the battery pack. Adjust the grip belt so that powers the product is on the camcorder. 21 Please call 1-800-8-BATTERY for overseas travels or special power sources such as those on aircraft and ships, DC-AC inverters, etc. • To... the padded handgrip's flap and detach the strap from the Velcro pad. 2 Pull the strap to remove it first from the front bracket on the camcorder, then to unthread it from the handgrip and finally to remove it from the rear bracket on . • If remaining battery time is an issue...
... on the day of use, or the day before charging the battery pack. Adjust the grip belt so that powers the product is on the camcorder. 21 Please call 1-800-8-BATTERY for overseas travels or special power sources such as those on aircraft and ships, DC-AC inverters, etc. • To... the padded handgrip's flap and detach the strap from the Velcro pad. 2 Pull the strap to remove it first from the front bracket on the camcorder, then to unthread it from the handgrip and finally to remove it from the rear bracket on . • If remaining battery time is an issue...

FS30 / FS31 / FS300 Instruction Manual
Page 22
... TO ATTACH A WRIST STRAP Pass the attaching end of the strap through the rear bracket on the camcorder. 2 Thread the strap through the padded handgrip and then pass it through the front bracket on the camcorder. 3 Fasten the grip belt as necessary, attach the strap to the Velcro pad on the handgrip... the flap. TO REATTACH THE GRIP BELT 1 Pass the end of the wrist strap through the back bracket on the camcorder, thread the wrist strap through the strap mount on the camcorder. Adjusting the Position and Brightness of the strap. 22 Pass the ends of the shoulder strap through the loop and...
... TO ATTACH A WRIST STRAP Pass the attaching end of the strap through the rear bracket on the camcorder. 2 Thread the strap through the padded handgrip and then pass it through the front bracket on the camcorder. 3 Fasten the grip belt as necessary, attach the strap to the Velcro pad on the handgrip... the flap. TO REATTACH THE GRIP BELT 1 Pass the end of the wrist strap through the back bracket on the camcorder, thread the wrist strap through the strap mount on the camcorder. Adjusting the Position and Brightness of the strap. 22 Pass the ends of the shoulder strap through the loop and...
FS30 / FS31 / FS300 Instruction Manual
Page 23
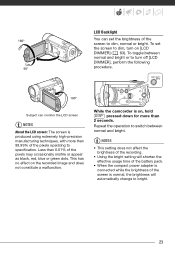
While the camcorder is on the recorded image and does not constitute a malfunction. pressed down for more than 99.99% of the pixels operating to specification. 180° ...
While the camcorder is on the recorded image and does not constitute a malfunction. pressed down for more than 99.99% of the pixels operating to specification. 180° ...
FS30 / FS31 / FS300 Instruction Manual
Page 24
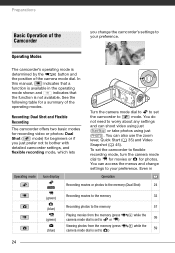
... and can also use the zoom lever, Quick Start ( 35) and Video Snapshot ( 45). You can access the menus and change the camcorder's settings to your preference. Operating Modes The camcorder's operating mode is set to ) 32 57 while the 36 while the 59 24 To set the... camcorder to mode. Preparations Basic Operation of the Camcorder you just prefer not to bother with detailed camcorder settings, and flexible recording mode, which lets Turn the camera mode dial to to set the camcorder to flexible recording mode, turn the camera mode...
... and can also use the zoom lever, Quick Start ( 35) and Video Snapshot ( 45). You can access the menus and change the camcorder's settings to your preference. Operating Modes The camcorder's operating mode is set to ) 32 57 while the 36 while the 59 24 To set the... camcorder to mode. Preparations Basic Operation of the Camcorder you just prefer not to bother with detailed camcorder settings, and flexible recording mode, which lets Turn the camera mode dial to to set the camcorder to flexible recording mode, turn the camera mode...
FS30 / FS31 / FS300 Instruction Manual
Page 25
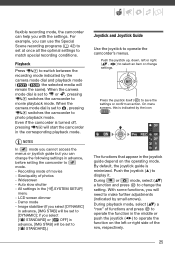
... adjustments (indicated by small arrows). Playback Press to photo playback mode. When the camera mode dial is set to , pressing switches the camcorder to switch between the recording mode indicated by the icon ( ). Size/quality of movies - Widescreen - if you can change the following... When the camera mode dial is turned off, pressing will be set to or , pressing switches the camcorder to select an item or change the setting. Even if the camcorder is set to [ STANDARD].) Joystick and Joystick Guide Use the joystick to display it. Auto slow shutter...
... adjustments (indicated by small arrows). Playback Press to photo playback mode. When the camera mode dial is set to , pressing switches the camcorder to switch between the recording mode indicated by the icon ( ). Size/quality of movies - Widescreen - if you can change the following... When the camera mode dial is turned off, pressing will be set to or , pressing switches the camcorder to select an item or change the setting. Even if the camcorder is set to [ STANDARD].) Joystick and Joystick Guide Use the joystick to display it. Auto slow shutter...

FS30 / FS31 / FS300 Instruction Manual
Page 26
To access the menus, set the camcorder to the appendix Menu Options Lists ( 79). Selecting a FUNC. Selecting an Option from the menus that will need to close the menu. Menu items not ... a few seconds, the joystick guide will minimize again but the selected function can be highlighted in Recording Mode 1 Press FUNC. . 2 Select ( ) the icon of the camcorder's functions can still be operated. For details about the available menu options and settings, refer to flexible recording mode. You can also push the joystick...
To access the menus, set the camcorder to the appendix Menu Options Lists ( 79). Selecting a FUNC. Selecting an Option from the menus that will need to close the menu. Menu items not ... a few seconds, the joystick guide will minimize again but the selected function can be highlighted in Recording Mode 1 Press FUNC. . 2 Select ( ) the icon of the camcorder's functions can still be operated. For details about the available menu options and settings, refer to flexible recording mode. You can also push the joystick...
FS30 / FS31 / FS300 Instruction Manual
Page 27
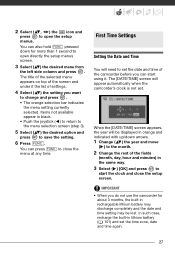
... FUNC. The title of the selected menu appears on top of the screen and under it . The [DATE/TIME] screen will appear automatically when the camcorder's clock is not set the time zone, date and time again. 27 First Time Settings Setting the Date and Time You will be lost. In...close the menu at any time. pressed down arrows. 1 Change ( ) the year and move ( ) to the month. 2 Change the rest of the camcorder before you do not use the camcorder for more than 1 second to open directly the setup menus screen. 3 Select ( ) the desired menu from the left side column and press...
... FUNC. The title of the selected menu appears on top of the screen and under it . The [DATE/TIME] screen will appear automatically when the camcorder's clock is not set the time zone, date and time again. 27 First Time Settings Setting the Date and Time You will be lost. In...close the menu at any time. pressed down arrows. 1 Change ( ) the year and move ( ) to the month. 2 Change the rest of the camcorder before you do not use the camcorder for more than 1 second to open directly the setup menus screen. 3 Select ( ) the desired menu from the left side column and press...


