Product Setup, User Guides & Manuals
Page 3
... be read the Quick Start Guide, we recommend that apply. Placement and Connection How to connect it to the computer and how to the CanoScan FB620U color image scanner and the accompanying software CD-ROM. You need only read the topics that you haven't already read as a separate unit. How to Use the...
... be read the Quick Start Guide, we recommend that apply. Placement and Connection How to connect it to the computer and how to the CanoScan FB620U color image scanner and the accompanying software CD-ROM. You need only read the topics that you haven't already read as a separate unit. How to Use the...
Product Setup, User Guides & Manuals
Page 5
...CanoScan FB620U 7 Safety Precautions 9 Setup and Use ...13 Components Guide ...16 Placement and Connection 18 Connecting to the Computer 19 About the USB Interface 21 Positioning the Documents 22 How to Use the Start Button 24 The Smart Button and ScanGear Toolbox CS 24 Changing the Start Button Functions 25 Transporting the Scanner... 27 Appendices 29 Troubleshooting ...30 Problems with the Initial Connection of the Scanner to a USB Port 31 Problems with Software Installation 32 Problems ...
...CanoScan FB620U 7 Safety Precautions 9 Setup and Use ...13 Components Guide ...16 Placement and Connection 18 Connecting to the Computer 19 About the USB Interface 21 Positioning the Documents 22 How to Use the Start Button 24 The Smart Button and ScanGear Toolbox CS 24 Changing the Start Button Functions 25 Transporting the Scanner... 27 Appendices 29 Troubleshooting ...30 Problems with the Initial Connection of the Scanner to a USB Port 31 Problems with Software Installation 32 Problems ...
Product Setup, User Guides & Manuals
Page 7
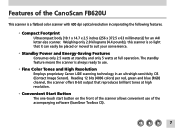
...proprietary Canon LIDE scanning technology in an ultrahigh-sensitivity CIS (Contact Image Sensor). Weighing only 2.0 kilograms (4.4 pounds), this scanner is so light that reproduces brilliant tones at full operation. The standby feature means the scanner is a flatbed color scanner with... 600 dpi optical resolution incorporating the following features. • Compact Footprint Ultracompact body [10.1 x 14.7 x 2.5 inches (256 x 372.5 x 63 millimeters)] for an A4/ letter-size scanner. Features of the CanoScan FB620U This scanner is always ...
...proprietary Canon LIDE scanning technology in an ultrahigh-sensitivity CIS (Contact Image Sensor). Weighing only 2.0 kilograms (4.4 pounds), this scanner is so light that reproduces brilliant tones at full operation. The standby feature means the scanner is a flatbed color scanner with... 600 dpi optical resolution incorporating the following features. • Compact Footprint Ultracompact body [10.1 x 14.7 x 2.5 inches (256 x 372.5 x 63 millimeters)] for an A4/ letter-size scanner. Features of the CanoScan FB620U This scanner is always ...
Product Setup, User Guides & Manuals
Page 13
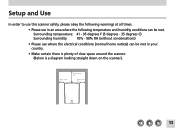
....) Approx. 20 cm (8 in.) Approx. 10 cm (4 in your country. • Make certain there is plenty of clear space around the scanner. (Below is a diagram looking straight down on the scanner). Surrounding temperature: 41 - 95 degrees F (5 degrees - 35 degrees C) Surrounding humidity: 10% - 90% RH (without condensations) • Please use in an area... all times. • Please use where the electrical conditions (normal home outlets) can be met in .) 13 Setup and Use In order to use this scanner safely, please obey the following temperature and humidity conditions can be met.
....) Approx. 20 cm (8 in.) Approx. 10 cm (4 in your country. • Make certain there is plenty of clear space around the scanner. (Below is a diagram looking straight down on the scanner). Surrounding temperature: 41 - 95 degrees F (5 degrees - 35 degrees C) Surrounding humidity: 10% - 90% RH (without condensations) • Please use in an area... all times. • Please use where the electrical conditions (normal home outlets) can be met in .) 13 Setup and Use In order to use this scanner safely, please obey the following temperature and humidity conditions can be met.
Product Setup, User Guides & Manuals
Page 14
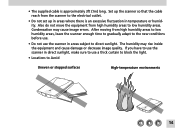
... areas subject to direct sunlight. After moving from high humidity areas to low humidity areas, leave the scanner enough time to gradually adapt to the new conditions before use. • Do not use a thick curtain to block the light. • Locations to low .... • The supplied cable is an excessive fluctuation in temperature or humidity. Also do not move the equipment from the scanner to the electrical outlet. • Do not set up the scanner so that the cable reach from high humidity areas to Avoid Uneven or stepped surfaces High-temperature environments 14 The...
... areas subject to direct sunlight. After moving from high humidity areas to low humidity areas, leave the scanner enough time to gradually adapt to the new conditions before use. • Do not use a thick curtain to block the light. • Locations to low .... • The supplied cable is an excessive fluctuation in temperature or humidity. Also do not move the equipment from the scanner to the electrical outlet. • Do not set up the scanner so that the cable reach from high humidity areas to Avoid Uneven or stepped surfaces High-temperature environments 14 The...
Product Setup, User Guides & Manuals
Page 16
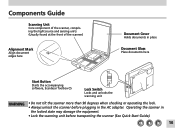
... Lock Switch Locks and unlocks the scanning unit • Do not tilt the scanner more than 90 degrees when checking or operating the lock. • Always unlock the scanner before transporting the scanner (See Quick Start Guide). 16 Components Guide Scanning Unit Core component of the... scanner, comprising the light source and sensing units (Usually found at the front of the scanner) Alignment Mark Align document edges here Document...
... Lock Switch Locks and unlocks the scanning unit • Do not tilt the scanner more than 90 degrees when checking or operating the lock. • Always unlock the scanner before transporting the scanner (See Quick Start Guide). 16 Components Guide Scanning Unit Core component of the... scanner, comprising the light source and sensing units (Usually found at the front of the scanner) Alignment Mark Align document edges here Document...
Product Setup, User Guides & Manuals
Page 17
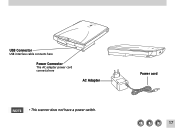
Power cord 17 USB Connector USB interface cable connects here Power Connector The AC adapter power cord connects here AC Adapter • This scanner does not have a power switch.
Power cord 17 USB Connector USB interface cable connects here Power Connector The AC adapter power cord connects here AC Adapter • This scanner does not have a power switch.
Product Setup, User Guides & Manuals
Page 18
Placement and Connection Connecting to the Computer ......19 About the USB Interface 21 Positioning Documents 22 How to Use the Start Button .....24 Transporting the Scanner ...........27 18
Placement and Connection Connecting to the Computer ......19 About the USB Interface 21 Positioning Documents 22 How to Use the Start Button .....24 Transporting the Scanner ...........27 18
Product Setup, User Guides & Manuals
Page 19
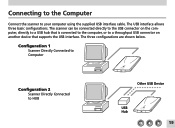
The three configurations are shown below. Configuration 1 Scanner Directly Connected to Computer Configuration 2 Scanner Directly Connected to your computer using the supplied USB interface cable. Connecting to the Computer Connect the scanner to HUB Other USB Device USB Hub 19 The USB interface allows three basic configurations. The scanner can be connected directly to the USB connector on the computer, directly to a USB hub that is connected to the computer, or to a throughput USB connector on another device that supports the USB interface.
The three configurations are shown below. Configuration 1 Scanner Directly Connected to Computer Configuration 2 Scanner Directly Connected to your computer using the supplied USB interface cable. Connecting to the Computer Connect the scanner to HUB Other USB Device USB Hub 19 The USB interface allows three basic configurations. The scanner can be connected directly to the USB connector on the computer, directly to a USB hub that is connected to the computer, or to a throughput USB connector on another device that supports the USB interface.
Product Setup, User Guides & Manuals
Page 20
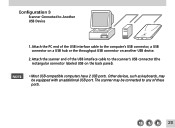
Other devices, such as keyboards, may be equipped with an additional USB port. The scanner may be connected to the scanner's USB connector (the rectangular connector labeled USB on the back panel). • Most USB-compatible computers have 2 USB ports. Configuration 3 Scanner Connected to Another USB Device 1.Attach the PC end of the USB interface cable to the computer's USB connector, a USB connector on a USB hub or the throughput USB connector on another USB device. 2.Attach the scanner end of the USB interface cable to any of these ports. 20
Other devices, such as keyboards, may be equipped with an additional USB port. The scanner may be connected to the scanner's USB connector (the rectangular connector labeled USB on the back panel). • Most USB-compatible computers have 2 USB ports. Configuration 3 Scanner Connected to Another USB Device 1.Attach the PC end of the USB interface cable to the computer's USB connector, a USB connector on a USB hub or the throughput USB connector on another USB device. 2.Attach the scanner end of the USB interface cable to any of these ports. 20
Product Setup, User Guides & Manuals
Page 21
The USB interface offers these benefits: • Accommodates a wide array of devices, including scanners, keyboards, joysticks, printers and modems. • Provides excellent expansibility, allowing up to 127 devices to be connected to one USB controller. • Supports two-way ...
The USB interface offers these benefits: • Accommodates a wide array of devices, including scanners, keyboards, joysticks, printers and modems. • Provides excellent expansibility, allowing up to 127 devices to be connected to one USB controller. • Supports two-way ...
Product Setup, User Guides & Manuals
Page 22
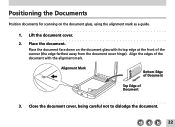
Positioning the Documents Position documents for scanning on the document glass with the alignment mark. Place the document. Alignment Mark Bottom Edge of Document Top Edge of the scanner (the edge farthest away from the document cover hinge). Align the edges of the document with its top edge at the front of Document 3. Place the document face down on the document glass, using the alignment mark as a guide. 1. Close the document cover, being careful not to dislodge the document. 22 Lift the document cover. 2.
Positioning the Documents Position documents for scanning on the document glass with the alignment mark. Place the document. Alignment Mark Bottom Edge of Document Top Edge of the scanner (the edge farthest away from the document cover hinge). Align the edges of the document with its top edge at the front of Document 3. Place the document face down on the document glass, using the alignment mark as a guide. 1. Close the document cover, being careful not to dislodge the document. 22 Lift the document cover. 2.

Product Setup, User Guides & Manuals
Page 23
When the document cover cannot be closed because you are scanning thick documents, such as books, cover the document glass with an ultra-sensitive scanning unit. Opening the document cover during scanning or improperly closing it may not produce proper results. • The maximum allowable size for scanning is equipped with a dark cloth to A4 or letter size. • This scanner is 8.5 x 11.69 inches (216 x 297 mm), up to prevent ambient light from affecting the scan. 23
When the document cover cannot be closed because you are scanning thick documents, such as books, cover the document glass with an ultra-sensitive scanning unit. Opening the document cover during scanning or improperly closing it may not produce proper results. • The maximum allowable size for scanning is equipped with a dark cloth to A4 or letter size. • This scanner is 8.5 x 11.69 inches (216 x 297 mm), up to prevent ambient light from affecting the scan. 23
Product Setup, User Guides & Manuals
Page 24
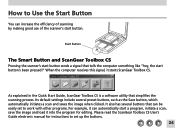
...to set to work with other programs. For example, it starts ScanGear Toolbox CS. Start Button The Smart Button and ScanGear Toolbox CS Pressing the scanner's start button sends a signal that tells the computer something like "hey, the start button. Its default settings include several buttons that simplifies the scanning... process. When the computer receives this signal, it can increase the efficiency of scanning by making good use of the scanner's start button's been pressed!" Please read the ScanGear Toolbox CS User's Guide electronic manual for editing.
...to set to work with other programs. For example, it starts ScanGear Toolbox CS. Start Button The Smart Button and ScanGear Toolbox CS Pressing the scanner's start button sends a signal that tells the computer something like "hey, the start button. Its default settings include several buttons that simplifies the scanning... process. When the computer receives this signal, it can increase the efficiency of scanning by making good use of the scanner's start button's been pressed!" Please read the ScanGear Toolbox CS User's Guide electronic manual for editing.
Product Setup, User Guides & Manuals
Page 25
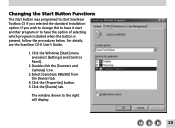
For details, see the ScanGear CS-U User's Guide. 1.Click the Windows [Start] menu and select [Settings] and [Control Panel]. 2.Double-click the [Scanners and Cameras] icon. 3.Select [CanoScan FB620U] from the Devices tab. 4.Click the [Properties] button. 5.Click the [Events] tab. The window shown to have it start ScanGear Toolbox CS if you wish...
For details, see the ScanGear CS-U User's Guide. 1.Click the Windows [Start] menu and select [Settings] and [Control Panel]. 2.Double-click the [Scanners and Cameras] icon. 3.Select [CanoScan FB620U] from the Devices tab. 4.Click the [Properties] button. 5.Click the [Events] tab. The window shown to have it start ScanGear Toolbox CS if you wish...
Product Setup, User Guides & Manuals
Page 26
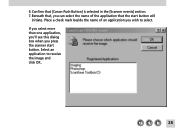
If you select more than one application, you'll see this dialog box when you wish to receive the image and click OK. 26 Select an application to select. Place a check mark beside the name of the application that , you can select the name of an application you press the scanner start button will initiate. 6.Confirm that [Canon Push Button] is selected in the [Scanner events] section. 7.Beneath that the start button.
If you select more than one application, you'll see this dialog box when you wish to receive the image and click OK. 26 Select an application to select. Place a check mark beside the name of the application that , you can select the name of an application you press the scanner start button will initiate. 6.Confirm that [Canon Push Button] is selected in the [Scanner events] section. 7.Beneath that the start button.
Product Setup, User Guides & Manuals
Page 27
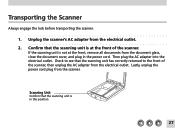
...in the power cord. Confirm that the scanning unit is not at the front of the scanner, then unplug the AC adapter from the electrical outlet. 2. Transporting the Scanner Always engage the lock before transporting the scanner. 1. Lastly, unplug the power cord plug from the document glass, close the document cover,... and plug in this position 27 Unplug the scanner's AC adapter from the electrical outlet. Then plug the AC adapter into the electrical outlet. Check to see that the scanning unit has ...
...in the power cord. Confirm that the scanning unit is not at the front of the scanner, then unplug the AC adapter from the electrical outlet. 2. Transporting the Scanner Always engage the lock before transporting the scanner. 1. Lastly, unplug the power cord plug from the document glass, close the document cover,... and plug in this position 27 Unplug the scanner's AC adapter from the electrical outlet. Then plug the AC adapter into the electrical outlet. Check to see that the scanning unit has ...
Product Setup, User Guides & Manuals
Page 28
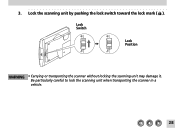
Lock the scanning unit by pushing the lock switch toward the lock mark ( ). Be particularly careful to lock the scanning unit when transporting the scanner in a vehicle. 28 3. Lock Switch Lock Position • Carrying or transporting the scanner without locking the scanning unit may damage it.
Lock the scanning unit by pushing the lock switch toward the lock mark ( ). Be particularly careful to lock the scanning unit when transporting the scanner in a vehicle. 28 3. Lock Switch Lock Position • Carrying or transporting the scanner without locking the scanning unit may damage it.
Product Setup, User Guides & Manuals
Page 30
...8226; When you . offers a full range of technical support options to assist you contact a Canon Customer Care Center, our technicians need to know about the computer connected to the scanner. • For assistance with problems related to the Readme and Help files accompanying each program. ...Troubleshooting Please read the suggestions below do not solve your problems, Canon Computer Systems, Inc. If the remedies suggested below...
...8226; When you . offers a full range of technical support options to assist you contact a Canon Customer Care Center, our technicians need to know about the computer connected to the scanner. • For assistance with problems related to the Readme and Help files accompanying each program. ...Troubleshooting Please read the suggestions below do not solve your problems, Canon Computer Systems, Inc. If the remedies suggested below...
Product Setup, User Guides & Manuals
Page 31
...manual that have been upgraded to Windows 98 may have the USB interface setting set to a USB hub or another USB device will prevent the scanner from working. Please refer to ensure that are correctly attached. (See p. 19) 31 You must change the BIOS settings to its software is... incompatible with the scanner, or the USB interface has not been enabled in USB port. Problems with the Initial Connection of the guarantee. Computers running Windows 98 that they...
...manual that have been upgraded to Windows 98 may have the USB interface setting set to a USB hub or another USB device will prevent the scanner from working. Please refer to ensure that are correctly attached. (See p. 19) 31 You must change the BIOS settings to its software is... incompatible with the scanner, or the USB interface has not been enabled in USB port. Problems with the Initial Connection of the guarantee. Computers running Windows 98 that they...


