

User Manual
Page 9
... shock. CAUTION • Avoid installing your Canon service representative. • To avoid electrical shock from the unit unless it immedi- Precautions • Do not remove the BJ cartridge from exposed power points, never disas- • Place the FAXPHONE on the cord to unplug the FAXPHONE. After moving the FAXPHONE, remove the orange tape and reload...
... shock. CAUTION • Avoid installing your Canon service representative. • To avoid electrical shock from the unit unless it immedi- Precautions • Do not remove the BJ cartridge from exposed power points, never disas- • Place the FAXPHONE on the cord to unplug the FAXPHONE. After moving the FAXPHONE, remove the orange tape and reload...
User Manual
Page 10
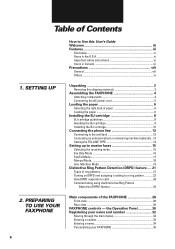
... Ring Pattern Detection (DRPD) feature 24 Main components of paper 6 Loading the paper 6 Installing the BJ cartridge 8 BJ cartridge guidelines 8 Handling the BJ cartridge 9 Installing the BJ cartridge 10 Connecting the phone line 13 Connecting to the wall jack 13 Connecting an extension phone or answering machine ... and number 32 Moving through the main menus 32 Entering a number 33 Entering a name 34 Personalizing your FAXPHONE 35 SETTING UP 2. PREPARING TO USE YOUR FAXPHONE x How to receive faxes 15 Selecting the receiving mode 15 Fax Only Mode 16 Fax/Tel Mode 17 ...
... Ring Pattern Detection (DRPD) feature 24 Main components of paper 6 Loading the paper 6 Installing the BJ cartridge 8 BJ cartridge guidelines 8 Handling the BJ cartridge 9 Installing the BJ cartridge 10 Connecting the phone line 13 Connecting to the wall jack 13 Connecting an extension phone or answering machine ... and number 32 Moving through the main menus 32 Entering a number 33 Entering a name 34 Personalizing your FAXPHONE 35 SETTING UP 2. PREPARING TO USE YOUR FAXPHONE x How to receive faxes 15 Selecting the receiving mode 15 Fax Only Mode 16 Fax/Tel Mode 17 ...
User Manual
Page 12
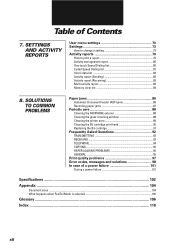
... Document Feeder (ADF) jams 86 Recording paper jams 87 Periodic care 88 Cleaning the FAXPHONE exterior 88 Cleaning the glass scanning window 88 Cleaning the printer area 89 Cleaning the BJ cartridge print head 90 Replacing the BJ cartridge 91 Frequently Asked Questions 92 TRANSMITTING 92 RECEIVING 93 TELEPHONE 94 COPYING 95 PAPER...
... Document Feeder (ADF) jams 86 Recording paper jams 87 Periodic care 88 Cleaning the FAXPHONE exterior 88 Cleaning the glass scanning window 88 Cleaning the printer area 89 Cleaning the BJ cartridge print head 90 Replacing the BJ cartridge 91 Frequently Asked Questions 92 TRANSMITTING 92 RECEIVING 93 TELEPHONE 94 COPYING 95 PAPER...

User Manual
Page 13
... Pattern Detection (DRPD) feature . 21 Types of paper 6 Loading the paper 6 Installing the BJ cartridge 8 BJ cartridge guidelines 8 Handling the BJ cartridge 9 Installing the BJ cartridge 10 Connecting the phone line 13 Connecting to the wall jack 13 Connecting an extension phone or answering ... using the Distinctive Ring Pattern Detection (DRPD) feature 24 1 1 1 SETTING UP Unpacking 2 Removing the shipping materials 3 Assembling the FAXPHONE 4 Attaching components 4 Connecting the AC power cord 5 Loading the paper 6 Selecting the right kind of ring patterns 21 Turning on ...
... Pattern Detection (DRPD) feature . 21 Types of paper 6 Loading the paper 6 Installing the BJ cartridge 8 BJ cartridge guidelines 8 Handling the BJ cartridge 9 Installing the BJ cartridge 10 Connecting the phone line 13 Connecting to the wall jack 13 Connecting an extension phone or answering ... using the Distinctive Ring Pattern Detection (DRPD) feature 24 1 1 1 SETTING UP Unpacking 2 Removing the shipping materials 3 Assembling the FAXPHONE 4 Attaching components 4 Connecting the AC power cord 5 Loading the paper 6 Selecting the right kind of ring patterns 21 Turning on ...

User Manual
Page 14
Paper tray BX-3 BJ FAX cartridge FAXPHONE B640 User's Guide Paper tray cover Power cord and Telephone line Main unit 2 Carefully remove all items from the box. „ It is best to have someone hold the box while you want to move or ship the unit in case you lift the FAXPHONE and its protective packaging out of the carton. Unpacking As you unpack the FAXPHONE, save the carton and packing material in the future.
Paper tray BX-3 BJ FAX cartridge FAXPHONE B640 User's Guide Paper tray cover Power cord and Telephone line Main unit 2 Carefully remove all items from the box. „ It is best to have someone hold the box while you want to move or ship the unit in case you lift the FAXPHONE and its protective packaging out of the carton. Unpacking As you unpack the FAXPHONE, save the carton and packing material in the future.

User Manual
Page 15
... purchase. Main unit Faceplate (may be installed on unit) BX-3 BJ FAX cartridge Paper tray cover Paper tray Telephone line Power cord Documentation • FAXPHONE B640 User's Guide (this manual) • Quick Start Guide • Registration card • Warranty card • Canon Cares card Removing the shipping materials Remove the shipping materials as shown...
... purchase. Main unit Faceplate (may be installed on unit) BX-3 BJ FAX cartridge Paper tray cover Paper tray Telephone line Power cord Documentation • FAXPHONE B640 User's Guide (this manual) • Quick Start Guide • Registration card • Warranty card • Canon Cares card Removing the shipping materials Remove the shipping materials as shown...

User Manual
Page 20
... or twice and you have removed and reinstalled the BJ cartridge. „ You have to change the ink cartridge more often than those designated by Canon. „ Canon makes numerous ink cartridges; BJ cartridge guidelines Use only the Canon BX-3 BJ FAX cartridge with the FAXPHONE B640. 8 the BX-3 BJ FAX cartridge is graphics, you may need to install the BX...
... or twice and you have removed and reinstalled the BJ cartridge. „ You have to change the ink cartridge more often than those designated by Canon. „ Canon makes numerous ink cartridges; BJ cartridge guidelines Use only the Canon BX-3 BJ FAX cartridge with the FAXPHONE B640. 8 the BX-3 BJ FAX cartridge is graphics, you may need to install the BX...

User Manual
Page 21
... one year of children; Ink may leak out and cause stains. • Never shake the BJ cartridge, especially after trying five successive head cleanings. • Never remove the BJ cartridge unless you are going to replace it. If spilled, the ink is missing, even after removing the protective ... from the print head. When left exposed, the cartridge print head dries out, making it unusable. • Do not touch the print head area on the BJ cartridge. Installing the BJ cartridge Handling the BJ cartridge • Leave the BJ cartridge in its packaging until you are ready to use ...
... one year of children; Ink may leak out and cause stains. • Never shake the BJ cartridge, especially after trying five successive head cleanings. • Never remove the BJ cartridge unless you are going to replace it. If spilled, the ink is missing, even after removing the protective ... from the print head. When left exposed, the cartridge print head dries out, making it unusable. • Do not touch the print head area on the BJ cartridge. Installing the BJ cartridge Handling the BJ cartridge • Leave the BJ cartridge in its packaging until you are ready to use ...
User Manual
Page 22
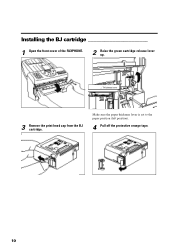
Installing the BJ cartridge 1 Open the front cover of the FAXPHONE. 2 Raise the green cartridge release lever up. Make sure the paper thickness lever is set to the paper position (left position). 4 Pull off the protective orange tape. 10 Thickness lever 3 Remove the print head cap from the BJ cartridge.
Installing the BJ cartridge 1 Open the front cover of the FAXPHONE. 2 Raise the green cartridge release lever up. Make sure the paper thickness lever is set to the paper position (left position). 4 Pull off the protective orange tape. 10 Thickness lever 3 Remove the print head cap from the BJ cartridge.

User Manual
Page 23
... the yellow post in the 6 Lower the cartridge release lever down on the cartridge or try to lock the FAXPHONE. cartridge in the cartridge with the marking on the BJ cartridge. „ If the lever movement is not smooth, release the lever and reload the cartridge. „ To avoid cartridge misalignment and an error message to appear, do...
... the yellow post in the 6 Lower the cartridge release lever down on the cartridge or try to lock the FAXPHONE. cartridge in the cartridge with the marking on the BJ cartridge. „ If the lever movement is not smooth, release the lever and reload the cartridge. „ To avoid cartridge misalignment and an error message to appear, do...
User Manual
Page 24
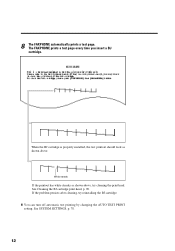
White streak If the printout has white streaks as shown above , try reinstalling the BJ cartridge. „ You can turn off automatic test printing by changing the AUTO TEST PRINT setting. The FAXPHONE prints a test page every time you insert a BJ cartridge. 8 The FAXPHONE automatically prints a test page. If the problem persists after cleaning, try cleaning the print head. See SYSTEM SETTINGS, p. 78. 12 When the BJ cartridge is properly installed, the test printout should look as shown above . See Cleaning the BJ cartridge print head, p. 90.
White streak If the printout has white streaks as shown above , try reinstalling the BJ cartridge. „ You can turn off automatic test printing by changing the AUTO TEST PRINT setting. The FAXPHONE prints a test page every time you insert a BJ cartridge. 8 The FAXPHONE automatically prints a test page. If the problem persists after cleaning, try cleaning the print head. See SYSTEM SETTINGS, p. 78. 12 When the BJ cartridge is properly installed, the test printout should look as shown above . See Cleaning the BJ cartridge print head, p. 90.
User Manual
Page 41
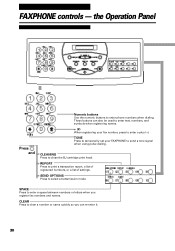
.... SEND OPTIONS Press to clean the BJ cartridge print head. TONE Press to temporarily set your fax number, press to enter a space between numbers or letters when you can also be used to enter text, numbers, and symbols when registering names. + (#) When registering your FAXPHONE to print a transaction report, a list of registered... Use the numeric buttons to clear a number or name quickly so you register fax numbers and names. CLEAR Press to enter phone numbers when dialing. FAXPHONE controls - These buttons can re-enter it. 30 SPACE Press to enter a plus (+).
.... SEND OPTIONS Press to clean the BJ cartridge print head. TONE Press to temporarily set your fax number, press to enter a space between numbers or letters when you can also be used to enter text, numbers, and symbols when registering names. + (#) When registering your FAXPHONE to print a transaction report, a list of registered... Use the numeric buttons to clear a number or name quickly so you register fax numbers and names. CLEAR Press to enter phone numbers when dialing. FAXPHONE controls - These buttons can re-enter it. 30 SPACE Press to enter a plus (+).

User Manual
Page 75
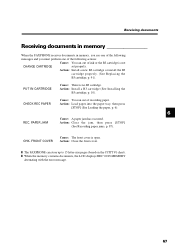
... using [RECEIVE MODE] . 66 Receiving documents in memory. Ans. rected and then press [STOP]. Machine Mode ___ Connecting an answering machine to the FAXPHONE allows you have them resend the document. Machine Mode" appears on the LCD display. If the call is connected to an answering machine, all incoming... Connecting the phone line, p. 13 for a few seconds. „ If the paper runs out or if the BJ cartridge runs out of ink, the FAXPHONE receives the rest of the document in memory. „ To stop receiving before the document is complete, press [STOP]. „ If an error ...
... using [RECEIVE MODE] . 66 Receiving documents in memory. Ans. rected and then press [STOP]. Machine Mode ___ Connecting an answering machine to the FAXPHONE allows you have them resend the document. Machine Mode" appears on the LCD display. If the call is connected to an answering machine, all incoming... Connecting the phone line, p. 13 for a few seconds. „ If the paper runs out or if the BJ cartridge runs out of ink, the FAXPHONE receives the rest of the document in memory. „ To stop receiving before the document is complete, press [STOP]. „ If an error ...
User Manual
Page 76
...Action: Clear the jam, then press [STOP] (See Recording paper jams, p. 87). PUT IN CARTRIDGE Cause: There is open. Receiving documents Receiving documents in memory When the FAXPHONE receives documents in memory, you see one of the following messages and you must perform one of the ...following actions: Cause: You ran out of recording paper. Action: Install a BJ cartridge (See Installing the BJ cartridge, p. 10). CHECK REC PAPER...
...Action: Clear the jam, then press [STOP] (See Recording paper jams, p. 87). PUT IN CARTRIDGE Cause: There is open. Receiving documents Receiving documents in memory When the FAXPHONE receives documents in memory, you see one of the following messages and you must perform one of the ...following actions: Cause: You ran out of recording paper. Action: Install a BJ cartridge (See Installing the BJ cartridge, p. 10). CHECK REC PAPER...

User Manual
Page 87
...ON/OFF REDUCTION RATE Set the reduction factor in bold. Set the language of the loaded fax paper. Set the speed at which the FAXPHONE starts receiving. STANDARD/A4->LTR/ LGL->LTR SEL. Name Description Settings AUTO TEST PRINT DATE FORMAT DISPLAY LANGUAGE TX START SPEED RX START... SPEED Enable/disable auto test printing whenever the BJ cartridge is replaced. ON/OFF MM/DD/YY DD/MM 'YY 'YY MM/DD ENGLISH/FRENCH/ SPANISH 14400bps /9600bps/ 7200bps/4800bps 9600bps /7200bps/...
...ON/OFF REDUCTION RATE Set the reduction factor in bold. Set the language of the loaded fax paper. Set the speed at which the FAXPHONE starts receiving. STANDARD/A4->LTR/ LGL->LTR SEL. Name Description Settings AUTO TEST PRINT DATE FORMAT DISPLAY LANGUAGE TX START SPEED RX START... SPEED Enable/disable auto test printing whenever the BJ cartridge is replaced. ON/OFF MM/DD/YY DD/MM 'YY 'YY MM/DD ENGLISH/FRENCH/ SPANISH 14400bps /9600bps/ 7200bps/4800bps 9600bps /7200bps/...
User Manual
Page 94
... Document Feeder (ADF) jams 86 Recording paper jams 87 Periodic care 88 Cleaning the FAXPHONE exterior 88 Cleaning the glass scanning window 88 Cleaning the printer area 89 Cleaning the BJ cartridge print head 90 Replacing the BJ cartridge 91 8 Frequently Asked Questions 92 TRANSMITTING 92 RECEIVING 93 TELEPHONE 94 COPYING 95 PAPER...
... Document Feeder (ADF) jams 86 Recording paper jams 87 Periodic care 88 Cleaning the FAXPHONE exterior 88 Cleaning the glass scanning window 88 Cleaning the printer area 89 Cleaning the BJ cartridge print head 90 Replacing the BJ cartridge 91 8 Frequently Asked Questions 92 TRANSMITTING 92 RECEIVING 93 TELEPHONE 94 COPYING 95 PAPER...
User Manual
Page 98
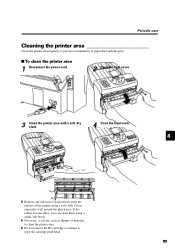
Periodic care Cleaning the printer area Clean the printer area regularly to wipe the cartridge print head. 89 Clean especially well around the platen area. s To clean the printer area 1 Disconnect the power cord. 2 Open the front cover. 3 Clean the ... them using a small, soft brush. „ Never use a solvent, such as thinner or benzene, to clean the printer area. „ Do not remove the BJ cartridge or attempt to prevent accumulation of the printer using a soft cloth.
Periodic care Cleaning the printer area Clean the printer area regularly to wipe the cartridge print head. 89 Clean especially well around the platen area. s To clean the printer area 1 Disconnect the power cord. 2 Open the front cover. 3 Clean the ... them using a small, soft brush. „ Never use a solvent, such as thinner or benzene, to clean the printer area. „ Do not remove the BJ cartridge or attempt to prevent accumulation of the printer using a soft cloth.
User Manual
Page 99
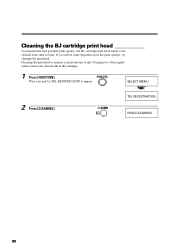
Cleaning too often significantly reduces the amount ink in the print quality, try cleaning the print head. Wait a second for TEL REGISTRATION to time. Cleaning the BJ cartridge print head ___________ To maintain the best possible print quality, the BJ cartridge print head needs to be cleaned from time to appear. Cleaning the print head consumes a small amount of ink. TEL REGISTRATION HEAD CLEANING 90 SELECT MENU 2 Press [CLEANING]. If you notice some degradation in the cartridge. 1 Press [FUNCTION].
Cleaning too often significantly reduces the amount ink in the print quality, try cleaning the print head. Wait a second for TEL REGISTRATION to time. Cleaning the BJ cartridge print head ___________ To maintain the best possible print quality, the BJ cartridge print head needs to be cleaned from time to appear. Cleaning the print head consumes a small amount of ink. TEL REGISTRATION HEAD CLEANING 90 SELECT MENU 2 Press [CLEANING]. If you notice some degradation in the cartridge. 1 Press [FUNCTION].

User Manual
Page 100
You may want to place it in a plastic bag to 8, p. 10. 8 Dispose of the FAXPHONE. 2 Raise the green cartridge release lever. 3 Remove the cartridge. 4 Insert a new cartridge. See Installing the BJ cartridge, steps 3 to keep from spilling any residual ink. 91 Periodic care Replacing the BJ cartridge Replace the BJ cartridge when you see the message CHANGE CARTRIDGE displayed. 1 Open the front cover of the BJ cartridge properly.
You may want to place it in a plastic bag to 8, p. 10. 8 Dispose of the FAXPHONE. 2 Raise the green cartridge release lever. 3 Remove the cartridge. 4 Insert a new cartridge. See Installing the BJ cartridge, steps 3 to keep from spilling any residual ink. 91 Periodic care Replacing the BJ cartridge Replace the BJ cartridge when you see the message CHANGE CARTRIDGE displayed. 1 Open the front cover of the BJ cartridge properly.
User Manual
Page 102
... up the handset? Change the BJ cartridge. Contact the other party and have to your FAXPHONE is a document fed into the FAXPHONE? Press [RECEIVE MODE] on the LCD? Remove the document. See p. 6. • Is the fax unit's BJ cartridge out of paper? Frequently Asked Questions RECEIVING... t Cannot receive a document automatically? • Is the FAXPHONE set to display "Fax/Tel Mode""Fax Only Mode"or "Ans. Check the LCD for...
... up the handset? Change the BJ cartridge. Contact the other party and have to your FAXPHONE is a document fed into the FAXPHONE? Press [RECEIVE MODE] on the LCD? Remove the document. See p. 6. • Is the fax unit's BJ cartridge out of paper? Frequently Asked Questions RECEIVING... t Cannot receive a document automatically? • Is the FAXPHONE set to display "Fax/Tel Mode""Fax Only Mode"or "Ans. Check the LCD for...


