Instruction Manual
Page 6
... mode 40 N Semi-Auto mode 43 N Auto mode 46 N Manual mode 50 Counting the Number of Originals In a Document 53 Function Sheets 55 3.3 Setting Scan Conditions 58 Basic Settings 59 Function Key Settings 60 N Manual Thickness Adjustment 61 N ...Setting in the User Mode 64 N How to Set the User mode 65 Chapter 4 Troubleshooting 67 4.1 When The Scanner Is Not Recognized 68 4.2 Removing Paper Jams 70 Paper Jam in the Paper Feed Unit 70 Paper Jam in Paper...5.1 Daily Cleaning 82 Cleaning the Main Unit 82 Cleaning the Scanning Glasses and Rollers 83 Power Cord 87 Imprinter ...87 4
... mode 40 N Semi-Auto mode 43 N Auto mode 46 N Manual mode 50 Counting the Number of Originals In a Document 53 Function Sheets 55 3.3 Setting Scan Conditions 58 Basic Settings 59 Function Key Settings 60 N Manual Thickness Adjustment 61 N ...Setting in the User Mode 64 N How to Set the User mode 65 Chapter 4 Troubleshooting 67 4.1 When The Scanner Is Not Recognized 68 4.2 Removing Paper Jams 70 Paper Jam in the Paper Feed Unit 70 Paper Jam in Paper...5.1 Daily Cleaning 82 Cleaning the Main Unit 82 Cleaning the Scanning Glasses and Rollers 83 Power Cord 87 Imprinter ...87 4
Instruction Manual
Page 9
...cause an injury. I When the unit is operating. You may cut your hands. I Never install the unit in malfunction. 7 I When you are loading a document or removing a paper jam. Never attempt to disconnect the cord from the unit. I Keep the area around the power outlet clear of the unit. I Do... not directly touch the pins and contacts on the scanner connector with moving parts, especially the rollers that feed the unit. Doing so might result in humid or dusty locations. If you can disconnect the power cord easily ...
...cause an injury. I When the unit is operating. You may cut your hands. I Never install the unit in malfunction. 7 I When you are loading a document or removing a paper jam. Never attempt to disconnect the cord from the unit. I Keep the area around the power outlet clear of the unit. I Do... not directly touch the pins and contacts on the scanner connector with moving parts, especially the rollers that feed the unit. Doing so might result in humid or dusty locations. If you can disconnect the power cord easily ...

Instruction Manual
Page 37
... be sure to and stain the scanning rollers. Chapter 3 Preparing Documents About Documents The DR-5020/5080C can feed a wide variety of paper into the scanner. If the documents are scanned with binding holes 36 After scanning a document written in .) Thickness : 0.06 to 0.15 mm (at manual feed: 0.06 to documents and scanner malfunction, do not feed the following types...
... be sure to and stain the scanning rollers. Chapter 3 Preparing Documents About Documents The DR-5020/5080C can feed a wide variety of paper into the scanner. If the documents are scanned with binding holes 36 After scanning a document written in .) Thickness : 0.06 to 0.15 mm (at manual feed: 0.06 to documents and scanner malfunction, do not feed the following types...

Instruction Manual
Page 39
...unit. If such objects become entangled with moving parts, especially the rollers that could become entangled, immediately disconnect the power plug from the power outlet to do so might damage the document, or cause a paper jam or scanner malfunction. 38 Failure to stop the unit. • Be ...very careful when you are loading a document or removing a paper jam. This section describes the following items: •...
...unit. If such objects become entangled with moving parts, especially the rollers that could become entangled, immediately disconnect the power plug from the power outlet to do so might damage the document, or cause a paper jam or scanner malfunction. 38 Failure to stop the unit. • Be ...very careful when you are loading a document or removing a paper jam. This section describes the following items: •...

Instruction Manual
Page 75
...Canon service department. Slide the paper feed adjustment lever to be scanned when the Function Sheet is appropriate. very humid locations) in which the Function Sheet is copied differs from that copy. 75 Or, copy the Function Sheet on paper of document sheets loaded on the document tray and scan the document... again. Condition • Dirty or worn rollers inside the scanner cause paper jams. Clean rollers if dirty. (P.83) Worn rollers must be causing a paper feed error to...
...Canon service department. Slide the paper feed adjustment lever to be scanned when the Function Sheet is appropriate. very humid locations) in which the Function Sheet is copied differs from that copy. 75 Or, copy the Function Sheet on paper of document sheets loaded on the document tray and scan the document... again. Condition • Dirty or worn rollers inside the scanner cause paper jams. Clean rollers if dirty. (P.83) Worn rollers must be causing a paper feed error to...

Instruction Manual
Page 77
... correctly. ➝ Re-install the driver or application. If the above remedies do not rectify the problem, contact a Canon service department. 77 G The scanning glasses and rollers on how to install the application, see the instruction manual for the application in use. When the scan condition setup is... in the image), one of the following may not be sharp or will appear darkish. ➝ Check the brightness and other scanner settings. If the document cannot be a probable cause. If this does not rectify the problem, contact the computer or SCSI card manufacturer.
... correctly. ➝ Re-install the driver or application. If the above remedies do not rectify the problem, contact a Canon service department. 77 G The scanning glasses and rollers on how to install the application, see the instruction manual for the application in use. When the scan condition setup is... in the image), one of the following may not be sharp or will appear darkish. ➝ Check the brightness and other scanner settings. If the document cannot be a probable cause. If this does not rectify the problem, contact the computer or SCSI card manufacturer.
Instruction Manual
Page 83
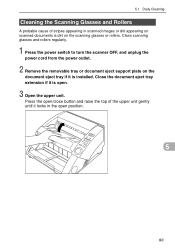
... in the open . 3 Open the upper unit. Clean scanning glasses and rollers regularly. 1 Press the power switch to turn the scanner OFF, and unplug the power cord from the power outlet. 2 Remove the removable tray or document eject support plate on the document eject tray if it locks in scanned images or dirt appearing...
... in the open . 3 Open the upper unit. Clean scanning glasses and rollers regularly. 1 Press the power switch to turn the scanner OFF, and unplug the power cord from the power outlet. 2 Remove the removable tray or document eject support plate on the document eject tray if it locks in scanned images or dirt appearing...

Instruction Manual
Page 85
... as you return the upper unit to its original position, be sure to wipe off any water from the rollers. 85 If the document is scanned with water or mild detergent. Turn these rollers in the figure below. Press this part. Lower the lever. 1. of the arrows as shown in Figure... B. • Before you wipe them clean. Rollers are located at the up position, a paper feed error will occur. 6 Use a ...
... as you return the upper unit to its original position, be sure to wipe off any water from the rollers. 85 If the document is scanned with water or mild detergent. Turn these rollers in the figure below. Press this part. Lower the lever. 1. of the arrows as shown in Figure... B. • Before you wipe them clean. Rollers are located at the up position, a paper feed error will occur. 6 Use a ...

Instruction Manual
Page 86
MEMO If paper jams or double-feed (feeding of two or more document pages) occurs frequently in spite of purchase or a Canon service department. 86 When you press the upper unit down . Do not apply unnecessary force to close the upper unit, push the upper unit inwards ... sides to push the upper unit down firmly on one side, the opposite side will not be full closed. If this is roller friction. Doing so might damage the scanner. 8 When the upper unit has fallen as far as possible, and then release the upper unit. Make sure that you hear it...
MEMO If paper jams or double-feed (feeding of two or more document pages) occurs frequently in spite of purchase or a Canon service department. 86 When you press the upper unit down . Do not apply unnecessary force to close the upper unit, push the upper unit inwards ... sides to push the upper unit down firmly on one side, the opposite side will not be full closed. If this is roller friction. Doing so might damage the scanner. 8 When the upper unit has fallen as far as possible, and then release the upper unit. Make sure that you hear it...
Instruction Manual
Page 93
...scanner 9, 23 - I - N - 5 New File key 19, 59 - DIP switch 16, 25 - Daily maintenance 6 Open/close button 15 Daily cleaning 82 Operation panel 17, 60 Document detection 64 Operation panel buzzer 64 Document eject support plate ... 20, 30 Options 92 Document eject tray 15 Document eject tray extention .. 15, 29 - About documents... and Rollers ... 83 Connecting the SCSI cable 24 - O - Document guide 15 Packaging 14 Document guide labels 20, 32 Paper Feed Adjustment 32 Document tray 15 Paper feed adjustment lever ..... 15, 32 Document tray ...
...scanner 9, 23 - I - N - 5 New File key 19, 59 - DIP switch 16, 25 - Daily maintenance 6 Open/close button 15 Daily cleaning 82 Operation panel 17, 60 Document detection 64 Operation panel buzzer 64 Document eject support plate ... 20, 30 Options 92 Document eject tray 15 Document eject tray extention .. 15, 29 - About documents... and Rollers ... 83 Connecting the SCSI cable 24 - O - Document guide 15 Packaging 14 Document guide labels 20, 32 Paper Feed Adjustment 32 Document tray 15 Paper feed adjustment lever ..... 15, 32 Document tray ...


