
User Manual
Page 4
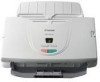
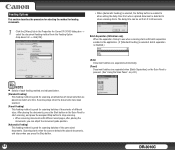
...Saving the Text Data of the Scanner 66 Cleaning the Sensor Glass and the Rollers 67 2. Handling Paper Jams/Double Feed Detection 34 7. Troubleshooting 75 2. Removing the Document Feed Tray 81 Chapter 8 Appendix 82 Specifications 82 Specifications 82 Replacement Parts 83 External Dimensions 84 INDEX 86 4 DR-3010C Starting the Job Registration Tool 56 2. Job Registration Tool Settings Dialog Box 57 Job Registration Tool Dialog Box 57 New/Editing Dialog Box 57 Setting the Launcher 61 Admin Dialog Box 63 Printing Registered Jobs 65 Chapter 6 Maintenance 66 1. Scanning...
...Saving the Text Data of the Scanner 66 Cleaning the Sensor Glass and the Rollers 67 2. Handling Paper Jams/Double Feed Detection 34 7. Troubleshooting 75 2. Removing the Document Feed Tray 81 Chapter 8 Appendix 82 Specifications 82 Specifications 82 Replacement Parts 83 External Dimensions 84 INDEX 86 4 DR-3010C Starting the Job Registration Tool 56 2. Job Registration Tool Settings Dialog Box 57 Job Registration Tool Dialog Box 57 New/Editing Dialog Box 57 Setting the Launcher 61 Admin Dialog Box 63 Printing Registered Jobs 65 Chapter 6 Maintenance 66 1. Scanning...

User Manual
Page 10
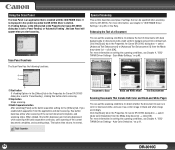
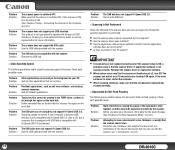
Document Feeder Load the Document. (See p.21.) Document Feed Tray Attach before using the scanner. „ Front View/Right-Side View „ Operation Panel Display Panel Displays the job numbers or the error codes. Document Guides Adjust these guides to fit the width of each part. Power Connector Connect the supplied AC adapter to this connector. USB Connector Connect a USB cable that supports Hi-Speed USB 2.0 to this connector. 10 DR-3010C Make sure to scan on p.78. „ Back View Theft Prevention Hole (Kensington...
Document Feeder Load the Document. (See p.21.) Document Feed Tray Attach before using the scanner. „ Front View/Right-Side View „ Operation Panel Display Panel Displays the job numbers or the error codes. Document Guides Adjust these guides to fit the width of each part. Power Connector Connect the supplied AC adapter to this connector. USB Connector Connect a USB cable that supports Hi-Speed USB 2.0 to this connector. 10 DR-3010C Make sure to scan on p.78. „ Back View Theft Prevention Hole (Kensington...

User Manual
Page 26
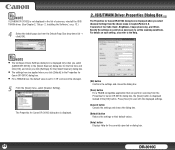
... 4, "ISIS/TWAIN Driver Settings," on p.43.) • The maximum size for Canon DR-3010C dialog box → select [Folio] from an application, you will become the right side of the folded document facing you can also use the Job function to start CapturePerfect 3.0, select the scanner, and scan documents. This section describes the procedures for scanning using the CapturePerfect 3.0 software included with the DR-3010C, in the Properties for the combined image is...
... 4, "ISIS/TWAIN Driver Settings," on p.43.) • The maximum size for Canon DR-3010C dialog box → select [Folio] from an application, you will become the right side of the folded document facing you can also use the Job function to start CapturePerfect 3.0, select the scanner, and scan documents. This section describes the procedures for scanning using the CapturePerfect 3.0 software included with the DR-3010C, in the Properties for the combined image is...

User Manual
Page 27
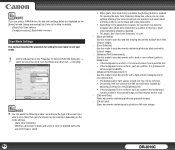
...; The settings here are applied when you click [Default] in the Properties for Canon DR-3010C dialog box. • For a TWAIN driver, the default value is not displayed in the list of scanners, reinstall the ISIS/TWAIN driver. (See Chapter 2, "Setup - 2. For more information on scan settings, see Chapter 4, "ISIS/TWAIN Driver Settings," on p. 13.) 4 Select the default page size from the Default Page size drop-down list → click [OK]. 7 Place your document. (See "3. NOTE If [CANON DR-3010C] is set to File].
...; The settings here are applied when you click [Default] in the Properties for Canon DR-3010C dialog box. • For a TWAIN driver, the default value is not displayed in the list of scanners, reinstall the ISIS/TWAIN driver. (See Chapter 2, "Setup - 2. For more information on scan settings, see Chapter 4, "ISIS/TWAIN Driver Settings," on p. 13.) 4 Select the default page size from the Default Page size drop-down list → click [OK]. 7 Place your document. (See "3. NOTE If [CANON DR-3010C] is set to File].
User Manual
Page 30
... setting on p.40. Auto Color Detection," on p.38, or the Help. Using the Scan Panel The Scan Panel is an application that can be specified when scanning with the DR-3010C. d X c e cStart button If in the [Others] tab in the Properties for Canon DR-3010C dialog box is installed with the ISIS/TWAIN driver. For more information on setting the scanning conditions, see Chapter 4, "ISIS/ TWAIN Driver Settings - Click the [Basic] tab in the Properties for Canon DR-3010C dialog box...
... setting on p.40. Auto Color Detection," on p.38, or the Help. Using the Scan Panel The Scan Panel is an application that can be specified when scanning with the DR-3010C. d X c e cStart button If in the [Others] tab in the Properties for Canon DR-3010C dialog box is installed with the ISIS/TWAIN driver. For more information on setting the scanning conditions, see Chapter 4, "ISIS/ TWAIN Driver Settings - Click the [Basic] tab in the Properties for Canon DR-3010C dialog box...
User Manual
Page 32
... document pages and straighten the scanned images. Omitting a Specific Color," on setting the scanning conditions, see Chapter 4, "ISIS/ TWAIN Driver Settings - Document to Scan X Color Drop-out (Red) 32 DR-3010C For more information on the back side, or to remove the background from the scanned image. However, this function is only available when scanning in 90° increments as needed to normalize the orientation. Click the [Basic] tab in the Properties for Canon DR-3010C dialog box...
... document pages and straighten the scanned images. Omitting a Specific Color," on setting the scanning conditions, see Chapter 4, "ISIS/ TWAIN Driver Settings - Document to Scan X Color Drop-out (Red) 32 DR-3010C For more information on the back side, or to remove the background from the scanned image. However, this function is only available when scanning in 90° increments as needed to normalize the orientation. Click the [Basic] tab in the Properties for Canon DR-3010C dialog box...

User Manual
Page 33
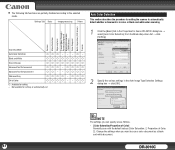
....0 Operation Guide. Scanning Both Sides of Pages • To scan both sides of settings when scanning with a standard size selected for PDF Files You can set the scan area when [Auto-detection] is useful if you want to these examples when specifying ISIS/TWAIN driver settings. Practical Examples This section provides examples of pages Select [Duplex] from the Feeding Option dialog box, scanning does not start until you have placed them in the Properties for OCR drop...
....0 Operation Guide. Scanning Both Sides of Pages • To scan both sides of settings when scanning with a standard size selected for PDF Files You can set the scan area when [Auto-detection] is useful if you want to these examples when specifying ISIS/TWAIN driver settings. Practical Examples This section provides examples of pages Select [Duplex] from the Feeding Option dialog box, scanning does not start until you have placed them in the Properties for OCR drop...
User Manual
Page 35
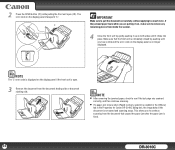
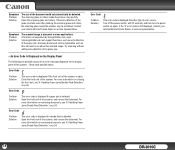
... system] is enabled in the [Others] tab in the Properties for Canon DR-3010C dialog box, the image data of the document is open (d). The error code on the display panel if the front unit is not saved and scanning stops. Make sure that caused the paper jam after the paper jam is no longer displayed. d c IMPORTANT Make sure to "C." 2 Press the OPEN button (c) while pulling the front unit open . 3 Remove the document from the document feeding side or document ejecting side.
... system] is enabled in the [Others] tab in the Properties for Canon DR-3010C dialog box, the image data of the document is open (d). The error code on the display panel if the front unit is not saved and scanning stops. Make sure that caused the paper jam after the paper jam is no longer displayed. d c IMPORTANT Make sure to "C." 2 Press the OPEN button (c) while pulling the front unit open . 3 Remove the document from the document feeding side or document ejecting side.
User Manual
Page 39
... Canon DR-3010C dialog box is displayed. [OK] button Confirms the settings and closes the dialog box. [Scan] button For a TWAIN-compatible application that can perform scanning from the [Scan] menu in CapturePerfect 3.0. NOTE If [CANON DR-3010C] is not displayed in the list of four tabs: Basic, Brightness, Image processing, and Others. Installing the Software," on each setting, also refer to their default values. [Help] button Displays Help for Canon DR-3010C dialog box. • For a TWAIN driver, the default value is set...
... Canon DR-3010C dialog box is displayed. [OK] button Confirms the settings and closes the dialog box. [Scan] button For a TWAIN-compatible application that can perform scanning from the [Scan] menu in CapturePerfect 3.0. NOTE If [CANON DR-3010C] is not displayed in the list of four tabs: Basic, Brightness, Image processing, and Others. Installing the Software," on each setting, also refer to their default values. [Help] button Displays Help for Canon DR-3010C dialog box. • For a TWAIN driver, the default value is set...
User Manual
Page 40
... restricted, depending on the application program, the operation may become unstable when [Auto Color Detection] is removed where it is saved. y The background in the Properties for Canon DR-3010C dialog box → select the scanning mode from the Mode drop-down list → click [OK]. y Depending on the mode settings. - [Auto Color Detection] Whether a document is black-and-white or color is detected before the scanned image is processed to enhance text...
... restricted, depending on the application program, the operation may become unstable when [Auto Color Detection] is removed where it is saved. y The background in the Properties for Canon DR-3010C dialog box → select the scanning mode from the Mode drop-down list → click [OK]. y Depending on the mode settings. - [Auto Color Detection] Whether a document is black-and-white or color is detected before the scanned image is processed to enhance text...
User Manual
Page 41
... available for setting the scanner to the selected mode. Change the settings when you can specify are partially disabled according to automatically detect whether a document is in color or black-and-white when scanning. 1 Click the [Basic] tab in the Auto Image Type Detection Settings dialog box → click [OK]. • The following tab functions are as a blackand-white document. 41 DR-3010C Settings Tab Basic Image processing Others Auto Color Detection...
... available for setting the scanner to the selected mode. Change the settings when you can specify are partially disabled according to automatically detect whether a document is in color or black-and-white when scanning. 1 Click the [Basic] tab in the Auto Image Type Detection Settings dialog box → click [OK]. • The following tab functions are as a blackand-white document. 41 DR-3010C Settings Tab Basic Image processing Others Auto Color Detection...
User Manual
Page 44
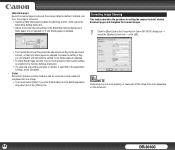
...-down list in the Properties for Canon DR-3010C dialog box → select the [Deskew] check box → click [OK]. NOTE Deskewing may not work properly, or cause part of the image to be adjusted according to detect slanted document pages and straighten the scanned images. 1 Click the [Basic] tab in the [Others] tab. y The Skip Blank Pages function may not work properly if the Custom setting is...
...-down list in the Properties for Canon DR-3010C dialog box → select the [Deskew] check box → click [OK]. NOTE Deskewing may not work properly, or cause part of the image to be adjusted according to detect slanted document pages and straighten the scanned images. 1 Click the [Basic] tab in the [Others] tab. y The Skip Blank Pages function may not work properly if the Custom setting is...
User Manual
Page 53
... for Canon DR-3010C dialog box → select the document feeding method from 0 to 60 seconds. 1 Click the [Others] tab in the application. (If [Standard Feeding] is selected, batch separation is disabled.) [Auto] Document batches are separated automatically. [Panel] Document batches are separated when [Batch Separation] on the Scan Panel is pressed. (See "Using the Scan Panel," on the Scan Panel to start scanning, and press the assigned Stop button to when scanning starts. y When scanning documents with...
... for Canon DR-3010C dialog box → select the document feeding method from 0 to 60 seconds. 1 Click the [Others] tab in the application. (If [Standard Feeding] is selected, batch separation is disabled.) [Auto] Document batches are separated automatically. [Panel] Document batches are separated when [Batch Separation] on the Scan Panel is pressed. (See "Using the Scan Panel," on the Scan Panel to start scanning, and press the assigned Stop button to when scanning starts. y When scanning documents with...
User Manual
Page 75
... still cannot resolve the problem, contact your local authorized Canon dealer or service representative. × The Scanner Does Not Turn ON Check the following are connected correctly with the USB cable. (See "Chapter 2 Setup - Uninstalling the Software 79 Uninstalling the ISIS/TWAIN Driver and Job Registration Tool 79 Uninstalling CapturePerfect 3.0 80 3. Troubleshooting This section describes the possible problems that might encounter. For details on p.16.) 75 DR-3010C Removing the Document Feed Tray 81 1.
... still cannot resolve the problem, contact your local authorized Canon dealer or service representative. × The Scanner Does Not Turn ON Check the following are connected correctly with the USB cable. (See "Chapter 2 Setup - Uninstalling the Software 79 Uninstalling the ISIS/TWAIN Driver and Job Registration Tool 79 Uninstalling CapturePerfect 3.0 80 3. Troubleshooting This section describes the possible problems that might encounter. For details on p.16.) 75 DR-3010C Removing the Document Feed Tray 81 1.
User Manual
Page 76
... the scanner driver been installed? • Has the application software been installed correctly? The USB cable does not support Hi-Speed USB 2.0. Has the application software been set up correctly? • Is there a problem in the Page Separation Mode," on your local authorized Canon dealer or service representative for more information. If the error continues to feed properly. Documents," on the hard disk to stick together, and they cannot be slow...
... the scanner driver been installed? • Has the application software been installed correctly? The USB cable does not support Hi-Speed USB 2.0. Has the application software been set up correctly? • Is there a problem in the Page Separation Mode," on your local authorized Canon dealer or service representative for more information. If the error continues to feed properly. Documents," on the hard disk to stick together, and they cannot be slow...

User Manual
Page 77
... right to purchase a roller replacement kit. Symptoms Problem Solution Text or images on the scanned image. Symptoms Problem Solution The scanned image is set to be replaced. The scanning glass or rollers inside the scanner may be scratched. For information on the image even after cleaning the scanning glass and rollers, the scanning glass inside the scanner are abnormalities in the Properties for Canon DR-3010C dialog box → select [Duplex] from the Scanning Side drop-down list is dark, click the...
... right to purchase a roller replacement kit. Symptoms Problem Solution Text or images on the scanned image. Symptoms Problem Solution The scanned image is set to be replaced. The scanning glass or rollers inside the scanner may be scratched. For information on the image even after cleaning the scanning glass and rollers, the scanning glass inside the scanner are abnormalities in the Properties for Canon DR-3010C dialog box → select [Duplex] from the Scanning Side drop-down list is dark, click the...
User Manual
Page 78
... paper size fails even after cleaning the scanning glass and rollers, the scanning glass inside the scanner may be detected. Open the front unit of the scanner. Error Code Problem Solution This error code is displayed if the front unit of the scanner is detected. Error Code Problem Solution This error code is displayed if a double feed is open. For more information on the display panel of the scanner. A function not supported by the application was used. Try scanning without setting auto-detection of the paper size...
... paper size fails even after cleaning the scanning glass and rollers, the scanning glass inside the scanner may be detected. Open the front unit of the scanner. Error Code Problem Solution This error code is displayed if the front unit of the scanner is detected. Error Code Problem Solution This error code is displayed if a double feed is open. For more information on the display panel of the scanner. A function not supported by the application was used. Try scanning without setting auto-detection of the paper size...
User Manual
Page 82
...: Horizontal feeding only Embossed cards can be scanned. Document Feeding Method Automatic Scanning Sensor Contact image sensor Light Source LED Scanning Side Simplex/Duplex Scanning Modes Black and White, Error Diffusion, 256-level Grayscale, Advanced Text Enhancement, Advanced Text Enhancement II, 24-bit Color Scanning Resolution 100 x 100dpi/150 x 150dpi/200 x 200dpi/ (Primary Scan Lines x Secondary 240 x 240dpi/300 x 300dpi/400 x 400dpi/ Scan Lines) 600 x 600dpi Scanning Speed (Conditions: Pentium 4 3.2 GHz CPU, 1 GB memory, LTR/A4 document size) Black and...
...: Horizontal feeding only Embossed cards can be scanned. Document Feeding Method Automatic Scanning Sensor Contact image sensor Light Source LED Scanning Side Simplex/Duplex Scanning Modes Black and White, Error Diffusion, 256-level Grayscale, Advanced Text Enhancement, Advanced Text Enhancement II, 24-bit Color Scanning Resolution 100 x 100dpi/150 x 150dpi/200 x 200dpi/ (Primary Scan Lines x Secondary 240 x 240dpi/300 x 300dpi/400 x 400dpi/ Scan Lines) 600 x 600dpi Scanning Speed (Conditions: Pentium 4 3.2 GHz CPU, 1 GB memory, LTR/A4 document size) Black and...

User Manual
Page 83
... power cord) Replacement Parts Exchange roller kit (product code: 3335B001AA) Kit to change without AC adapter) Approximately 6.4 lb (2.9 kg). Grayscale Simplex 200 x 200 dpi 30 pages/min. 300 x 300 dpi 30 pages/min. Duplex 100 x 100 dpi 60 images/min. 200 x 200 dpi 60 images/min. Product specifications are subject to replace the rollers (retard roller, feed roller) and document holding guide, see "Removing/Attaching the Feed Roller," on p. 73. • Contact your local authorized Canon dealer...
... power cord) Replacement Parts Exchange roller kit (product code: 3335B001AA) Kit to change without AC adapter) Approximately 6.4 lb (2.9 kg). Grayscale Simplex 200 x 200 dpi 30 pages/min. 300 x 300 dpi 30 pages/min. Duplex 100 x 100 dpi 60 images/min. 200 x 200 dpi 60 images/min. Product specifications are subject to replace the rollers (retard roller, feed roller) and document holding guide, see "Removing/Attaching the Feed Roller," on p. 73. • Contact your local authorized Canon dealer...
User Manual
Page 87
... O OPEN button ...10 Operating system 12 Operation panel 10 P Page Separation mode 22 Paper jam, clearing 34 Plus key ...10 Power connector 10 Power indicator 10 Power switch ...10 Practical examples 33 Preparing the scanner 21 Document stopper 21 Trays...21 R Recognizing the scanner by computer 18 Registered job list 57 Replacement parts 83 Retard roller Attaching 72 Removing 71 Roller, replacing Counter, resetting 74 Replacement cycle 69 S Scan Panel ...30 Scanning methods 26 Service...75 Setup disc...13 Custom Installation 13 Read Manuals 13 Typical Installation...
... O OPEN button ...10 Operating system 12 Operation panel 10 P Page Separation mode 22 Paper jam, clearing 34 Plus key ...10 Power connector 10 Power indicator 10 Power switch ...10 Practical examples 33 Preparing the scanner 21 Document stopper 21 Trays...21 R Recognizing the scanner by computer 18 Registered job list 57 Replacement parts 83 Retard roller Attaching 72 Removing 71 Roller, replacing Counter, resetting 74 Replacement cycle 69 S Scan Panel ...30 Scanning methods 26 Service...75 Setup disc...13 Custom Installation 13 Read Manuals 13 Typical Installation...


