
User Manual
Page 16
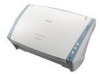
...connector on the back of Windows recognizes the scanner and automatically installs the required device driver. 4 Use the supplied USB cable to connect the scanner to turn the scanner ON (I side). 16 DR-2010C / DR-2510C Scanner Recognition The scanner will be recognized the first... time it ON again. • If you will not be using the scanner for an extended period, you turn the power OFF, wait at least 10...
...connector on the back of Windows recognizes the scanner and automatically installs the required device driver. 4 Use the supplied USB cable to connect the scanner to turn the scanner ON (I side). 16 DR-2010C / DR-2510C Scanner Recognition The scanner will be recognized the first... time it ON again. • If you will not be using the scanner for an extended period, you turn the power OFF, wait at least 10...

User Manual
Page 27
...how to start the Job Registration Tool and how to scan with the ISIS/TWAIN driver, and is used by applications. The Job Function includes functions for performing scanning, ...pressed. 1 From the Windows task bar, click [Start] → point to [All Programs] → [Canon DR-2510C] or [Canon DR-2010C] → click [Job Registration Tool]. 27 DR-2010C / DR-2510C For more pages of the document to scan, scanning stops...using the Job Registration Tool. 11 After scanning is displayed. 10 Place the next document → click [Continue Scanning] to resume Scanning, or click [Stop Scanning] ...
...how to start the Job Registration Tool and how to scan with the ISIS/TWAIN driver, and is used by applications. The Job Function includes functions for performing scanning, ...pressed. 1 From the Windows task bar, click [Start] → point to [All Programs] → [Canon DR-2510C] or [Canon DR-2010C] → click [Job Registration Tool]. 27 DR-2010C / DR-2510C For more pages of the document to scan, scanning stops...using the Job Registration Tool. 11 After scanning is displayed. 10 Place the next document → click [Continue Scanning] to resume Scanning, or click [Stop Scanning] ...

Easy Start Guide
Page 1
... refer to Windows with the shaft on its left (2). 6. CE-IE-598 ©2007 CANON ELECTRONICS INC. 7. Slide the roller lock lever to lock the feed roller shaft (2). 1. The DR-2010C/DR-2510C driver installation is the operations guide for purchasing the Canon DR-2010C/DR-2510C Document Scanner. Click ... items listed below are subject to complete the installation. and Canada only) (U.S.A. The scanner is installed on back side Next, you insert the CD-ROM into place. 10. During scanner driver installation, the scanner driver and the Job Registration Tool are installed. 5.
... refer to Windows with the shaft on its left (2). 6. CE-IE-598 ©2007 CANON ELECTRONICS INC. 7. Slide the roller lock lever to lock the feed roller shaft (2). 1. The DR-2010C/DR-2510C driver installation is the operations guide for purchasing the Canon DR-2010C/DR-2510C Document Scanner. Click ... items listed below are subject to complete the installation. and Canada only) (U.S.A. The scanner is installed on back side Next, you insert the CD-ROM into place. 10. During scanner driver installation, the scanner driver and the Job Registration Tool are installed. 5.
Easy Start Guide
Page 2
... are connected. 2. Next, you can be sure to your document is displayed at least 10 seconds before turning it OFF. Caution Be sure to log on the scanner so that the image was saved. Windows automatically recognizes the DR-2010C/DR-2510C as a stack. For details, see "Scanning with a... DR-2010C/DR-2510C is automatically installed. Read the software license agreement, and click [Yes] if you turn it ON again. Check the destination folder and click [Next]. Click [Finish] to the PC ON, the plug-and-play function recognizes the scanner, and the device driver ...
... are connected. 2. Next, you can be sure to your document is displayed at least 10 seconds before turning it OFF. Caution Be sure to log on the scanner so that the image was saved. Windows automatically recognizes the DR-2010C/DR-2510C as a stack. For details, see "Scanning with a... DR-2010C/DR-2510C is automatically installed. Read the software license agreement, and click [Yes] if you turn it ON again. Check the destination folder and click [Next]. Click [Finish] to the PC ON, the plug-and-play function recognizes the scanner, and the device driver ...


