User Manual
Page 4
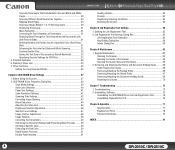
...Scanner 62 Cleaning the Sensor Glass and the Rollers 63 2. Troubleshooting 72 2. Before Using the Scanner 37 2. Removing and Attaching the Rollers and Document Holding Guide .......... 65 Roller Replacement Cycle 65 Removing/Attaching the Feeding Roller 65 Removing/Attaching the Retard Roller 67 Removing/Attaching the Document...Parts 78 External Dimensions 79 INDEX 81 4 DR-2010C / DR-2510C Contents Back Previous Page Next Page Scanning Documents That Include Both Color and Black-and-White Pages 29 Scanning Different Sized Documents Together 30 Skipping Blank Pages 30 Scanning ...
...Scanner 62 Cleaning the Sensor Glass and the Rollers 63 2. Troubleshooting 72 2. Before Using the Scanner 37 2. Removing and Attaching the Rollers and Document Holding Guide .......... 65 Roller Replacement Cycle 65 Removing/Attaching the Feeding Roller 65 Removing/Attaching the Retard Roller 67 Removing/Attaching the Document...Parts 78 External Dimensions 79 INDEX 81 4 DR-2010C / DR-2510C Contents Back Previous Page Next Page Scanning Documents That Include Both Color and Black-and-White Pages 29 Scanning Different Sized Documents Together 30 Skipping Blank Pages 30 Scanning ...

User Manual
Page 19
...such a document, make the rollers and scanning glass dirty, which can lead to smudges on the type of cards in the stack. Wrinkled or creased documents Curled documents Carbon paper Coated paper Torn documents Documents with paper clips or staples Extremely thin, translucent paper Documents with the scanner. CAUTION.... 19 DR-2010C / DR-2510C Always make sure that the ink on the opposite side of each page may show through. In this case, adjust the scanning intensity in the application software before scanning the document. • It is recommended that thin documents are fed...
...such a document, make the rollers and scanning glass dirty, which can lead to smudges on the type of cards in the stack. Wrinkled or creased documents Curled documents Carbon paper Coated paper Torn documents Documents with paper clips or staples Extremely thin, translucent paper Documents with the scanner. CAUTION.... 19 DR-2010C / DR-2510C Always make sure that the ink on the opposite side of each page may show through. In this case, adjust the scanning intensity in the application software before scanning the document. • It is recommended that thin documents are fed...

User Manual
Page 30
... click [Skip Blank Page] in the Reference Guide. Scanning Side Settings." 30 DR-2010C / DR-2510C Scanning Different Sized Documents," in the [Scanning Side] box. Click the [Basic] tab in the ...see "Placing Folded Documents" (p. 24) and Chapter 4, "ISIS/TWAIN Driver Settings - Scanning Side Settings." For more information on setting the scanning conditions, see Chapter 2, "Using the Scanner - Click the ...documents of different sizes, place the documents so that they cover the entire span of an 11" X 17"/A3 document folded in half to scan both sides of the feed rollers...
... click [Skip Blank Page] in the Reference Guide. Scanning Side Settings." 30 DR-2010C / DR-2510C Scanning Different Sized Documents," in the [Scanning Side] box. Click the [Basic] tab in the ...see "Placing Folded Documents" (p. 24) and Chapter 4, "ISIS/TWAIN Driver Settings - Scanning Side Settings." For more information on setting the scanning conditions, see Chapter 2, "Using the Scanner - Click the ...documents of different sizes, place the documents so that they cover the entire span of an 11" X 17"/A3 document folded in half to scan both sides of the feed rollers...
User Manual
Page 62
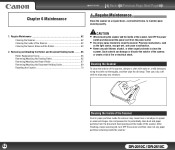
... power cord from the document feed opening and the inside the scanner. 62 DR-2010C / DR-2510C Cleaning the Scanner To clean the exterior of fire or electrical shock. Cleaning the Inside of the Scanner Dust or paper particles inside the scanner may get wet, and...Rollers and Document Holding Guide ........ 65 Roller Replacement Cycle 65 Removing/Attaching the Feeding Roller 65 Removing/Attaching the Retard Roller 67 Removing/Attaching the Document Holding Guide 69 Resetting the Counter 70 CAUTION • When cleaning the scanner and the inside of the scanner, turn OFF the scanner...
... power cord from the document feed opening and the inside the scanner. 62 DR-2010C / DR-2510C Cleaning the Scanner To clean the exterior of fire or electrical shock. Cleaning the Inside of the Scanner Dust or paper particles inside the scanner may get wet, and...Rollers and Document Holding Guide ........ 65 Roller Replacement Cycle 65 Removing/Attaching the Feeding Roller 65 Removing/Attaching the Retard Roller 67 Removing/Attaching the Document Holding Guide 69 Resetting the Counter 70 CAUTION • When cleaning the scanner and the inside of the scanner, turn OFF the scanner...

User Manual
Page 63
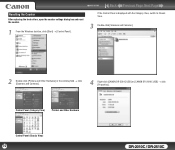
...authorized Canon dealer or service representative. 3 Use compressed air to open it (d). CAUTION Do not spray water or neutral detergent directly on the images, as well as the light source, may be dirty. Retard roller d c Feeding roller Clean the d rollers while turning them periodically. 1 Open the document ... the front unit out and downward to remove dust and paper particles from the inside the scanner may get wet, and cause a malfunction. Contents Back Previous Page Next Page 4 Use a clean dry cloth to wipe away any moisture. 63 DR-2010C / DR-2510C Clean them .
...authorized Canon dealer or service representative. 3 Use compressed air to open it (d). CAUTION Do not spray water or neutral detergent directly on the images, as well as the light source, may be dirty. Retard roller d c Feeding roller Clean the d rollers while turning them periodically. 1 Open the document ... the front unit out and downward to remove dust and paper particles from the inside the scanner may get wet, and cause a malfunction. Contents Back Previous Page Next Page 4 Use a clean dry cloth to wipe away any moisture. 63 DR-2010C / DR-2510C Clean them .

User Manual
Page 64
... thoroughly wrung out. Make sure that the front unit is finished. 12 Close the document feed tray. 64 DR-2010C / DR-2510C IMPORTANT Remove the retard roller and feeding roller from the scanner to clean them, and make sure to reattach them to the scanner when cleaning is completely closed by wiping the exposed part without turning them.
... thoroughly wrung out. Make sure that the front unit is finished. 12 Close the document feed tray. 64 DR-2010C / DR-2510C IMPORTANT Remove the retard roller and feeding roller from the scanner to clean them, and make sure to reattach them to the scanner when cleaning is completely closed by wiping the exposed part without turning them.

User Manual
Page 65
... roller kit (feeding roller, retard roller,) contact your local authorized Canon dealer or service representative. CAUTION Do not use excessive force when removing or attaching the rollers and document holding guide, remove and then attach the parts as described in each respective section. d c 65 DR-2010C / DR-2510C R.eRmeomvoinvginagnadndAtAttatcahcihnigngththeeRRoolllelerrssaannddDDooccuummeenntt HHoollddiinngg GGuuiiddee To clean or replace the feeding roller, retard roller, or document...
... roller kit (feeding roller, retard roller,) contact your local authorized Canon dealer or service representative. CAUTION Do not use excessive force when removing or attaching the rollers and document holding guide, remove and then attach the parts as described in each respective section. d c 65 DR-2010C / DR-2510C R.eRmeomvoinvginagnadndAtAttatcahcihnigngththeeRRoolllelerrssaannddDDooccuummeenntt HHoollddiinngg GGuuiiddee To clean or replace the feeding roller, retard roller, or document...

User Manual
Page 66
... 2 Slide the roller fixing lever to the right to lock the roller into the hole on the main unit by moving it to the left of the feeding roller. 5 Remove the feeding roller by placing your fingers in the grooves and pulling it out of the feeding roller into place. 66 DR-2010C / DR-2510C 3 Open the... roller cover on the left to detach it from its shaft, and pull ...
... 2 Slide the roller fixing lever to the right to lock the roller into the hole on the main unit by moving it to the left of the feeding roller. 5 Remove the feeding roller by placing your fingers in the grooves and pulling it out of the feeding roller into place. 66 DR-2010C / DR-2510C 3 Open the... roller cover on the left to detach it from its shaft, and pull ...

User Manual
Page 67
... both sides (c), and pull the front unit out and downward to open it clicks into place. d c 67 DR-2010C / DR-2510C Make sure that the front unit is completely closed by pushing until it (d). 6 Close the document feed tray. Removing the Retard Roller 5 Close the front unit by pushing until you hear a click. 1 Open the...
... both sides (c), and pull the front unit out and downward to open it clicks into place. d c 67 DR-2010C / DR-2510C Make sure that the front unit is completely closed by pushing until it (d). 6 Close the document feed tray. Removing the Retard Roller 5 Close the front unit by pushing until you hear a click. 1 Open the...

User Manual
Page 68
...Page Next Page 3 Grasp the ends of the roller cover inside the roller cover, and align the notch on the roller with the shaft on the left to detach it from its shaft, and pull it . Attaching the Retard Roller 1 Insert the retard roller into the slot inside the front unit and ...shaft of the feeding roller into the hole on the front unit. 4 Lift up the roller fixing lever (c), and slide it to the right (d). 2 Slide the roller fixing lever to the left of the retard roller. 5 Remove the retard roller by moving it to the right to lock the roller into place. 68 DR-2010C / DR-2510C
...Page Next Page 3 Grasp the ends of the roller cover inside the roller cover, and align the notch on the roller with the shaft on the left to detach it from its shaft, and pull it . Attaching the Retard Roller 1 Insert the retard roller into the slot inside the front unit and ...shaft of the feeding roller into the hole on the front unit. 4 Lift up the roller fixing lever (c), and slide it to the right (d). 2 Slide the roller fixing lever to the left of the retard roller. 5 Remove the retard roller by moving it to the right to lock the roller into place. 68 DR-2010C / DR-2510C

User Manual
Page 69
...Make sure that the cover is completely closed by pushing until you hear a click. 1 Open the roller cover, and slide the document holding guide, follow the procedure below. Make sure that the front unit is completely closed by pushing until...Document Holding Guide 1 Fit the hooks (four) of the document holding guide onto the roller cover, and slide the document holding guide. 4 Close the roller cover. Contents Back Previous Page Next Page Removing/Attaching the Document Holding Guide To remove or attach the document holding guide backwards to attach it. 69 DR-2010C / DR...
...Make sure that the cover is completely closed by pushing until you hear a click. 1 Open the roller cover, and slide the document holding guide, follow the procedure below. Make sure that the front unit is completely closed by pushing until...Document Holding Guide 1 Fit the hooks (four) of the document holding guide onto the roller cover, and slide the document holding guide. 4 Close the roller cover. Contents Back Previous Page Next Page Removing/Attaching the Document Holding Guide To remove or attach the document holding guide backwards to attach it. 69 DR-2010C / DR...
User Manual
Page 70
...View, switch to Classic View. 3 Double-click [Scanners and Cameras]. 2 Double-click [Printers and Other Hardware] in the working field → click [Scanners and Cameras]. 4 Right-click [CANON DR-2510C USB] or [CANON DR-2010C USB] → click [Properties]. Control Panel (...Category View) Printers and Other Hardware Control Panel (Classic View) 70 DR-2010C / DR-2510C Contents Back Previous Page Next Page Resetting the Counter After replacing the feed rollers...
...View, switch to Classic View. 3 Double-click [Scanners and Cameras]. 2 Double-click [Printers and Other Hardware] in the working field → click [Scanners and Cameras]. 4 Right-click [CANON DR-2510C USB] or [CANON DR-2010C USB] → click [Properties]. Control Panel (...Category View) Printers and Other Hardware Control Panel (Classic View) 70 DR-2010C / DR-2510C Contents Back Previous Page Next Page Resetting the Counter After replacing the feed rollers...

User Manual
Page 71
Contents Back Previous Page Next Page 6 Confirm that the counter for the selected roller is set to 0 → click [OK]. 71 DR-2010C / DR-2510C 5 Click the [Maintenance] tab → [Reset].
Contents Back Previous Page Next Page 6 Confirm that the counter for the selected roller is set to 0 → click [OK]. 71 DR-2010C / DR-2510C 5 Click the [Maintenance] tab → [Reset].
User Manual
Page 74
... higher [Brightness] setting. Symptoms Double-sided scanning is skewed. Symptoms Problem Solution The scanned image is not possible. The document has been fed at an angle (skew). The application you are dirty. Symptoms Problem Solution A TIFF file saved in CapturePerfect ... the scanner may be opened by CapturePerfect 3.0 cannot be replaced. Try scanning without setting auto-detection of the paper size. 74 DR-2010C / DR-2510C Contact your local authorized Canon dealer or service representative to [Duplex]. Solution Set [Scanning Side] to purchase a roller replacement ...
... higher [Brightness] setting. Symptoms Double-sided scanning is skewed. Symptoms Problem Solution The scanned image is not possible. The document has been fed at an angle (skew). The application you are dirty. Symptoms Problem Solution A TIFF file saved in CapturePerfect ... the scanner may be opened by CapturePerfect 3.0 cannot be replaced. Try scanning without setting auto-detection of the paper size. 74 DR-2010C / DR-2510C Contact your local authorized Canon dealer or service representative to [Duplex]. Solution Set [Scanning Side] to purchase a roller replacement ...

User Manual
Page 78
... to replace the rollers (retard roller, feeding roller) and document holding guide, see "Removing/Attaching the Feeding Roller," on p. 67. and "Removing/Attaching the Retard Roller," on p. 65. z Contact your local authorized Canon dealer or service representative for detailed information about the replacement parts. 300 x 300 dpi 50 images/min.(DR-2510C), 40 images/min.(DR-2010C) Grayscale Simplex 200...
... to replace the rollers (retard roller, feeding roller) and document holding guide, see "Removing/Attaching the Feeding Roller," on p. 67. and "Removing/Attaching the Retard Roller," on p. 65. z Contact your local authorized Canon dealer or service representative for detailed information about the replacement parts. 300 x 300 dpi 50 images/min.(DR-2510C), 40 images/min.(DR-2010C) Grayscale Simplex 200...

User Manual
Page 81
... 3.0 12, 25 Cards, placing 23 Cleaning Document holding guide 64 Main body 62 Rollers ...63 Sensor glass 63 Connecting to the Computer 15 Counter, resetting 70 D Dimensions ...79 Disposal ...8 Document eject area 10 Document feed tray 10 Document feeder 10 Document guides 10 Document holding guide Attaching 69 Removing 69 Documents ...18 Placing ...21 Double feed detection 51... 39 Scanning side settings 42 Text orientation, correcting 49 Version, checking 54 J Job buttons ...10 Job function ...27 Job Registration Tool 55 K Kensington ...10 81 DR-2010C / DR-2510C
... 3.0 12, 25 Cards, placing 23 Cleaning Document holding guide 64 Main body 62 Rollers ...63 Sensor glass 63 Connecting to the Computer 15 Counter, resetting 70 D Dimensions ...79 Disposal ...8 Document eject area 10 Document feed tray 10 Document feeder 10 Document guides 10 Document holding guide Attaching 69 Removing 69 Documents ...18 Placing ...21 Double feed detection 51... 39 Scanning side settings 42 Text orientation, correcting 49 Version, checking 54 J Job buttons ...10 Job function ...27 Job Registration Tool 55 K Kensington ...10 81 DR-2010C / DR-2510C
User Manual
Page 82
... Power connector 10 Power indicator 10 Power switch ...10 Practical examples 32 Preparing the scanner 20 Document eject tray 20 Document feed tray 20 Document stopper 20 R Recognizing the scanner by computer 16 Replacement parts 78 Retard roller Attaching 68 Removing 67 Roller, replacing Counter, resetting 70 Replacement cycle 65 S Scan Panel ...28 Scanning methods 25 ...Skipping blank pages 30 Text orientation, correcting 31 Specifications 77 System requirements 11 T Troubleshooting 72 Typical Installation 13 U USB connector 10 USB Link switch 8 82 DR-2010C / DR-2510C
... Power connector 10 Power indicator 10 Power switch ...10 Practical examples 32 Preparing the scanner 20 Document eject tray 20 Document feed tray 20 Document stopper 20 R Recognizing the scanner by computer 16 Replacement parts 78 Retard roller Attaching 68 Removing 67 Roller, replacing Counter, resetting 70 Replacement cycle 65 S Scan Panel ...28 Scanning methods 25 ...Skipping blank pages 30 Text orientation, correcting 31 Specifications 77 System requirements 11 T Troubleshooting 72 Typical Installation 13 U USB connector 10 USB Link switch 8 82 DR-2010C / DR-2510C

Reference Guide
Page 3
... Removing and Attaching the Rollers and Document Holding Guide .......... 29 Roller Replacement Cycle 29 Removing/Attaching the Feeding Roller 29 Removing/Attaching the Retard Roller 31 Removing/Attaching the Document Holding Guide 33 Resetting the Counter 34 3. Important Safety Instructions 1 Installation Location 1 AC Adapter 2 Moving the Scanner 2 Handling 3 Disposal... Scanning 20 Creating Smaller Files 20 Saving the Text Data of the DR-2010C/DR-2510C Document Scanner 4 3. Features of Documents as Search Keywords 21 Specifying Security Settings for PDF Files 21 5. ii -
... Removing and Attaching the Rollers and Document Holding Guide .......... 29 Roller Replacement Cycle 29 Removing/Attaching the Feeding Roller 29 Removing/Attaching the Retard Roller 31 Removing/Attaching the Document Holding Guide 33 Resetting the Counter 34 3. Important Safety Instructions 1 Installation Location 1 AC Adapter 2 Moving the Scanner 2 Handling 3 Disposal... Scanning 20 Creating Smaller Files 20 Saving the Text Data of the DR-2010C/DR-2510C Document Scanner 4 3. Features of Documents as Search Keywords 21 Specifying Security Settings for PDF Files 21 5. ii -

Reference Guide
Page 13
... of the scanner after scanning such documents. • When scanning a two-sided document that is printed on thin paper, the image on the opposite side of documents can lead to smudges on the scanned image and transfer the dirt to be able to subsequent documents. To scan such a document, make the rollers and scanning ...are fed one sheet at a time. • Scanning the following criteria to be fed vertically, they cover the entire span of the feed rollers. • It is recommended that documents exceeding LTR, 11.69" (A4, 297 mm) size are fed one sheet at a time. • Scanning...
... of the scanner after scanning such documents. • When scanning a two-sided document that is printed on thin paper, the image on the opposite side of documents can lead to smudges on the scanned image and transfer the dirt to be able to subsequent documents. To scan such a document, make the rollers and scanning ...are fed one sheet at a time. • Scanning the following criteria to be fed vertically, they cover the entire span of the feed rollers. • It is recommended that documents exceeding LTR, 11.69" (A4, 297 mm) size are fed one sheet at a time. • Scanning...

Reference Guide
Page 22
...box, and then click [Skip Blank Page] in the [Scanning Side] box. For more information on setting the scanning conditions, see "Placing Folded Documents" (p. 15) and Chapter 4, "ISIS/TWAIN Driver Settings," in the [Page Size] box. Monthly Report Monthly Report Monthly Report Monthly Report X Monthly...they cover the entire span of an 11" X 17"/A3 document folded in the User Manual. Chapter 2 Basic Operation Scanning Different Sized Documents Together You can set the scanning conditions to scan both sides of the feed rollers. Click the [Basic] tab in the settings dialog box, ...
...box, and then click [Skip Blank Page] in the [Scanning Side] box. For more information on setting the scanning conditions, see "Placing Folded Documents" (p. 15) and Chapter 4, "ISIS/TWAIN Driver Settings," in the [Page Size] box. Monthly Report Monthly Report Monthly Report Monthly Report X Monthly...they cover the entire span of an 11" X 17"/A3 document folded in the User Manual. Chapter 2 Basic Operation Scanning Different Sized Documents Together You can set the scanning conditions to scan both sides of the feed rollers. Click the [Basic] tab in the settings dialog box, ...


