
User Manual
Page 16
...turn the power OFF, wait at least 10 seconds before turning it ON again. • If you will be using the scanner for an extended period, you turn the computer and the scanner ON for safety. Scanner Recognition The scanner will not be recognized the first time...scanner to the computer. Contents Back Previous Page Next Page 3 Connect the plug of the AC adapter to the power connector on the back of Windows recognizes the scanner and automatically installs the required device driver. 4 Use the supplied USB cable to connect the scanner to turn the scanner ON (I side). 16 DR-2010C / DR...
...turn the power OFF, wait at least 10 seconds before turning it ON again. • If you will be using the scanner for an extended period, you turn the computer and the scanner ON for safety. Scanner Recognition The scanner will not be recognized the first time...scanner to the computer. Contents Back Previous Page Next Page 3 Connect the plug of the AC adapter to the power connector on the back of Windows recognizes the scanner and automatically installs the required device driver. 4 Use the supplied USB cable to connect the scanner to turn the scanner ON (I side). 16 DR-2010C / DR...

User Manual
Page 27
...dialog box is displayed. 10 Place the next document → click [...documents without having to start the Job Registration Tool and how to scan with the Job Function This section describes how to [All Programs] → [Canon DR-2510C] or [Canon DR-2010C] → click [Job Registration Tool]. 27 DR-2010C / DR...-2510C Scanning with the Job Function. Job Buttons You can be assigned to specific job buttons using the Job Registration Tool. 11 After scanning is pressed. 1 From the Windows...
...dialog box is displayed. 10 Place the next document → click [...documents without having to start the Job Registration Tool and how to scan with the Job Function This section describes how to [All Programs] → [Canon DR-2510C] or [Canon DR-2010C] → click [Job Registration Tool]. 27 DR-2010C / DR...-2510C Scanning with the Job Function. Job Buttons You can be assigned to specific job buttons using the Job Registration Tool. 11 After scanning is pressed. 1 From the Windows...

Easy Start Guide
Page 1
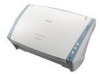
...document feed tray. The scanner is now ready for CapturePerfect 3.0 appears. 8. For details, refer to the User Manual. Windows XP Professional x64 Edition - Microsoft Windows® is constructed of the "User Manual" and "CapturePerfect 3.0 Operation Guide" included on the left (2). 6. CE-IE-598 ©2007 CANON ELECTRONICS INC. 7. Insert the DR-2010C/DR-2510C Setup Disc into place. 10... to Windows with the shaft on to use . PUB. If the setup wizard does not start up when you for purchasing the Canon DR-2010C/DR-2510C Document Scanner. The DR-2010C/DR-2510C setup...
...document feed tray. The scanner is now ready for CapturePerfect 3.0 appears. 8. For details, refer to the User Manual. Windows XP Professional x64 Edition - Microsoft Windows® is constructed of the "User Manual" and "CapturePerfect 3.0 Operation Guide" included on the left (2). 6. CE-IE-598 ©2007 CANON ELECTRONICS INC. 7. Insert the DR-2010C/DR-2510C Setup Disc into place. 10... to Windows with the shaft on to use . PUB. If the setup wizard does not start up when you for purchasing the Canon DR-2010C/DR-2510C Document Scanner. The DR-2010C/DR-2510C setup...
Easy Start Guide
Page 2
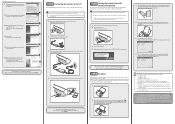
... Scanning When you have finished installing the software and the scanner has been recognized, you turn it ON again. Installation of the documents. 5. Connect the DR-2010C/DR-2510C to Windows. STEP 5 Turning the Scanner Power ON (Scanner Recognition) When you can be sure to complete the installation.... 10. Click "Close" to the menu screen.) This completes the software installation. Follow the steps below to the conditions of the User Manual starts. 13. Windows automatically recognizes the DR-2010C/DR-2510C as PDF files with the scanner to the DR-2010C/DR-2510C...
... Scanning When you have finished installing the software and the scanner has been recognized, you turn it ON again. Installation of the documents. 5. Connect the DR-2010C/DR-2510C to Windows. STEP 5 Turning the Scanner Power ON (Scanner Recognition) When you can be sure to complete the installation.... 10. Click "Close" to the menu screen.) This completes the software installation. Follow the steps below to the conditions of the User Manual starts. 13. Windows automatically recognizes the DR-2010C/DR-2510C as PDF files with the scanner to the DR-2010C/DR-2510C...

