Instruction Manual
Page 2
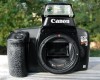
... ways of September 1993). 2. This is possible that are applicable only to the Rebel X S model (with any Canon EF lens. Silent mechanisms ensuring quiet operation • Your now EOS camera can be taken to avoid possible problems. • This instruction manual is Important ...of the preparations you should be used with built-in the EOS range (as of taking photographs using the camera's various functions. A wide autolocus frame. For more information regarding the S mark, see them in this Canon product. Those instructions Include an explanation of the following four ...
... ways of September 1993). 2. This is possible that are applicable only to the Rebel X S model (with any Canon EF lens. Silent mechanisms ensuring quiet operation • Your now EOS camera can be taken to avoid possible problems. • This instruction manual is Important ...of the preparations you should be used with built-in the EOS range (as of taking photographs using the camera's various functions. A wide autolocus frame. For more information regarding the S mark, see them in this Canon product. Those instructions Include an explanation of the following four ...
Instruction Manual
Page 3
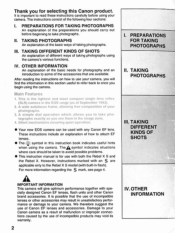
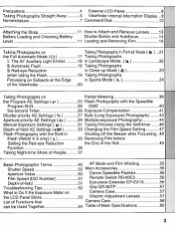
...Mode and Film Winding. 55 Shutter Speed 50 Main Accessories. 56 Aperture Value 50 Canon Speedlite Flashes 56 Film Speed (ISO Number) 51 Remote Switch RS-60E3 56 Depth.... Taking Night-time Shots of People Partial Metering. 39 25 Flash Photography with the Built-in Flash (Rebel X S only) ( i ) Setting the Red-eye Reduction Function. Precautions Taking Photographs Straight Away Nomenclature... How to Do If the Exposure Meter on Camera Case 57 the LCD Panel Blinks 53 Dioptric Adjustment Lenses. 57 List of Functions that Camera Care 58 can be Used Together 54 Table of...
...Mode and Film Winding. 55 Shutter Speed 50 Main Accessories. 56 Aperture Value 50 Canon Speedlite Flashes 56 Film Speed (ISO Number) 51 Remote Switch RS-60E3 56 Depth.... Taking Night-time Shots of People Partial Metering. 39 25 Flash Photography with the Built-in Flash (Rebel X S only) ( i ) Setting the Red-eye Reduction Function. Precautions Taking Photographs Straight Away Nomenclature... How to Do If the Exposure Meter on Camera Case 57 the LCD Panel Blinks 53 Dioptric Adjustment Lenses. 57 List of Functions that Camera Care 58 can be Used Together 54 Table of...
Instruction Manual
Page 4
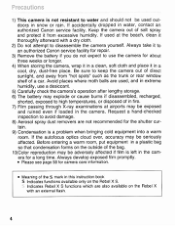
...the outside of the S mark in this instruction book S Indicates functions available only on the Rebel X with a dry cloth. 2) Do not attempt to disassemble the camera yourself. Precautions 1) This camera is not resistant to water and should not be used , and in extreme humidity, use ... 10)Color reproduction may be adversely affected if film is left in the camera for a long time. Keep the camera out of a car. Indicates Rebel X S functions which are used outdoor,s in water, contact an authorized Canon service facility. If the autofocus optics cloud over, accuracy may be seriously ...
...the outside of the S mark in this instruction book S Indicates functions available only on the Rebel X with a dry cloth. 2) Do not attempt to disassemble the camera yourself. Precautions 1) This camera is not resistant to water and should not be used , and in extreme humidity, use ... 10)Color reproduction may be adversely affected if film is left in the camera for a long time. Keep the camera out of a car. Indicates Rebel X S functions which are used outdoor,s in water, contact an authorized Canon service facility. If the autofocus optics cloud over, accuracy may be seriously ...
Instruction Manual
Page 5
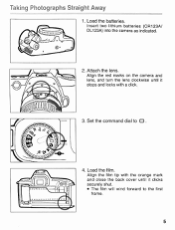
Load the batteries. Set the command dial to the first frame. 000 5 Align the film tip with the orange mark a and close the back cover until it clicks securely shut. • The film will wind forward to 0 . 4. Attach the lens. Align the red marks on the camera and lens, and turn the lens clockwise until it stops and locks with a click. 3. Insert two lithium batteries (CR123A/ DL123A) into the camera as indicated. Taking Photographs Straight Away '"...Ouu youuy ,0° 0 O O 1. Load the film. CIP O 0 a 0 iii0000000000il ka Ost I 0 2.
Load the batteries. Set the command dial to the first frame. 000 5 Align the film tip with the orange mark a and close the back cover until it clicks securely shut. • The film will wind forward to 0 . 4. Attach the lens. Align the red marks on the camera and lens, and turn the lens clockwise until it stops and locks with a click. 3. Insert two lithium batteries (CR123A/ DL123A) into the camera as indicated. Taking Photographs Straight Away '"...Ouu youuy ,0° 0 O O 1. Load the film. CIP O 0 a 0 iii0000000000il ka Ost I 0 2.

Instruction Manual
Page 6
Press the shutter button down to focus. 6. When the last picture on a roll of film has been taken, the film will rewind automatically. Compose the subject within the AF frame ( [ ] ) and lightly press the shutter button to take the picture. 7. When complete, open the back cover and remove the film. 6 Taking Photographs Straight Away The image was removed due to copyright restrictions 5. Take the photograph. Removing film. Focus the camera.
Press the shutter button down to focus. 6. When the last picture on a roll of film has been taken, the film will rewind automatically. Compose the subject within the AF frame ( [ ] ) and lightly press the shutter button to take the picture. 7. When complete, open the back cover and remove the film. 6 Taking Photographs Straight Away The image was removed due to copyright restrictions 5. Take the photograph. Removing film. Focus the camera.
Instruction Manual
Page 10
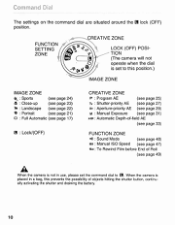
FUNCTION SETTING ZONE CREATIVE ZONE dz 42" Os; 7.7:0 LOCK (OFF) POSITION (The camera will not operate when the dial is set to this position.) IMAGE ZONE IMAGE ZONE : Sports (see page 24) 8 : Close-up (see page 23) : Landscape (...) iso : Manual ISO Speed (see page 47) : To Rewind Film before End of Roll (see page 49) a When the camera is not in use, please set the command dial to When the camera is placed in a bag, this prevents the possibility of objects hitting the shutter button, continually activating the shutter and...
FUNCTION SETTING ZONE CREATIVE ZONE dz 42" Os; 7.7:0 LOCK (OFF) POSITION (The camera will not operate when the dial is set to this position.) IMAGE ZONE IMAGE ZONE : Sports (see page 24) 8 : Close-up (see page 23) : Landscape (...) iso : Manual ISO Speed (see page 47) : To Rewind Film before End of Roll (see page 49) a When the camera is not in use, please set the command dial to When the camera is placed in a bag, this prevents the possibility of objects hitting the shutter button, continually activating the shutter and...
Instruction Manual
Page 11
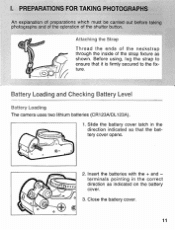
Before using, tug the strap to the fixture. 0 Battery Loading and Checking Battery Level Battery Loading The camera uses two lithium batteries (CR123A/DL123A). O go O 2. Close the battery cover. 11 I. Slide the battery cover latch in the correct direction as shown. terminals pointing ...
Before using, tug the strap to the fixture. 0 Battery Loading and Checking Battery Level Battery Loading The camera uses two lithium batteries (CR123A/DL123A). O go O 2. Close the battery cover. 11 I. Slide the battery cover latch in the correct direction as shown. terminals pointing ...
Instruction Manual
Page 12
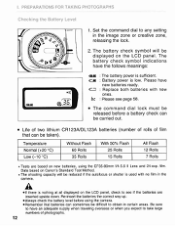
...will be taken). OS; 2. Please have new batteries ready. I. be : Please see if the batteries are based on new batteries, using the camera. •Remember that can sometimes be displayed on the LCD panel. Set the command dial to have the follows meanings: : The battery power is... sufficient. : Battery power is nothing at all displayed on Canon's Standard Test Method. * The shooting capacity will be difficult to see page 58. • The command dial lock must be released before using...
...will be taken). OS; 2. Please have new batteries ready. I. be : Please see if the batteries are based on new batteries, using the camera. •Remember that can sometimes be displayed on the LCD panel. Set the command dial to have the follows meanings: : The battery power is... sufficient. : Battery power is nothing at all displayed on Canon's Standard Test Method. * The shooting capacity will be difficult to see page 58. • The command dial lock must be released before using...

Instruction Manual
Page 13
... it stops. 13 Removing the Lens \ 0 eg.g.r.o.s..trn To remove the lens, turn the lens in the direction of the arrow on the lens and camera, and turn the lens in the direction of the lens. 4. Remove the rear lens cap by turning it clicks. 3.
... it stops. 13 Removing the Lens \ 0 eg.g.r.o.s..trn To remove the lens, turn the lens in the direction of the arrow on the lens and camera, and turn the lens in the direction of the lens. 4. Remove the rear lens cap by turning it clicks. 3.
Instruction Manual
Page 14
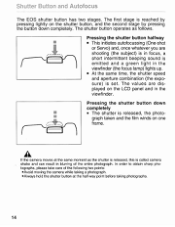
Pressing the shutter button down completely. A If the camera moves at the half-way point before taking photographs. 14 Shutter Button and Autofocus The EOS shutter button has two stages. The shutter button operates as the shutter is released, this is released, the photograph taken ...and the second stage by pressing the button down completely c•B • The shutter is called camera shake and can result in blurring of the following two points: •Avoid moving the camera while taking a photograph. •Always hold the shutter button at the same moment as follows....
Pressing the shutter button down completely. A If the camera moves at the half-way point before taking photographs. 14 Shutter Button and Autofocus The EOS shutter button has two stages. The shutter button operates as the shutter is released, this is released, the photograph taken ...and the second stage by pressing the button down completely c•B • The shutter is called camera shake and can result in blurring of the following two points: •Avoid moving the camera while taking a photograph. •Always hold the shutter button at the same moment as follows....

Instruction Manual
Page 17
... AF Frame 2. The various automatic settings possible are possible. Set the command dial too . •rx x?. II. As long as the subject is pressed the camera takes over, setting everything automatically for your photograph. Taking Photographs on the Full Automatic Mode ( 0) Taking photographs on Subjects at the Edge of all combinations...
... AF Frame 2. The various automatic settings possible are possible. Set the command dial too . •rx x?. II. As long as the subject is pressed the camera takes over, setting everything automatically for your photograph. Taking Photographs on the Full Automatic Mode ( 0) Taking photographs on Subjects at the Edge of all combinations...

Instruction Manual
Page 18
....0 JU I ®2`1 • 4. however, it is still possible for the shutter speed to blink if there is a danger of the shutter speed resulting in camera shake, the shutter speed Indicated on the LCD panel and in the viewfinder will blink. Please see page 52. Press the shutter button halfway. Press ...the subject, making focussing easier. • The AF auxiliary light emiter can not be released. If this occurs although you have been holding the camera steadily and taking care how you press the shutter button, we recommend using a tripod. (Even when using a tripod. II. The subject is ...
....0 JU I ®2`1 • 4. however, it is still possible for the shutter speed to blink if there is a danger of the shutter speed resulting in camera shake, the shutter speed Indicated on the LCD panel and in the viewfinder will blink. Please see page 52. Press the shutter button halfway. Press ...the subject, making focussing easier. • The AF auxiliary light emiter can not be released. If this occurs although you have been holding the camera steadily and taking care how you press the shutter button, we recommend using a tripod. (Even when using a tripod. II. The subject is ...
Instruction Manual
Page 19
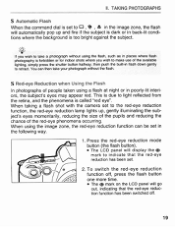
... switch the red-eye reduction function off . 19 You can be set to indicate that the red-eye reduc- When taking a flash shot with the camera set in places where flash photography is called "red eye".
... switch the red-eye reduction function off . 19 You can be set to indicate that the red-eye reduc- When taking a flash shot with the camera set in places where flash photography is called "red eye".

Instruction Manual
Page 22
... the shutter speed to take care how you press the shutter button. This will not be able to blink if there is a danger of camera shake, so be sure to hold the camera steady and take the picture as ta on . • If the shutter speed indicator blinks, there is a danger of... camera shake.) 22 You will create a feeling of expansiveness and add depth to your zoom lens, use the wide-angle setting (35 mm in Landscape Mode (u) ...
... the shutter speed to take care how you press the shutter button. This will not be able to blink if there is a danger of camera shake, so be sure to hold the camera steady and take the picture as ta on . • If the shutter speed indicator blinks, there is a danger of... camera shake.) 22 You will create a feeling of expansiveness and add depth to your zoom lens, use the wide-angle setting (35 mm in Landscape Mode (u) ...
Instruction Manual
Page 24
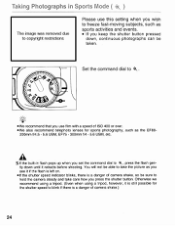
... gen- EF75 - 300mm f/4 - 5.6 USM, etc. A S If the built-in Sports Mode ( ) The image was removed due to copyright restrictions Please use film with a speed of camera shake.) 24 You will not be taken. Taking Photographs in flash pops up when you set the command dial to . Set the command dial to..., there is a danger of ISO 400 or over. •We also recommend telephoto lenses for the shutter speed to blink if there is a danger of camera shake, so be sure to hold the camera steady and take the picture as you see it retracts before shooting.
... gen- EF75 - 300mm f/4 - 5.6 USM, etc. A S If the built-in Sports Mode ( ) The image was removed due to copyright restrictions Please use film with a speed of camera shake.) 24 You will not be taken. Taking Photographs in flash pops up when you set the command dial to . Set the command dial to..., there is a danger of ISO 400 or over. •We also recommend telephoto lenses for the shutter speed to blink if there is a danger of camera shake, so be sure to hold the camera steady and take the picture as you see it retracts before shooting.
Instruction Manual
Page 25
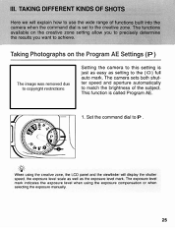
...level when using the creative zone, the LCD panel and the viewfinder will explain how to use the wide range of functions built into the camera when the command dial is set to match the brightness of the subject. The functions available on the Program AE Settings (P ) The ...image was removed due to copyright restrictions Setting the camera to the (0) full auto mark. This function is just as easy as the exposure level mark. The camera sets both shutter speed and aperture automatically to the creative zone. When using the exposure compensation...
...level when using the creative zone, the LCD panel and the viewfinder will explain how to use the wide range of functions built into the camera when the command dial is set to match the brightness of the subject. The functions available on the Program AE Settings (P ) The ...image was removed due to copyright restrictions Setting the camera to the (0) full auto mark. This function is just as easy as the exposure level mark. The camera sets both shutter speed and aperture automatically to the creative zone. When using the exposure compensation...

Instruction Manual
Page 27
... speed 1. The image was removed due to copyright restrictions Fast shutter speed On the shutter-priority setting, the camera automatically set screen. •When taking a photograph of a TV screen, be sure to hold the camera very steady, or else use a tripod. Turn the electronic input dial to Tv . Tv 2. Faster shutter speeds...
... speed 1. The image was removed due to copyright restrictions Fast shutter speed On the shutter-priority setting, the camera automatically set screen. •When taking a photograph of a TV screen, be sure to hold the camera very steady, or else use a tripod. Turn the electronic input dial to Tv . Tv 2. Faster shutter speeds...

Instruction Manual
Page 29
... ) The image was removed due to copyright restrictions Smaller aperture value The image was removed due to copyright restrictions When you set the aperture, the camera automatically selects the correct shutter speed to Av 2.
... ) The image was removed due to copyright restrictions Smaller aperture value The image was removed due to copyright restrictions When you set the aperture, the camera automatically selects the correct shutter speed to Av 2.
Instruction Manual
Page 31
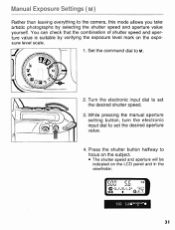
You can check that the combination of shutter speed and aperture value is suitable by selecting the shutter speed and aperture value yourself. Set the command dial to set the desired shutter speed. Turn the electronic input dial to M. M \ "'V'0' 0 11/1 2. Manual Exposure Settings ( wi) Rather than leaving everything to the camera, this mode allows you take artistic photographs by verifying the exposure level mark on the exposure level scale. 1.
You can check that the combination of shutter speed and aperture value is suitable by selecting the shutter speed and aperture value yourself. Set the command dial to set the desired shutter speed. Turn the electronic input dial to M. M \ "'V'0' 0 11/1 2. Manual Exposure Settings ( wi) Rather than leaving everything to the camera, this mode allows you take artistic photographs by verifying the exposure level mark on the exposure level scale. 1.

Instruction Manual
Page 34
... can not be taken on the kDEP setting. 34 This setting is designed to select a slower shutter speed, so it is important to hold the camera steady when taking the photograph or use a tripod. • Using the flash with the command dial set to P will achieve the same results. • If...
... can not be taken on the kDEP setting. 34 This setting is designed to select a slower shutter speed, so it is important to hold the camera steady when taking the photograph or use a tripod. • Using the flash with the command dial set to P will achieve the same results. • If...


