Product Setup, User Guides & Manuals
Page 10
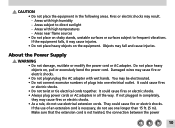
... shocks. If not plugged in completely, they may cause injuries. • Do not place heavy objects on , pull or excessively bend the power cord. CAUTION • Do not place the equipment in all the way. Fires or electric shocks may fall and cause injuries. If the equipment falls...8226; Do not connect excessive numbers of an extension cord is not twisted, the connection between the power 10 It could cause fires or electric shocks. • Always plug power cords or AC adapters in the following areas. Objects may result. - About the Power Supply WARNING • Do not damage, mutilate ...
... shocks. If not plugged in completely, they may cause injuries. • Do not place heavy objects on , pull or excessively bend the power cord. CAUTION • Do not place the equipment in all the way. Fires or electric shocks may fall and cause injuries. If the equipment falls...8226; Do not connect excessive numbers of an extension cord is not twisted, the connection between the power 10 It could cause fires or electric shocks. • Always plug power cords or AC adapters in the following areas. Objects may result. - About the Power Supply WARNING • Do not damage, mutilate ...
Product Setup, User Guides & Manuals
Page 17
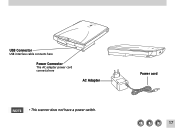
Power cord 17 USB Connector USB interface cable connects here Power Connector The AC adapter power cord connects here AC Adapter • This scanner does not have a power switch.
Power cord 17 USB Connector USB interface cable connects here Power Connector The AC adapter power cord connects here AC Adapter • This scanner does not have a power switch.
Product Setup, User Guides & Manuals
Page 27
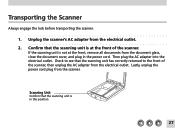
... the scanning unit is at the front, remove all documents from the scanner. If the scanning unit is in the power cord. Check to the front of the scanner. Lastly, unplug the power cord plug from the document glass, close the document cover, and plug in this position 27 Then plug the AC adapter...
... the scanning unit is at the front, remove all documents from the scanner. If the scanning unit is in the power cord. Check to the front of the scanner. Lastly, unplug the power cord plug from the document glass, close the document cover, and plug in this position 27 Then plug the AC adapter...
Product Setup, User Guides & Manuals
Page 32
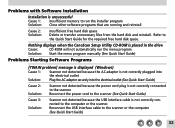
...32 Reconnect the USB interface cable to the Quick Start Guide for the required free hard disk space. Nothing displays when the CanoScan Setup Utility CD-ROM is not correctly connected to the computer or the scanner. Problems with Software Installation Installation is unsuccessful Cause... securely into the electrical outlet (See Quick Start Guide) Cause 2: Solution: Scanner not detected because the power cord plug is not correctly connected to the scanner Reconnect the power cord to the scanner (See Quick Start Guide) Cause 3: Solution: Scanner not detected because the USB interface ...
...32 Reconnect the USB interface cable to the Quick Start Guide for the required free hard disk space. Nothing displays when the CanoScan Setup Utility CD-ROM is not correctly connected to the computer or the scanner. Problems with Software Installation Installation is unsuccessful Cause... securely into the electrical outlet (See Quick Start Guide) Cause 2: Solution: Scanner not detected because the power cord plug is not correctly connected to the scanner Reconnect the power cord to the scanner (See Quick Start Guide) Cause 3: Solution: Scanner not detected because the USB interface ...
Product Setup, User Guides & Manuals
Page 36
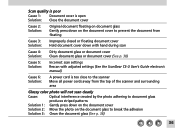
... (See p. 38) Cause 5: Solution: Incorrect scan settings Rescan with adjusted settings (See the ScanGear CS-U User's Guide electronic manual) Cause 6: Solution: A power cord is too close to the scanner Move all power cords away from the top of the scanner and surrounding area Glossy color photo will not scan clearly Cause: Optical interference created...
... (See p. 38) Cause 5: Solution: Incorrect scan settings Rescan with adjusted settings (See the ScanGear CS-U User's Guide electronic manual) Cause 6: Solution: A power cord is too close to the scanner Move all power cords away from the top of the scanner and surrounding area Glossy color photo will not scan clearly Cause: Optical interference created...
Product Setup, User Guides & Manuals
Page 41
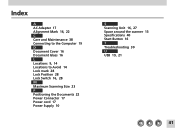
Index A AC Adapter 17 Alignment Mark 16, 22 C Care and Maintenance 38 Connecting to the Computer 19 D Document Cover 16 Document Glass 16 L Locations 9, 14 Locations to Avoid 14 Lock mark 28 Lock Position 28 Lock Switch 16, 28 M Maximum Scanning Size 23 P Positioning the Documents 22 Power Connector 17 Power cord 17 Power Supply 10 S Scanning Unit 16, 27 Space around the scanner 13 Specifications 40 Start Button 16 T Troubleshooting 30 U USB 19, 21 41
Index A AC Adapter 17 Alignment Mark 16, 22 C Care and Maintenance 38 Connecting to the Computer 19 D Document Cover 16 Document Glass 16 L Locations 9, 14 Locations to Avoid 14 Lock mark 28 Lock Position 28 Lock Switch 16, 28 M Maximum Scanning Size 23 P Positioning the Documents 22 Power Connector 17 Power cord 17 Power Supply 10 S Scanning Unit 16, 27 Space around the scanner 13 Specifications 40 Start Button 16 T Troubleshooting 30 U USB 19, 21 41


