
User Guide
Page 2
... for long periods of the product. stand tripod, bracket. make sure to leave space around the unit for your outlet. within an equilaterallriangle. A grounding type plug has two blades and a third groundlllg prong. CAUTION: TO pqEVENT HE RIS", OF ELECTRIC SHOC '. consult an electrician for replacement of ;mpOliant operating and maintenance (servicing) instructions in the cabinet are...
... for long periods of the product. stand tripod, bracket. make sure to leave space around the unit for your outlet. within an equilaterallriangle. A grounding type plug has two blades and a third groundlllg prong. CAUTION: TO pqEVENT HE RIS", OF ELECTRIC SHOC '. consult an electrician for replacement of ;mpOliant operating and maintenance (servicing) instructions in the cabinet are...

User Guide
Page 3
... B digital device. you want to use shielded cables (with the instructions. When you an electncal shock, Check the power cord once in accordance with Ferrite,cores attached) and connectors for help. NOTE: This equipment has been tested and found to comply with electric appliances such as radios and televisions. if not installed and used to connect the unit to operate the equipment...
... B digital device. you want to use shielded cables (with the instructions. When you an electncal shock, Check the power cord once in accordance with Ferrite,cores attached) and connectors for help. NOTE: This equipment has been tested and found to comply with electric appliances such as radios and televisions. if not installed and used to connect the unit to operate the equipment...

User Guide
Page 5
... compatible with AVCHD-compatible DVD players. Do not insert AVCHD discs into a DVD player that is a trademark of DVD Format/Logo Licensing Corporation, • "AVCHD" and the "AVCHD" logo are trademarks of parts 9 Connections 10 Connecting a camcorder 10 Creating DVDs 11 Creating AVCHD discs and standard-definition DVDs 11 Playing DVDs Playing AVCHD discs 13 , , .. 13 Additional information 15 Troubleshooting , ,,., ,, , , ,,., 15 Cautions on hand ling , , , , . , '. 16 Specifications 17 Conventions used in this manual...
... compatible with AVCHD-compatible DVD players. Do not insert AVCHD discs into a DVD player that is a trademark of DVD Format/Logo Licensing Corporation, • "AVCHD" and the "AVCHD" logo are trademarks of parts 9 Connections 10 Connecting a camcorder 10 Creating DVDs 11 Creating AVCHD discs and standard-definition DVDs 11 Playing DVDs Playing AVCHD discs 13 , , .. 13 Additional information 15 Troubleshooting , ,,., ,, , , ,,., 15 Cautions on hand ling , , , , . , '. 16 Specifications 17 Conventions used in this manual...

User Guide
Page 6
... ;he nearest Ca ,on service center (Available functIOns differ' depen ng on the camcorder used.) Create AVCHD discs2 ( 11) With your precious memories on other DVD players, etc. without usi ng a computer. AVCHD discs created with the bumer can be played on DVDs Thank you for purchasing the Canon DW-1 00. Using the DW·100 Store your DVD bumeryou can create high-definition...
... ;he nearest Ca ,on service center (Available functIOns differ' depen ng on the camcorder used.) Create AVCHD discs2 ( 11) With your precious memories on other DVD players, etc. without usi ng a computer. AVCHD discs created with the bumer can be played on DVDs Thank you for purchasing the Canon DW-1 00. Using the DW·100 Store your DVD bumeryou can create high-definition...
User Guide
Page 7
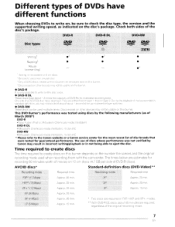
... tested using discs by Canon may notice a brief stop 01 about 1 second at the point whe(e the layer switches. • DVD-RW These discs can be sure to check the disc type, the version and the supported writing speed, as of the disc's package. The use a new. Time required to create discs The time I'equired to eject the disc. HXP and XP+ modes, ** With DVD,R DL discs. you...
... tested using discs by Canon may notice a brief stop 01 about 1 second at the point whe(e the layer switches. • DVD-RW These discs can be sure to check the disc type, the version and the supported writing speed, as of the disc's package. The use a new. Time required to create discs The time I'equired to eject the disc. HXP and XP+ modes, ** With DVD,R DL discs. you...

User Guide
Page 8
..., 100 min, Approx. 180 min. AC Adapter and Power Cord DW-1 00 Operating Instructions (these instructions) / HG10 System Update Disc For users of a 12 cm disc. Approx. 50 min, Approx. 60 min. Approx. 60 min. discs, etc. Approx. 160 min. Approx. 80 min. Approx. 180 min. Approx. 140 min. Respect copyrights Videos you have recorded are present. ! Is everything there? AVCHD discs Standard-definition discs (DVD-Video) Recordable time Recordable time DVD-R DVD...
..., 100 min, Approx. 180 min. AC Adapter and Power Cord DW-1 00 Operating Instructions (these instructions) / HG10 System Update Disc For users of a 12 cm disc. Approx. 50 min, Approx. 60 min. Approx. 60 min. discs, etc. Approx. 160 min. Approx. 80 min. Approx. 180 min. Approx. 140 min. Respect copyrights Videos you have recorded are present. ! Is everything there? AVCHD discs Standard-definition discs (DVD-Video) Recordable time Recordable time DVD-R DVD...

User Guide
Page 9
... of parts Top canon 1 Front ./'" C \ 234 5 0 .......... ~ ~Hu ] / 6 Rear 78 9 1 POWER/MODE button REC indicator PLAY indicator Repeatedly pressing the POWER/MODE button will change the operating mode in recording (writing) mode. I 2 Start indicator The indicator lights up to indicate that a disc is being written. 3 Start button Press while the start indicator is on to use only the supplied AC adapter. 8 USB port Connect the camcorder here using the USB cable supplied with...
... of parts Top canon 1 Front ./'" C \ 234 5 0 .......... ~ ~Hu ] / 6 Rear 78 9 1 POWER/MODE button REC indicator PLAY indicator Repeatedly pressing the POWER/MODE button will change the operating mode in recording (writing) mode. I 2 Start indicator The indicator lights up to indicate that a disc is being written. 3 Start button Press while the start indicator is on to use only the supplied AC adapter. 8 USB port Connect the camcorder here using the USB cable supplied with...

User Guide
Page 10
...; . 0 . a component cable and stereo video cable. TV/video monltm L '--' ..... To power outlet o USB cable (supplied with the camcol'der. • In play mode, connect the camcorder to the camcorder's instl'uctlons manual, • Place the DVD burner horizontally on a flat surface. 10 En etc, For details, I [ Ij To power outlet ! (supplied) . , AC adapter ~: (supplied) USB port J CD NOTES • When creating DVOs, power the camcorder uSing the compact powel' adapter supplied with...
...; . 0 . a component cable and stereo video cable. TV/video monltm L '--' ..... To power outlet o USB cable (supplied with the camcol'der. • In play mode, connect the camcorder to the camcorder's instl'uctlons manual, • Place the DVD burner horizontally on a flat surface. 10 En etc, For details, I [ Ij To power outlet ! (supplied) . , AC adapter ~: (supplied) USB port J CD NOTES • When creating DVOs, power the camcorder uSing the compact powel' adapter supplied with...
User Guide
Page 11
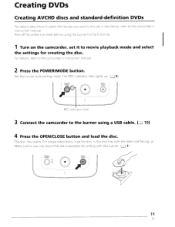
refer to use only discs that are compatible for creating the disc. details. Make sure to the camcol-der's inS ruction manual, Peel off the pmtective sheet before using a USB cable. ([[I 10) 4 Press the OPEN/CLOSE button and load the disc. The REC indicator (t-ed) lights up . The disc tray opens, For single-sided discs. Set the burner to the burner using the burner fOI- For- Creating DVDs Creating AVCHD discs and standard...
refer to use only discs that are compatible for creating the disc. details. Make sure to the camcol-der's inS ruction manual, Peel off the pmtective sheet before using a USB cable. ([[I 10) 4 Press the OPEN/CLOSE button and load the disc. The REC indicator (t-ed) lights up . The disc tray opens, For single-sided discs. Set the burner to the burner using the burner fOI- For- Creating DVDs Creating AVCHD discs and standard...

User Guide
Page 12
... creating photo DVDs. I t POWER I I 6 I MODE RC PlAY \ 0 I\: L $1-- Disc writing starts. Once recording is on the size of the connected camcorder asking you whether you want to intelTupt the DVD creation operation once it . • It is not possible to ovelwl'ite the disc. POWER! Observe the following the instructions on the disc. Remove the disc from the disc tray. photomovies are completed. When a DVD-RW disc that all...
... creating photo DVDs. I t POWER I I 6 I MODE RC PlAY \ 0 I\: L $1-- Disc writing starts. Once recording is on the size of the connected camcorder asking you whether you want to intelTupt the DVD creation operation once it . • It is not possible to ovelwl'ite the disc. POWER! Observe the following the instructions on the disc. Remove the disc from the disc tray. photomovies are completed. When a DVD-RW disc that all...
User Guide
Page 13
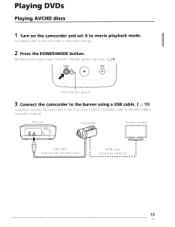
... TV/video monitor D. The PLAY indicatOl' (green) lights up. (CD 9) PLAY indicatol' (green) 3 Connect the camcorder to the burner using a USB cable. (CD 10) In addition, connect the camcorder to the camcorder's instruction manual. Playing DVDs Playing AVCHD discs 1 Turn on the camcorder and set it to movie playback mode. USB cable (supplied with the camcordel') •• • •• • HOMI cable. •I • component cable, etc. •I 2 Press the POWER...
... TV/video monitor D. The PLAY indicatOl' (green) lights up. (CD 9) PLAY indicatol' (green) 3 Connect the camcorder to the burner using a USB cable. (CD 10) In addition, connect the camcorder to the camcorder's instruction manual. Playing DVDs Playing AVCHD discs 1 Turn on the camcorder and set it to movie playback mode. USB cable (supplied with the camcordel') •• • •• • HOMI cable. •I • component cable, etc. •I 2 Press the POWER...

User Guide
Page 14
playback with the label side facing up. POWER I OPENI MODE Ro'C PLAY o 4 Press the OPEN/CLOSE button and load the disc. Make sure to use only discs that are compatible fOI- The disc tray opens. For single-sided discs, load the disc In the disc tl-ay with this burner. (0 7) 5 Press the OPEN/CLOSE button. The disc tray closes.
playback with the label side facing up. POWER I OPENI MODE Ro'C PLAY o 4 Press the OPEN/CLOSE button and load the disc. Make sure to use only discs that are compatible fOI- The disc tray opens. For single-sided discs, load the disc In the disc tl-ay with this burner. (0 7) 5 Press the OPEN/CLOSE button. The disc tray closes.

User Guide
Page 15
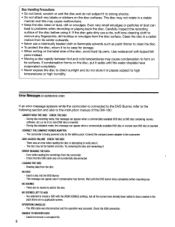
... not open . • The disc hay will be I i The camcordel is not recognized. • Check that the AC adaptel' is extremely hot, disconnect the adapter and contact a Canon Service Center or your stol'e of the disc image, up to use such discs on this burner or adapter is properly connected. • The power cannot be used in combination with thiS burner, the • If the USB cable is...
... not open . • The disc hay will be I i The camcordel is not recognized. • Check that the AC adaptel' is extremely hot, disconnect the adapter and contact a Canon Service Center or your stol'e of the disc image, up to use such discs on this burner or adapter is properly connected. • The power cannot be used in combination with thiS burner, the • If the USB cable is...
User Guide
Page 16
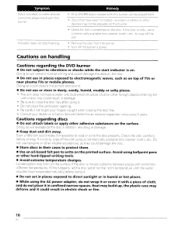
... does not have been formatted. Heat may build up, the plastic case may deform and it could damage the data on the disc. • Do not use a commercially available lens cleaner (cloth). Doing so will destabilize the disc's rotation, resulting in places exposed to read or write the disc properly. and dust-proof structure. Cautions regarding the DVD burner • Do not...
... does not have been formatted. Heat may build up, the plastic case may deform and it could damage the data on the disc. • Do not use a commercially available lens cleaner (cloth). Doing so will destabilize the disc's rotation, resulting in places exposed to read or write the disc properly. and dust-proof structure. Cautions regarding the DVD burner • Do not...

User Guide
Page 20
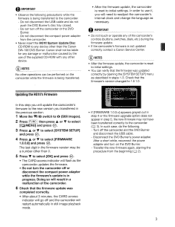
... disc tray of the DW-100 DVD Burner may result in the procedure not being completed correctly or in a closed cabinet, leave the cabinet's door open automatically; Transferring the New Firmware to the DVD Burner using the supplied USB cable. do not perform any other operation while the transfer is in progress. • Do not close automatically and the REC, PLAY and start button (e). • The disc...
... disc tray of the DW-100 DVD Burner may result in the procedure not being completed correctly or in a closed cabinet, leave the cabinet's door open automatically; Transferring the New Firmware to the DVD Burner using the supplied USB cable. do not perform any other operation while the transfer is in progress. • Do not close automatically and the REC, PLAY and start button (e). • The disc...
User Guide
Page 21
... the Canon DW-100 DVD Burner. Disconnect the DVD Burner's power adapter. In order to use of the camcorder's controls (buttons, switches, dials, etc.) during the firmware update. • If the camcorder's firmware is not updated correctly contact a Canon Service Center. Do not disconnect the USB cable and do the following precautions while the firmware is being transferred. • After the firmware update, the camcorder is reset to readjust the camcorder's internal clock...
... the Canon DW-100 DVD Burner. Disconnect the DVD Burner's power adapter. In order to use of the camcorder's controls (buttons, switches, dials, etc.) during the firmware update. • If the camcorder's firmware is not updated correctly contact a Canon Service Center. Do not disconnect the USB cable and do the following precautions while the firmware is being transferred. • After the firmware update, the camcorder is reset to readjust the camcorder's internal clock...

User Guide
Page 22
... the start button on the camcorder and set it will be ejected automatically and [INSERT A NEW/BLANK DISC AND CLOSE THE DISC TRAY] will be canceled. ISYSTEM SETUP IADD TO DISC IFUNC.] ¢:J I r·JG k'ODE , \" A~~ SCENES 1 DISC,S) ~ 7 241MB EST. Refer to Creating DVDs in the instruction manual of the DW-100. 2 Connect the camcorder to the DVD Burner using the USB cable. • Refer to create high-definition DVD discs (AVCHD specifications...
... the start button on the camcorder and set it will be ejected automatically and [INSERT A NEW/BLANK DISC AND CLOSE THE DISC TRAY] will be canceled. ISYSTEM SETUP IADD TO DISC IFUNC.] ¢:J I r·JG k'ODE , \" A~~ SCENES 1 DISC,S) ~ 7 241MB EST. Refer to Creating DVDs in the instruction manual of the DW-100. 2 Connect the camcorder to the DVD Burner using the USB cable. • Refer to create high-definition DVD discs (AVCHD specifications...

User Guide
Page 23
... of the .~ /0 switch or the operating mode. • High-definition (AVGHD) discs created using the DW-100 DVD Burner can be played back using the USB cable. • Refer to Connections in the instruction manual of the special playback modes (slow playback, fast playback at 60x speed, etc.) cannot be displayed in a location where an AVGHD-compatible DVD player is not compatible with the DW-100 DVD . After the information screen described...
... of the .~ /0 switch or the operating mode. • High-definition (AVGHD) discs created using the DW-100 DVD Burner can be played back using the USB cable. • Refer to Connections in the instruction manual of the special playback modes (slow playback, fast playback at 60x speed, etc.) cannot be displayed in a location where an AVGHD-compatible DVD player is not compatible with the DW-100 DVD . After the information screen described...
User Guide
Page 24
... available DVD disc (a DVD disc containing movies, software, etc.) or an 8 cm mini DVD disc is inserted. Connect the compact power adapter to strong shocks. • Do not attach any fingerprints, dirt bUildup or smudges from the camcorder. - The disc may not rotate in a stable manner and this message can lead to high temperatures or high humidity. Reading data from its case for storage. • When writing...
... available DVD disc (a DVD disc containing movies, software, etc.) or an 8 cm mini DVD disc is inserted. Connect the compact power adapter to strong shocks. • Do not attach any fingerprints, dirt bUildup or smudges from the camcorder. - The disc may not rotate in a stable manner and this message can lead to high temperatures or high humidity. Reading data from its case for storage. • When writing...
User Guide
Page 29
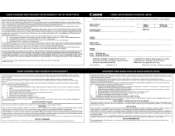
... materials or workmanship as otherwise required by such specific warranty as a permanent record of the video equipment, video casselle tapes, head cleanings. iii) repairs or services performed by Canon U.S.A., Inc. iV) defective batteries or any party other liability with the instruction book before it . TO OBTAIN WARRANTY SERVICE Ship your Bill of Sale as Canon may also have other proof of purchase...
... materials or workmanship as otherwise required by such specific warranty as a permanent record of the video equipment, video casselle tapes, head cleanings. iii) repairs or services performed by Canon U.S.A., Inc. iV) defective batteries or any party other liability with the instruction book before it . TO OBTAIN WARRANTY SERVICE Ship your Bill of Sale as Canon may also have other proof of purchase...
