
User Manual
Page 5
...the following and familiarize yourself with its capabilities, and to observe the instructions provided in a warning could result in using the scanner. 1 Failure to make the most of its many functions. CAUTION Caution notices are provided for your safety and contain extremely... injury to yourself or your coworkers or damage to observe a request could result in a safe place for purchasing the Canon Document Scanner DR-7580/9080C. After reading this manual thoroughly before operating the machine in damage to familiarize yourself with their meanings. Failure to observe ...
...the following and familiarize yourself with its capabilities, and to observe the instructions provided in a warning could result in using the scanner. 1 Failure to make the most of its many functions. CAUTION Caution notices are provided for your safety and contain extremely... injury to yourself or your coworkers or damage to observe a request could result in a safe place for purchasing the Canon Document Scanner DR-7580/9080C. After reading this manual thoroughly before operating the machine in damage to familiarize yourself with their meanings. Failure to observe ...
User Manual
Page 6
CONTENTS INTRODUCTION 1 Conventions 1 Safety Precautions 5 Daily Maintenance 5 Installation Location 7 Power Supply 8 Carrying ...8 Chapter 1 DR-7580/9080C 1.1 Features of the DR-7580/9080C 10 1.2 Packaging: What Is in the Box 12 1.3 Part Names 13 ◆ Front View 13 ◆ Rear View 14 ◆ Connectors (Bottom View 14 ◆...9670; USB 2.0 Interface Cards 22 ◆ Connecting a USB Interface Cable 23 Connecting the Power Cord 23 2.3 Preparing for Paper Feed and Eject 24 Preparing the Document Tray Extension 24 Preparing the Document Eject Tray Extension 25 ◆ Long...
CONTENTS INTRODUCTION 1 Conventions 1 Safety Precautions 5 Daily Maintenance 5 Installation Location 7 Power Supply 8 Carrying ...8 Chapter 1 DR-7580/9080C 1.1 Features of the DR-7580/9080C 10 1.2 Packaging: What Is in the Box 12 1.3 Part Names 13 ◆ Front View 13 ◆ Rear View 14 ◆ Connectors (Bottom View 14 ◆...9670; USB 2.0 Interface Cards 22 ◆ Connecting a USB Interface Cable 23 Connecting the Power Cord 23 2.3 Preparing for Paper Feed and Eject 24 Preparing the Document Tray Extension 24 Preparing the Document Eject Tray Extension 25 ◆ Long...
User Manual
Page 13
Chapter 1 DR-7580/9080C This chapter describes the features of the scanner, what's in the box, and the names and functions of parts on the scanner. 1.1 Features of the DR-7580/9080C ........ 10 1.2 Packaging: What Is in the Box? ........ 12 1.3 Part Names 13 Front View 13 Rear View 14 Connectors (Bottom View 14 Operation Panel 15 1.4 Optional Products 16
Chapter 1 DR-7580/9080C This chapter describes the features of the scanner, what's in the box, and the names and functions of parts on the scanner. 1.1 Features of the DR-7580/9080C ........ 10 1.2 Packaging: What Is in the Box? ........ 12 1.3 Part Names 13 Front View 13 Rear View 14 Connectors (Bottom View 14 Operation Panel 15 1.4 Optional Products 16
User Manual
Page 14
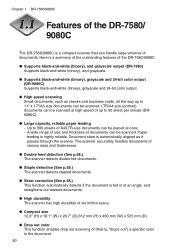
... sheet per minute (DR9080C). ● Large capacity, reliable paper feeding - Chapter 1 DR-7580/9080C Features of the DR-7580/ 9080C The DR-7580/9080C is a compact scanner that is, "drops out") a specific color in at an angle, and straightens out skewed documents. ● High durability The scanner has high durability of six million scans. ● Compact size 12.3" (H) x 18...
... sheet per minute (DR9080C). ● Large capacity, reliable paper feeding - Chapter 1 DR-7580/9080C Features of the DR-7580/ 9080C The DR-7580/9080C is a compact scanner that is, "drops out") a specific color in at an angle, and straightens out skewed documents. ● High durability The scanner has high durability of six million scans. ● Compact size 12.3" (H) x 18...

User Manual
Page 15
1.1 Features of the DR-7580/9080C ● Various options The wide range of options includes the imprinter for printing characters on the 1 document being scanned, the bar code module that reads bar codes on documents that are being scanned, and the endorser for printing numbers on the documents after scanning. 11
1.1 Features of the DR-7580/9080C ● Various options The wide range of options includes the imprinter for printing characters on the 1 document being scanned, the bar code module that reads bar codes on documents that are being scanned, and the endorser for printing numbers on the documents after scanning. 11

User Manual
Page 16
Make sure that you have everything. Warranty Card (U.S.A. Power Cord DR-7580/9080C Setup Disc Instructions (this manual) QUICK REFERENCE TROUUSBSECLFEAUSNLHNFOIENOAGTTUINBRAGESSICS DOCUMENT SCANNER Quick Reference Guide USB Cable • The setup disc is in the Instructions. • Item included in the Box? If any items are missing, contact your sales representative. Check every item you have removed from the box. and Canada only) 12 Chapter 1 DR-7580/9080C Packaging: What Is in this package may change without notice.
Make sure that you have everything. Warranty Card (U.S.A. Power Cord DR-7580/9080C Setup Disc Instructions (this manual) QUICK REFERENCE TROUUSBSECLFEAUSNLHNFOIENOAGTTUINBRAGESSICS DOCUMENT SCANNER Quick Reference Guide USB Cable • The setup disc is in the Instructions. • Item included in the Box? If any items are missing, contact your sales representative. Check every item you have removed from the box. and Canada only) 12 Chapter 1 DR-7580/9080C Packaging: What Is in this package may change without notice.
User Manual
Page 17
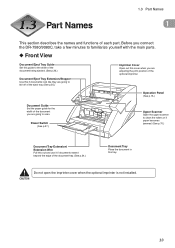
....) Imprinter Cover Open out this cover when you connect the DR-7580/9080C, take a few minutes to familiarize yourself with the main parts. ◆ Front View Document Eject Tray Guide Set this guide to the width of the document you are going to scan. Do not open the imprinter ... p.27.) Upper Scanner Open the upper scanner to clean the rollers or if paper becomes jammed. (See p.70.) Document Tray Extension/ Extension Wire Pull this out and use it if documents extend beyond the edge of the document tray. (See p.24.) Document Tray Place the document in this if documents look like they...
....) Imprinter Cover Open out this cover when you connect the DR-7580/9080C, take a few minutes to familiarize yourself with the main parts. ◆ Front View Document Eject Tray Guide Set this guide to the width of the document you are going to scan. Do not open the imprinter ... p.27.) Upper Scanner Open the upper scanner to clean the rollers or if paper becomes jammed. (See p.70.) Document Tray Extension/ Extension Wire Pull this out and use it if documents extend beyond the edge of the document tray. (See p.24.) Document Tray Place the document in this if documents look like they...
User Manual
Page 18
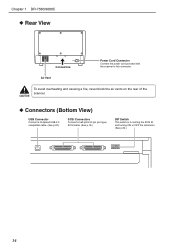
Air Vent To avoid overheating and causing a fire, never block the air vents on the rear of the scanner. Chapter 1 DR-7580/9080C ◆ Rear View Connectors Power Cord Connector Connect the power cord provided with the scanner to this connector. CAUTION ◆ Connectors (Bottom View) USB Connector Connect a Hi-Speed USB 2.0 compatible cable. (See p.22.) SCSI Connectors Connect a half-pitch 50 pin (pin type) SCSI cable. (See p.19.) DIP Switch This switch is for setting the SCSI ID and turning ON or OFF the terminator. (See p.20.) 14
Air Vent To avoid overheating and causing a fire, never block the air vents on the rear of the scanner. Chapter 1 DR-7580/9080C ◆ Rear View Connectors Power Cord Connector Connect the power cord provided with the scanner to this connector. CAUTION ◆ Connectors (Bottom View) USB Connector Connect a Hi-Speed USB 2.0 compatible cable. (See p.22.) SCSI Connectors Connect a half-pitch 50 pin (pin type) SCSI cable. (See p.19.) DIP Switch This switch is for setting the SCSI ID and turning ON or OFF the terminator. (See p.20.) 14

User Manual
Page 20
... that allows the ISIS/TWAIN driver to use the bar code module. It keeps a tally of the document being scanned. Contact your sales representative. ◆ Imprinter Unit The imprinter unit is installed inside the scanner, and prints a text message on the front of the pages that are : C6602B (blue), C6602G... (green), and C6602R (red). ◆ Endorser ED-600 The Endorser ED-600 unit is installed on top of the scanner, and prints a eight digit number on the DR-7580/9080C, if they are using the endorser, the scanning speed lowers to match the printing speed of the...
... that allows the ISIS/TWAIN driver to use the bar code module. It keeps a tally of the document being scanned. Contact your sales representative. ◆ Imprinter Unit The imprinter unit is installed inside the scanner, and prints a text message on the front of the pages that are : C6602B (blue), C6602G... (green), and C6602R (red). ◆ Endorser ED-600 The Endorser ED-600 unit is installed on top of the scanner, and prints a eight digit number on the DR-7580/9080C, if they are using the endorser, the scanning speed lowers to match the printing speed of the...

User Manual
Page 22
... an ISIS (compatible) or a TWAIN (compatible) application that operates on the hard disk ● SCSI card that is compatible with this scanner or Hi-Speed USB 2.0 interface card (See "Connecting to transfer data may increase. 18 Chapter 2 Preparation Before Use Checking Your Operating Environment... Your computer system must meet the following conditions to use the DR-7580/9080C. ● IBM PC/AT or compatible machines that meet the recommended specifications, the scanning speed may slow down or the time...
... an ISIS (compatible) or a TWAIN (compatible) application that operates on the hard disk ● SCSI card that is compatible with this scanner or Hi-Speed USB 2.0 interface card (See "Connecting to transfer data may increase. 18 Chapter 2 Preparation Before Use Checking Your Operating Environment... Your computer system must meet the following conditions to use the DR-7580/9080C. ● IBM PC/AT or compatible machines that meet the recommended specifications, the scanning speed may slow down or the time...

User Manual
Page 33
..."Completing the Found New Hardware Wizard" screen. ● The DR-7580 will be registered as "CANON DR-7580 SCSI" or "CANON DR-7580 Note USB" in the "Imaging Device" directory. ● The DR-9080C will be registered as "CANON DR-9080C SCSI" or "CANON DR-9080C USB" in the search], enter "D:\INF" (assuming that the ...select [Install from a list or specific location (Advanced)], and then click the [Next] button. 3. In the "Welcome to the scanner and the computer before it finishes, the driver installer screen will be displayed again when you are using Windows XP, the "Found New...
..."Completing the Found New Hardware Wizard" screen. ● The DR-7580 will be registered as "CANON DR-7580 SCSI" or "CANON DR-7580 Note USB" in the "Imaging Device" directory. ● The DR-9080C will be registered as "CANON DR-9080C SCSI" or "CANON DR-9080C USB" in the search], enter "D:\INF" (assuming that the ...select [Install from a list or specific location (Advanced)], and then click the [Next] button. 3. In the "Welcome to the scanner and the computer before it finishes, the driver installer screen will be displayed again when you are using Windows XP, the "Found New...
User Manual
Page 40
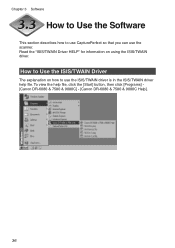
Chapter 3 Software How to Use the Software This section describes how to use the scanner. Read the "ISIS/TWAIN Driver HELP" for information on how to use CapturePerfect so that you can use the ISIS/TWAIN driver is in the ISIS/TWAIN driver help file, click the [Start] button, then click [Programs] [Canon DR-6080 & 7580 & 9080C] - [Canon DR-6080 & 7580 & 9080C Help]. 36 How to Use the ISIS/TWAIN Driver The explanation on using the ISIS/TWAIN driver. To view the help file.
Chapter 3 Software How to Use the Software This section describes how to use the scanner. Read the "ISIS/TWAIN Driver HELP" for information on how to use CapturePerfect so that you can use the ISIS/TWAIN driver is in the ISIS/TWAIN driver help file, click the [Start] button, then click [Programs] [Canon DR-6080 & 7580 & 9080C] - [Canon DR-6080 & 7580 & 9080C Help]. 36 How to Use the ISIS/TWAIN Driver The explanation on using the ISIS/TWAIN driver. To view the help file.

User Manual
Page 44
Chapter 3 Software 3 Select "Canon DR-6080/7580/9080C Driver" or "CapturePerfect" from the list in the dialog box, and then click the [Add/Remove] button. 4 The [Confirm File Deletion] dialog box appears. If you selected "Canon DR-6080/7580/9080C Driver," the above dialog box appears. 5 Click the [Yes] button, and the uninstaller starts. If you selected "CapturePerfect," the above dialog box appears. Follow the instructions on the screen to finish uninstalling the software. 40
Chapter 3 Software 3 Select "Canon DR-6080/7580/9080C Driver" or "CapturePerfect" from the list in the dialog box, and then click the [Add/Remove] button. 4 The [Confirm File Deletion] dialog box appears. If you selected "Canon DR-6080/7580/9080C Driver," the above dialog box appears. 5 Click the [Yes] button, and the uninstaller starts. If you selected "CapturePerfect," the above dialog box appears. Follow the instructions on the screen to finish uninstalling the software. 40
User Manual
Page 46
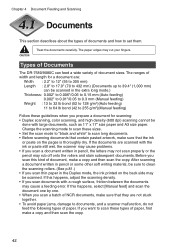
... and then scan the copy. 42 Before you want to scan these types of paper. Types of Documents The DR-7580/9080C can be scanned in pencil, the letters may not scan properly or the pencil may be done with large documents, such as 11" x 17" size paper and A3 size paper. If the... feeding) 11 to 64 lb bond (42 to 255 g/m2)(Manual feeding) Follow these sizes. • Set the scan mode to "black and white" to documents, and a scanner malfunction, do not feed the following types of paper, first make a copy and then scan the copy. The ranges of NCR...
... and then scan the copy. 42 Before you want to scan these types of paper. Types of Documents The DR-7580/9080C can be scanned in pencil, the letters may not scan properly or the pencil may be done with large documents, such as 11" x 17" size paper and A3 size paper. If the... feeding) 11 to 64 lb bond (42 to 255 g/m2)(Manual feeding) Follow these sizes. • Set the scan mode to "black and white" to documents, and a scanner malfunction, do not feed the following types of paper, first make a copy and then scan the copy. The ranges of NCR...
User Manual
Page 57
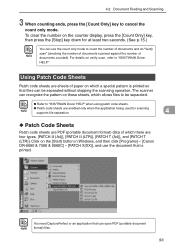
... scanner can be separated. ● Refer to "ISIS/TWAIN Driver HELP" when using patch code sheets. 4.2 Document Feeding and Scanning 3 When counting ends, press the [Count Only] key to "ISIS/TWAIN Driver HELP." For details on the [Start] button in Windows, and then click [Programs] - [Canon DR-6080 & 7580 & 9080C] - [PATCH X(XX)], and use the document...
... scanner can be separated. ● Refer to "ISIS/TWAIN Driver HELP" when using patch code sheets. 4.2 Document Feeding and Scanning 3 When counting ends, press the [Count Only] key to "ISIS/TWAIN Driver HELP." For details on the [Start] button in Windows, and then click [Programs] - [Canon DR-6080 & 7580 & 9080C] - [PATCH X(XX)], and use the document...
User Manual
Page 67
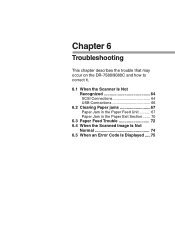
Chapter 6 Troubleshooting This chapter describes the trouble that may occur on the DR-7580/9080C and how to correct it. 6.1 When the Scanner Is Not Recognized 64 SCSI Connections 64 USB Connections 66 6.2 Clearing Paper jams 67 Paper Jam in the Paper Feed Unit .......... 67 Paper Jam in the Paper Exit Section ....... 70 6.3 Paper Feed Trouble 72 6.4 When the Scanned Image Is Not Normal 74 6.5 When an Error Code Is Displayed .....75
Chapter 6 Troubleshooting This chapter describes the trouble that may occur on the DR-7580/9080C and how to correct it. 6.1 When the Scanner Is Not Recognized 64 SCSI Connections 64 USB Connections 66 6.2 Clearing Paper jams 67 Paper Jam in the Paper Feed Unit .......... 67 Paper Jam in the Paper Exit Section ....... 70 6.3 Paper Feed Trouble 72 6.4 When the Scanned Image Is Not Normal 74 6.5 When an Error Code Is Displayed .....75
User Manual
Page 71
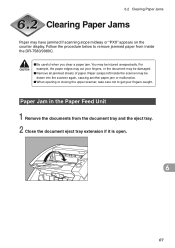
...display. Follow the procedure below to get your fingers, or the document may be injured unexpectedly. Paper scraps left inside the DR-7580/9080C. 6.2 Clearing Paper Jams Clearing Paper Jams Paper may be drawn into the scanner again, causing another paper jam or malfunction. ■ When opening... or closing the upper scanner, take care not to remove jammed paper from the document tray and the eject...
...display. Follow the procedure below to get your fingers, or the document may be injured unexpectedly. Paper scraps left inside the DR-7580/9080C. 6.2 Clearing Paper Jams Clearing Paper Jams Paper may be drawn into the scanner again, causing another paper jam or malfunction. ■ When opening... or closing the upper scanner, take care not to remove jammed paper from the document tray and the eject...
User Manual
Page 84
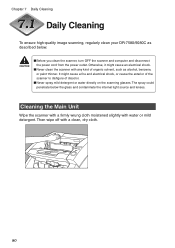
... below the glass and contaminate the internal light source and lenses. It might cause an electrical shock. ■ Never clean the scanner with any kind of discolor. ■ Never spray mild detergent or water directly on the scanning glasses. Then wipe off with water...or mild detergent. Chapter 7 Daily Cleaning Daily Cleaning To ensure high-quality image scanning, regularly clean your DR-7580/9080C as alcohol, benzene, or paint thinner. CAUTION ■ Before you clean the scanner, turn OFF the scanner and computer and disconnect the power cord from the power outlet.
... below the glass and contaminate the internal light source and lenses. It might cause an electrical shock. ■ Never clean the scanner with any kind of discolor. ■ Never spray mild detergent or water directly on the scanning glasses. Then wipe off with water...or mild detergent. Chapter 7 Daily Cleaning Daily Cleaning To ensure high-quality image scanning, regularly clean your DR-7580/9080C as alcohol, benzene, or paint thinner. CAUTION ■ Before you clean the scanner, turn OFF the scanner and computer and disconnect the power cord from the power outlet.

User Manual
Page 104
Specifications Specifications for the Scanner Type Document size Document feeding Scanning method Desktop sheet fed type Width: Length: 2.2" to 12"/55 to 305 mm 2.8" to 17.0"/70 to 432 mm 2.8" to 39.4" /70 to 1,000 mm (Long Document mode) Thickness: 0.002" to 0.006"/0.06 to 0.15 mm (Auto feeding) 0.002" to 0.... lines x secondary scan lines) 600 x 600dpi/400 x 400dpi/300 x 300dpi/ 240 x 240dpi/200 x 200dpi/150 x 150dpi/ 100 x 100dpi Scanning speed (max.) DR-9080C DR-7580 Black and White Simplex 200 x 200 dpi 90 ppm 75 ppm 300 x 300 dpi 90 ppm 75 ppm Duplex 200 x 200 dpi 180 ipm...
Specifications Specifications for the Scanner Type Document size Document feeding Scanning method Desktop sheet fed type Width: Length: 2.2" to 12"/55 to 305 mm 2.8" to 17.0"/70 to 432 mm 2.8" to 39.4" /70 to 1,000 mm (Long Document mode) Thickness: 0.002" to 0.006"/0.06 to 0.15 mm (Auto feeding) 0.002" to 0.... lines x secondary scan lines) 600 x 600dpi/400 x 400dpi/300 x 300dpi/ 240 x 240dpi/200 x 200dpi/150 x 150dpi/ 100 x 100dpi Scanning speed (max.) DR-9080C DR-7580 Black and White Simplex 200 x 200 dpi 90 ppm 75 ppm 300 x 300 dpi 90 ppm 75 ppm Duplex 200 x 200 dpi 180 ipm...
User Manual
Page 107
.../TWAIN driver 36 - O - Type of DR-7580/9080C 10 Feed rollers 88 - Main unit 80 - Power outlet 87 - Installing and removing the rollers 91 - M - Rollers 81 - Install 33 - Operating environment 18 Operation panel 13, 15 Options 16, 99 103 A - CapturePerfect 32 - Scanning glasses 81 Connecting to place documents 43 - Guide plate 87 - Manual...
.../TWAIN driver 36 - O - Type of DR-7580/9080C 10 Feed rollers 88 - Main unit 80 - Power outlet 87 - Installing and removing the rollers 91 - M - Rollers 81 - Install 33 - Operating environment 18 Operation panel 13, 15 Options 16, 99 103 A - CapturePerfect 32 - Scanning glasses 81 Connecting to place documents 43 - Guide plate 87 - Manual...


