CanoScan 8400F Quick Start Guide
Page 1
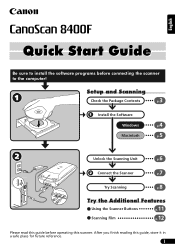
Try the Additional Features Using the Scanner Buttons p.11 Scanning Film p.12 Please read this guide before connecting the scanner to install the software programs before operating this guide, store it in a safe place for future reference. 1 After you finish reading this scanner. English Quick Start Guide Be sure to the computer! Unlock the Scanning Unit 6 p. Try Scanning 8 p. Connect the Scanner 7 p. Setup and Scanning Check the Package Contents 3 p. Macintosh 5 p. Install the Software Windows 4 p.
Try the Additional Features Using the Scanner Buttons p.11 Scanning Film p.12 Please read this guide before connecting the scanner to install the software programs before operating this guide, store it in a safe place for future reference. 1 After you finish reading this scanner. English Quick Start Guide Be sure to the computer! Unlock the Scanning Unit 6 p. Try Scanning 8 p. Connect the Scanner 7 p. Setup and Scanning Check the Package Contents 3 p. Macintosh 5 p. Install the Software Windows 4 p.
CanoScan 8400F Quick Start Guide
Page 2
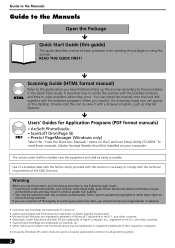
... Quick Start Guide (this guide) This guide describes a series of basic processes from a person possessing copyrights or other legal rights to the item being scanned. To read these manuals, Adobe Acrobat Reader should pay attention to the following legal issues: • Scanning of certain documents, such as Internet Explorer. The socket-outlet shall be installed near the equipment and shall be installed on the CanoScan Setup Utility...
... Quick Start Guide (this guide) This guide describes a series of basic processes from a person possessing copyrights or other legal rights to the item being scanned. To read these manuals, Adobe Acrobat Reader should pay attention to the following legal issues: • Scanning of certain documents, such as Internet Explorer. The socket-outlet shall be installed near the equipment and shall be installed on the CanoScan Setup Utility...
CanoScan 8400F Quick Start Guide
Page 3
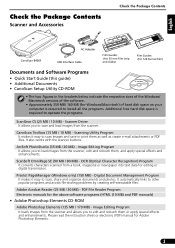
... (PDF) manual for Windows/Macintosh) of the software. • Approximately 350 MB/ 160 MB (for Adobe Photoshop Elements. 3 Check the Package Contents Scanner and Accessories Check the Package Contents English CanoScan 8400F AC Adapter USB Interface Cable Film Guides (for 35 mm film strip and slides) Film Guides (for 120 format film) Documents and Software Programs • Quick Start Guide (this guide) • Additional Documents • CanoScan Setup Utility CD-ROM • The two figures in the brackets below indicate the respective sizes...
... (PDF) manual for Windows/Macintosh) of the software. • Approximately 350 MB/ 160 MB (for Adobe Photoshop Elements. 3 Check the Package Contents Scanner and Accessories Check the Package Contents English CanoScan 8400F AC Adapter USB Interface Cable Film Guides (for 35 mm film strip and slides) Film Guides (for 120 format film) Documents and Software Programs • Quick Start Guide (this guide) • Additional Documents • CanoScan Setup Utility CD-ROM • The two figures in the brackets below indicate the respective sizes...

CanoScan 8400F Quick Start Guide
Page 4
... will restart. 7 After Windows restarts, remove the CD-ROM from the drive and store it in the drive. Continue on -screen messages to continue the installation. • In a few cases, your language, the CanoScan Setup Utility main menu will start. Click [Yes] if you should log on with an administrator user name when installing or uninstalling software programs. 1 Turn the computer on -screen message prompts and click [Next...
... will restart. 7 After Windows restarts, remove the CD-ROM from the drive and store it in the drive. Continue on -screen messages to continue the installation. • In a few cases, your language, the CanoScan Setup Utility main menu will start. Click [Yes] if you should log on with an administrator user name when installing or uninstalling software programs. 1 Turn the computer on -screen message prompts and click [Next...
CanoScan 8400F Quick Start Guide
Page 5
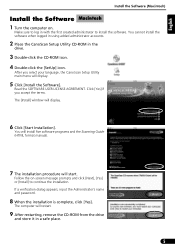
... CD-ROM icon. 4 Double-click the [SetUp] icon. You will install five software programs and the Scanning Guide (HTML format manual). 7 The installation procedure will display. 5 Click [Install the Software]. Read the SOFTWARE USER LICENSE AGREEMENT. If a verification dialog appears, input the Administrator's name and password. 8 When the installation is complete, click [Yes]. After you accept the terms. The [Install] window will restart. 9 After restarting, remove the CD-ROM from...
... CD-ROM icon. 4 Double-click the [SetUp] icon. You will install five software programs and the Scanning Guide (HTML format manual). 7 The installation procedure will display. 5 Click [Install the Software]. Read the SOFTWARE USER LICENSE AGREEMENT. If a verification dialog appears, input the Administrator's name and password. 8 When the installation is complete, click [Yes]. After you accept the terms. The [Install] window will restart. 9 After restarting, remove the CD-ROM from...
CanoScan 8400F Quick Start Guide
Page 6
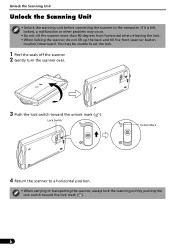
... releasing the lock. • When locking the scanner, do not lift up the back and tilt the front (scanner button location) downward. Unlock the Scanning Unit Unlock the Scanning Unit • Unlock the scanning unit before connecting the scanner to set the lock. 1 Peel the seals off the scanner. 2 Gently turn the scanner over. 3 Push the lock switch toward the lock mark ( ). 6 If it is left locked, a malfunction or other problem may be unable to...
... releasing the lock. • When locking the scanner, do not lift up the back and tilt the front (scanner button location) downward. Unlock the Scanning Unit Unlock the Scanning Unit • Unlock the scanning unit before connecting the scanner to set the lock. 1 Peel the seals off the scanner. 2 Gently turn the scanner over. 3 Push the lock switch toward the lock mark ( ). 6 If it is left locked, a malfunction or other problem may be unable to...
CanoScan 8400F Quick Start Guide
Page 7
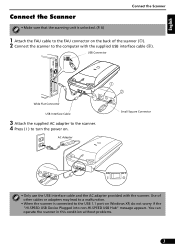
... supplied USB interface cable (d). You can operate the scanner in this condition without problems. 7 Use of other cables or adapters may lead to a malfunction. • When the scanner is unlocked. (P. 6) Connect the Scanner 1 Attach the FAU cable to the FAU connector on Windows XP, do not worry if the "HI-SPEED USB Device Plugged into non-HI-SPEED USB Hub" message appears. English Connect the Scanner • Make sure that the scanning unit...
... supplied USB interface cable (d). You can operate the scanner in this condition without problems. 7 Use of other cables or adapters may lead to a malfunction. • When the scanner is unlocked. (P. 6) Connect the Scanner 1 Attach the FAU cable to the FAU connector on Windows XP, do not worry if the "HI-SPEED USB Device Plugged into non-HI-SPEED USB Hub" message appears. English Connect the Scanner • Make sure that the scanning unit...

CanoScan 8400F Quick Start Guide
Page 8
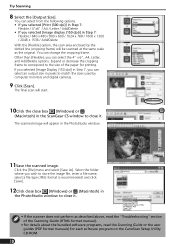
Macintosh 2 Double-click the [Applications] folder followed by aligning its top edge with ArcSoft PhotoStudio. PhotoStudio will start. 8 PhotoStudio will start. Try Scanning Try Scanning The following steps explain how to scan with the alignment mark, and close the document cover. Top • Make sure that the power switch is turned on the glass by the [PhotoStudio] folder and the [PhotoStudio] icon. Bottom 1 Place a photo or a picture on . Alignment Mark Windows 2 Select [Start], [Programs] or [All Programs], [ArcSoft PhotoStudio 5.5] and [PhotoStudio 5.5].
Macintosh 2 Double-click the [Applications] folder followed by aligning its top edge with ArcSoft PhotoStudio. PhotoStudio will start. 8 PhotoStudio will start. Try Scanning Try Scanning The following steps explain how to scan with the alignment mark, and close the document cover. Top • Make sure that the power switch is turned on the glass by the [PhotoStudio] folder and the [PhotoStudio] icon. Bottom 1 Place a photo or a picture on . Alignment Mark Windows 2 Select [Start], [Programs] or [All Programs], [ArcSoft PhotoStudio 5.5] and [PhotoStudio 5.5].
CanoScan 8400F Quick Start Guide
Page 9
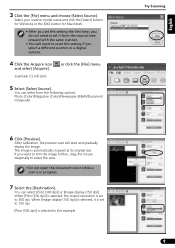
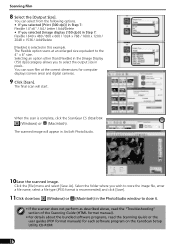
... [Print (300 dpi)] is selected, the output resolution is automatically cropped at its original size. Select your scanner model name and click the [Select] button for Windows or the [OK] button for Macintosh. • After you set to reset this setting the first time, you select a different scanner or a digital camera. 4 Click the Acquire icon and select [Acquire]. ScanGear CS will start . 3 Click the [File] menu...
... [Print (300 dpi)] is selected, the output resolution is automatically cropped at its original size. Select your scanner model name and click the [Select] button for Windows or the [OK] button for Macintosh. • After you set to reset this setting the first time, you select a different scanner or a digital camera. 4 Click the Acquire icon and select [Acquire]. ScanGear CS will start . 3 Click the [File] menu...
CanoScan 8400F Quick Start Guide
Page 10
... ScanGear CS window to the size of the Scanning Guide (HTML format manual). • For details about the bundled software programs, read the Scanning Guide or the user guides (PDF format manuals) for printing. Select the folder where you wish to store the image file, enter a file name, select a file type (JPEG format is recommended) and click [Save]. 12Click close box (Windows) or (Macintosh) in the PhotoStudio window to match the sizes used by the...
... ScanGear CS window to the size of the Scanning Guide (HTML format manual). • For details about the bundled software programs, read the Scanning Guide or the user guides (PDF format manuals) for printing. Select the folder where you wish to store the image file, enter a file name, select a file type (JPEG format is recommended) and click [Save]. 12Click close box (Windows) or (Macintosh) in the PhotoStudio window to match the sizes used by the...
CanoScan 8400F Quick Start Guide
Page 11
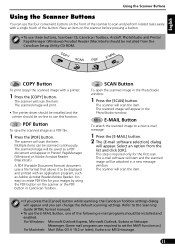
... installed and enabled. PDF Button To save the scanned image as a PDF file: 1 Press the [PDF] button. Select an option from the CanoScan Setup Utility CD-ROM. The e-mail software will start and the scanned image will appear and you press the [Cancel] button while scanning, the CanoScan Toolbox settings dialog will be on-line to scan and perform related tasks easily with a printer: 1 Press the [COPY] button. The scanned image will scan the item. Multiple items can use this function. For Windows...
... installed and enabled. PDF Button To save the scanned image as a PDF file: 1 Press the [PDF] button. Select an option from the CanoScan Setup Utility CD-ROM. The e-mail software will start and the scanned image will appear and you press the [Cancel] button while scanning, the CanoScan Toolbox settings dialog will be on-line to scan and perform related tasks easily with a printer: 1 Press the [COPY] button. The scanned image will scan the item. Multiple items can use this function. For Windows...
CanoScan 8400F Quick Start Guide
Page 12
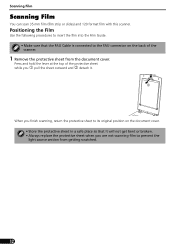
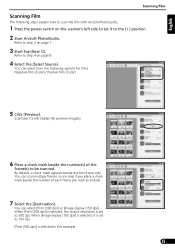
... the top of the scanner. 1 Remove the protective sheet from getting scratched. 12 Scanning Film Scanning Film You can scan 35 mm film (film strip or slides) and 120 format film with this scanner. Positioning the Film Use the following procedures to insert the film into the Film Guide. • Make sure that the FAU Cable is connected to the FAU connector on the document cover. • Store the protective sheet in a safe place so...
... the top of the scanner. 1 Remove the protective sheet from getting scratched. 12 Scanning Film Scanning Film You can scan 35 mm film (film strip or slides) and 120 format film with this scanner. Positioning the Film Use the following procedures to insert the film into the Film Guide. • Make sure that the FAU Cable is connected to the FAU connector on the document cover. • Store the protective sheet in a safe place so...

CanoScan 8400F Quick Start Guide
Page 13
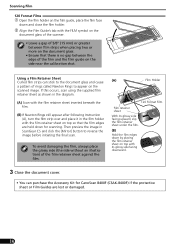
... film holder. d Align the Film Guide's tab with the FILM symbol on the document glass of a scanned image appears whitened. • Ensure that there is obstructed. 35mm Film Strip c Open the film holder on the film guide, place the film face down (correctly viewed from the film, document glass or light source unit. • Do not block the calibration slot on the document glass of the scanner. Film Holder Calibration Slot • Place a black piece of paper...
... film holder. d Align the Film Guide's tab with the FILM symbol on the document glass of a scanned image appears whitened. • Ensure that there is obstructed. 35mm Film Strip c Open the film holder on the film guide, place the film face down (correctly viewed from the film, document glass or light source unit. • Do not block the calibration slot on the document glass of the scanner. Film Holder Calibration Slot • Place a black piece of paper...
CanoScan 8400F Quick Start Guide
Page 14
... final scan. Using a Film Retainer Sheet Curled film strips can purchase the Accessory Kit for scanning. Then preview the image in the film holder with the film retainer sheet inserted beneath the film. (B) If Newton Rings still appear after following Instruction (A), turn the film strip over and place it in ScanGear CS and click the [Mirror] button to the document glass and cause a pattern of the film and the film guide...
... final scan. Using a Film Retainer Sheet Curled film strips can purchase the Accessory Kit for scanning. Then preview the image in the film holder with the film retainer sheet inserted beneath the film. (B) If Newton Rings still appear after following Instruction (A), turn the film strip over and place it in ScanGear CS and click the [Mirror] button to the document glass and cause a pattern of the film and the film guide...
CanoScan 8400F Quick Start Guide
Page 15
... ( I ) position. 2 Start ArcSoft PhotoStudio. English Scanning Film Scanning Film The following options for films. Negative Film (Color) / Positive Film (Color) 5 Click [Preview]. When [Print (300 dpi)] is selected, the output resolution is set to step 2 on the scanner's left side to set it to 300 dpi. By default, a check mark appears beside the first frame only. You can select [Print (300 dpi)] or [Image display (150 dpi)]. You can scan multiple frames...
... ( I ) position. 2 Start ArcSoft PhotoStudio. English Scanning Film Scanning Film The following options for films. Negative Film (Color) / Positive Film (Color) 5 Click [Preview]. When [Print (300 dpi)] is selected, the output resolution is set to step 2 on the scanner's left side to set it to 300 dpi. By default, a check mark appears beside the first frame only. You can select [Print (300 dpi)] or [Image display (150 dpi)]. You can scan multiple frames...
CanoScan 8400F Quick Start Guide
Page 16
... above, read the "Troubleshooting" section of the Scanning Guide (HTML format manual). • For details about the bundled software programs, read the Scanning Guide or the user guides (PDF format manuals) for computer displays (screen area) and digital cameras. 9 Click [Scan]. The Flexible option scans at the correct dimensions for each software program on the CanoScan Setup Utility CD-ROM. 16 Selecting an option other than [Flexible] in pixels. Scanning Film 8 Select the [Output...
... above, read the "Troubleshooting" section of the Scanning Guide (HTML format manual). • For details about the bundled software programs, read the Scanning Guide or the user guides (PDF format manuals) for computer displays (screen area) and digital cameras. 9 Click [Scan]. The Flexible option scans at the correct dimensions for each software program on the CanoScan Setup Utility CD-ROM. 16 Selecting an option other than [Flexible] in pixels. Scanning Film 8 Select the [Output...
CanoScan 8400F Quick Start Guide
Page 17
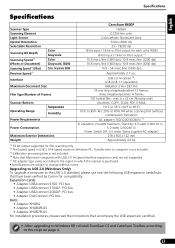
... subject to the steps on Windows PC. Specifications English Specifications Scanner Type Scanning Element Light Source Optical Resolution Selectable Resolution Scanning Bit Depth Scanning Speed*2 (Photo or Document) Scanning Speed*2 (Film) Preview Speed*3 Color Grayscale Color Grayscale, B&W Color, GrayScale, B&W Interface Maximum Document Size Film Type/Number of Frames Scanner Buttons Operating Range Power Requirements Temperature Humidity Power Consumption Maximum Exterior Dimensions Weight CanoScan 8400F Flatbed CCD 6-line color Cold cathode fluorescent lamp 3200 x 6400 dpi 25...
... subject to the steps on Windows PC. Specifications English Specifications Scanner Type Scanning Element Light Source Optical Resolution Selectable Resolution Scanning Bit Depth Scanning Speed*2 (Photo or Document) Scanning Speed*2 (Film) Preview Speed*3 Color Grayscale Color Grayscale, B&W Color, GrayScale, B&W Interface Maximum Document Size Film Type/Number of Frames Scanner Buttons Operating Range Power Requirements Temperature Humidity Power Consumption Maximum Exterior Dimensions Weight CanoScan 8400F Flatbed CCD 6-line color Cold cathode fluorescent lamp 3200 x 6400 dpi 25...
CanoScan 8400F Quick Start Guide
Page 18
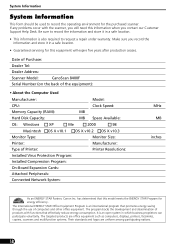
...: Scanner Model: CanoScan 8400F Serial Number (on the back of the equipment): • About the Computer Used Manufacturer: Model: CPU: Clock Speed: Memory Capacity (RAM): MB Hard Disk Capacity: MB Space Available: OS: Windows XP Me 2000 98 Macintosh OS X v10.1 OS X v10.2 OS X v10.3 Monitor Type: Monitor Size: Printer: Manufacturer: Type of Printer: Printer Resolutions: Installed Virus Protection Program: Installed Compression Program: On-Board Expansion Cards: Attached Peripherals: Connected Network...
...: Scanner Model: CanoScan 8400F Serial Number (on the back of the equipment): • About the Computer Used Manufacturer: Model: CPU: Clock Speed: Memory Capacity (RAM): MB Hard Disk Capacity: MB Space Available: OS: Windows XP Me 2000 98 Macintosh OS X v10.1 OS X v10.2 OS X v10.3 Monitor Type: Monitor Size: Printer: Manufacturer: Type of Printer: Printer Resolutions: Installed Virus Protection Program: Installed Compression Program: On-Board Expansion Cards: Attached Peripherals: Connected Network...


