
Quick Start Guide
Page 1
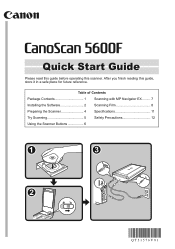
Table of Contents Package Contents 1 Scanning with MP Navigator EX......... 7 Installing the Software 2 Scanning Film 8 Preparing the Scanner 4 Specifications 11 Try Scanning 5 Safety Precautions 12 Using the Scanner Buttons 6 After you finish reading this scanner. Quick Start Guide Please read this guide before operating this guide, store it in a safe place for future reference.
Table of Contents Package Contents 1 Scanning with MP Navigator EX......... 7 Installing the Software 2 Scanning Film 8 Preparing the Scanner 4 Specifications 11 Try Scanning 5 Safety Precautions 12 Using the Scanner Buttons 6 After you finish reading this scanner. Quick Start Guide Please read this guide before operating this guide, store it in a safe place for future reference.
Quick Start Guide
Page 2
... a shielded cable is subject to the item being scanned. If this product, you could be prohibited by turning the equipment off and on, the user is a trademark or registered trademark of the FCC Rules. FCC Notice (U.S.A. Operation is required to comply with Part 15 of Microsoft Corporation in a particular installation. Use of their respective companies. If such changes or...
... a shielded cable is subject to the item being scanned. If this product, you could be prohibited by turning the equipment off and on, the user is a trademark or registered trademark of the FCC Rules. FCC Notice (U.S.A. Operation is required to comply with Part 15 of Microsoft Corporation in a particular installation. Use of their respective companies. If such changes or...
Quick Start Guide
Page 3
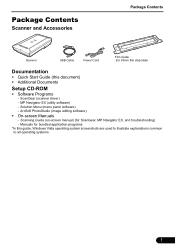
Scanning Guide (on-screen manual) (for ScanGear, MP Navigator EX, and troubleshooting) - Manuals for bundled application programs *In this document) • Additional Documents Setup CD-ROM • Software Programs - Solution Menu (menu panel software) - Package Contents Scanner and Accessories Package Contents Scanner USB Cable Power Cord Film Guide (for 35mm film strip/slide) Documentation • Quick Start Guide (this guide, Windows Vista operating system screenshots are used to illustrate explanations common to all operating systems. 1 MP Navigator EX (utility software) ...
Scanning Guide (on-screen manual) (for ScanGear, MP Navigator EX, and troubleshooting) - Manuals for bundled application programs *In this document) • Additional Documents Setup CD-ROM • Software Programs - Solution Menu (menu panel software) - Package Contents Scanner and Accessories Package Contents Scanner USB Cable Power Cord Film Guide (for 35mm film strip/slide) Documentation • Quick Start Guide (this guide, Windows Vista operating system screenshots are used to illustrate explanations common to all operating systems. 1 MP Navigator EX (utility software) ...
Quick Start Guide
Page 4
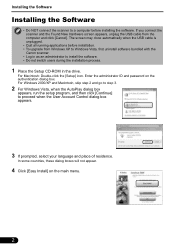
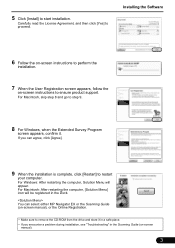
... ID and password on the main menu. 2 If you connect the scanner and the Found New Hardware screen appears, unplug the USB cable from Windows XP to Windows Vista, first uninstall software bundled with the Canon scanner. • Log in as an administrator to install the software. • Do not switch users during the installation process. 1 Place the Setup CD-ROM in the drive. For Macintosh: Double-click the [Setup] icon...
... ID and password on the main menu. 2 If you connect the scanner and the Found New Hardware screen appears, unplug the USB cable from Windows XP to Windows Vista, first uninstall software bundled with the Canon scanner. • Log in as an administrator to install the software. • Do not switch users during the installation process. 1 Place the Setup CD-ROM in the drive. For Macintosh: Double-click the [Setup] icon...
Quick Start Guide
Page 5
... Scanning Guide (on -screen instructions to restart your computer. For Macintosh, skip step 8 and go to remove the CD-ROM from the drive and store it . Carefully read the License Agreement, and then click [Yes] to start installation. If you can select either MP Navigator EX or the Scanning Guide (on-screen manual), or the Online Registration. • Make sure to step 9. 8 For Windows...
... Scanning Guide (on -screen instructions to restart your computer. For Macintosh, skip step 8 and go to remove the CD-ROM from the drive and store it . Carefully read the License Agreement, and then click [Yes] to start installation. If you can select either MP Navigator EX or the Scanning Guide (on-screen manual), or the Online Registration. • Make sure to step 9. 8 For Windows...
Quick Start Guide
Page 6
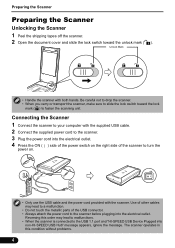
... scanner, make sure to slide the lock switch toward the unlock mark ( ). Unlock Mark • Handle the scanner with the supplied USB cable. 2 Connect the supplied power cord to fasten the scanning unit. Reversing this condition without problems. 4 The scanner operates in this order may lead to a malfunction. • Do not touch the metallic parts of the scanner to turn the power on the right side of the USB connector. • Always attach the power cord...
... scanner, make sure to slide the lock switch toward the unlock mark ( ). Unlock Mark • Handle the scanner with the supplied USB cable. 2 Connect the supplied power cord to fasten the scanning unit. Reversing this condition without problems. 4 The scanner operates in this order may lead to a malfunction. • Do not touch the metallic parts of the scanner to turn the power on the right side of the USB connector. • Always attach the power cord...
Quick Start Guide
Page 7
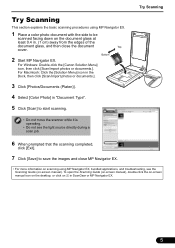
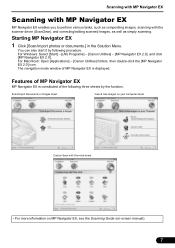
... Scanning This section explains the basic scanning procedures using MP Navigator EX, bundled applications, and troubleshooting, see the Scanning Guide (on-screen manual). For Macintosh: Click the [Solution Menu] icon in the Dock, then click [Scan/import photos or documents.]. 3 Click [Photos/Documents (Platen)]. 4 Select [Color Photo] in "Document Type". 5 Click [Scan] to start scanning. • Do not move the scanner while it is operating. • Do not see the light source directly during a scan job...
... Scanning This section explains the basic scanning procedures using MP Navigator EX, bundled applications, and troubleshooting, see the Scanning Guide (on-screen manual). For Macintosh: Click the [Solution Menu] icon in the Dock, then click [Scan/import photos or documents.]. 3 Click [Photos/Documents (Platen)]. 4 Select [Color Photo] in "Document Type". 5 Click [Scan] to start scanning. • Do not move the scanner while it is operating. • Do not see the light source directly during a scan job...
Quick Start Guide
Page 8
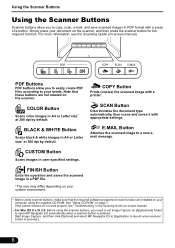
... not work properly, see the Scanning Guide (on the scanner. See "Setup CD-ROM" on -screen manual). • For Mac OS X v.10.3.9: Before using the supplied CD-ROM. Using the Scanner Buttons Using the Scanner Buttons Scanner buttons allow you to easily create PDF files according to your needs. SCAN Button Discriminates the document type automatically, then scans and saves it with a printer. E-MAIL Button Attaches the scanned image to a new email message. Start Image Capture, and then click [Options] and select MP Navigator EX in the Scanning Guide (on page 1.
... not work properly, see the Scanning Guide (on the scanner. See "Setup CD-ROM" on -screen manual). • For Mac OS X v.10.3.9: Before using the supplied CD-ROM. Using the Scanner Buttons Using the Scanner Buttons Scanner buttons allow you to easily create PDF files according to your needs. SCAN Button Discriminates the document type automatically, then scans and saves it with a printer. E-MAIL Button Attaches the scanned image to a new email message. Start Image Capture, and then click [Options] and select MP Navigator EX in the Scanning Guide (on page 1.
Quick Start Guide
Page 9
..., such as compositing images, scanning with One-click sheet • For more information on MP Navigator EX, see the Scanning Guide (on-screen manual). 7 Scan/Import Documents or Images sheet View & Use Images on your Computer sheet Custom Scan with the scanner driver (ScanGear), and correcting/editing scanned images, as well as simply scanning. For Macintosh: Open [Applications] - [Canon Utilities] folders, then double-click the [MP Navigator EX 2.0] icon. For Windows: Select [Start] - [(All) Programs] - [Canon Utilities] - [MP Navigator EX...
..., such as compositing images, scanning with One-click sheet • For more information on MP Navigator EX, see the Scanning Guide (on-screen manual). 7 Scan/Import Documents or Images sheet View & Use Images on your Computer sheet Custom Scan with the scanner driver (ScanGear), and correcting/editing scanned images, as well as simply scanning. For Macintosh: Open [Applications] - [Canon Utilities] folders, then double-click the [MP Navigator EX 2.0] icon. For Windows: Select [Start] - [(All) Programs] - [Canon Utilities] - [MP Navigator EX...
Quick Start Guide
Page 10
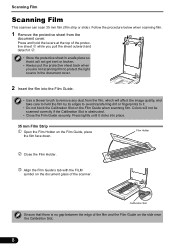
... of the film and the Film Guide on the Film Guide when scanning film. Calibration Slot Ensure that it clicks into the Film Guide. • Use a blower brush to remove any dust from the document cover. Colors will affect the image quality, and take care to hold the levers at the top of the scanner. Scanning Film Scanning Film This scanner can scan 35 mm film (film strip or slide). Press and hold the film by its...
... of the film and the Film Guide on the Film Guide when scanning film. Calibration Slot Ensure that it clicks into the Film Guide. • Use a blower brush to remove any dust from the document cover. Colors will affect the image quality, and take care to hold the levers at the top of the scanner. Scanning Film Scanning Film This scanner can scan 35 mm film (film strip or slide). Press and hold the film by its...
Quick Start Guide
Page 11
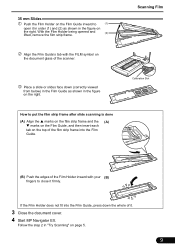
... "Try Scanning" on the document glass of the film strip frame into the Film Guide, press down (correctly viewed from below) in the Film Guide as shown in the figure on the right. How to close it firmly. Follow the step 2 in the figure on the right. With the Film Holder being opened and (2) lifted, remove the film strip frame. 35 mm Slides...
... "Try Scanning" on the document glass of the film strip frame into the Film Guide, press down (correctly viewed from below) in the Film Guide as shown in the figure on the right. How to close it firmly. Follow the step 2 in the figure on the right. With the Film Holder being opened and (2) lifted, remove the film strip frame. 35 mm Slides...
Quick Start Guide
Page 12
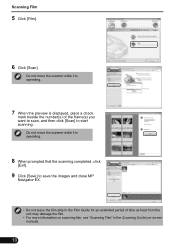
... the unit may damage the film. • For more information on scanning film, see "Scanning Film" in the Film Guide for an extended period of the frame(s) you want to scan, and then click [Scan] to save the images and close MP Navigator EX. • Do not leave the film strip in the Scanning Guide (on-screen manual). 10 Do not move the scanner while it is operating. 7 When...
... the unit may damage the film. • For more information on scanning film, see "Scanning Film" in the Film Guide for an extended period of the frame(s) you want to scan, and then click [Scan] to save the images and close MP Navigator EX. • Do not leave the film strip in the Scanning Guide (on-screen manual). 10 Do not move the scanner while it is operating. 7 When...
Quick Start Guide
Page 13
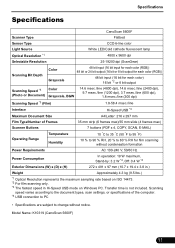
...), 1.8 msec./line (300 dpi) Scanning Speed *3 (Film) 1.8-58.4 msec./line Interface Hi-Speed USB *3 Maximum Document Size A4/Letter: 216 x 297 mm Film Type/Number of the computer. *4 USB connection to PC • Specifications are subject to 80 % RH for film scanning without notice. Scanning speed varies according to the document types, scan settings, or specifications of Frames 35 mm strip (6 frames max)/35 mm slide (4 frames max) Scanner Buttons 7 buttons (PDF x 4, COPY, SCAN, E-MAIL) Operating Range...
...), 1.8 msec./line (300 dpi) Scanning Speed *3 (Film) 1.8-58.4 msec./line Interface Hi-Speed USB *3 Maximum Document Size A4/Letter: 216 x 297 mm Film Type/Number of the computer. *4 USB connection to PC • Specifications are subject to 80 % RH for film scanning without notice. Scanning speed varies according to the document types, scan settings, or specifications of Frames 35 mm strip (6 frames max)/35 mm slide (4 frames max) Scanner Buttons 7 buttons (PDF x 4, COPY, SCAN, E-MAIL) Operating Range...
Quick Start Guide
Page 14
... shock may result. • Do not use a dry cloth to clean the area around the power cord in all dust is not plugged in contact with voltages other than the specified voltages. If the scanner falls, it is removed. Also do not touch the scanner, power cord and cables. WARNING Indicates a warning concerning operations that may lead to injury to persons...
... shock may result. • Do not use a dry cloth to clean the area around the power cord in all dust is not plugged in contact with voltages other than the specified voltages. If the scanner falls, it is removed. Also do not touch the scanner, power cord and cables. WARNING Indicates a warning concerning operations that may lead to injury to persons...
Quick Start Guide
Page 15
... not bump the document glass or drop heavy books or objects on the document cover or the document glass. Setup and Operating Conditions • Do not set up . It may result. • When cleaning the scanner, always unplug the power cord. Also do not enter metallic objects or spill water, liquids, or flammable materials on the document glass. Then contact your retailer or Canon Customer Support Help Desk. Condensation...
... not bump the document glass or drop heavy books or objects on the document cover or the document glass. Setup and Operating Conditions • Do not set up . It may result. • When cleaning the scanner, always unplug the power cord. Also do not enter metallic objects or spill water, liquids, or flammable materials on the document glass. Then contact your retailer or Canon Customer Support Help Desk. Condensation...

Quick Start Guide
Page 16
As an ENERGY STAR® Partner, Canon Inc. QT5-1576-V01 XXXXXXXX ©CANON INC. 2008 PRINTED IN THAILAND has determined that this product meets the ENERGY STAR® guidelines for energy efficiency. LAMP(S) INSIDE THIS PRODUCT CONTAIN MERCURY AND MUST BE RECYCLED OR DISPOSED OF ACCORDING TO LOCAL, STATE OR FEDERAL LAWS. The socket-outlet shall be installed near the equipment and shall be easily accessible.
As an ENERGY STAR® Partner, Canon Inc. QT5-1576-V01 XXXXXXXX ©CANON INC. 2008 PRINTED IN THAILAND has determined that this product meets the ENERGY STAR® guidelines for energy efficiency. LAMP(S) INSIDE THIS PRODUCT CONTAIN MERCURY AND MUST BE RECYCLED OR DISPOSED OF ACCORDING TO LOCAL, STATE OR FEDERAL LAWS. The socket-outlet shall be installed near the equipment and shall be easily accessible.


