
User Manual
Page 4
... pressing the button and changing the setting. indicates the Multi-controller. respectively after you let go of the page indicates that the function is available only in this manual assume that the power switch is already set to the default. Basic Assumptions All operations explained in this manual assume that the power switch is already set to prevent shooting problems. : Supplemental information. The M icon on and no menu or image is assumed...
... pressing the button and changing the setting. indicates the Multi-controller. respectively after you let go of the page indicates that the function is available only in this manual assume that the power switch is already set to the default. Basic Assumptions All operations explained in this manual assume that the power switch is already set to prevent shooting problems. : Supplemental information. The M icon on and no menu or image is assumed...

User Manual
Page 7
... Customizing the Camera 151 Setting Custom Functions 152 Custom Functions 153 5 Custom Function Settings 154 C.Fn I: Exposure 154 C.Fn II: Image 156 6 C.Fn III: Auto focus/Drive 157 C.Fn IV: Operation/Others 160 Registering My Menu 164 7 Register Camera User Settings 165 12 Reference 167 Checking Camera Settings 168 8 Using a Household Power Outlet 170 Replacing the Date/Time Battery 171 Function Availability Table 172 9 Troubleshooting Guide 174 Error Codes...177 System Map 178 Using the Battery Grip 180 10 Specifications 181...
... Customizing the Camera 151 Setting Custom Functions 152 Custom Functions 153 5 Custom Function Settings 154 C.Fn I: Exposure 154 C.Fn II: Image 156 6 C.Fn III: Auto focus/Drive 157 C.Fn IV: Operation/Others 160 Registering My Menu 164 7 Register Camera User Settings 165 12 Reference 167 Checking Camera Settings 168 8 Using a Household Power Outlet 170 Replacing the Date/Time Battery 171 Function Availability Table 172 9 Troubleshooting Guide 174 Error Codes...177 System Map 178 Using the Battery Grip 180 10 Specifications 181...
User Manual
Page 16
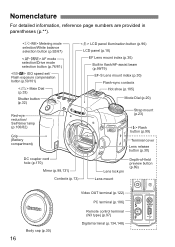
...) Lens lock pin Depth-of-field preview button (p.89) Lens mount Body cap (p.30) 16 Video OUT terminal (p.122) PC terminal (p.106) Remote control terminal (N3 type) (p.97) Digital terminal (p.134,148) Metering mode selection/White balance selection button (p.92/67) AF mode selection/Drive mode selection button (p.76/81) ISO speed set/ Flash exposure compensation button (p.59/101) Main Dial (p.33) Shutter button (p.32) Red-eye reduction/ Self-timer lamp (p.100/82) Grip (Battery compartment) LCD panel illumination button...
...) Lens lock pin Depth-of-field preview button (p.89) Lens mount Body cap (p.30) 16 Video OUT terminal (p.122) PC terminal (p.106) Remote control terminal (N3 type) (p.97) Digital terminal (p.134,148) Metering mode selection/White balance selection button (p.92/67) AF mode selection/Drive mode selection button (p.76/81) ISO speed set/ Flash exposure compensation button (p.59/101) Main Dial (p.33) Shutter button (p.32) Red-eye reduction/ Self-timer lamp (p.100/82) Grip (Battery compartment) LCD panel illumination button...
User Manual
Page 31
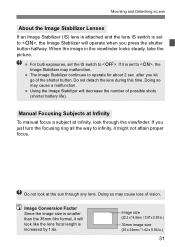
... .) 31 The Image Stabilizer continues to , the Image Stabilizer will operate when you press the shutter button halfway. Do not detach the lens during this time. If you let go of possible shots (shorter battery life). after you just turn the focusing ring all the way to . Image Conversion Factor Since the image size is set to operate for about 2 sec. Manual Focusing Subjects at Infinity To manual focus a subject at...
... .) 31 The Image Stabilizer continues to , the Image Stabilizer will operate when you press the shutter button halfway. Do not detach the lens during this time. If you let go of possible shots (shorter battery life). after you just turn the focusing ring all the way to . Image Conversion Factor Since the image size is set to operate for about 2 sec. Manual Focusing Subjects at Infinity To manual focus a subject at...

User Manual
Page 33
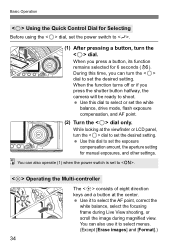
... the menu display, image playback, and image recording, you press a button, its function remains selected for Selecting (1) After pressing a button, turn the dial to shoot. During this time, you can set the desired setting. In this way, you can instantly go back to set the metering mode, AF mode, ISO speed, and select the AF point. (2) Turn the dial only. In this way, you can turn the dial to shooting-ready by...
... the menu display, image playback, and image recording, you press a button, its function remains selected for Selecting (1) After pressing a button, turn the dial to shoot. During this time, you can set the desired setting. In this way, you can instantly go back to set the metering mode, AF mode, ISO speed, and select the AF point. (2) Turn the dial only. In this way, you can turn the dial to shooting-ready by...
User Manual
Page 34
... aperture setting for manual exposures, and other settings. Use it to shoot. When you can also operate (1) when the power switch is set to set the desired setting. Use this dial to select the AF point, correct the white balance, select the focusing frame during Live View shooting, or scroll the image during magnified view. During this dial to set the desired setting. Use this time, you press a button, its function remains selected for 6 seconds (9). Operating the Multi-controller...
... aperture setting for manual exposures, and other settings. Use it to shoot. When you can also operate (1) when the power switch is set to set the desired setting. Use this dial to select the AF point, correct the white balance, select the focusing frame during Live View shooting, or scroll the image during magnified view. During this dial to set the desired setting. Use this time, you press a button, its function remains selected for 6 seconds (9). Operating the Multi-controller...
User Manual
Page 39
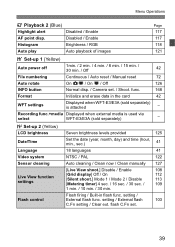
... Brightness / RGB Auto play Auto playback of images Page 117 117 118 121 5 Set-up 2 (Yellow) LCD brightness Date/Time Language Video system Sensor cleaning Live View function settings Flash control Seven brightness levels provided 125 Set the date (year, month, day) and time (hour, min., sec.) 41 18 languages 41 NTSC / PAL 122 Auto cleaning / Clean now / Clean manually 127 [Live View shoot.] Disable / Enable 108 [Grid display] Off / On 112 [Silent shoot.] Mode 1 / Mode 2 / Disable 113 [Metering timer] 4 sec...
... Brightness / RGB Auto play Auto playback of images Page 117 117 118 121 5 Set-up 2 (Yellow) LCD brightness Date/Time Language Video system Sensor cleaning Live View function settings Flash control Seven brightness levels provided 125 Set the date (year, month, day) and time (hour, min., sec.) 41 18 languages 41 NTSC / PAL 122 Auto cleaning / Clean now / Clean manually 127 [Live View shoot.] Disable / Enable 108 [Grid display] Off / On 112 [Silent shoot.] Mode 1 / Mode 2 / Disable 113 [Metering timer] 4 sec...
User Manual
Page 40
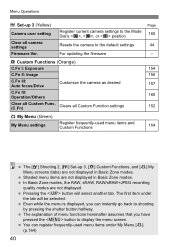
... default settings For updating the firmware 8 Custom Functions (Orange) C.Fn I: Exposure C.Fn II: Image C.Fn III: Auto focus/Drive Customize the camera as desired C.Fn IV: Operation/Others Clear all Custom Func. (C.Fn) Clears all camera settings Firmware Ver. In Basic Zone modes, the RAW, sRAW, RAW/sRAW+JPEG recording quality modes are not displayed in Basic Zone modes. The explanation of menu functions hereinafter assumes that you can register frequently-used menu...
... default settings For updating the firmware 8 Custom Functions (Orange) C.Fn I: Exposure C.Fn II: Image C.Fn III: Auto focus/Drive Customize the camera as desired C.Fn IV: Operation/Others Clear all Custom Func. (C.Fn) Clears all camera settings Firmware Ver. In Basic Zone modes, the RAW, sRAW, RAW/sRAW+JPEG recording quality modes are not displayed in Basic Zone modes. The explanation of menu functions hereinafter assumes that you can register frequently-used menu...

User Manual
Page 61
... Zone modes, the Picture Style is ready to shoot. Neutral For natural colors and subdued images. X The Picture Style screen will appear. 2 Select a Picture Style. Portrait For nice skin tones. When the camera is set automatically, so the operation explained on this page to select a Picture Style, then press . This Picture Style assumes that you can also use the [2 Picture Style] menu to select the Picture Style. Picture...
... Zone modes, the Picture Style is ready to shoot. Neutral For natural colors and subdued images. X The Picture Style screen will appear. 2 Select a Picture Style. Portrait For nice skin tones. When the camera is set automatically, so the operation explained on this page to select a Picture Style, then press . This Picture Style assumes that you can also use the [2 Picture Style] menu to select the Picture Style. Picture...
User Manual
Page 76
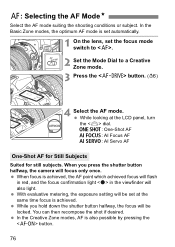
... time focus is achieved. When focus is also possible by pressing the button. 76 While you press the shutter button halfway, the camera will also light. In the Creative Zone modes, AF is achieved, the AF point which achieved focus will flash in red, and the focus confirmation light in the viewfinder will focus only once. With evaluative metering, the exposure setting will be set the focus mode switch to . 2 Set the Mode...
... time focus is achieved. When focus is also possible by pressing the button. 76 While you press the shutter button halfway, the camera will also light. In the Creative Zone modes, AF is achieved, the AF point which achieved focus will flash in red, and the focus confirmation light in the viewfinder will focus only once. With evaluative metering, the exposure setting will be set the focus mode switch to . 2 Set the Mode...
User Manual
Page 109
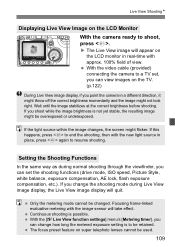
... resume shooting. Only the metering mode cannot be used. 109 If the light source within the image changes, the screen might be retained. Setting the Shooting Functions In the same way as during Live View image display, the Live View image display will take effect. With the video cable (provided) connecting the camera to be overexposed or underexposed. Continuous shooting is to a TV set the shooting functions (drive mode, ISO speed, Picture Style, white balance, exposure compensation, AE lock, flash exposure compensation, etc.). X The Live View image will...
... resume shooting. Only the metering mode cannot be used. 109 If the light source within the image changes, the screen might be retained. Setting the Shooting Functions In the same way as during Live View image display, the Live View image display will take effect. With the video cable (provided) connecting the camera to be overexposed or underexposed. Continuous shooting is to a TV set the shooting functions (drive mode, ISO speed, Picture Style, white balance, exposure compensation, AE lock, flash exposure compensation, etc.). X The Live View image will...

User Manual
Page 122
... to VIDEO IN. 3 Set the camera's power switch to . 4 Press the button. Use the video cable (provided) to connect the camera's video OUT terminal to the TV. Open the camera's terminal cover. Insert the video cable plugs firmly all the way. 2 Turn on the TV monitor, part of the image might not be displayed on the camera's LCD monitor.) After you finish, set the camera's power switch to , turn off the TV, then disconnect the video cable. x Image Playback Viewing the Images on...
... to VIDEO IN. 3 Set the camera's power switch to . 4 Press the button. Use the video cable (provided) to connect the camera's video OUT terminal to the TV. Open the camera's terminal cover. Insert the video cable plugs firmly all the way. 2 Turn on the TV monitor, part of the image might not be displayed on the camera's LCD monitor.) After you finish, set the camera's power switch to , turn off the TV, then disconnect the video cable. x Image Playback Viewing the Images on...

User Manual
Page 139
.... If you select [Print]. Turn the dial to select the desired setting, then press . 6 Set the number of copies, then press . 7 Start printing. X The button's blue lamp will blink and the printing will not be applied to start . See the printer's instruction manual to select the number of copies. Turn the dial to find out what the [Default] settings are the printer's own default settings as set by the printer's manufacturer. wPrinting 5 Set the date and file number imprinting.
.... If you select [Print]. Turn the dial to select the desired setting, then press . 6 Set the number of copies, then press . 7 Start printing. X The button's blue lamp will blink and the printing will not be applied to start . See the printer's instruction manual to select the number of copies. Turn the dial to find out what the [Default] settings are the printer's own default settings as set by the printer's manufacturer. wPrinting 5 Set the date and file number imprinting.
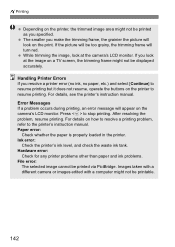
User Manual
Page 142
... select [Continue] to resume printing but it does not resume, operate the buttons on the camera's LCD monitor. After resolving the problem, resume printing. Hardware error: Check for any printer problems other than paper and ink problems. File error: The selected image cannot be printed as you look at the image on the print. If the picture will be too grainy, the trimming frame will look on a TV screen, the...
... select [Continue] to resume printing but it does not resume, operate the buttons on the camera's LCD monitor. After resolving the problem, resume printing. Hardware error: Check for any printer problems other than paper and ink problems. File error: The selected image cannot be printed as you look at the image on the print. If the picture will be too grainy, the trimming frame will look on a TV screen, the...
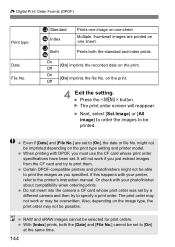
User Manual
Page 144
... camera a CF card whose print order specifications have been set to print the images as you specified. The print order may not work if you must use the CF card whose print order was set to specify a print order. With [Index] prints, both the standard and index prints. on the print type setting and printer model. K Standard Prints one sheet. On [On] imprints the recorded date on one image on the print. Off 4 Exit the setting...
... camera a CF card whose print order specifications have been set to print the images as you specified. The print order may not work if you must use the CF card whose print order was set to specify a print order. With [Index] prints, both the standard and index prints. on the print type setting and printer model. K Standard Prints one sheet. On [On] imprints the recorded date on one image on the print. Off 4 Exit the setting...
User Manual
Page 182
Specifications Recording functions: Backup recording: With the WFT-E3/E3A attached, image recording to the CF card and to USB external media connected to the WFT-E3/E3A will be possible as follows: (1) Standard (2) Automatic switching of recording media (3) Separate recordings according to image-recording quality (4) Recording images having the same size Enabled with WFT-E3/E3A attached • White Balance Type: Auto, daylight, shade, cloudy, tungsten light, white fluorescent light, flash, custom, color temperature setting Auto white balance: Auto white balance with...
Specifications Recording functions: Backup recording: With the WFT-E3/E3A attached, image recording to the CF card and to USB external media connected to the WFT-E3/E3A will be possible as follows: (1) Standard (2) Automatic switching of recording media (3) Separate recordings according to image-recording quality (4) Recording images having the same size Enabled with WFT-E3/E3A attached • White Balance Type: Auto, daylight, shade, cloudy, tungsten light, white fluorescent light, flash, custom, color temperature setting Auto white balance: Auto white balance with...

Brochure
Page 7
... the sound of the shutter cocking, or (in Live View Function. It's EOS 40D's Live View function lets you like Exposure, ISO and bracketing increments, noise reduction and highlight tone priority, AF, drive speed, flash, button and dial assignments, among others, can start C. easy to appear when the Menu button is serene and the colors calming...My Canon camera makes it easy for reviewing, editing and deleting photos or composing new images in mode 2) postpone...
... the sound of the shutter cocking, or (in Live View Function. It's EOS 40D's Live View function lets you like Exposure, ISO and bracketing increments, noise reduction and highlight tone priority, AF, drive speed, flash, button and dial assignments, among others, can start C. easy to appear when the Menu button is serene and the colors calming...My Canon camera makes it easy for reviewing, editing and deleting photos or composing new images in mode 2) postpone...

Brochure
Page 9
... image adjustment using EXIF information or make adjustments manually to photographic excellence does not end with a compatible Canon photo printer, such as index sheets with results that are meeting and surpassing the expectations of extraordinary beauty and clarity with the incamera trimming tool. With control over image optimization with the EOS 40D. Digital Photo Professional offers displays that are both powerful and optimized specifically for backlighting and remove red-eye...
... image adjustment using EXIF information or make adjustments manually to photographic excellence does not end with a compatible Canon photo printer, such as index sheets with results that are meeting and surpassing the expectations of extraordinary beauty and clarity with the incamera trimming tool. With control over image optimization with the EOS 40D. Digital Photo Professional offers displays that are both powerful and optimized specifically for backlighting and remove red-eye...

Brochure
Page 10
..., the imagePROGRAF printers provide advanced direct output support for up to 13" x 19", Canon's PIXMA Pro9000 raises the bar thanks to its combination of color balance when viewing prints Canon LUCIA Ink set includes Black and Matte Black, only one needs to look no other printers require the user to perform an inconvenient and wasteful manual operation to flush unused ink and switch cartridges, the imagePROGRAF printers automate the...
..., the imagePROGRAF printers provide advanced direct output support for up to 13" x 19", Canon's PIXMA Pro9000 raises the bar thanks to its combination of color balance when viewing prints Canon LUCIA Ink set includes Black and Matte Black, only one needs to look no other printers require the user to perform an inconvenient and wasteful manual operation to flush unused ink and switch cartridges, the imagePROGRAF printers automate the...

Brochure
Page 11
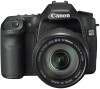
... During Continuous Shooting: JPEG: approx. 75 frames (Large/Fine); NOMENCLATURE Hot Shoe Built-in Flash Main Dial Shutter Button Red-Eye Reduction/ Self-Timer Lamp Grip Battery Compartment, Cover and Release Lever Dioptric Adjustment Knob Viewfinder Eyepiece Print/Share Button MENU Button LCD Monitor INFO Button/Trimming Orientation Button JUMP Button Erase Button Playback Button Picture Style Selection Button LCD Panel Illumination Button Hot Shoe Flash-sync Contacts Mode Dial Strap Mount 22 X-sync Contact Flash Button DIGITAL Terminal VIDEO OUT Terminal Lens Release Button Remote Control...
... During Continuous Shooting: JPEG: approx. 75 frames (Large/Fine); NOMENCLATURE Hot Shoe Built-in Flash Main Dial Shutter Button Red-Eye Reduction/ Self-Timer Lamp Grip Battery Compartment, Cover and Release Lever Dioptric Adjustment Knob Viewfinder Eyepiece Print/Share Button MENU Button LCD Monitor INFO Button/Trimming Orientation Button JUMP Button Erase Button Playback Button Picture Style Selection Button LCD Panel Illumination Button Hot Shoe Flash-sync Contacts Mode Dial Strap Mount 22 X-sync Contact Flash Button DIGITAL Terminal VIDEO OUT Terminal Lens Release Button Remote Control...


