

EOS DIGITAL Software Instruction Manual Macintosh
Page 28
Selects the printer for printing. Selects the paper size. O For detailed information, click the [?] button and refer to the help that appears. Printing Images Printing One Image per Page You can print the images in the EOS Capture 4 Setting the EOS 5D and EOS-1D Series Cameras 5 Troubleshooting and...can print one image per page. 1 Select an image. 2 Click the [Print] button and select [Print 1 Image per Page] from the Camera, and Camera Settings 3 Specify desired settings. Sets the page layout. 4 Click the [Print] button. ¿ The [Print] dialog box appears. 5 Specify ...
Selects the printer for printing. Selects the paper size. O For detailed information, click the [?] button and refer to the help that appears. Printing Images Printing One Image per Page You can print the images in the EOS Capture 4 Setting the EOS 5D and EOS-1D Series Cameras 5 Troubleshooting and...can print one image per page. 1 Select an image. 2 Click the [Print] button and select [Print 1 Image per Page] from the Camera, and Camera Settings 3 Specify desired settings. Sets the page layout. 4 Click the [Print] button. ¿ The [Print] dialog box appears. 5 Specify ...

EOS DIGITAL Software Instruction Manual Macintosh
Page 29
...[Print] dialog box appears. 5 Specify desired settings and click the [Print] button. O The settings displayed in the dialog box vary depending on the printer being used. 1 Select the images. 2 Click the [Print] button and then select [Arrange and Print] from the menu that appears. ¿ ...desired settings and click the [Next] button. 5 Click the [Finish] button. ¿ The image is displayed in the EOS Capture 4 Setting the EOS 5D and EOS-1D Series Cameras 5 Troubleshooting and Uninstalling the Software Index 2-17 Internet Function Sending an Image by E-mail You can change the size of the...
...[Print] dialog box appears. 5 Specify desired settings and click the [Print] button. O The settings displayed in the dialog box vary depending on the printer being used. 1 Select the images. 2 Click the [Print] button and then select [Arrange and Print] from the menu that appears. ¿ ...desired settings and click the [Next] button. 5 Click the [Finish] button. ¿ The image is displayed in the EOS Capture 4 Setting the EOS 5D and EOS-1D Series Cameras 5 Troubleshooting and Uninstalling the Software Index 2-17 Internet Function Sending an Image by E-mail You can change the size of the...

Instruction Manual
Page 23
... various ways to the Help displayed. 5 Click [Print] button. ¿ The processing window appears and the image is installed, it becomes the default software for Canon PIXMA/BJ Printers, is printed.
... various ways to the Help displayed. 5 Click [Print] button. ¿ The processing window appears and the image is installed, it becomes the default software for Canon PIXMA/BJ Printers, is printed.

Instruction Manual
Page 24
... the [Launch Software] button. ¿ The software selected in step 4 starts. If printing software compatible with ZoomBrowser EX is software exclusively for use with Canon PIXMA/BJ printers. O For detailed information, click the [?] button and refer to select printing software in step 4 for printing and specify desired settings. If EasyPhotoPrint is not...
... the [Launch Software] button. ¿ The software selected in step 4 starts. If printing software compatible with ZoomBrowser EX is software exclusively for use with Canon PIXMA/BJ printers. O For detailed information, click the [?] button and refer to select printing software in step 4 for printing and specify desired settings. If EasyPhotoPrint is not...
User Manual
Page 2
...compliant printer, the camera setting information is a trademark of this manual are the property of Canon Inc. Macintosh is a standard that the images are trademarks of their respective owners. * This digital camera supports Design rule for quick shooting at will. Canon and EOS are... a high-performance, digital AF SLR camera with all types of photography, from fully automatic snapshooting to obtain better print output quality. 2 All other countries. The EOS-1D Mark II N is a trademark. Besides high-precision Area AF, the camera has many features for all Canon EF lenses (except ...
...compliant printer, the camera setting information is a trademark of this manual are the property of Canon Inc. Macintosh is a standard that the images are trademarks of their respective owners. * This digital camera supports Design rule for quick shooting at will. Canon and EOS are... a high-performance, digital AF SLR camera with all types of photography, from fully automatic snapshooting to obtain better print output quality. 2 All other countries. The EOS-1D Mark II N is a trademark. Besides high-precision Area AF, the camera has many features for all Canon EF lenses (except ...

User Manual
Page 63
... Design rule for Camera File System 2.0 (Exif 2.21), post-processing of the button. Hold down the button and turn the dial to select [Color space]. The ICC profile is explained in the file name will look very subdued with sRGB personal computers and printers not compatible with Design... rule for Camera File System 2.0 (Exif 2.21). 3 Setting the Color Space The color space refers to sRGB or Adobe RGB. For general...
... Design rule for Camera File System 2.0 (Exif 2.21), post-processing of the button. Hold down the button and turn the dial to select [Color space]. The ICC profile is explained in the file name will look very subdued with sRGB personal computers and printers not compatible with Design... rule for Camera File System 2.0 (Exif 2.21). 3 Setting the Color Space The color space refers to sRGB or Adobe RGB. For general...

User Manual
Page 135
... - 145 Page 139 - 142 135 Canon CP printer Canon PIXMA/DS/BJ printer Non-Canon printer wPictBridge or ACP Direct Compatible with PictBridge Compatible with Compatible Bubble Jet Direct only with " PictBridge", Canon " CP Direct", and Canon " Bubble Jet Direct." Direct Printing from the Camera For the latest information on connecting the camera to a printer and print out the images in...
... - 145 Page 139 - 142 135 Canon CP printer Canon PIXMA/DS/BJ printer Non-Canon printer wPictBridge or ACP Direct Compatible with PictBridge Compatible with Compatible Bubble Jet Direct only with " PictBridge", Canon " CP Direct", and Canon " Bubble Jet Direct." Direct Printing from the Camera For the latest information on connecting the camera to a printer and print out the images in...

User Manual
Page 136
...only S Bubble Jet Direct only Interface cable provided with printer Only one plug has the icon. 136 Refer to the table (Printers and Cables) below to select the proper cable to connect the camera to the printer. Cable provided with camera The plug at both ends have the icon. For... details, refer to the printer's manual. 3 Connect the camera to printer. Preparing to the printer's instruction manual. The operation method is the same as...
...only S Bubble Jet Direct only Interface cable provided with printer Only one plug has the icon. 136 Refer to the table (Printers and Cables) below to select the proper cable to connect the camera to the printer. Cable provided with camera The plug at both ends have the icon. For... details, refer to the printer's manual. 3 Connect the camera to printer. Preparing to the printer's instruction manual. The operation method is the same as...

User Manual
Page 137
See the applicable pages below. Icon Direct Print Type w PictBridge A CP Direct S Bubble Jet Direct Reference pages 139 - 142 143 - 145 146 - 148 137 The procedure will be different depending on the printer. 5 Set the switch to . Preparing to Print wPictBridge ACP Direct SBubble Jet Direct 4 Turn on the icon displayed. X Some printers may have a beeping sound. 6 Playback the image. X The image and the printer icon , , or indicating a printer connection will be displayed.
See the applicable pages below. Icon Direct Print Type w PictBridge A CP Direct S Bubble Jet Direct Reference pages 139 - 142 143 - 145 146 - 148 137 The procedure will be different depending on the printer. 5 Set the switch to . Preparing to Print wPictBridge ACP Direct SBubble Jet Direct 4 Turn on the icon displayed. X Some printers may have a beeping sound. 6 Playback the image. X The image and the printer icon , , or indicating a printer connection will be displayed.

User Manual
Page 138
... in step 5, it is fully charged. Pull out the cable while holding the plug, not the cord. For details, see the EOS DIGITAL Software Instruction Manual (PDF). 138 On the print setting screen, select [Print]. Do not disconnect the cable during direct printing. To ...wrong, do not use a battery to power the camera, make sure it indicates a problem with the PictBridge printer. See "Error Messages" on the LCD monitor. When connecting the camera to the printer, do the following: Press the button to power the camera. Press the button. 2. Before disconnecting the cable...
... in step 5, it is fully charged. Pull out the cable while holding the plug, not the cord. For details, see the EOS DIGITAL Software Instruction Manual (PDF). 138 On the print setting screen, select [Print]. Do not disconnect the cable during direct printing. To ...wrong, do not use a battery to power the camera, make sure it indicates a problem with the PictBridge printer. See "Error Messages" on the LCD monitor. When connecting the camera to the printer, do the following: Press the button to power the camera. Press the button. 2. Before disconnecting the cable...

User Manual
Page 139
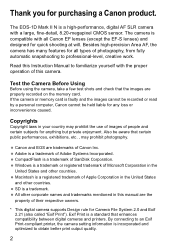
X The print setting screen will appear. 139 Sets the trimming area. Printer connected icon 1 Select the image to be printed. Sets the paper size, type, and layout. Print setting screen Set the date or file number imprinting ... type of the LCD monitor. 2 Press the button. Starts the printing. wPrinting with PictBridge The setting options will differ depending on the upper left of printer, the date and file number imprinting, trimming, and other settings might be disabled. X The Paper Settings screen will appear. Returns to your...
X The print setting screen will appear. 139 Sets the trimming area. Printer connected icon 1 Select the image to be printed. Sets the paper size, type, and layout. Print setting screen Set the date or file number imprinting ... type of the LCD monitor. 2 Press the button. Starts the printing. wPrinting with PictBridge The setting options will differ depending on the upper left of printer, the date and file number imprinting, trimming, and other settings might be disabled. X The Paper Settings screen will appear. Returns to your...

User Manual
Page 140
... of paper to be loaded in the printer. X The print settings screen will appear. X The Page Layout screen will reappear. 140 X The Paper Type screen will appear. USetting the Page Layout Select the desired layout. wPrinting with Canon paper, set the respective paper type as... follows: Photo Photo Paper Plus Glossy Fast Photo Photo Paper Pro Default Photo Paper Plus Glossy If you are using a non-Canon printer, refer to the printer's instruction manual. YSetting the Paper Type...
... of paper to be loaded in the printer. X The print settings screen will appear. X The Page Layout screen will reappear. 140 X The Paper Type screen will appear. USetting the Page Layout Select the desired layout. wPrinting with Canon paper, set the respective paper type as... follows: Photo Photo Paper Plus Glossy Fast Photo Photo Paper Pro Default Photo Paper Plus Glossy If you are using a non-Canon printer, refer to the printer's instruction manual. YSetting the Paper Type...

User Manual
Page 141
Default With a Canon printer, the print will be borderless. * From the Exif data, the camera name, lens name, shooting mode, shutter speed, aperture, exposure compensation amount, ISO speed, white balance, etc., will have no white borders. wPrinting with ... caused by backlighting) or [On] setting. Bordered c The shooting data will have the shooting information* printed on the side of the thumbnail images. If your printer cannot print borderless prints, the print will be printed. [20-upc] will have borders. If necessary, you to print 2, 4, 8, 9, 16, or 20 copies...
Default With a Canon printer, the print will be borderless. * From the Exif data, the camera name, lens name, shooting mode, shutter speed, aperture, exposure compensation amount, ISO speed, white balance, etc., will have no white borders. wPrinting with ... caused by backlighting) or [On] setting. Bordered c The shooting data will have the shooting information* printed on the side of the thumbnail images. If your printer cannot print borderless prints, the print will be printed. [20-upc] will have borders. If necessary, you to print 2, 4, 8, 9, 16, or 20 copies...
User Manual
Page 142
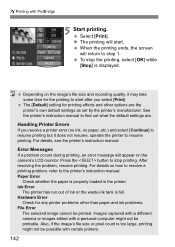
... is properly loaded in the printer. Hardware Error Check for printing effects and other than paper and ink problems. File Error The selected image cannot be possible with certain printers. 142 When the printing ends, the screen will appear on the camera's LCD monitor. Select [Print...]. For details, see the printer's instruction manual. Error Messages If a problem occurs during printing, an error...
... is properly loaded in the printer. Hardware Error Check for printing effects and other than paper and ink problems. File Error The selected image cannot be possible with certain printers. 142 When the printing ends, the screen will appear on the camera's LCD monitor. Select [Print...]. For details, see the printer's instruction manual. Error Messages If a problem occurs during printing, an error...

User Manual
Page 143
X The print setting screen will appear. 143 Sets the printing style. Sets the trimming area. Starts the printing. X The Style screen will appear. APrinting with CP Direct Printer connected icon 1 Select the image to be printed. Print setting screen Trimming frame: Appears when you want to step 1. Sets the quantity to be printed. The printing style settings are displayed. Check that the icon is the date icon. 3 Select [Style]. Returns to trim the image. is displayed on the upper left of the LCD monitor. 2 Press the button.
X The print setting screen will appear. 143 Sets the printing style. Sets the trimming area. Starts the printing. X The Style screen will appear. APrinting with CP Direct Printer connected icon 1 Select the image to be printed. Print setting screen Trimming frame: Appears when you want to step 1. Sets the quantity to be printed. The printing style settings are displayed. Check that the icon is the date icon. 3 Select [Style]. Returns to trim the image. is displayed on the upper left of the LCD monitor. 2 Press the button.

User Manual
Page 146
Print setting screen Trimming frame: Appears when you want to step 1. Returns to trim the image. Check that the icon is the date icon. 3 Select [Style]. Sets the printing style. Starts the printing. X The print setting screen will appear. 146 is displayed on the upper left of the LCD monitor. 2 Press the button. X The Style screen will appear. Sets the trimming area. The printing style settings are displayed. Sets the quantity to be printed. SPrinting with Bubble Jet Direct Printer connected icon 1 Select the image to be printed.
Print setting screen Trimming frame: Appears when you want to step 1. Returns to trim the image. Check that the icon is the date icon. 3 Select [Style]. Sets the printing style. Starts the printing. X The print setting screen will appear. 146 is displayed on the upper left of the LCD monitor. 2 Press the button. X The Style screen will appear. Sets the trimming area. The printing style settings are displayed. Sets the quantity to be printed. SPrinting with Bubble Jet Direct Printer connected icon 1 Select the image to be printed.

User Manual
Page 147
[Paper] SPrinting with Bubble Jet Direct 4 Set the options as desired. [Borders] [Date] [Paper] is the size of copies. For details on trimming, see page 149. 147 Set as necessary. Set a number from 1 to the print setting screen. 5 Set the number of the paper loaded in the printer. Check the [Borders] and [Date] settings and set them if necessary. When you are done, press the to return to 99. 6 Set the trimming. Set as necessary.
[Paper] SPrinting with Bubble Jet Direct 4 Set the options as desired. [Borders] [Date] [Paper] is the size of copies. For details on trimming, see page 149. 147 Set as necessary. Set a number from 1 to the print setting screen. 5 Set the number of the paper loaded in the printer. Check the [Borders] and [Date] settings and set them if necessary. When you are done, press the to return to 99. 6 Set the trimming. Set as necessary.

User Manual
Page 148
... screen will appear on the lower right of the image. If [Date] is set, the date might be imprinted on the border, depending on the camera's LCD monitor. Select [Stop] or [Continue]. To resolve the respective error, refer to step 1. If you select [Stop] during printing, an error message... will appear on the print. If you resolve the problem. The date will appear on the printer. If you select [Continue] and the printer does not resume printing, it will start. If [Bordered] is [On], the date recorded for the image will return to the...
... screen will appear on the lower right of the image. If [Date] is set, the date might be imprinted on the border, depending on the camera's LCD monitor. Select [Stop] or [Continue]. To resolve the respective error, refer to step 1. If you select [Stop] during printing, an error message... will appear on the print. If you resolve the problem. The date will appear on the printer. If you select [Continue] and the printer does not resume printing, it will start. If [Bordered] is [On], the date recorded for the image will return to the...

User Manual
Page 150
.... 150 If you specified. The trimming frame shape will reappear. X The Print setting screen will be printed as you look at the image on the printer, the trimmed image area might not be printed. When trimming the image, look at the...
.... 150 If you specified. The trimming frame shape will reappear. X The Print setting screen will be printed as you look at the image on the printer, the trimmed image area might not be printed. When trimming the image, look at the...

User Manual
Page 151
... do the following: By inserting a memory card into a DPOF-compatible printer, you can print the images as specified. DPOF: Digital Print Order Format With DPOF (Digital Print Order Format), you can specify which photos and the quantity to print. With a DPOF-compatible digital camera, you can do not need to fill in the memory card...
... do the following: By inserting a memory card into a DPOF-compatible printer, you can print the images as specified. DPOF: Digital Print Order Format With DPOF (Digital Print Order Format), you can specify which photos and the quantity to print. With a DPOF-compatible digital camera, you can do not need to fill in the memory card...


