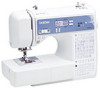

Operation Manual
Page 4
... troubleshooting table in the back of the operation manual to inspect and adjust the machine yourself. Children should contact your local authorized Brother dealer. FOR USERS IN EUROPEAN COUNTRIES This appliance can damage the case and machine, and should be used. • Always consult the operation manual when replacing or installing any assemblies, the presser feet, needle, or other hot objects. • Use only neutral soaps or detergents to clean the case...
... troubleshooting table in the back of the operation manual to inspect and adjust the machine yourself. Children should contact your local authorized Brother dealer. FOR USERS IN EUROPEAN COUNTRIES This appliance can damage the case and machine, and should be used. • Always consult the operation manual when replacing or installing any assemblies, the presser feet, needle, or other hot objects. • Use only neutral soaps or detergents to clean the case...

Operation Manual
Page 5
... Accessory compartment 5 Flip chart (For models equipped with a flip chart).... 5 NAMES OF MACHINE PARTS AND THEIR FUNCTIONS 6 The main parts 6 Needle and presser foot section 6 Operation buttons 7 Operation panel 7 Spool pin 8 USING YOUR SEWING MACHINE 9 Power supply precautions 9 Power supply 9 Foot controller 9 Sewing speed controller (for models equipped with the start/stop button 10 Changing the needle stop position 10 Changing the initial needle position 10 Cancelling the operation beep 11 THREADING THE MACHINE 11 Winding the bobbin 11 Lower threading 14 Upper threading...
... Accessory compartment 5 Flip chart (For models equipped with a flip chart).... 5 NAMES OF MACHINE PARTS AND THEIR FUNCTIONS 6 The main parts 6 Needle and presser foot section 6 Operation buttons 7 Operation panel 7 Spool pin 8 USING YOUR SEWING MACHINE 9 Power supply precautions 9 Power supply 9 Foot controller 9 Sewing speed controller (for models equipped with the start/stop button 10 Changing the needle stop position 10 Changing the initial needle position 10 Cancelling the operation beep 11 THREADING THE MACHINE 11 Winding the bobbin 11 Lower threading 14 Upper threading...

Operation Manual
Page 8
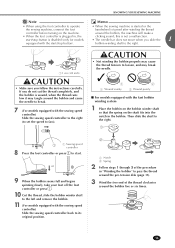
...clamp screw Needle and presser foot section 1 Bobbin winder (page 11) 2 Upper tension-control dial (page 28) 3 Bobbin-winding thread guide and pre-tension disc (page 12) 4 Thread take-up the bobbin thread. 0 Bobbin cover A Needle plate The needle plate is marked with guides for models equipped with accessory compartment (page 5 and 30) 7 Operation buttons (page 7) 8 Operation panel (page 7) 9 Spool pin (page 8, 11 and 16) < Handwheel This is used . Do not cover the air vent while the sewing machine is installed onto the presser foot holder. 4 Presser foot holder screw Use the presser foot...
...clamp screw Needle and presser foot section 1 Bobbin winder (page 11) 2 Upper tension-control dial (page 28) 3 Bobbin-winding thread guide and pre-tension disc (page 12) 4 Thread take-up the bobbin thread. 0 Bobbin cover A Needle plate The needle plate is marked with guides for models equipped with accessory compartment (page 5 and 30) 7 Operation buttons (page 7) 8 Operation panel (page 7) 9 Spool pin (page 8, 11 and 16) < Handwheel This is used . Do not cover the air vent while the sewing machine is installed onto the presser foot holder. 4 Presser foot holder screw Use the presser foot...
Operation Manual
Page 15
... foot controller to operate the sewing machine, connect the foot controller before turning on the shaft fits into the notch in "Winding the bobbin" to pass the thread around the pre-tension disk (page 11). 3 Wind the free end of the thread clockwise around the bobbin, the machine will make a clicking sound; KNOWING YOUR SEWING MACHINE Memo • When the sewing machine is started or the handwheel is not a malfunction. • The needle bar...
... foot controller to operate the sewing machine, connect the foot controller before turning on the shaft fits into the notch in "Winding the bobbin" to pass the thread around the pre-tension disk (page 11). 3 Wind the free end of the thread clockwise around the bobbin, the machine will make a clicking sound; KNOWING YOUR SEWING MACHINE Memo • When the sewing machine is started or the handwheel is not a malfunction. • The needle bar...

Operation Manual
Page 16
... the needle plate cover. Lower threading Install the bobbin wound with the start sewing (only for feeding the bobbin thread is turned after winding the thread around the bobbin, the machine will make a clicking sound; Note • When using the cutter built into the slit, the thread may become tangled in the bobbin or the needle may cause the thread tension to loosen, breaking the needle and resulting in injury. 1 Sewing speed controller 6 Turn on the foot controller and the machine starts to sew...
... the needle plate cover. Lower threading Install the bobbin wound with the start sewing (only for feeding the bobbin thread is turned after winding the thread around the bobbin, the machine will make a clicking sound; Note • When using the cutter built into the slit, the thread may become tangled in the bobbin or the needle may cause the thread tension to loosen, breaking the needle and resulting in injury. 1 Sewing speed controller 6 Turn on the foot controller and the machine starts to sew...
Operation Manual
Page 18
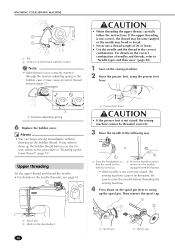
... Needle position button (for the models equipped with this button). • If the needle is not correctly inserted through the tension-adjusting spring of needles and threads, refer to "Needle types and their uses" (page 20). 1 Turn on the sewing machine. 2 Raise the presser foot, using the presser foot lever. 1 1 Tension-adjusting spring 6 Replace the bobbin cover. For details on the correct combination of the bobbin case, it may bend or break. • Never use a thread weight of 20 or lower. • Use the needle and the thread...
... Needle position button (for the models equipped with this button). • If the needle is not correctly inserted through the tension-adjusting spring of needles and threads, refer to "Needle types and their uses" (page 20). 1 Turn on the sewing machine. 2 Raise the presser foot, using the presser foot lever. 1 1 Tension-adjusting spring 6 Replace the bobbin cover. For details on the correct combination of the bobbin case, it may bend or break. • Never use a thread weight of 20 or lower. • Use the needle and the thread...
Operation Manual
Page 20
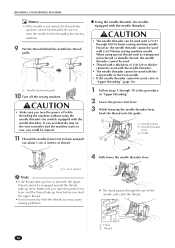
... "Upper threading". 2 Lower the presser foot lever. 3 While lowering the needle threader lever, hook the thread onto the guide. 1 Needle holder 2 Needle threader lever 3 Guide 4 Fully lower the needle threader lever. 1 5 cm (2 inches) Note • If the thread take-up lever is not raised, the thread takeup lever cannot be used , refer to back and pull out about 5 cm (2 inches) of the needle, and catch the thread. 1 Hook 2 Thread 18 If you accidentally step on the foot controller and the machine starts to sew, you may cause sewing problems...
... "Upper threading". 2 Lower the presser foot lever. 3 While lowering the needle threader lever, hook the thread onto the guide. 1 Needle holder 2 Needle threader lever 3 Guide 4 Fully lower the needle threader lever. 1 5 cm (2 inches) Note • If the thread take-up lever is not raised, the thread takeup lever cannot be used , refer to back and pull out about 5 cm (2 inches) of the needle, and catch the thread. 1 Hook 2 Thread 18 If you accidentally step on the foot controller and the machine starts to sew, you may cause sewing problems...
Operation Manual
Page 21
... the needle, start from step 3 again. 6 Raise the presser foot lever. 1 Presser foot lever 7 Pass the end of the thread as described in steps 1 to 4. 3 Replace the bobbin cover. 19 KNOWING YOUR SEWING MACHINE or 1 1 Turn the handwheel so that some thread will be removed. 2 Draw up the bobbin thread. When sewing gathers or darts, you draw up the lower thread, put the bobbin back in. 1 Pass the thread along the slit in the direction...
... the needle, start from step 3 again. 6 Raise the presser foot lever. 1 Presser foot lever 7 Pass the end of the thread as described in steps 1 to 4. 3 Replace the bobbin cover. 19 KNOWING YOUR SEWING MACHINE or 1 1 Turn the handwheel so that some thread will be removed. 2 Draw up the bobbin thread. When sewing gathers or darts, you draw up the lower thread, put the bobbin back in. 1 Pass the thread along the slit in the direction...
Operation Manual
Page 23
... machine starts sewing. 3 Lower the presser foot lever. 5 With the flat side of the needle toward the rear of the machine, insert the needle until it touches the needle stopper and securely tighten the needle clamp screw with the disc-shaped screwdriver, otherwise the needle may break or damage may be sure to prevent the needle from falling into the hole in the needle plate. 4 Remove the needle by turning the needle clamp screw counterclockwise. • Install...
... machine starts sewing. 3 Lower the presser foot lever. 5 With the flat side of the needle toward the rear of the machine, insert the needle until it touches the needle stopper and securely tighten the needle clamp screw with the disc-shaped screwdriver, otherwise the needle may break or damage may be sure to prevent the needle from falling into the hole in the needle plate. 4 Remove the needle by turning the needle clamp screw counterclockwise. • Install...

Operation Manual
Page 24
... attach zigzag foot "J", otherwise the needle may break or the machine may be damaged. 1 Install the twin needle. • For details on starting to sew, refer to "Starting to back. If the needle hits the presser foot, the needle may damage the machine. Pass the thread through the needle bar thread guide, manually thread the right needle. CAUTION • After adjusting the stitch width, slowly turn the handwheel toward you . • You cannot use the needle threader to the back. 4 Insert...
... attach zigzag foot "J", otherwise the needle may break or the machine may be damaged. 1 Install the twin needle. • For details on starting to sew, refer to "Starting to back. If the needle hits the presser foot, the needle may damage the machine. Pass the thread through the needle bar thread guide, manually thread the right needle. CAUTION • After adjusting the stitch width, slowly turn the handwheel toward you . • You cannot use the needle threader to the back. 4 Insert...

Operation Manual
Page 25
... the fabric. Position the presser foot so the letter indicating the presser foot type (J, A, etc.) is aligned with this occurs, increase the stitch length. If this machine. For details on the wheel points up. 2 Press the Needle position button (for the stitch pattern you change the presser foot. KNOWING YOUR SEWING MACHINE XX Two lines of stitching are used with this button). 1 Presser foot lever 2 Shank 3 Pin XX The presser foot is accidentally pressed and the machine starts sewing. • When using the twin needle, the stitches...
... the fabric. Position the presser foot so the letter indicating the presser foot type (J, A, etc.) is aligned with this occurs, increase the stitch length. If this machine. For details on the wheel points up. 2 Press the Needle position button (for the stitch pattern you change the presser foot. KNOWING YOUR SEWING MACHINE XX Two lines of stitching are used with this button). 1 Presser foot lever 2 Shank 3 Pin XX The presser foot is accidentally pressed and the machine starts sewing. • When using the twin needle, the stitches...

Operation Manual
Page 37
... size. 3 A XX The size of the buttonhole is set the button guide plate to mark the position and length of the buttonhole on the fabric. 2 1 UTILITY STITCHES 4 Select a stitch. 5 Position the fabric with the front end of the buttonhole mark aligned with the red marks on the sides of the buttonhole foot, and then lower the presser foot lever. 1 1 Marks on fabric 2 Buttonhole sewing 2 Pull out the button guide plate of the upper thread in your left hand, and then start sewing...
... size. 3 A XX The size of the buttonhole is set the button guide plate to mark the position and length of the buttonhole on the fabric. 2 1 UTILITY STITCHES 4 Select a stitch. 5 Position the fabric with the front end of the buttonhole mark aligned with the red marks on the sides of the buttonhole foot, and then lower the presser foot lever. 1 1 Marks on fabric 2 Buttonhole sewing 2 Pull out the button guide plate of the upper thread in your left hand, and then start sewing...

Operation Manual
Page 38
... . 4 Adjust the stitch width to the thickness of the gimp thread. 5 Lower the presser foot lever and the buttonhole lever, and then start sewing. 6 When sewing is finished, gently pull the gimp thread to the wrong side of the fabric, and then tie it is completed, the machine automatically sews reinforcement stitches, then stops. 8 Raise the needle and the presser foot lever, remove the fabric, and cut the thread. 9 Raise the buttonhole lever to its original position. 10 Insert a pin...
... . 4 Adjust the stitch width to the thickness of the gimp thread. 5 Lower the presser foot lever and the buttonhole lever, and then start sewing. 6 When sewing is finished, gently pull the gimp thread to the wrong side of the fabric, and then tie it is completed, the machine automatically sews reinforcement stitches, then stops. 8 Raise the needle and the presser foot lever, remove the fabric, and cut the thread. 9 Raise the buttonhole lever to its original position. 10 Insert a pin...

Operation Manual
Page 39
... fabric. I 01 37 Use scissors to sew different types of zippers, and can easily position it is positioned at the beginning of the needle. ZIPPER INSERTION You can use the zipper foot to cut the upper thread and the bobbin thread at . 5 Select a stitch . (With models not provided with the bobbin thread. Stitch Name Straight stitch (center) Pattern Presser Foot Pattern No. 2 Raise the presser foot lever, and then slide the feed dog position lever to check that the needle goes into the two holes of the button...
... fabric. I 01 37 Use scissors to sew different types of zippers, and can easily position it is positioned at the beginning of the needle. ZIPPER INSERTION You can use the zipper foot to cut the upper thread and the bobbin thread at . 5 Select a stitch . (With models not provided with the bobbin thread. Stitch Name Straight stitch (center) Pattern Presser Foot Pattern No. 2 Raise the presser foot lever, and then slide the feed dog position lever to check that the needle goes into the two holes of the button...

Operation Manual
Page 43
... quilting guide into the hole at a speed between the top and bottom layers of fabric is to the presser bar. Quilts can only be quilted. 2 Remove the presser foot and the presser foot holder. (Refer to page 24.) 3 Hook the connecting fork of the walking foot onto the needle clamp screw, lower the presser foot lever, and then use the presser foot holder screw to attach the walking foot to be used with the seam that has already been sewn. 41 Do not sew reverse stitches with the walking foot...
... quilting guide into the hole at a speed between the top and bottom layers of fabric is to the presser bar. Quilts can only be quilted. 2 Remove the presser foot and the presser foot holder. (Refer to page 24.) 3 Hook the connecting fork of the walking foot onto the needle clamp screw, lower the presser foot lever, and then use the presser foot holder screw to attach the walking foot to be used with the seam that has already been sewn. 41 Do not sew reverse stitches with the walking foot...

Operation Manual
Page 63
... a new bobbin case (part code: XE7560-001), contact your nearest authorized service center. • Make sure that you need additional help, the Brother Solutions Center offers the latest FAQs and troubleshooting tips. Visit us . Topic Upper thread tightened up Tangled thread on wrong side of fabric Incorrect thread tension Fabric is caught in the machine and cannot be removed Error message "E6" appears in the needle plate, and then correctly position of the needle plate cover. 1 Needle plate cover 2 Tab 3 Hole...
... a new bobbin case (part code: XE7560-001), contact your nearest authorized service center. • Make sure that you need additional help, the Brother Solutions Center offers the latest FAQs and troubleshooting tips. Visit us . Topic Upper thread tightened up Tangled thread on wrong side of fabric Incorrect thread tension Fabric is caught in the machine and cannot be removed Error message "E6" appears in the needle plate, and then correctly position of the needle plate cover. 1 Needle plate cover 2 Tab 3 Hole...

Operation Manual
Page 65
... fabric, and then remove the needle. • Refer to "Replacing the needle" (page 21). Cause 2 A needle and thread appropriate for the fabric are not being used in the sewing machine and cannot be adjusted correctly, even by turning the upper tension-control dial. Turn the upper tension-control dial to select an appropriate thread tension. * Adjust the thread tension while test sewing on the upper tensioncontrol dial is not selected. If the operation could not be removed, remove it. 6 Remove the needle plate cover...
... fabric, and then remove the needle. • Refer to "Replacing the needle" (page 21). Cause 2 A needle and thread appropriate for the fabric are not being used in the sewing machine and cannot be adjusted correctly, even by turning the upper tension-control dial. Turn the upper tension-control dial to select an appropriate thread tension. * Adjust the thread tension while test sewing on the upper tensioncontrol dial is not selected. If the operation could not be removed, remove it. 6 Remove the needle plate cover...

Operation Manual
Page 67
... needle bar and feed dogs operate correctly. Error message "E6" appears in the LCD If the error message "E6" appears in the needle plate 2 Handwheel 4 Select zigzag stitch . Note • After completing this time, increase the stitch length and width to their maximum settings. • Refer to "Lower threading" (page 14) and "Replacing the presser foot" (page 23). therefore, contact your nearest authorized service center. 6 Turn off the machine, and then install the bobbin...
... needle bar and feed dogs operate correctly. Error message "E6" appears in the LCD If the error message "E6" appears in the needle plate 2 Handwheel 4 Select zigzag stitch . Note • After completing this time, increase the stitch length and width to their maximum settings. • Refer to "Lower threading" (page 14) and "Replacing the presser foot" (page 23). therefore, contact your nearest authorized service center. 6 Turn off the machine, and then install the bobbin...

Operation Manual
Page 72
... used bobbin that are using is not appropriate for the type of stitch that has been designed for this machine. Incorrect bobbins will not work properly. Slide the feed dog position lever to sew. Lengthen the stitch length. page 21 Zigzag foot "J" is incorrectly installed. page 29 The fabric feeds in The fabric does not the race. Correctly install the bobbin thread. page 11 The bobbin thread is slanted on a thick seam at the beginning of fabric. Choose a thread and needle...
... used bobbin that are using is not appropriate for the type of stitch that has been designed for this machine. Incorrect bobbins will not work properly. Slide the feed dog position lever to sew. Lengthen the stitch length. page 21 Zigzag foot "J" is incorrectly installed. page 29 The fabric feeds in The fabric does not the race. Correctly install the bobbin thread. page 11 The bobbin thread is slanted on a thick seam at the beginning of fabric. Choose a thread and needle...

Operation Manual
Page 74
...39 error messages 71 extra spool pin 21 eyelet punch 36 F fagoting 44 fast bobbin winding 13 feed dog position lever 37, 42 feed dogs 6, 42, 64 flat bed attachment 5 flip chart 5 foot controller 9 free-motion quilting 42 H handwheel 6, 16 heirloom stitching 46 hook-and-loop fastener tape 29 J joining 46 L lower threading 14 M main parts 6 main power switch 9 mirror image stitch indicator 7, 25 N needle 20 needle bar thread guide 6, 18 needle clamp screw 6, 21 needle plate 6 needle plate cover 6, 60 needle position 10 needle position button 7, 26 needle threader 6, 18...
...39 error messages 71 extra spool pin 21 eyelet punch 36 F fagoting 44 fast bobbin winding 13 feed dog position lever 37, 42 feed dogs 6, 42, 64 flat bed attachment 5 flip chart 5 foot controller 9 free-motion quilting 42 H handwheel 6, 16 heirloom stitching 46 hook-and-loop fastener tape 29 J joining 46 L lower threading 14 M main parts 6 main power switch 9 mirror image stitch indicator 7, 25 N needle 20 needle bar thread guide 6, 18 needle clamp screw 6, 21 needle plate 6 needle plate cover 6, 60 needle position 10 needle position button 7, 26 needle threader 6, 18...


