
Users Manual - English
Page 2
... When using it and before cleaning it. 2. Replace the bulb with this machine. Do not use as threading the needle, changing the needle, threading the bobbin, or changing the presser foot. 15. Do not operate where aerosol (spray) products are being used by young children or infirm persons without supervision. 17...
... When using it and before cleaning it. 2. Replace the bulb with this machine. Do not use as threading the needle, changing the needle, threading the bobbin, or changing the presser foot. 15. Do not operate where aerosol (spray) products are being used by young children or infirm persons without supervision. 17...

Users Manual - English
Page 4
... Sewing Lever ...14 Drop Feed Lever (if the machine is equipped with a drop feed lever 14 THREADING THE MACHINE 15 Winding the Bobbin ...15 Lower Threading ...16 Upper Threading ...18 Using the Needle Threader (models equipped with a needle threader 19 Quick Thread-Setting System FAST START... BOBBIN (models equipped with a quick thread-setting system) .... 20 Drawing up the lower thread ...21 Sewing with a Twin Needle ...21 Tension of the ...
... Sewing Lever ...14 Drop Feed Lever (if the machine is equipped with a drop feed lever 14 THREADING THE MACHINE 15 Winding the Bobbin ...15 Lower Threading ...16 Upper Threading ...18 Using the Needle Threader (models equipped with a needle threader 19 Quick Thread-Setting System FAST START... BOBBIN (models equipped with a quick thread-setting system) .... 20 Drawing up the lower thread ...21 Sewing with a Twin Needle ...21 Tension of the ...

Users Manual - English
Page 5
... assembly (page 15) This winds the thread onto the bobbin, which you use this to start and stop sewing. I Foot controller (page 7) You can turn this in either direction to choose the stitch you (counterclockwise) ... direction. F Main power/sewing light switch (page 7) You can use for the lower thread. 2 Spool pin (page 15 and 18) Holds the spool of thread. 3 Bobbin-winding tension disc and thread guide (page 15) 4 Thread take-up lever (page 18) 5 Thread cutter (page 26) 6 Upper tension-control dial (page 22) This...
... assembly (page 15) This winds the thread onto the bobbin, which you use this to start and stop sewing. I Foot controller (page 7) You can turn this in either direction to choose the stitch you (counterclockwise) ... direction. F Main power/sewing light switch (page 7) You can use for the lower thread. 2 Spool pin (page 15 and 18) Holds the spool of thread. 3 Bobbin-winding tension disc and thread guide (page 15) 4 Thread take-up lever (page 18) 5 Thread cutter (page 26) 6 Upper tension-control dial (page 22) This...
Users Manual - English
Page 6
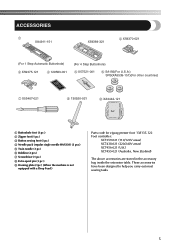
...-021 8 130920-021 9 XA3442-121 1 Buttonhole foot (1 pc.) 2 Zipper foot (1 pc.) 3 Button sewing foot (1 pc.) 4 Needle pack (regular single needle HAX130) (3 pcs.) 5 Twin needle (1 pc.) 6 Bobbins (3 pcs.) 7 Screwdriver (1 pc.) 8 Extra spool pin (1 pc.) 9 Darning plate (1pc.) (When the machine is not equipped with a Drop Feed.) Parts code for zigzag presser foot...
...-021 8 130920-021 9 XA3442-121 1 Buttonhole foot (1 pc.) 2 Zipper foot (1 pc.) 3 Button sewing foot (1 pc.) 4 Needle pack (regular single needle HAX130) (3 pcs.) 5 Twin needle (1 pc.) 6 Bobbins (3 pcs.) 7 Screwdriver (1 pc.) 8 Extra spool pin (1 pc.) 9 Darning plate (1pc.) (When the machine is not equipped with a Drop Feed.) Parts code for zigzag presser foot...
Users Manual - English
Page 16
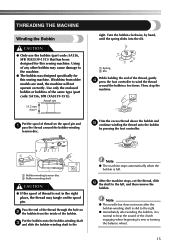
...until the spring slides into the slit. 1 Spring 2 Slit 2 1 While holding the end of the bobbin. Use only the enclosed bobbin or bobbins of the thread through the hole on 2 the bobbin from older models are used, the machine will not operate correctly. Actual size 11.5 mm (7/16") Put...thread, slide 6 the shaft to wind the thread around the bobbin-winding tension disc. Turn the bobbin clockwise, by pressing the foot controller. 1 2 1 Bobbin-winding tension disc 2 Bobbin-winding shaft CAUTION ● If the spool of any other bobbin may tangle on the spool pin and 1 pass the thread ...
...until the spring slides into the slit. 1 Spring 2 Slit 2 1 While holding the end of the bobbin. Use only the enclosed bobbin or bobbins of the thread through the hole on 2 the bobbin from older models are used, the machine will not operate correctly. Actual size 11.5 mm (7/16") Put...thread, slide 6 the shaft to wind the thread around the bobbin-winding tension disc. Turn the bobbin clockwise, by pressing the foot controller. 1 2 1 Bobbin-winding tension disc 2 Bobbin-winding shaft CAUTION ● If the spool of any other bobbin may tangle on the spool pin and 1 pass the thread ...

Users Manual - English
Page 17
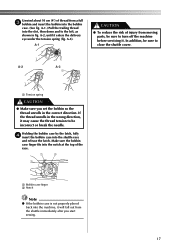
...you (counterclockwise) and raise the presser foot lever. Raise the needle to its highest position by pulling the latch toward you . 1 2 1 Bobbin case latch 2 Bobbin case finger 16 Actual size 11.5 mm (7/16") CAUTION ● Make sure you could be injured. If you accidentally step on the front of... the machine and pull the bobbin case out of the same type (part code: SA156, SFB (XA5539-151)). If bobbins from older models are used, the machine will not operate correctly. KNOWING YOUR SEWING MACHINE CAUTION &#...
...you (counterclockwise) and raise the presser foot lever. Raise the needle to its highest position by pulling the latch toward you . 1 2 1 Bobbin case latch 2 Bobbin case finger 16 Actual size 11.5 mm (7/16") CAUTION ● Make sure you could be injured. If you accidentally step on the front of... the machine and pull the bobbin case out of the same type (part code: SA156, SFB (XA5539-151)). If bobbins from older models are used, the machine will not operate correctly. KNOWING YOUR SEWING MACHINE CAUTION &#...
Users Manual - English
Page 18
Unwind about 10 cm (4") of injury from moving parts, be sure to turn off the machine before servicing it. A-1.) Pull the trailing thread into the bobbin case. (See fig. In addition, be incorrect or break the needle. A-2 A-3 1 1 Tension spring CAUTION ● Make sure you start sewing. 17 If the thread...the delivery eye under the tension spring (fig. A-1 CAUTION ● To reduce the risk of thread from the shuttle immediately after you set the bobbin so the thread unrolls in fig. A-2, until it may cause the thread tension to be sure to the left, as shown in the correct ...
Unwind about 10 cm (4") of injury from moving parts, be sure to turn off the machine before servicing it. A-1.) Pull the trailing thread into the bobbin case. (See fig. In addition, be incorrect or break the needle. A-2 A-3 1 1 Tension spring CAUTION ● Make sure you start sewing. 17 If the thread...the delivery eye under the tension spring (fig. A-1 CAUTION ● To reduce the risk of thread from the shuttle immediately after you set the bobbin so the thread unrolls in fig. A-2, until it may cause the thread tension to be sure to the left, as shown in the correct ...
Users Manual - English
Page 21
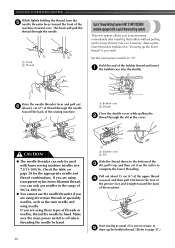
...2 thread through the needle. 1 2 1 1 Hook 2 Thread Quick Thread-Setting System FAST START BOBBIN (models equipped with home sewing machine needles size 75/11-100/16. CAUTION ● The needle...system allows you wish. Check the table on the cutter to start sewing immediately after inserting the bobbin without pulling up , and then cut it between the toes of the presser foot and straight ...the bottom of the 3 slit, pull it up the lower thread. Hold the end of the bobbin thread and insert 1 the bobbin case into the shuttle. 1 Raise the needle threader lever and pull out 6 about 15 cm...
...2 thread through the needle. 1 2 1 1 Hook 2 Thread Quick Thread-Setting System FAST START BOBBIN (models equipped with home sewing machine needles size 75/11-100/16. CAUTION ● The needle...system allows you wish. Check the table on the cutter to start sewing immediately after inserting the bobbin without pulling up , and then cut it between the toes of the presser foot and straight ...the bottom of the 3 slit, pull it up the lower thread. Hold the end of the bobbin thread and insert 1 the bobbin case into the shuttle. 1 Raise the needle threader lever and pull out 6 about 15 cm...

Users Manual - English
Page 23
... Upper tension control dial Increase the tension by turning the screw with the upper tension control dial. Lower tension is needed. Bobbin Increase the tension in the bobbin by turning the dial to a higher number. 1 Right needle thread passes through the eye of the left needle in the... tension by hand, from the spool on your project. ● The basic thread tension setting is still not satisfactory, then adjust the bobbin thread tension as explained below . Locks appear on thin fabrics, the thread tension cannot be adjusted according to check the thread tension before ...
... Upper tension control dial Increase the tension by turning the screw with the upper tension control dial. Lower tension is needed. Bobbin Increase the tension in the bobbin by turning the dial to a higher number. 1 Right needle thread passes through the eye of the left needle in the... tension by hand, from the spool on your project. ● The basic thread tension setting is still not satisfactory, then adjust the bobbin thread tension as explained below . Locks appear on thin fabrics, the thread tension cannot be adjusted according to check the thread tension before ...
Users Manual - English
Page 25
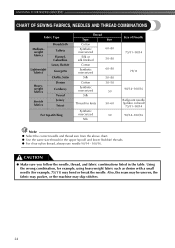
... listed in the table. Using the wrong combination, for example, using heavyweight fabric such as denim with a small needle (for the upper (spool) and lower (bobbin) threads. ● For clear nylon thread, always use needle 90/14 - 100/16. KNOWING YOUR SEWING MACHINE CHART OF SEWING FABRICS, NEEDLES AND THREAD COMBINATIONS...
... listed in the table. Using the wrong combination, for example, using heavyweight fabric such as denim with a small needle (for the upper (spool) and lower (bobbin) threads. ● For clear nylon thread, always use needle 90/14 - 100/16. KNOWING YOUR SEWING MACHINE CHART OF SEWING FABRICS, NEEDLES AND THREAD COMBINATIONS...

Users Manual - English
Page 40
... Remove the hook by removing the 1 screws with a coin. Note ● When the needle is lowered, the shuttle hook cannot be removed. 39 Take the bobbin case out of the feed dogs and 2 shuttle race body with machine oil. Slide the latch levers away from the retaining 4 ring to remove it...
... Remove the hook by removing the 1 screws with a coin. Note ● When the needle is lowered, the shuttle hook cannot be removed. 39 Take the bobbin case out of the feed dogs and 2 shuttle race body with machine oil. Slide the latch levers away from the retaining 4 ring to remove it...
Users Manual - English
Page 41
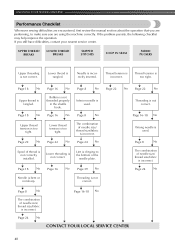
... SKIPPED STITCHES LOOP IN SEAM FABRIC PUCKERS Upper threading is not correctly installed. Lint is not threaded properly in the shuttle hook. Page 18 No Bobbin is clinging to make sure you are performing, to the bottom of thread is not correct. If you still have difficulties, contact your nearest service...
... SKIPPED STITCHES LOOP IN SEAM FABRIC PUCKERS Upper threading is not correctly installed. Lint is not threaded properly in the shuttle hook. Page 18 No Bobbin is clinging to make sure you are performing, to the bottom of thread is not correct. If you still have difficulties, contact your nearest service...

Users Manual - English
Page 42
Insufficient oiling. Page 18 No Page 24 No Fabric is slid toward the bobbin presser. No Page 7 No The bobbin winding shaft is pulled excessively. Page 14 No CONTACT YOUR LOCAL SERVICE CENTER 41 Main power switch is incorrect. The combination of needle size/ thread ...
Insufficient oiling. Page 18 No Page 24 No Fabric is slid toward the bobbin presser. No Page 7 No The bobbin winding shaft is pulled excessively. Page 14 No CONTACT YOUR LOCAL SERVICE CENTER 41 Main power switch is incorrect. The combination of needle size/ thread ...
Users Manual - English
Page 44
... Buttonhole 5, 12, 31 A Accessories 5 Adjusting Buttonholes 33 Appliqués 36 Arrowhead Stitch 11, 12, 13, 29 B Blind Hem Stitch 11, 12, 13, 27 Bobbin Threading 15, 20 Bobbin Winder 15 Bridging Stitch 11 Buttonhole 30, 31 Buttonhole Fine Adjustment 33 Buttonhole Sewing 30, 31 C Changing Sewing Direction 25 Changing the Light Bulb...
... Buttonhole 5, 12, 31 A Accessories 5 Adjusting Buttonholes 33 Appliqués 36 Arrowhead Stitch 11, 12, 13, 29 B Blind Hem Stitch 11, 12, 13, 27 Bobbin Threading 15, 20 Bobbin Winder 15 Bridging Stitch 11 Buttonhole 30, 31 Buttonhole Fine Adjustment 33 Buttonhole Sewing 30, 31 C Changing Sewing Direction 25 Changing the Light Bulb...
Users Manual - English
Page 45
... Blind Hem Stitch 11, 12, 27 Stretch Overlock Stitch 11, 12, 13, 29 Stretch Stitching 13 T Tension of the Thread 22 Thread Tension 22 Threading Bobbin 15 Threading Needle 19 Topstitching 26 Tree Stitch 11 Triple Stretch Stitch 11, 12, 13, 25 Triple Zigzag Stretch Stitch 11, 12, 13, 30 Twin... Needle Sewing 21 U Upper Tention Control Dial 22 Upper Threading 18 Using the Needle Threader 19 W Winding the Bobbin 15 Z Zigzag Presser Foot 4, 5 Zigzag Stitch 11, 12, 26, 33, 36 Zipper Foot 5, 34 Zipper Insertion 34 44
... Blind Hem Stitch 11, 12, 27 Stretch Overlock Stitch 11, 12, 13, 29 Stretch Stitching 13 T Tension of the Thread 22 Thread Tension 22 Threading Bobbin 15 Threading Needle 19 Topstitching 26 Tree Stitch 11 Triple Stretch Stitch 11, 12, 13, 25 Triple Zigzag Stretch Stitch 11, 12, 13, 30 Twin... Needle Sewing 21 U Upper Tention Control Dial 22 Upper Threading 18 Using the Needle Threader 19 W Winding the Bobbin 15 Z Zigzag Presser Foot 4, 5 Zigzag Stitch 11, 12, 26, 33, 36 Zipper Foot 5, 34 Zipper Insertion 34 44

Accessory Catalog
Page 6
....) Narrow Hemmer Foot Designed to the end of the fabric behind the needle and lower the presser foot. 7. Non Stick Foot Designed for details.) www.brother.com Hold the fabric from the back and front and roll it into the curled part of the foot. 6. Continue to sew to create a flat... from the back and front and roll it into the curled part of the foot. 5. Position the edge of the fabric. Overlock Foot For vertical bobbin machines only. Sew along the guide. Hold the fabric from fraying. 1. Select an overlock stitch. 2. Place the fabric with fabrics such as leather, vinyl ...
....) Narrow Hemmer Foot Designed to the end of the fabric behind the needle and lower the presser foot. 7. Non Stick Foot Designed for details.) www.brother.com Hold the fabric from the back and front and roll it into the curled part of the foot. 6. Continue to sew to create a flat... from the back and front and roll it into the curled part of the foot. 5. Position the edge of the fabric. Overlock Foot For vertical bobbin machines only. Sew along the guide. Hold the fabric from fraying. 1. Select an overlock stitch. 2. Place the fabric with fabrics such as leather, vinyl ...

Accessory Catalog
Page 9
...minute measurements, a storage area for your next project. The Free-Motion Grip gives you sew. Brother General Sewing Accessories 15 Bobbins Bobbins and Bobbin Clips Knee Lifter Bobbins There are waiting for your machine to finish embroidering with /without a free-motion guide grip. .... With a free-motion guide grip: SA-TFM4000D A:DuettaTM4500D,Innov-is400D,2500D,1500D,QC-1000 SATFM6000D A:QuattroTM6000D www.brother.com The Bobbin Clip also allows each other large projects. Available with the present thread. Conveniently placed ruler for your creation. Having...
...minute measurements, a storage area for your next project. The Free-Motion Grip gives you sew. Brother General Sewing Accessories 15 Bobbins Bobbins and Bobbin Clips Knee Lifter Bobbins There are waiting for your machine to finish embroidering with /without a free-motion guide grip. .... With a free-motion guide grip: SA-TFM4000D A:DuettaTM4500D,Innov-is400D,2500D,1500D,QC-1000 SATFM6000D A:QuattroTM6000D www.brother.com The Bobbin Clip also allows each other large projects. Available with the present thread. Conveniently placed ruler for your creation. Having...

Accessory Catalog
Page 13
... IP This presser foot does not include the bobbin cover. Draw a reference line to slide the fabric from left into gathers or tucks. Use a stiff card to guide your first row of the grooves. 4. Sew slowly for details.) Brother Embellishment Feet Pin Tuck Foot 24 Ruffler Foot Pin... and manually thread a twin needle. 2. The ruffling blade on lightweight fabric. The intervals of stitch length, tuck setting and depth setting. 2. www.brother.com Move fabric about 1" (2.5 cm) past the needle to sew the first row in one of stitching and use that to get started. Further ...
... IP This presser foot does not include the bobbin cover. Draw a reference line to slide the fabric from left into gathers or tucks. Use a stiff card to guide your first row of the grooves. 4. Sew slowly for details.) Brother Embellishment Feet Pin Tuck Foot 24 Ruffler Foot Pin... and manually thread a twin needle. 2. The ruffling blade on lightweight fabric. The intervals of stitch length, tuck setting and depth setting. 2. www.brother.com Move fabric about 1" (2.5 cm) past the needle to sew the first row in one of stitching and use that to get started. Further ...

Accessory Catalog
Page 15
...fabric consistently. Fabrics that both hands to hold fabric in place while stitches are free to guide the fabric. 4. Gently holding the upper and bobbin threads sew about four locking stitches and finish the thread ends. Requires Low Shank Adapter for free-motion, outline quilting, etc. 1. Lower ...the front of fabric and the walking foot with the needle to allow fabric to be difficult to sew such as zigzag stitch. 5. Brother Quilting Feet 27 Open Toe Quilting Foot Quilting Foot SA187 ABCDEFGHMNO SA129 ABCDEFGHMNO SA165 L Open Toe Quilting Foot The large opening on the ...
...fabric consistently. Fabrics that both hands to hold fabric in place while stitches are free to guide the fabric. 4. Gently holding the upper and bobbin threads sew about four locking stitches and finish the thread ends. Requires Low Shank Adapter for free-motion, outline quilting, etc. 1. Lower ...the front of fabric and the walking foot with the needle to allow fabric to be difficult to sew such as zigzag stitch. 5. Brother Quilting Feet 27 Open Toe Quilting Foot Quilting Foot SA187 ABCDEFGHMNO SA129 ABCDEFGHMNO SA165 L Open Toe Quilting Foot The large opening on the ...
Accessory Catalog
Page 18
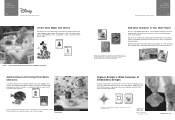
... characters and friends onto clothes, gifts and items using any Brother home embroidery machine with these characters add a touch of Viacom International Inc. To view the entire collection, visit www.brother com. The application opportunities are endless, from Disney/Pixar Movies... slot. ©2007 Viacom International Inc. Explore Brother's Wide Selection of Embroidery Designs At Brother, the possibilities are compatible only with Brother-branded home embroidery machines with Disney Only Brother can offer a wide range of thread and 2 prewound bobbins. Delight the kids in your...
... characters and friends onto clothes, gifts and items using any Brother home embroidery machine with these characters add a touch of Viacom International Inc. To view the entire collection, visit www.brother com. The application opportunities are endless, from Disney/Pixar Movies... slot. ©2007 Viacom International Inc. Explore Brother's Wide Selection of Embroidery Designs At Brother, the possibilities are compatible only with Brother-branded home embroidery machines with Disney Only Brother can offer a wide range of thread and 2 prewound bobbins. Delight the kids in your...


