

Users Manual - English
Page 2
... water. DANGER - Always unplug before cleaning. 2. Special care is not working properly, if it is required around the sewing machine needle. 11. "IMPORTANT SAFETY INSTRUCTIONS" When using the sewing machine, basic safety precautions should always be left unattended when plugged in. Never... after using and before changing the light bulb. Keep fingers away from the accumulation of electric shock: 1. Always use a bent needle. 13. Keep the ventilation openings of the sewing machine and foot controller free from all instructions before using." "SAVE THESE INSTRUCTIONS"...
... water. DANGER - Always unplug before cleaning. 2. Special care is not working properly, if it is required around the sewing machine needle. 11. "IMPORTANT SAFETY INSTRUCTIONS" When using the sewing machine, basic safety precautions should always be left unattended when plugged in. Never... after using and before changing the light bulb. Keep fingers away from the accumulation of electric shock: 1. Always use a bent needle. 13. Keep the ventilation openings of the sewing machine and foot controller free from all instructions before using." "SAVE THESE INSTRUCTIONS"...

Users Manual - English
Page 6
...PARTS 1 ACCESSORIES 3 OPERATING YOUR SEWING MACHINE 5 Connecting Plugs 5 Main Power and Sewing Light Switches 6 Foot Controller 6 Inserting the Needle 7 Checking the Needle 7 Changing the Presser Foot 8 Converting to Free-Arm Style 9 Steadying the Machine 9 VARIOUS CONTROLS 10 Pattern Selection Dial 10 ... Sewing Lever 17 THREADING THE MACHINE 18 Winding the Bobbin 18 Lower Threading 19 Upper (Needle) Threading 20 Using the Needle Threader (when the machine is equipped with a needle threader) .. 22 Quick Thread-setting System FAST START BOBBIN (when the machine is equipped...
...PARTS 1 ACCESSORIES 3 OPERATING YOUR SEWING MACHINE 5 Connecting Plugs 5 Main Power and Sewing Light Switches 6 Foot Controller 6 Inserting the Needle 7 Checking the Needle 7 Changing the Presser Foot 8 Converting to Free-Arm Style 9 Steadying the Machine 9 VARIOUS CONTROLS 10 Pattern Selection Dial 10 ... Sewing Lever 17 THREADING THE MACHINE 18 Winding the Bobbin 18 Lower Threading 19 Upper (Needle) Threading 20 Using the Needle Threader (when the machine is equipped with a needle threader) .. 22 Quick Thread-setting System FAST START BOBBIN (when the machine is equipped...

Users Manual - English
Page 9
... (1 Step automatic buttonhole) C Handle D Balance wheel Turn toward you (counterclockwise) to control sewing speed start and stop. H Foot controller Used to raise and lower the needle.
... (1 Step automatic buttonhole) C Handle D Balance wheel Turn toward you (counterclockwise) to control sewing speed start and stop. H Foot controller Used to raise and lower the needle.

Users Manual - English
Page 13
... COSER FONCTIONNEMENT DE LA MACHINE A COUDRE Conexión de los enchufes Raccordement 1. ATENCIÓN: 1. Brancher la fiche d'alimentation à une prise secteur. When changing the needle, bobbin or light bulb or when the sew- PRÉCAUTION: 1. Lors du remplacement de l'ampoule, de la canette, de l'aiguille ou lorsque la machine...
... COSER FONCTIONNEMENT DE LA MACHINE A COUDRE Conexión de los enchufes Raccordement 1. ATENCIÓN: 1. Brancher la fiche d'alimentation à une prise secteur. When changing the needle, bobbin or light bulb or when the sew- PRÉCAUTION: 1. Lors du remplacement de l'ampoule, de la canette, de l'aiguille ou lorsque la machine...
Users Manual - English
Page 19
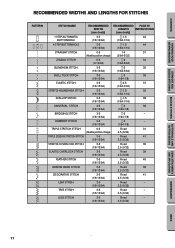
... 3-5 -1.5 42 (1/8-13/64) (1/64-1/16) 4 STEP BUTTONHOLE 3-5 -1.5 44 (1/8-13/64) (1/64-1/16) STRAIGHT STITCH 0-5 1-4 31 (Needle position change) (3/64-5/32) ZIGZAG STITCH 0-5 -2 34 (0-13/64) (1/64-5/64) BLINDHEM STITCH 3-5 -2 35 (1/8-13/64) (1/64-5/64...64-1/8) BRIDGING STITCH 3-5 -3 - (1/8-13/64) (1/64-1/8) RAMPART STITCH 3-5 -3 - (1/8-13/64) (1/64-1/8) TRIPLE STRETCH STITCH 0-5 Fixed 31 (Needle position change) 2.5 (3/32) TRIPLE ZIGZAG STRETCH STITCH 3-5 Fixed 41 (1/8-13/64) 2.5 (3/32) STRETCH OVERLOCK STITCH 3-5 Fixed 39 (1/8-13/64) ...
... 3-5 -1.5 42 (1/8-13/64) (1/64-1/16) 4 STEP BUTTONHOLE 3-5 -1.5 44 (1/8-13/64) (1/64-1/16) STRAIGHT STITCH 0-5 1-4 31 (Needle position change) (3/64-5/32) ZIGZAG STITCH 0-5 -2 34 (0-13/64) (1/64-5/64) BLINDHEM STITCH 3-5 -2 35 (1/8-13/64) (1/64-5/64...64-1/8) BRIDGING STITCH 3-5 -3 - (1/8-13/64) (1/64-1/8) RAMPART STITCH 3-5 -3 - (1/8-13/64) (1/64-1/8) TRIPLE STRETCH STITCH 0-5 Fixed 31 (Needle position change) 2.5 (3/32) TRIPLE ZIGZAG STRETCH STITCH 3-5 Fixed 41 (1/8-13/64) 2.5 (3/32) STRETCH OVERLOCK STITCH 3-5 Fixed 39 (1/8-13/64) ...

Users Manual - English
Page 28
...the thread guide. 5 Thread guide 7. D). Pass the thread through the slit by pulling it toward you and into the eyelet. 6. E. Thread the needle from front to back and pull out about 5 cm (2") of thread on it to raise the thread take-up the spool pin and place a ... YOUR SEWING MACHINE STRAIGHT AND ZIGZAG STITCHING BUILT-IN STITCHES 1 2 4 3 BUTTONHOLE AND BUTTON SEWING USING ATTACHMENTS AND APPLICATIONS A 4 23 1 C B D 4 4 E 5 Upper (Needle) Threading Turn power switch to its highest position. 2. While holding the thread as shown in fig. Pull up lever to "O". 1.
...the thread guide. 5 Thread guide 7. D). Pass the thread through the slit by pulling it toward you and into the eyelet. 6. E. Thread the needle from front to back and pull out about 5 cm (2") of thread on it to raise the thread take-up the spool pin and place a ... YOUR SEWING MACHINE STRAIGHT AND ZIGZAG STITCHING BUILT-IN STITCHES 1 2 4 3 BUTTONHOLE AND BUTTON SEWING USING ATTACHMENTS AND APPLICATIONS A 4 23 1 C B D 4 4 E 5 Upper (Needle) Threading Turn power switch to its highest position. 2. While holding the thread as shown in fig. Pull up lever to "O". 1.

Users Manual - English
Page 30
CONTENTS KNOWING YOUR SEWING MACHINE STRAIGHT AND ZIGZAG STITCHING BUILT-IN STITCHES 1 2 3 1 2 4 5 7 6 6 Using the Needle Threader (when the machine is equipped with the bottom of the needle in front of the holder for the needle-threading hook before lowering the needle threader lever. Turn the balance wheel toward you (counterclockwise) until the bottom of the...
CONTENTS KNOWING YOUR SEWING MACHINE STRAIGHT AND ZIGZAG STITCHING BUILT-IN STITCHES 1 2 3 1 2 4 5 7 6 6 Using the Needle Threader (when the machine is equipped with the bottom of the needle in front of the holder for the needle-threading hook before lowering the needle threader lever. Turn the balance wheel toward you (counterclockwise) until the bottom of the...

Users Manual - English
Page 33
... fils et les placer vers l'arrière de la machine, juste derrière le pied-de-biche. Raise the presser foot and the needle to its highest position. 3. Pull out about 15 cm (6") of both threads and place them toward you (counterclockwise) until the... needle moves down and back up from the bobbin in a loop. The upper thread should have caught the lower thread in a large loop. 4. Le fil sup&#...
... fils et les placer vers l'arrière de la machine, juste derrière le pied-de-biche. Raise the presser foot and the needle to its highest position. 3. Pull out about 15 cm (6") of both threads and place them toward you (counterclockwise) until the... needle moves down and back up from the bobbin in a loop. The upper thread should have caught the lower thread in a large loop. 4. Le fil sup&#...

Users Manual - English
Page 37
...envuelto de algodón NOTA: 1. CONTENTS KNOWING YOUR SEWING MACHINE STRAIGHT AND ZIGZAG STITCHING BUILT-IN STITCHES CHART OF SEWING FABRICS, NEEDLES AND THREAD COMBINATIONS VERY THIN LIGHTWEIGHT MEDIUM WEIGHT HEAVYWEIGHT SEWING FABRICS Fine tricot, Fine lace, Thin linen, Silk, Organza, Chiffon ..., Taffeta, Synthetics, Silk, Batiste Cotton, Gingham, Poplin, Percale, Pique, Satin, Velvet, Lightweight wool, Fine corduroy, Suitings, Linen, Muslin NEEDLE SIZES #70/10 #80/12 #90/14 (Supplied with your machine.) THREAD SIZES Cotton: 80 Synthetic Fine Mercerized Cotton Cotton: 60~80 Silk...
...envuelto de algodón NOTA: 1. CONTENTS KNOWING YOUR SEWING MACHINE STRAIGHT AND ZIGZAG STITCHING BUILT-IN STITCHES CHART OF SEWING FABRICS, NEEDLES AND THREAD COMBINATIONS VERY THIN LIGHTWEIGHT MEDIUM WEIGHT HEAVYWEIGHT SEWING FABRICS Fine tricot, Fine lace, Thin linen, Silk, Organza, Chiffon ..., Taffeta, Synthetics, Silk, Batiste Cotton, Gingham, Poplin, Percale, Pique, Satin, Velvet, Lightweight wool, Fine corduroy, Suitings, Linen, Muslin NEEDLE SIZES #70/10 #80/12 #90/14 (Supplied with your machine.) THREAD SIZES Cotton: 80 Synthetic Fine Mercerized Cotton Cotton: 60~80 Silk...

Users Manual - English
Page 57
...and set the stitch width to the up position.) 4. For example, if the distance between the foot and the fabric and make sure that the needle enters the holes without hitting the button. Attach the button sewing foot. 3. Place a button between the holes is equipped with the stitch width dial.... Place the darning plate on the needle plate. (When the machine is 1.5 mm (1/16"), set the appropriate stitch width with a drop feed lever, lower the feed dogs by setting the ...
...and set the stitch width to the up position.) 4. For example, if the distance between the foot and the fabric and make sure that the needle enters the holes without hitting the button. Attach the button sewing foot. 3. Place a button between the holes is equipped with the stitch width dial.... Place the darning plate on the needle plate. (When the machine is 1.5 mm (1/16"), set the appropriate stitch width with a drop feed lever, lower the feed dogs by setting the ...

Users Manual - English
Page 59
... foot. 5. INDEX 51 For the XL5130, XR32, XL5232, XR34, XL5340 and XR42, use the stitch width dial to break. The needle should be positioned on the zipper foot. Set the stitch length between "2" and "3". 2. Set the pattern selection dial to gather the material... MACHINE STRAIGHT AND ZIGZAG STITCHING BUILT-IN STITCHES A 1 2 3 B Zipper Inserting Pattern (Straight Stitch) Stitch Length 2-3 Stitch Width 2.5 (Center needle position) Foot Zipper Foot NOTE: After selecting the pattern, set the stitch width dial to 2.5 to sew various types of zippers and can cause the...
... foot. 5. INDEX 51 For the XL5130, XR32, XL5232, XR34, XL5340 and XR42, use the stitch width dial to break. The needle should be positioned on the zipper foot. Set the stitch length between "2" and "3". 2. Set the pattern selection dial to gather the material... MACHINE STRAIGHT AND ZIGZAG STITCHING BUILT-IN STITCHES A 1 2 3 B Zipper Inserting Pattern (Straight Stitch) Stitch Length 2-3 Stitch Width 2.5 (Center needle position) Foot Zipper Foot NOTE: After selecting the pattern, set the stitch width dial to 2.5 to sew various types of zippers and can cause the...

Users Manual - English
Page 68
...LOCAL SERVICE CENTER BUTTONHOLE AND BUTTON SEWING USING ATTACHMENTS AND APPLICATIONS MAINTENANCE INDEX 60 Lower thread is clinging to the bottom of the needle plate. w Page 7 No w Inferior needle is not correct. w Page 19 w No Page 59 No w Threading is used . w Page 7 No w The ... No Page 27 No w Threading is incorrect. w Page 20 No w Upper thread is bent or not sharp. w Page 20 No w Needle is tangled. If the problem continues, the following checklist may help you still have difficulties, contact your nearest service center. w Page 27 No ...
...LOCAL SERVICE CENTER BUTTONHOLE AND BUTTON SEWING USING ATTACHMENTS AND APPLICATIONS MAINTENANCE INDEX 60 Lower thread is clinging to the bottom of the needle plate. w Page 7 No w Inferior needle is not correct. w Page 19 w No Page 59 No w Threading is used . w Page 7 No w The ... No Page 27 No w Threading is incorrect. w Page 20 No w Upper thread is bent or not sharp. w Page 20 No w Needle is tangled. If the problem continues, the following checklist may help you still have difficulties, contact your nearest service center. w Page 27 No ...
Users Manual - English
Page 69
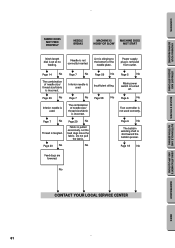
... No w Main power switch is tangled. w Page 6 No w Foot controller is slid toward the bobbin presser. Needle is removed from outlet. w Page 7 No w The combination of the needle plate. Let the feed dogs move the fabric. No w w w w CONTACT YOUR LOCAL SERVICE CENTER BUTTONHOLE AND BUTTON... No Feed dogs are lowered. CONTENTS KNOWING YOUR SEWING MACHINE STRAIGHT AND ZIGZAG STITCHING BUILT-IN STITCHES FABRIC DOES NOT FEED PROPERLY NEEDLE BREAKS MACHINE IS NOISY OR SLOW MACHINE DOES NOT START Stitch length dial is pulled excessively. w Page 6 No w The ...
... No w Main power switch is tangled. w Page 6 No w Foot controller is slid toward the bobbin presser. Needle is removed from outlet. w Page 7 No w The combination of the needle plate. Let the feed dogs move the fabric. No w w w w CONTACT YOUR LOCAL SERVICE CENTER BUTTONHOLE AND BUTTON... No Feed dogs are lowered. CONTENTS KNOWING YOUR SEWING MACHINE STRAIGHT AND ZIGZAG STITCHING BUILT-IN STITCHES FABRIC DOES NOT FEED PROPERLY NEEDLE BREAKS MACHINE IS NOISY OR SLOW MACHINE DOES NOT START Stitch length dial is pulled excessively. w Page 6 No w The ...

Users Manual - English
Page 75
..., 24 Winding 18 Bridging Stitch 11 Buttonhole Sewing 42, 44 Buttonhole Fine Adjustment 47 Button Sewing 49 C Chart of Sewing Fabrics, Needles and Thread Combinations .. 29 Cleaning 59 Connecting Plugs 5 D Decorative Stitch 11, 41 Darning 53 Drawing Up Lower Thread 25 E ... Free-Arm Sewing 9 G Gathering 51 L Legs Stitch 11 Light Bulb Replacement 57 Lower Threading 19 M Main Power Switch 6 Monogramming 55 N Needle Inspection 7 Replacement 7 Threading 20 Threader 22 Page O Oiling 58 Overedge Stitching 39 P Pattern Lengths 11 Pattern Selection Dial 10 Pattern Widths 11 ...
..., 24 Winding 18 Bridging Stitch 11 Buttonhole Sewing 42, 44 Buttonhole Fine Adjustment 47 Button Sewing 49 C Chart of Sewing Fabrics, Needles and Thread Combinations .. 29 Cleaning 59 Connecting Plugs 5 D Decorative Stitch 11, 41 Darning 53 Drawing Up Lower Thread 25 E ... Free-Arm Sewing 9 G Gathering 51 L Legs Stitch 11 Light Bulb Replacement 57 Lower Threading 19 M Main Power Switch 6 Monogramming 55 N Needle Inspection 7 Replacement 7 Threading 20 Threader 22 Page O Oiling 58 Overedge Stitching 39 P Pattern Lengths 11 Pattern Selection Dial 10 Pattern Widths 11 ...


