
Users Manual - English
Page 2
..."O" position when making any adjustments in the needle area, such as contained in this sewing machine if it has a damaged cord or plug, if it has been dropped or damaged, or dropped into any of the sewing machine and foot controller free from all instructions before using." It may deflect... the needle causing it to be followed, including the following: "Read all moving parts. The sewing machine should always be used or where oxygen is not...
..."O" position when making any adjustments in the needle area, such as contained in this sewing machine if it has a damaged cord or plug, if it has been dropped or damaged, or dropped into any of the sewing machine and foot controller free from all instructions before using." It may deflect... the needle causing it to be followed, including the following: "Read all moving parts. The sewing machine should always be used or where oxygen is not...

Users Manual - English
Page 6
... AND ZIGZAG STITCHING BUILT-IN STITCHES KNOWING YOUR SEWING MACHINE PRINCIPAL PARTS 1 ACCESSORIES 3 OPERATING YOUR SEWING MACHINE 5 Connecting Plugs 5 Main Power and Sewing Light Switches 6 Foot Controller 6 Inserting the Needle 7 Checking the Needle 7 Changing the Presser Foot 8 Converting to Free-Arm Style 9 Steadying the Machine 9 VARIOUS CONTROLS 10 Pattern Selection Dial 10 RECOMMENDED WIDTHS AND LENGTHS FOR STITCHES 11 Stitch...
... AND ZIGZAG STITCHING BUILT-IN STITCHES KNOWING YOUR SEWING MACHINE PRINCIPAL PARTS 1 ACCESSORIES 3 OPERATING YOUR SEWING MACHINE 5 Connecting Plugs 5 Main Power and Sewing Light Switches 6 Foot Controller 6 Inserting the Needle 7 Checking the Needle 7 Changing the Presser Foot 8 Converting to Free-Arm Style 9 Steadying the Machine 9 VARIOUS CONTROLS 10 Pattern Selection Dial 10 RECOMMENDED WIDTHS AND LENGTHS FOR STITCHES 11 Stitch...

Users Manual - English
Page 9
H Foot controller Used to raise and lower the needle. B 0 7 Stitch width dial Controls the stitch width. 8 Pattern selection dial Turn in the reverse direction. F Foot controller receptacle Insert the foot... foot lever Raises and lowers the presser foot. D C E G F H BUTTONHOLE AND BUTTON SEWING USING ATTACHMENTS AND APPLICATIONS MAINTENANCE INDEX 1 E Main power/sewing light switch Turns the main power and sewing light on and off. CONTENTS KNOWING YOUR SEWING MACHINE STRAIGHT AND ZIGZAG STITCHING BUILT-IN STITCHES PRINCIPAL PARTS 34 62 1 1 Bobbin winding assembly...
H Foot controller Used to raise and lower the needle. B 0 7 Stitch width dial Controls the stitch width. 8 Pattern selection dial Turn in the reverse direction. F Foot controller receptacle Insert the foot... foot lever Raises and lowers the presser foot. D C E G F H BUTTONHOLE AND BUTTON SEWING USING ATTACHMENTS AND APPLICATIONS MAINTENANCE INDEX 1 E Main power/sewing light switch Turns the main power and sewing light on and off. CONTENTS KNOWING YOUR SEWING MACHINE STRAIGHT AND ZIGZAG STITCHING BUILT-IN STITCHES PRINCIPAL PARTS 34 62 1 1 Bobbin winding assembly...

Users Manual - English
Page 13
... plug into a wall outlet. only This appliance has a polarized plug (one way. When changing the needle, bobbin or light bulb or when the sew- ing machine is not in any way. ATENCIÓN: 1. To reduce the risk of electric shock, this plug is... de corriente para evitar choques eléctricos. 1. BUTTONHOLE AND BUTTON SEWING USING ATTACHMENTS AND APPLICATIONS MAINTENANCE INDEX 5 CONTENTS KNOWING YOUR SEWING MACHINE STRAIGHT AND ZIGZAG STITCHING BUILT-IN STITCHES OPERATING YOUR SEWING MACHINE Connecting Plugs 1. Do not modify the plug in use, it still does...
... plug into a wall outlet. only This appliance has a polarized plug (one way. When changing the needle, bobbin or light bulb or when the sew- ing machine is not in any way. ATENCIÓN: 1. To reduce the risk of electric shock, this plug is... de corriente para evitar choques eléctricos. 1. BUTTONHOLE AND BUTTON SEWING USING ATTACHMENTS AND APPLICATIONS MAINTENANCE INDEX 5 CONTENTS KNOWING YOUR SEWING MACHINE STRAIGHT AND ZIGZAG STITCHING BUILT-IN STITCHES OPERATING YOUR SEWING MACHINE Connecting Plugs 1. Do not modify the plug in use, it still does...
Users Manual - English
Page 19
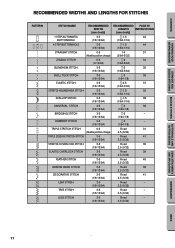
...SEWING MACHINE STRAIGHT AND ZIGZAG STITCHING BUILT-IN STITCHES RECOMMENDED WIDTHS AND LENGTHS FOR STITCHES PATTERN C A STITCH NAME RECOMMENDED WIDTH [mm (inch)] RECOMMENDED PAGE IN LENGTH INSTRUCTIONS [mm (inch)] 1 STEP AUTOMATIC BUTTONHOLE 3-5 -1.5 42 (1/8-13/64) (1/64-1/16) 4 STEP BUTTONHOLE 3-5 -1.5 44 (1/8-13/64) (1/64-1/16) STRAIGHT STITCH 0-5 1-4 31 (Needle...64-1/8) RAMPART STITCH 3-5 -3 - (1/8-13/64) (1/64-1/8) TRIPLE STRETCH STITCH 0-5 Fixed 31 (Needle position change) 2.5 (3/32) TRIPLE ZIGZAG STRETCH STITCH 3-5 Fixed 41 (1/8-13/64) 2.5 (3/32...
...SEWING MACHINE STRAIGHT AND ZIGZAG STITCHING BUILT-IN STITCHES RECOMMENDED WIDTHS AND LENGTHS FOR STITCHES PATTERN C A STITCH NAME RECOMMENDED WIDTH [mm (inch)] RECOMMENDED PAGE IN LENGTH INSTRUCTIONS [mm (inch)] 1 STEP AUTOMATIC BUTTONHOLE 3-5 -1.5 42 (1/8-13/64) (1/64-1/16) 4 STEP BUTTONHOLE 3-5 -1.5 44 (1/8-13/64) (1/64-1/16) STRAIGHT STITCH 0-5 1-4 31 (Needle...64-1/8) RAMPART STITCH 3-5 -3 - (1/8-13/64) (1/64-1/8) TRIPLE STRETCH STITCH 0-5 Fixed 31 (Needle position change) 2.5 (3/32) TRIPLE ZIGZAG STRETCH STITCH 3-5 Fixed 41 (1/8-13/64) 2.5 (3/32...

Users Manual - English
Page 28
...3 Tension discs 4 Thread take -up the spool pin and place a spool of the thread take-up lever 4. D). Thread the needle from front to its highest position. 2. Raise the presser foot lever and turn the balance wheel toward you (counterclockwise) to break, ... it behind the thread guide. 5 Thread guide 7. CONTENTS KNOWING YOUR SEWING MACHINE STRAIGHT AND ZIGZAG STITCHING BUILT-IN STITCHES 1 2 4 3 BUTTONHOLE AND BUTTON SEWING USING ATTACHMENTS AND APPLICATIONS A 4 23 1 C B D 4 4 E 5 Upper (Needle) Threading Turn power switch to the left (fig. Bring the thread ...
...3 Tension discs 4 Thread take -up the spool pin and place a spool of the thread take-up lever 4. D). Thread the needle from front to its highest position. 2. Raise the presser foot lever and turn the balance wheel toward you (counterclockwise) to break, ... it behind the thread guide. 5 Thread guide 7. CONTENTS KNOWING YOUR SEWING MACHINE STRAIGHT AND ZIGZAG STITCHING BUILT-IN STITCHES 1 2 4 3 BUTTONHOLE AND BUTTON SEWING USING ATTACHMENTS AND APPLICATIONS A 4 23 1 C B D 4 4 E 5 Upper (Needle) Threading Turn power switch to the left (fig. Bring the thread ...

Users Manual - English
Page 30
... wheel toward the back of the sewing machine. • Only use needles of the holder for the needle-threading hook before lowering the needle threader lever. While lightly holding the thread, rotate the needle threader lever toward the front of the machine (toward the back of the needle in front of the machine (away from you ). In addition, refer...
... wheel toward the back of the sewing machine. • Only use needles of the holder for the needle-threading hook before lowering the needle threader lever. While lightly holding the thread, rotate the needle threader lever toward the front of the machine (toward the back of the needle in front of the machine (away from you ). In addition, refer...

Users Manual - English
Page 33
...hilo inferior saldrá de la canilla en un amplio enlace. 4. Raise the presser foot and the needle to its highest position. 3. The upper thread should pass between the toes of the upper thread. El ...25 Pull the upper thread toward the back of both threads and place them toward you (counterclockwise) until the needle moves down and back up from the bobbin in a loop. Levante el prensatelas y la aguja a sus... le pied-de-biche et l'aiguille. 2. CONTENTS KNOWING YOUR SEWING MACHINE STRAIGHT AND ZIGZAG STITCHING BUILT-IN STITCHES 1 2 Drawing Up Lower Thread 1.
...hilo inferior saldrá de la canilla en un amplio enlace. 4. Raise the presser foot and the needle to its highest position. 3. The upper thread should pass between the toes of the upper thread. El ...25 Pull the upper thread toward the back of both threads and place them toward you (counterclockwise) until the needle moves down and back up from the bobbin in a loop. Levante el prensatelas y la aguja a sus... le pied-de-biche et l'aiguille. 2. CONTENTS KNOWING YOUR SEWING MACHINE STRAIGHT AND ZIGZAG STITCHING BUILT-IN STITCHES 1 2 Drawing Up Lower Thread 1.

Users Manual - English
Page 37
.... 2. Use the same size thread for the upper (spool) and lower (bobbin) threads. CONTENTS KNOWING YOUR SEWING MACHINE STRAIGHT AND ZIGZAG STITCHING BUILT-IN STITCHES CHART OF SEWING FABRICS, NEEDLES AND THREAD COMBINATIONS VERY THIN LIGHTWEIGHT MEDIUM WEIGHT HEAVYWEIGHT SEWING FABRICS Fine tricot, Fine lace, Thin linen, Silk, Organza, Chiffon Voile, Taffeta, Synthetics, Silk, Batiste...
.... 2. Use the same size thread for the upper (spool) and lower (bobbin) threads. CONTENTS KNOWING YOUR SEWING MACHINE STRAIGHT AND ZIGZAG STITCHING BUILT-IN STITCHES CHART OF SEWING FABRICS, NEEDLES AND THREAD COMBINATIONS VERY THIN LIGHTWEIGHT MEDIUM WEIGHT HEAVYWEIGHT SEWING FABRICS Fine tricot, Fine lace, Thin linen, Silk, Organza, Chiffon Voile, Taffeta, Synthetics, Silk, Batiste...

Users Manual - English
Page 57
... foot and the fabric and make sure that the needle enters the holes without hitting the button. Remove the material from the machine. CONTENTS KNOWING YOUR SEWING MACHINE STRAIGHT AND ZIGZAG STITCHING BUILT-IN STITCHES Button Sewing Pattern (Zigzag Stitch) Stitch Length Stitch Width Any Foot Button Sewing Foot 1. Cut the upper and lower threads and...
... foot and the fabric and make sure that the needle enters the holes without hitting the button. Remove the material from the machine. CONTENTS KNOWING YOUR SEWING MACHINE STRAIGHT AND ZIGZAG STITCHING BUILT-IN STITCHES Button Sewing Pattern (Zigzag Stitch) Stitch Length Stitch Width Any Foot Button Sewing Foot 1. Cut the upper and lower threads and...

Users Manual - English
Page 59
CONTENTS KNOWING YOUR SEWING MACHINE STRAIGHT AND ZIGZAG STITCHING BUILT-IN STITCHES A 1 2 3 B Zipper Inserting Pattern (Straight Stitch) Stitch Length 2-3 Stitch Width 2.5 (Center needle position) Foot Zipper Foot NOTE: After selecting the pattern, set the stitch width dial to 2.5 to adjust the needle position. Set ..., XR34, XL5340 and XR42, use the stitch width dial to select the center needle position. A.) 1. Fold the edge of the zipper Check for correct needle setting. To sew the opposite side of the zipper, release the foot by raising the lever located...
CONTENTS KNOWING YOUR SEWING MACHINE STRAIGHT AND ZIGZAG STITCHING BUILT-IN STITCHES A 1 2 3 B Zipper Inserting Pattern (Straight Stitch) Stitch Length 2-3 Stitch Width 2.5 (Center needle position) Foot Zipper Foot NOTE: After selecting the pattern, set the stitch width dial to 2.5 to adjust the needle position. Set ..., XR34, XL5340 and XR42, use the stitch width dial to select the center needle position. A.) 1. Fold the edge of the zipper Check for correct needle setting. To sew the opposite side of the zipper, release the foot by raising the lever located...

Users Manual - English
Page 68
... you are performing to make sure you to the bottom of needle size/ thread size/fabric is incorrectly inserted. w Page 7 No w Inferior needle is clinging to improve the operation. CONTENTS KNOWING YOUR SEWING MACHINE STRAIGHT AND ZIGZAG STITCHING BUILT-IN STITCHES Performance Checklist Whenever sewing difficulties are encountered, review the section in the shuttle hook...
... you are performing to make sure you to the bottom of needle size/ thread size/fabric is incorrectly inserted. w Page 7 No w Inferior needle is clinging to improve the operation. CONTENTS KNOWING YOUR SEWING MACHINE STRAIGHT AND ZIGZAG STITCHING BUILT-IN STITCHES Performance Checklist Whenever sewing difficulties are encountered, review the section in the shuttle hook...
Users Manual - English
Page 69
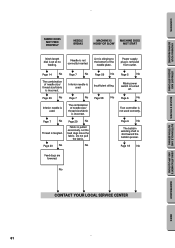
CONTENTS KNOWING YOUR SEWING MACHINE STRAIGHT AND ZIGZAG STITCHING BUILT-IN STITCHES FABRIC DOES NOT FEED PROPERLY NEEDLE BREAKS MACHINE IS NOISY OR SLOW MACHINE DOES NOT START Stitch length dial is slid toward the bobbin presser. w Page 7 No w The combination of needle size/ thread ... w w w w CONTACT YOUR LOCAL SERVICE CENTER BUTTONHOLE AND BUTTON SEWING USING ATTACHMENTS AND APPLICATIONS MAINTENANCE INDEX 61 Do not pull the fabric. Lint is not correctly inserted. Needle is clinging to the bottom of the needle plate. Power supply plug is used correctly.
CONTENTS KNOWING YOUR SEWING MACHINE STRAIGHT AND ZIGZAG STITCHING BUILT-IN STITCHES FABRIC DOES NOT FEED PROPERLY NEEDLE BREAKS MACHINE IS NOISY OR SLOW MACHINE DOES NOT START Stitch length dial is slid toward the bobbin presser. w Page 7 No w The combination of needle size/ thread ... w w w w CONTACT YOUR LOCAL SERVICE CENTER BUTTONHOLE AND BUTTON SEWING USING ATTACHMENTS AND APPLICATIONS MAINTENANCE INDEX 61 Do not pull the fabric. Lint is not correctly inserted. Needle is clinging to the bottom of the needle plate. Power supply plug is used correctly.

Users Manual - English
Page 75
...YOUR SEWING MACHINE STRAIGHT AND ZIGZAG STITCHING BUILT-IN STITCHES Page A Accessories 3 Appliques 54 B Blindhem Stitching 35 Bobbin Threading 19, 24 Winding 18 Bridging Stitch 11 Buttonhole Sewing 42, 44 Buttonhole Fine Adjustment 47 Button Sewing 49 C Chart of Sewing Fabrics, Needles and...17 Finishing a Seam 32-33 Foot Controller Connecting 5 Operating 6 Free-Arm Sewing 9 G Gathering 51 L Legs Stitch 11 Light Bulb Replacement 57 Lower Threading 19 M Main Power Switch 6 Monogramming 55 N Needle Inspection 7 Replacement 7 Threading 20 Threader 22 Page O Oiling 58...
...YOUR SEWING MACHINE STRAIGHT AND ZIGZAG STITCHING BUILT-IN STITCHES Page A Accessories 3 Appliques 54 B Blindhem Stitching 35 Bobbin Threading 19, 24 Winding 18 Bridging Stitch 11 Buttonhole Sewing 42, 44 Buttonhole Fine Adjustment 47 Button Sewing 49 C Chart of Sewing Fabrics, Needles and...17 Finishing a Seam 32-33 Foot Controller Connecting 5 Operating 6 Free-Arm Sewing 9 G Gathering 51 L Legs Stitch 11 Light Bulb Replacement 57 Lower Threading 19 M Main Power Switch 6 Monogramming 55 N Needle Inspection 7 Replacement 7 Threading 20 Threader 22 Page O Oiling 58...


