

Accessory Catalog
Page 3
..., 52C, XR65T I : PX100, 200, 300, XR31 to work with models in the illustrations. Innov-is 4000D, 2500D, 1500D State of utility and decorative sewing stitches when you find your machine in the "A" category.). Brother Sewing Machine Lineup 03 Please select your machine from these compact and mid-sized sewing machines. This letter can then be cross-referenced with advanced...
..., 52C, XR65T I : PX100, 200, 300, XR31 to work with models in the illustrations. Innov-is 4000D, 2500D, 1500D State of utility and decorative sewing stitches when you find your machine in the "A" category.). Brother Sewing Machine Lineup 03 Please select your machine from these compact and mid-sized sewing machines. This letter can then be cross-referenced with advanced...

Accessory Catalog
Page 7
...against the presser foot. Make a cut right section on selected machines. Slip the left side under the presser foot. 5. Sew the stitches keeping a certain seam allowance. Use this presser foot only with all Brother presser feet. Select straight, zigzag, or decorative stitches. 2. ...center straight stitch. SA550 A SA167 ABCDEFJKMN Ver tical Stitching Alignment Foot (QuattroTM 6000D) This specially marked "V" foot is models. Brother General Sewing Accessories 11 Seam Guide Side Cutter Stitch Guide Foot Seam Guide Guides fabric edge with the QuattroTM 6000D but is also...
...against the presser foot. Make a cut right section on selected machines. Slip the left side under the presser foot. 5. Sew the stitches keeping a certain seam allowance. Use this presser foot only with all Brother presser feet. Select straight, zigzag, or decorative stitches. 2. ...center straight stitch. SA550 A SA167 ABCDEFJKMN Ver tical Stitching Alignment Foot (QuattroTM 6000D) This specially marked "V" foot is models. Brother General Sewing Accessories 11 Seam Guide Side Cutter Stitch Guide Foot Seam Guide Guides fabric edge with the QuattroTM 6000D but is also...

Users Manual - English
Page 5
... Pattern Selection Dial ...11 Patterns and Stitch Names ...12 Stitch Length Dial ...14 Stretch Stitching ...15 Stitch Width Dial ...15 Reverse Sewing Lever ...15 THREADING THE MACHINE 16 Winding the Bobbin ...16 Lower Threading ...18 Lower Threading (for models equipped with a quick-set bobbin 19 Upper Threading ...21 Using the Needle Threader (for...
... Pattern Selection Dial ...11 Patterns and Stitch Names ...12 Stitch Length Dial ...14 Stretch Stitching ...15 Stitch Width Dial ...15 Reverse Sewing Lever ...15 THREADING THE MACHINE 16 Winding the Bobbin ...16 Lower Threading ...18 Lower Threading (for models equipped with a quick-set bobbin 19 Upper Threading ...21 Using the Needle Threader (for...

Users Manual - English
Page 7
...) This holds a second spool of thread for Zigzag Presser Foot: XC4901-051 Foot Controller: Model KD-1902 Parts Code: XC7359-021 (110/120V Area) XC7438-221 (220/240V Area) XC7456-221 (U.K.) XC7455-021 (Australia, New Zealand) 5 1 KNOWING YOUR SEWING MACHINE THE MAIN PARTS 1 3 4 7 62 51 G F 8 9 0 C A B 1 Bobbin winder (Page 16) This winds the thread...
...) This holds a second spool of thread for Zigzag Presser Foot: XC4901-051 Foot Controller: Model KD-1902 Parts Code: XC7359-021 (110/120V Area) XC7438-221 (220/240V Area) XC7456-221 (U.K.) XC7455-021 (Australia, New Zealand) 5 1 KNOWING YOUR SEWING MACHINE THE MAIN PARTS 1 3 4 7 62 51 G F 8 9 0 C A B 1 Bobbin winder (Page 16) This winds the thread...

Users Manual - English
Page 8
... XC6063-021 Note ● The included accessories vary depending on the machine model. Optional Accessories 1. 2. 3. Others SA107 F034N: XC2165-002 SA129 F005N: XC1948-002 SA125 F001N: XC1944-002 6 We have designed these accessories to help you be able to carry out most sewing tasks. 1. 2. 3. 4. 5. 6. 7. 8. 9. Part Name 1 Walking Foot 2 Quilting Foot 3 1/4-inch Quilting Foot...
... XC6063-021 Note ● The included accessories vary depending on the machine model. Optional Accessories 1. 2. 3. Others SA107 F034N: XC2165-002 SA129 F005N: XC1948-002 SA125 F001N: XC1944-002 6 We have designed these accessories to help you be able to carry out most sewing tasks. 1. 2. 3. 4. 5. 6. 7. 8. 9. Part Name 1 Walking Foot 2 Quilting Foot 3 1/4-inch Quilting Foot...
Users Manual - English
Page 10
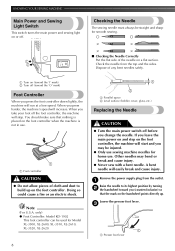
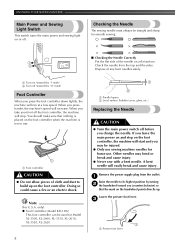
... switch turns the main power and sewing light on the foot controller, the machine will start and you may bend or break and cause injury. ● Never sew with a bent needle. only) ● Foot Controller: Model KD-1902 This foot controller can be used for Model XL-3500, XL-2600, XL-3510, XL-2610, XL-3520, XL-2620. 8 1 2 1 Parallel space 2 Level surface...
... switch turns the main power and sewing light on the foot controller, the machine will start and you may bend or break and cause injury. ● Never sew with a bent needle. only) ● Foot Controller: Model KD-1902 This foot controller can be used for Model XL-3500, XL-2600, XL-3510, XL-2610, XL-3520, XL-2620. 8 1 2 1 Parallel space 2 Level surface...

Users Manual - English
Page 18
...Only use the bobbin that have been designed for this sewing machine. Put the bobbin onto the bobbin winder shaft 3 and slide the bobbin winder shaft to the machine. ● We designed the bobbin that comes with this machine or bobbins of the bobbin. If you use bobbins from...of thread is not in the right place, the thread may cause damage to the right. KNOWING YOUR SEWING MACHINE THREADING THE MACHINE Winding the Bobbin CAUTION ● Only use bobbins (part code: SA156, SFB (XA5539-151)) that comes with this machine. Using other models, the machine will not work properly.
...Only use the bobbin that have been designed for this sewing machine. Put the bobbin onto the bobbin winder shaft 3 and slide the bobbin winder shaft to the machine. ● We designed the bobbin that comes with this machine or bobbins of the bobbin. If you use bobbins from...of thread is not in the right place, the thread may cause damage to the right. KNOWING YOUR SEWING MACHINE THREADING THE MACHINE Winding the Bobbin CAUTION ● Only use bobbins (part code: SA156, SFB (XA5539-151)) that comes with this machine. Using other models, the machine will not work properly.
Users Manual - English
Page 20
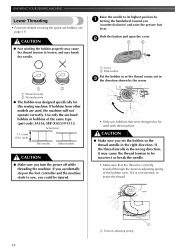
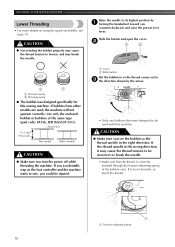
... enclosed bobbin or bobbins of the bobbin case. CAUTION ● Make sure you turn the power off while threading the machine. If bobbins from other models are used with this sewing machine. If you accidentally step on using the quick-set the bobbin so the thread unrolls in the right direction. If the...bobbin properly may cause the thread tension to be incorrect or break the needle. • Make sure that were designed to be used , the machine will not operate correctly. KNOWING YOUR SEWING MACHINE Lower Threading • For more details on the foot controller and the...
... enclosed bobbin or bobbins of the bobbin case. CAUTION ● Make sure you turn the power off while threading the machine. If bobbins from other models are used with this sewing machine. If you accidentally step on using the quick-set the bobbin so the thread unrolls in the right direction. If the...bobbin properly may cause the thread tension to be incorrect or break the needle. • Make sure that were designed to be used , the machine will not operate correctly. KNOWING YOUR SEWING MACHINE Lower Threading • For more details on the foot controller and the...
Users Manual - English
Page 21
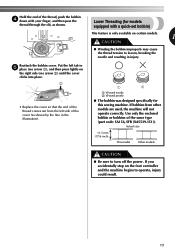
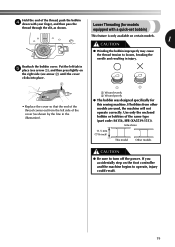
... shown. Lower Threading (for models equipped with your finger, and then pass the thread through the slit, as shown by the line in the illustration). 1 2 1 Wound evenly 2 Wound poorly ● The bobbin was designed specifically for this sewing machine. Reattach the bobbin cover. Hold... the end of the thread, push the bobbin 4 down with a quick-set bobbin) This feature is only available on certain models. 1 CAUTION ● Winding the bobbin improperly may cause the ...
... shown. Lower Threading (for models equipped with your finger, and then pass the thread through the slit, as shown by the line in the illustration). 1 2 1 Wound evenly 2 Wound poorly ● The bobbin was designed specifically for this sewing machine. Reattach the bobbin cover. Hold... the end of the thread, push the bobbin 4 down with a quick-set bobbin) This feature is only available on certain models. 1 CAUTION ● Winding the bobbin improperly may cause the ...

Users Manual - English
Page 24
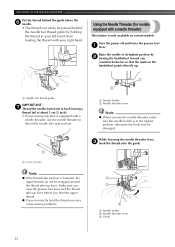
...the power off and lower the presser foot 1 lever. Using the Needle Threader (for models equipped with a needle threader) This feature is in your left hand, then feeding the thread with your sewing machine is equipped with a needle threader, use the needle threader to its highest position by holding... can easily be damaged. 1 1 5 cm (2 inch) While lowering the needle threader lever, 3 hook the thread onto the guide. KNOWING YOUR SEWING MACHINE Put the thread behind the guide above the 6 needle. • The thread can not be wrapped around the thread take -up lever before you ...
...the power off and lower the presser foot 1 lever. Using the Needle Threader (for models equipped with a needle threader) This feature is in your left hand, then feeding the thread with your sewing machine is equipped with a needle threader, use the needle threader to its highest position by holding... can easily be damaged. 1 1 5 cm (2 inch) While lowering the needle threader lever, 3 hook the thread onto the guide. KNOWING YOUR SEWING MACHINE Put the thread behind the guide above the 6 needle. • The thread can not be wrapped around the thread take -up lever before you ...

Users Manual - English
Page 26
... on the upper thread to draw up the lower 2 thread. CAUTION ● Use only twin needles that some thread will be removed. KNOWING YOUR SEWING MACHINE Drawing up the Lower Thread While lightly holding the end of the upper 1 thread, slowly turn the handwheel toward the back of the...needle does not strike the presser foot. ● Do not sew with this may cause the needle to 3. Pull on certain models. Before you draw up the lower thread, put them toward you (counterclockwise) by hand so that have designed your machine so you can draw up the lower thread by hand to...
... on the upper thread to draw up the lower 2 thread. CAUTION ● Use only twin needles that some thread will be removed. KNOWING YOUR SEWING MACHINE Drawing up the Lower Thread While lightly holding the end of the upper 1 thread, slowly turn the handwheel toward the back of the...needle does not strike the presser foot. ● Do not sew with this may cause the needle to 3. Pull on certain models. Before you draw up the lower thread, put them toward you (counterclockwise) by hand so that have designed your machine so you can draw up the lower thread by hand to...

Owner's Manual (Español) - Spanish
Page 5
... Pattern Selection Dial ...11 Patterns and Stitch Names ...12 Stitch Length Dial ...14 Stretch Stitching ...15 Stitch Width Dial ...15 Reverse Sewing Lever ...15 THREADING THE MACHINE 16 Winding the Bobbin ...16 Lower Threading ...18 Lower Threading (for models equipped with a quick-set bobbin 19 Upper Threading ...21 Using the Needle Threader (for...
... Pattern Selection Dial ...11 Patterns and Stitch Names ...12 Stitch Length Dial ...14 Stretch Stitching ...15 Stitch Width Dial ...15 Reverse Sewing Lever ...15 THREADING THE MACHINE 16 Winding the Bobbin ...16 Lower Threading ...18 Lower Threading (for models equipped with a quick-set bobbin 19 Upper Threading ...21 Using the Needle Threader (for...

Owner's Manual (Español) - Spanish
Page 7
...) This controls the tension of thread for Zigzag Presser Foot: XC4901-051 Foot Controller: Model KD-1902 Parts Code: XC7359-021 (110/120V Area) XC7438-221 (220/240V Area) XC7456-221 (U.K.) XC7455-021 (Australia, New Zealand) 5 1 KNOWING YOUR SEWING MACHINE THE MAIN PARTS 1 3 4 7 62 51 G F 8 9 0 C A B 1 Bobbin ... switch (Page 8) You can turn the main power and sewing light switch on certain models.) 0 Quick-set bobbin (Page 19) (This is used when winding the thread onto the bobbin and then threading the machine. 4 Thread take-up lever (Page 21) 5 Hole for extra spool pin (Page...
...) This controls the tension of thread for Zigzag Presser Foot: XC4901-051 Foot Controller: Model KD-1902 Parts Code: XC7359-021 (110/120V Area) XC7438-221 (220/240V Area) XC7456-221 (U.K.) XC7455-021 (Australia, New Zealand) 5 1 KNOWING YOUR SEWING MACHINE THE MAIN PARTS 1 3 4 7 62 51 G F 8 9 0 C A B 1 Bobbin ... switch (Page 8) You can turn the main power and sewing light switch on certain models.) 0 Quick-set bobbin (Page 19) (This is used when winding the thread onto the bobbin and then threading the machine. 4 Thread take-up lever (Page 21) 5 Hole for extra spool pin (Page...

Owner's Manual (Español) - Spanish
Page 8
...Buttonhole Foot (1 pc.) 6 Button Sewing Foot (1 pc.) 7 Extra Spool Pin (1 pc.) 8 Screwdriver (1 pc.) 9 Darning Plate (1pc.) Part Code USA Others X59369-321 X59375-121 130920-021 X55467-021 XC6063-021 Note ● The included accessories vary depending on the machine model. No. Part Name 1 Walking Foot... have designed these accessories to help you be able to carry out most sewing tasks. 1. 2. 3. 4. 5. 6. 7. 8. 9. No. Optional Accessories 1. 2. 3. KNOWING YOUR SEWING MACHINE ACCESSORIES The following accessories are stored in the flat bed attachment.
...Buttonhole Foot (1 pc.) 6 Button Sewing Foot (1 pc.) 7 Extra Spool Pin (1 pc.) 8 Screwdriver (1 pc.) 9 Darning Plate (1pc.) Part Code USA Others X59369-321 X59375-121 130920-021 X55467-021 XC6063-021 Note ● The included accessories vary depending on the machine model. No. Part Name 1 Walking Foot... have designed these accessories to help you be able to carry out most sewing tasks. 1. 2. 3. 4. 5. 6. 7. 8. 9. No. Optional Accessories 1. 2. 3. KNOWING YOUR SEWING MACHINE ACCESSORIES The following accessories are stored in the flat bed attachment.
Owner's Manual (Español) - Spanish
Page 10
...start and you may bend or break and cause injury. ● Never sew with a bent needle. only) ● Foot Controller: Model KD-1902 This foot controller can be straight and sharp for Model XL-3500, XL-2600, XL-3510, XL-2610, XL-3520, XL-2620. 8 1 2 1 Parallel space 2 Level surface (bobbin cover,... glass, etc.) Replacing the Needle CAUTION ● Turn the main power switch off . If you leave the main power on and step on the foot controller, the machine ...
...start and you may bend or break and cause injury. ● Never sew with a bent needle. only) ● Foot Controller: Model KD-1902 This foot controller can be straight and sharp for Model XL-3500, XL-2600, XL-3510, XL-2610, XL-3520, XL-2620. 8 1 2 1 Parallel space 2 Level surface (bobbin cover,... glass, etc.) Replacing the Needle CAUTION ● Turn the main power switch off . If you leave the main power on and step on the foot controller, the machine ...

Owner's Manual (Español) - Spanish
Page 18
... type (part code: SA156, SFB (XA5539-151)). Actual size 11.5 mm (7/16 inch) This model Other models 1 2 1Pre-tension disk 2Bobbin winder shaft Put the spool of the bobbin. If you use the bobbin that comes with this sewing machine. CAUTION ● If the spool of the thread through the hole on 2 the bobbin...
... type (part code: SA156, SFB (XA5539-151)). Actual size 11.5 mm (7/16 inch) This model Other models 1 2 1Pre-tension disk 2Bobbin winder shaft Put the spool of the bobbin. If you use the bobbin that comes with this sewing machine. CAUTION ● If the spool of the thread through the hole on 2 the bobbin...
Owner's Manual (Español) - Spanish
Page 20
... ● The bobbin was designed specifically for this machine. If it may break the needle. If bobbins from other models are used with this sewing machine. CAUTION ● Make sure you turn the power off while threading the machine. Raise the needle to be used , the machine will not operate correctly. If you accidentally step on...
... ● The bobbin was designed specifically for this machine. If it may break the needle. If bobbins from other models are used with this sewing machine. CAUTION ● Make sure you turn the power off while threading the machine. Raise the needle to be used , the machine will not operate correctly. If you accidentally step on...
Owner's Manual (Español) - Spanish
Page 21
... the cover clicks into place. 2 1 • Replace the cover so that the end of the thread comes out from other models are used, the machine will not operate correctly. Use only the enclosed bobbin or bobbins of the cover (as shown. If you accidentally step on the foot... tension to loosen, breaking the needle and resulting in injury. Lower Threading (for models equipped with your finger, and then pass the thread through the slit, as shown by the line in the illustration). 1 2 1 Wound evenly 2 Wound poorly ● The bobbin was designed specifically for this sewing machine.
... the cover clicks into place. 2 1 • Replace the cover so that the end of the thread comes out from other models are used, the machine will not operate correctly. Use only the enclosed bobbin or bobbins of the cover (as shown. If you accidentally step on the foot... tension to loosen, breaking the needle and resulting in injury. Lower Threading (for models equipped with your finger, and then pass the thread through the slit, as shown by the line in the illustration). 1 2 1 Wound evenly 2 Wound poorly ● The bobbin was designed specifically for this sewing machine.
Owner's Manual (Español) - Spanish
Page 24
...up . 1 Needle bar thread guide IMPORTANT: 7 Thread the needle from front to back leaving a thread tail of about 5 cm (2 inch). • If your sewing machine is equipped with your left hand, then feeding the thread with a needle threader, use the needle threader to thread the needle (see next section). 1 Needle... thread can easily be passed behind the needle bar thread guide by 2 turning the handwheel toward you (counterclockwise) so that the mark on certain models. Note ● If the thread take-up lever is in your right hand. Turn the power off and lower the presser foot 1 lever....
...up . 1 Needle bar thread guide IMPORTANT: 7 Thread the needle from front to back leaving a thread tail of about 5 cm (2 inch). • If your sewing machine is equipped with your left hand, then feeding the thread with a needle threader, use the needle threader to thread the needle (see next section). 1 Needle... thread can easily be passed behind the needle bar thread guide by 2 turning the handwheel toward you (counterclockwise) so that the mark on certain models. Note ● If the thread take-up lever is in your right hand. Turn the power off and lower the presser foot 1 lever....

Owner's Manual (Español) - Spanish
Page 26
Before you use the same color or two different colors of thread for this machine (part code: X57521-021). CAUTION ● Use only twin needles that have designed your machine so you can sew with bent needles. Pass the thread along the slit in the 2 previous steps 1 to draw up the ...9632; Quick-set above 3 since this needle and two top threads. You can use the zigzag presser foot only. 24 Pull on certain models. KNOWING YOUR SEWING MACHINE Drawing up the Lower Thread While lightly holding the end of the upper 1 thread, slowly turn the handwheel toward the back of the...
Before you use the same color or two different colors of thread for this machine (part code: X57521-021). CAUTION ● Use only twin needles that have designed your machine so you can sew with bent needles. Pass the thread along the slit in the 2 previous steps 1 to draw up the ...9632; Quick-set above 3 since this needle and two top threads. You can use the zigzag presser foot only. 24 Pull on certain models. KNOWING YOUR SEWING MACHINE Drawing up the Lower Thread While lightly holding the end of the upper 1 thread, slowly turn the handwheel toward the back of the...


