Users Manual - English
Page 1
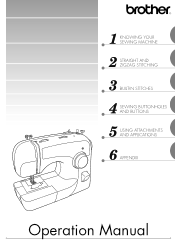
1 KNOWING YOUR SEWING MACHINE 2 STRAIGHT AND ZIGZAG STITCHING 3 BUILT-IN STITCHES 4 SEWING BUTTONHOLES AND BUTTONS 5 USING ATTACHMENTS AND APPLICATIONS 6 APPENDIX Operation Manual
1 KNOWING YOUR SEWING MACHINE 2 STRAIGHT AND ZIGZAG STITCHING 3 BUILT-IN STITCHES 4 SEWING BUTTONHOLES AND BUTTONS 5 USING ATTACHMENTS AND APPLICATIONS 6 APPENDIX Operation Manual
Users Manual - English
Page 2
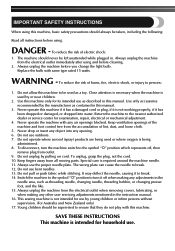
...shock, or injury to break. 12. To reduce the risk of lint, dust, and loose cloth. 5. Close attention is necessary when the machine is not intended for its intended use . Use only accessories recommended by young children or infirm persons without supervision. (For Australia and New ...Special care is being administered. 8. Always use by the manufacturer as described in the instruction manual. 16. This sewing machine is used by pulling on cord. WARNING - Do not allow this machine to be supervised to break. 14. Do not use bent needles. 13. To unplug, grasp the plug, ...
...shock, or injury to break. 12. To reduce the risk of lint, dust, and loose cloth. 5. Close attention is necessary when the machine is not intended for its intended use . Use only accessories recommended by young children or infirm persons without supervision. (For Australia and New ...Special care is being administered. 8. Always use by the manufacturer as described in the instruction manual. 16. This sewing machine is used by pulling on cord. WARNING - Do not allow this machine to be supervised to break. 14. Do not use bent needles. 13. To unplug, grasp the plug, ...
Users Manual - English
Page 5
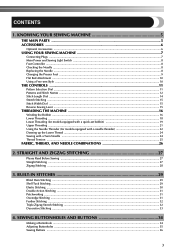
...Before Sewing ...27 Straight Stitching ...27 Zigzag Stitching ...28 3. SEWING BUTTONHOLES AND BUTTONS 34 Making a Buttonhole ...34 Adjusting Buttonholes ...35 Sewing Buttons ...36 3 KNOWING YOUR SEWING MACHINE 5 THE MAIN PARTS ...5 ACCESSORIES ...6 Optional Accessories ...6 USING YOUR SEWING MACHINE 7 Connecting Plugs ...7 Main Power and Sewing Light ... Stitch Names ...12 Stitch Length Dial ...14 Stretch Stitching ...15 Stitch Width Dial ...15 Reverse Sewing Lever ...15 THREADING THE MACHINE 16 Winding the Bobbin ...16 Lower Threading ...18 Lower Threading (for models equipped with a quick...
...Before Sewing ...27 Straight Stitching ...27 Zigzag Stitching ...28 3. SEWING BUTTONHOLES AND BUTTONS 34 Making a Buttonhole ...34 Adjusting Buttonholes ...35 Sewing Buttons ...36 3 KNOWING YOUR SEWING MACHINE 5 THE MAIN PARTS ...5 ACCESSORIES ...6 Optional Accessories ...6 USING YOUR SEWING MACHINE 7 Connecting Plugs ...7 Main Power and Sewing Light ... Stitch Names ...12 Stitch Length Dial ...14 Stretch Stitching ...15 Stitch Width Dial ...15 Reverse Sewing Lever ...15 THREADING THE MACHINE 16 Winding the Bobbin ...16 Lower Threading ...18 Lower Threading (for models equipped with a quick...
Users Manual - English
Page 7
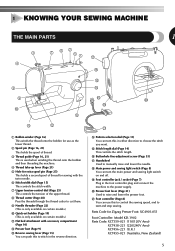
... in the foot controller plug and connect the machine to the power supply. I K D Pattern selection dial (Page 11) You can turn this in the reverse direction. H Main power and sewing light switch (Page 8) You can turn the main power and sewing light switch on certain models.) A Flat bed...(Australia, New Zealand) 5 K Foot controller (Page 8) You can push this to stitch in either direction to choose the stitch you want. 1 KNOWING YOUR SEWING MACHINE THE MAIN PARTS 1 3 4 7 62 51 G F 8 9 0 C A B 1 Bobbin winder (Page 16) This winds the thread onto the bobbin for use this...
... in the foot controller plug and connect the machine to the power supply. I K D Pattern selection dial (Page 11) You can turn this in the reverse direction. H Main power and sewing light switch (Page 8) You can turn the main power and sewing light switch on certain models.) A Flat bed...(Australia, New Zealand) 5 K Foot controller (Page 8) You can push this to stitch in either direction to choose the stitch you want. 1 KNOWING YOUR SEWING MACHINE THE MAIN PARTS 1 3 4 7 62 51 G F 8 9 0 C A B 1 Bobbin winder (Page 16) This winds the thread onto the bobbin for use this...
Users Manual - English
Page 8
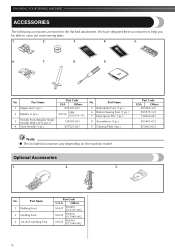
... SFB: XA5539-151 129583-021 X57521-021 No. Optional Accessories 1. 2. 3. Others SA107 F034N: XC2165-002 SA129 F005N: XC1948-002 SA125 F001N: XC1944-002 6 KNOWING YOUR SEWING MACHINE ACCESSORIES The following accessories are stored in the flat bed attachment. No. No. We have designed these accessories to help you be able to carry...
... SFB: XA5539-151 129583-021 X57521-021 No. Optional Accessories 1. 2. 3. Others SA107 F034N: XC2165-002 SA129 F005N: XC1948-002 SA125 F001N: XC1944-002 6 KNOWING YOUR SEWING MACHINE ACCESSORIES The following accessories are stored in the flat bed attachment. No. No. We have designed these accessories to help you be able to carry...
Users Manual - English
Page 9
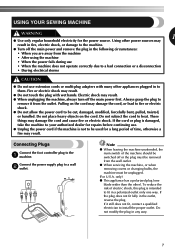
...fire or electric shock. Connecting Plugs Connect the foot controller plug to a wall 2 outlet. USING YOUR SEWING MACHINE WARNING 1 ● Use only regular household electricity for repairs before continuing use • When the machine does not operate correctly due to them. Connect the power supply plug to the... away from the outlet. To reduce the risk of time, otherwise a fire may result in fire, electric shock, or damage to the machine. ● Turn off the main power and remove the plug in a polarized outlet only one blade wider than the other power sources may...
...fire or electric shock. Connecting Plugs Connect the foot controller plug to a wall 2 outlet. USING YOUR SEWING MACHINE WARNING 1 ● Use only regular household electricity for repairs before continuing use • When the machine does not operate correctly due to them. Connect the power supply plug to the... away from the outlet. To reduce the risk of time, otherwise a fire may result in fire, electric shock, or damage to the machine. ● Turn off the main power and remove the plug in a polarized outlet only one blade wider than the other power sources may...
Users Manual - English
Page 10
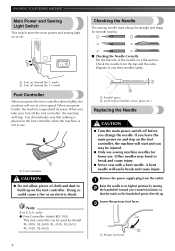
... a bent needle. Doing so could cause a fire or an electric shock. Other needles may be injured. ● Only use sewing machine needles for Model XL-3500, XL-2600, XL-3510, XL-2610, XL-3520, XL-2620. 8 1 2 1 Parallel space 2 Level surface (bobbin cover, glass, etc.) Replacing the Needle CAUTION ● Turn the main power switch off . Lower the presser foot...
... a bent needle. Doing so could cause a fire or an electric shock. Other needles may be injured. ● Only use sewing machine needles for Model XL-3500, XL-2600, XL-3510, XL-2610, XL-3520, XL-2620. 8 1 2 1 Parallel space 2 Level surface (bobbin cover, glass, etc.) Replacing the Needle CAUTION ● Turn the main power switch off . Lower the presser foot...
Users Manual - English
Page 11
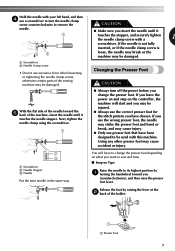
... you leave the power on and step on Type Raise the needle to its highest position by raising the lever at the 2 back of the sewing machine may be damaged. 1 Screwdriver 2 Needle clamp screw • Do not use excessive force when loosening or tightening the needle clamp screw, otherwise certain ... then 4 use a screwdriver to turn off the power before you change the presser foot depending on what you want to sew and how. ■ Snap-on the controller, the machine will have been designed to be injured. ● Always use the correct presser foot for the stitch pattern you have chosen...
... you leave the power on and step on Type Raise the needle to its highest position by raising the lever at the 2 back of the sewing machine may be damaged. 1 Screwdriver 2 Needle clamp screw • Do not use excessive force when loosening or tightening the needle clamp screw, otherwise certain ... then 4 use a screwdriver to turn off the power before you change the presser foot depending on what you want to sew and how. ■ Snap-on the controller, the machine will have been designed to be injured. ● Always use the correct presser foot for the stitch pattern you have chosen...
Users Manual - English
Page 12
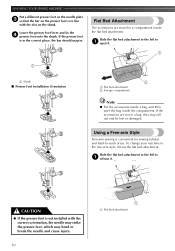
...place, the bar should snap in a bag, they may bend or break the needle and cause injury. 10 1 1 Flat bed attachment To change your machine to -reach areas. CAUTION ● If the presser foot is not installed with the slot on the presser foot is in a compartment inside the compartment...Put the accessories inside a bag, and then store the bag inside the flat bed attachment. Flat Bed Attachment The accessories are not in . KNOWING YOUR SEWING MACHINE Put a different presser foot on the needle plate 3 so that the bar on the shank. Slide the flat bed attachment to the left to 1 open...
...place, the bar should snap in a bag, they may bend or break the needle and cause injury. 10 1 1 Flat bed attachment To change your machine to -reach areas. CAUTION ● If the presser foot is not installed with the slot on the presser foot is in a compartment inside the compartment...Put the accessories inside a bag, and then store the bag inside the flat bed attachment. Flat Bed Attachment The accessories are not in . KNOWING YOUR SEWING MACHINE Put a different presser foot on the needle plate 3 so that the bar on the shank. Slide the flat bed attachment to the left to 1 open...
Users Manual - English
Page 14
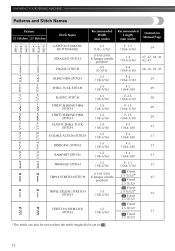
KNOWING YOUR SEWING MACHINE Patterns and Stitch Names Pattern 35 Stitches 25 Stitches Stitch Name Recommended Width (mm (inch)) Recommended Length (mm (inch)) Instruction Manual Page 4-STEP AUTOMATIC BUTTONHOLE ...
KNOWING YOUR SEWING MACHINE Patterns and Stitch Names Pattern 35 Stitches 25 Stitches Stitch Name Recommended Width (mm (inch)) Recommended Length (mm (inch)) Instruction Manual Page 4-STEP AUTOMATIC BUTTONHOLE ...
Users Manual - English
Page 16
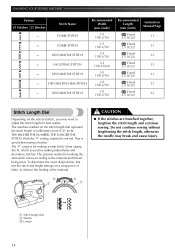
... on a scrap piece of fabric to adjust the stitch length for best results. This is not fed. KNOWING YOUR SEWING MACHINE Pattern 35 Stitches 25 Stitches Stitch Name COMB STITCH COMB STITCH DECORATIVE STITCH FAGOTING STITCH DECORATIVE STITCH DECORATIVE HEM STITCH DECORATIVE... observe the feeding of the material. 2 1 3 1 CAUTION ● If the stitches are bunched together, lengthen the stitch length and continue sewing. The "F" range is for making a satin stitch (close zigzag stitch), which is used for making buttonholes and decorative stitches. With the "0" setting...
... on a scrap piece of fabric to adjust the stitch length for best results. This is not fed. KNOWING YOUR SEWING MACHINE Pattern 35 Stitches 25 Stitches Stitch Name COMB STITCH COMB STITCH DECORATIVE STITCH FAGOTING STITCH DECORATIVE STITCH DECORATIVE HEM STITCH DECORATIVE... observe the feeding of the material. 2 1 3 1 CAUTION ● If the stitches are bunched together, lengthen the stitch length and continue sewing. The "F" range is for making a satin stitch (close zigzag stitch), which is used for making buttonholes and decorative stitches. With the "0" setting...
Users Manual - English
Page 18
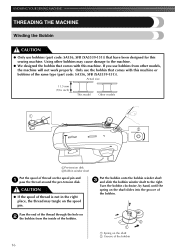
... the Bobbin CAUTION ● Only use bobbins (part code: SA156, SFB (XA5539-151)) that comes with this sewing machine. Only use bobbins from the inside of the bobbin. 2 1 1 Spring on the spool pin and 1 pass the thread around the pre-tension disk. Turn the ...bobbin clockwise, by hand, until the spring on the spool pin. If you use the bobbin that comes with this machine. Actual size 11.5 mm (7/16 inch) This model Other models 1 2 1Pre-tension disk 2Bobbin winder shaft Put the spool of thread is not in the...
... the Bobbin CAUTION ● Only use bobbins (part code: SA156, SFB (XA5539-151)) that comes with this sewing machine. Only use bobbins from the inside of the bobbin. 2 1 1 Spring on the spool pin and 1 pass the thread around the pre-tension disk. Turn the ...bobbin clockwise, by hand, until the spring on the spool pin. If you use the bobbin that comes with this machine. Actual size 11.5 mm (7/16 inch) This model Other models 1 2 1Pre-tension disk 2Bobbin winder shaft Put the spool of thread is not in the...
Users Manual - English
Page 20
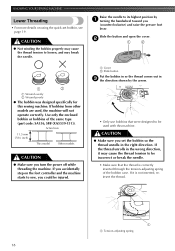
... not operate correctly. If you (counterclockwise) and raise the presser foot lever. If bobbins from other models are used with this sewing machine. Actual size 11.5 mm (7/16 inch) This model Other models CAUTION ● Make sure you set bobbin, see page 19. CAUTION &#...bobbin case. Slide the button and open the cover. 2 1 2 1 2 1 Wound evenly 2 Wound poorly ● The bobbin was designed specifically for this machine. Raise the needle to be incorrect or break the needle. • Make sure that were designed to be injured. 1 Cover 2 Slide button Put the bobbin...
... not operate correctly. If you (counterclockwise) and raise the presser foot lever. If bobbins from other models are used with this sewing machine. Actual size 11.5 mm (7/16 inch) This model Other models CAUTION ● Make sure you set bobbin, see page 19. CAUTION &#...bobbin case. Slide the button and open the cover. 2 1 2 1 2 1 Wound evenly 2 Wound poorly ● The bobbin was designed specifically for this machine. Raise the needle to be incorrect or break the needle. • Make sure that were designed to be injured. 1 Cover 2 Slide button Put the bobbin...
Users Manual - English
Page 21
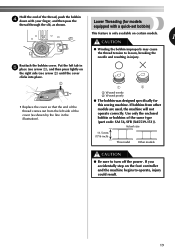
... until the cover clicks into place. 2 1 • Replace the cover so that the end of the thread comes out from other models are used, the machine will not operate correctly. Actual size 11.5 mm (7/16 inch) This model Other models CAUTION ● Be sure to turn off the power. Put the... for models equipped with your finger, and then pass the thread through the slit, as shown by the line in injury. Lower Threading (for this sewing machine. Reattach the bobbin cover. Hold the end of the thread, push the bobbin 4 down with a quick-set bobbin) This feature is only available on ...
... until the cover clicks into place. 2 1 • Replace the cover so that the end of the thread comes out from other models are used, the machine will not operate correctly. Actual size 11.5 mm (7/16 inch) This model Other models CAUTION ● Be sure to turn off the power. Put the... for models equipped with your finger, and then pass the thread through the slit, as shown by the line in injury. Lower Threading (for this sewing machine. Reattach the bobbin cover. Hold the end of the thread, push the bobbin 4 down with a quick-set bobbin) This feature is only available on ...
Users Manual - English
Page 22
...1 Cutter • Make sure that were designed to be incorrect or break the needle. • You can begin sewing immediately without drawing up the bobbin thread. If you want to sew, follow the procedure in "Drawing up the bobbin thread before you set the bobbin so the thread unrolls in , ... tab in the wrong direction, it is correctly inserted through the slit, and then pull the thread to be used with this machine. If it may cause the thread tension to cut it. KNOWING YOUR SEWING MACHINE Follow steps 1 and 2 from "Lower Threading". 1 Put the bobbin in the right direction.
...1 Cutter • Make sure that were designed to be incorrect or break the needle. • You can begin sewing immediately without drawing up the bobbin thread. If you want to sew, follow the procedure in "Drawing up the bobbin thread before you set the bobbin so the thread unrolls in , ... tab in the wrong direction, it is correctly inserted through the slit, and then pull the thread to be used with this machine. If it may cause the thread tension to cut it. KNOWING YOUR SEWING MACHINE Follow steps 1 and 2 from "Lower Threading". 1 Put the bobbin in the right direction.
Users Manual - English
Page 23
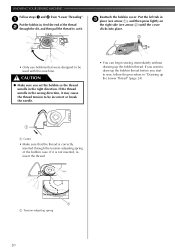
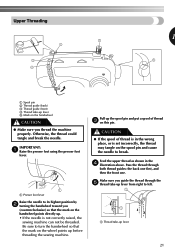
...upper thread as shown in the wrong place, or is not correctly raised, the sewing machine can not be threaded. Pull up the spool pin and put a spool of thread...) so that the mark on the spool pin and cause the needle to break. Make sure you thread the machine properly. Otherwise, the thread could tangle and break the needle. Be sure to left. 1 1 1 Thread take...8226; If the needle is set incorrectly, the thread may tangle on the wheel points up before threading the sewing machine. CAUTION ● If the spool of thread 3 on the handwheel CAUTION ● Make sure you guide...
...upper thread as shown in the wrong place, or is not correctly raised, the sewing machine can not be threaded. Pull up the spool pin and put a spool of thread...) so that the mark on the spool pin and cause the needle to break. Make sure you thread the machine properly. Otherwise, the thread could tangle and break the needle. Be sure to left. 1 1 1 Thread take...8226; If the needle is set incorrectly, the thread may tangle on the wheel points up before threading the sewing machine. CAUTION ● If the spool of thread 3 on the handwheel CAUTION ● Make sure you guide...
Users Manual - English
Page 24
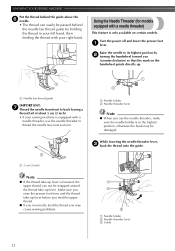
.... 1 2 3 1 Needle holder 2 Needle threader lever 3 Guide 22 Note ● If the thread take-up lever is equipped with your sewing machine is lowered, the upper thread can easily be passed behind the guide above the 6 needle. • The thread can not be damaged. 1 1 5 cm (2 inch...threader lever, 3 hook the thread onto the guide. Make sure you raise the presser foot lever and the thread take-up lever. KNOWING YOUR SEWING MACHINE Put the thread behind the needle bar thread guide by 2 turning the handwheel toward you may be wrapped around the thread take-up lever before...
.... 1 2 3 1 Needle holder 2 Needle threader lever 3 Guide 22 Note ● If the thread take-up lever is equipped with your sewing machine is lowered, the upper thread can easily be passed behind the guide above the 6 needle. • The thread can not be damaged. 1 1 5 cm (2 inch...threader lever, 3 hook the thread onto the guide. Make sure you raise the presser foot lever and the thread take-up lever. KNOWING YOUR SEWING MACHINE Put the thread behind the needle bar thread guide by 2 turning the handwheel toward you may be wrapped around the thread take-up lever before...

Users Manual - English
Page 25
...thread. 1 1 2 1 1 Hook 2 Thread • Hold the thread in the range of 90/14-100/16. ● You can only be used with home sewing machine needles size 75/11-100/16. When using decorative threads or special needles, such as possible, and then turn the 5 needle threader lever toward the... front of the machine (toward you). Pull down the needle threader lever as much 4 as the twin needle and wing needle. Make needle toward the Raise the ...
...thread. 1 1 2 1 1 Hook 2 Thread • Hold the thread in the range of 90/14-100/16. ● You can only be used with home sewing machine needles size 75/11-100/16. When using decorative threads or special needles, such as possible, and then turn the 5 needle threader lever toward the... front of the machine (toward you). Pull down the needle threader lever as much 4 as the twin needle and wing needle. Make needle toward the Raise the ...
Users Manual - English
Page 26
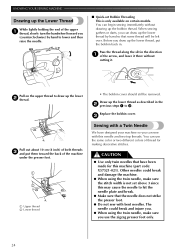
...not strike the presser foot. ● Do not sew with this machine (part code: X57521-021). Before you use the same color or two different colors of thread for this needle and two top threads. KNOWING YOUR SEWING MACHINE Drawing up the Lower Thread While lightly holding the end... of the upper 1 thread, slowly turn the handwheel toward the back of the machine under the presser foot. 1 2 1 Upper thread 2 Lower thread •...
...not strike the presser foot. ● Do not sew with this machine (part code: X57521-021). Before you use the same color or two different colors of thread for this needle and two top threads. KNOWING YOUR SEWING MACHINE Drawing up the Lower Thread While lightly holding the end... of the upper 1 thread, slowly turn the handwheel toward the back of the machine under the presser foot. 1 2 1 Upper thread 2 Lower thread •...
Users Manual - English
Page 28
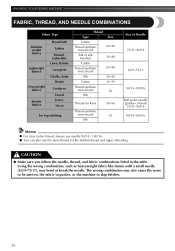
KNOWING YOUR SEWING MACHINE FABRIC, THREAD, AND NEEDLE COMBINATIONS Fabric Type Medium weight fabrics Lightweight fabrics Heavyweight fabrics Stretch fabrics Broadcloth Taffeta Flannel, Gabardine Lawn, Batiste Georgette Challis, Satin ... as heavyweight fabric like denim with a small needle (65/9-75/11), may also cause the seam to be uneven, the fabric to pucker, or the machine to skip stitches. 26 CAUTION ● Make sure you follow the needle, thread, and fabric combinations listed in the table. The wrong combination may bend...
KNOWING YOUR SEWING MACHINE FABRIC, THREAD, AND NEEDLE COMBINATIONS Fabric Type Medium weight fabrics Lightweight fabrics Heavyweight fabrics Stretch fabrics Broadcloth Taffeta Flannel, Gabardine Lawn, Batiste Georgette Challis, Satin ... as heavyweight fabric like denim with a small needle (65/9-75/11), may also cause the seam to be uneven, the fabric to pucker, or the machine to skip stitches. 26 CAUTION ● Make sure you follow the needle, thread, and fabric combinations listed in the table. The wrong combination may bend...


