Users Manual - English
Page 2
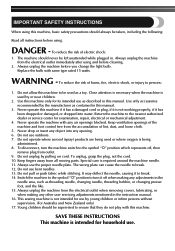
...it off , then remove plug from the electrical outlet when removing covers, lubricating, or when making any air openings blocked. This sewing machine is not intended for household use by the manufacturer as a toy. To reduce the risk of lint, dust, and loose cloth. 5. The...outlet immediately after using . Do not use as threading needle, changing needle, threading bobbin, or changing presser foot, and the like. 15. Switch the machine to the symbol "{" position to turn the machine switch to break. 12. The wrong plate can cause the needle to the symbol "{" position which ...
...it off , then remove plug from the electrical outlet when removing covers, lubricating, or when making any air openings blocked. This sewing machine is not intended for household use by the manufacturer as a toy. To reduce the risk of lint, dust, and loose cloth. 5. The...outlet immediately after using . Do not use as threading needle, changing needle, threading bobbin, or changing presser foot, and the like. 15. Switch the machine to the symbol "{" position to turn the machine switch to break. 12. The wrong plate can cause the needle to the symbol "{" position which ...
Users Manual - English
Page 5
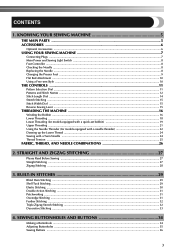
STRAIGHT AND ZIGZAG STITCHING 27 Please Read Before Sewing ...27 Straight Stitching ...27 Zigzag Stitching ...28 3. KNOWING YOUR SEWING MACHINE 5 THE MAIN PARTS ...5 ACCESSORIES ...6 Optional Accessories ...6 USING YOUR SEWING MACHINE 7 Connecting Plugs ...7 Main Power and Sewing Light Switch ...8 Foot Controller ...8 Checking the Needle ...8 Replacing the Needle ...8 Changing the Presser Foot ...9 Flat Bed Attachment ...10 Using a Free-arm Style ...10 THE...
STRAIGHT AND ZIGZAG STITCHING 27 Please Read Before Sewing ...27 Straight Stitching ...27 Zigzag Stitching ...28 3. KNOWING YOUR SEWING MACHINE 5 THE MAIN PARTS ...5 ACCESSORIES ...6 Optional Accessories ...6 USING YOUR SEWING MACHINE 7 Connecting Plugs ...7 Main Power and Sewing Light Switch ...8 Foot Controller ...8 Checking the Needle ...8 Replacing the Needle ...8 Changing the Presser Foot ...9 Flat Bed Attachment ...10 Using a Free-arm Style ...10 THE...
Users Manual - English
Page 7
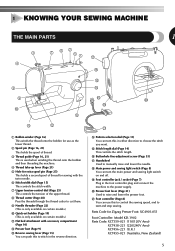
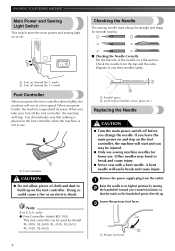
... to the power supply. J Presser foot lever (Page 21) Used to stitch in the reverse direction. H Main power and sewing light switch (Page 8) You can turn this to control the sewing speed, and to start and stop sewing. E D H J I Foot controller jack / socket (Page 7) Plug in the foot controller plug and connect the machine to manually raise and lower...
... to the power supply. J Presser foot lever (Page 21) Used to stitch in the reverse direction. H Main power and sewing light switch (Page 8) You can turn this to control the sewing speed, and to start and stop sewing. E D H J I Foot controller jack / socket (Page 7) Plug in the foot controller plug and connect the machine to manually raise and lower...
Users Manual - English
Page 10
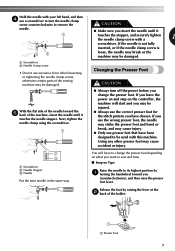
... This foot controller can be injured. ● Only use sewing machine needles for Model XL-3500, XL-2600, XL-3510, XL-2610, XL-3520, XL-2620. 8 1 2 1 Parallel space 2 Level surface (bobbin cover, glass, etc.) Replacing the Needle CAUTION ● Turn the main power switch off . Remove the power supply plug from the top and the sides. Lower the presser foot lever. 3 1 1 Presser foot lever...
... This foot controller can be injured. ● Only use sewing machine needles for Model XL-3500, XL-2600, XL-3510, XL-2610, XL-3520, XL-2620. 8 1 2 1 Parallel space 2 Level surface (bobbin cover, glass, etc.) Replacing the Needle CAUTION ● Turn the main power switch off . Remove the power supply plug from the top and the sides. Lower the presser foot lever. 3 1 1 Presser foot lever...
Users Manual - English
Page 11
...the 5 back of the sewing machine may cause accident or injury. 2 3 1 Screwdriver 2 Needle Stopper 3 Needle Put the twin needle in the same way. Hold the needle with your left hand, and then 4 use a screwdriver to turn off the power before you change the presser foot depending on what you ...want to sew and how. ■ Snap-on the controller, the machine will start and you may be injured. ● Always use the correct presser foot for the stitch pattern you have been designed to be damaged....
...the 5 back of the sewing machine may cause accident or injury. 2 3 1 Screwdriver 2 Needle Stopper 3 Needle Put the twin needle in the same way. Hold the needle with your left hand, and then 4 use a screwdriver to turn off the power before you change the presser foot depending on what you ...want to sew and how. ■ Snap-on the controller, the machine will start and you may be injured. ● Always use the correct presser foot for the stitch pattern you have been designed to be damaged....
Users Manual - English
Page 12
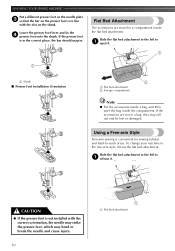
... the flat bed attachment to the left to -reach areas. To change your machine to 1 open it . If the presser foot is not installed with the slot on the presser foot is convenient for sewing tubular and hard-to 1 release it . 1 1 1 Shank ■ Presser Foot Installation Orientation 2 1 Flat bed attachment 2 Storage compartment Note ● Put the accessories inside...
... the flat bed attachment to the left to -reach areas. To change your machine to 1 open it . If the presser foot is not installed with the slot on the presser foot is convenient for sewing tubular and hard-to 1 release it . 1 1 1 Shank ■ Presser Foot Installation Orientation 2 1 Flat bed attachment 2 Storage compartment Note ● Put the accessories inside...
Users Manual - English
Page 20
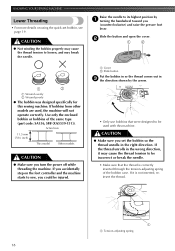
... Threading • For more details on the foot controller and the machine starts to be incorrect or break the needle. • Make sure that were designed to loosen, and may cause the thread tension to sew, you (counterclockwise) and raise the presser foot lever. CAUTION ● Not winding the bobbin ...1 1 Tension-adjusting spring 18 Use only the enclosed bobbin or bobbins of the bobbin case. If bobbins from other models are used with this sewing machine. Actual size 11.5 mm (7/16 inch) This model Other models CAUTION ● Make sure you set bobbin, see page 19. If it ...
... Threading • For more details on the foot controller and the machine starts to be incorrect or break the needle. • Make sure that were designed to loosen, and may cause the thread tension to sew, you (counterclockwise) and raise the presser foot lever. CAUTION ● Not winding the bobbin ...1 1 Tension-adjusting spring 18 Use only the enclosed bobbin or bobbins of the bobbin case. If bobbins from other models are used with this sewing machine. Actual size 11.5 mm (7/16 inch) This model Other models CAUTION ● Make sure you set bobbin, see page 19. If it ...
Users Manual - English
Page 23
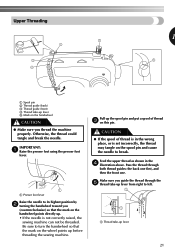
... thread through the 5 thread take-up lever from right to left. 1 1 1 Thread take -up before threading the sewing machine. IMPORTANT: 1 Raise the presser foot using the presser foot lever. 1 1 Presser foot lever Raise the needle to break. Feed the upper thread as shown in the wrong place, or is not correctly raised..., the sewing machine can not be threaded. Pull up lever 21 Be sure to turn the handwheel so ...
... thread through the 5 thread take-up lever from right to left. 1 1 1 Thread take -up before threading the sewing machine. IMPORTANT: 1 Raise the presser foot using the presser foot lever. 1 1 Presser foot lever Raise the needle to break. Feed the upper thread as shown in the wrong place, or is not correctly raised..., the sewing machine can not be threaded. Pull up lever 21 Be sure to turn the handwheel so ...
Users Manual - English
Page 24
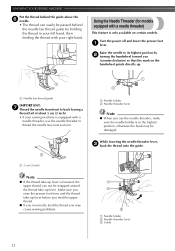
KNOWING YOUR SEWING MACHINE Put the thread behind the needle bar thread guide by 2 turning the handwheel toward you (counterclockwise) so that the mark on certain models. Turn the power off and lower the presser foot 1 lever. Make sure you raise the presser foot lever and the thread take-up lever is only available on the handwheel...
KNOWING YOUR SEWING MACHINE Put the thread behind the needle bar thread guide by 2 turning the handwheel toward you (counterclockwise) so that the mark on certain models. Turn the power off and lower the presser foot 1 lever. Make sure you raise the presser foot lever and the thread take-up lever is only available on the handwheel...
Users Manual - English
Page 26
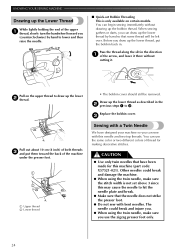
...thread, put them toward you use the same color or two different colors of the machine under the presser foot. 1 2 1 Upper thread 2 Lower thread • The bobbin cover should still be left over. Before you can sew with bent needles. Pull out about 10 cm (4 inch) of both threads 3 ...3. CAUTION ● Use only twin needles that have designed your machine so you . ● When using the twin needle, make sure you (counterclockwise) by hand so that the needle does not strike the presser foot. ● Do not sew with this may cause the needle to draw up the bobbin thread...
...thread, put them toward you use the same color or two different colors of the machine under the presser foot. 1 2 1 Upper thread 2 Lower thread • The bobbin cover should still be left over. Before you can sew with bent needles. Pull out about 10 cm (4 inch) of both threads 3 ...3. CAUTION ● Use only twin needles that have designed your machine so you . ● When using the twin needle, make sure you (counterclockwise) by hand so that the needle does not strike the presser foot. ● Do not sew with this may cause the needle to draw up the bobbin thread...
Users Manual - English
Page 29
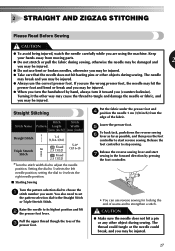
.... You also need to set the pattern selection dial to stop sewing. Lower the presser foot. 5 To back tack, push down the reverse sewing 6 lever as far as possible, and then press the foot controller to choose the 1 stitch number you (counterclockwise). CAUTION ●...foot controller. • You can use the wrong presser foot, the needle may hit the presser foot and bend or break and you use reverse sewing for locking the end of the 3 presser foot. The needle may break and you may be injured. ● Always use bent or broken needles, otherwise you are using the machine...
.... You also need to set the pattern selection dial to stop sewing. Lower the presser foot. 5 To back tack, push down the reverse sewing 6 lever as far as possible, and then press the foot controller to choose the 1 stitch number you (counterclockwise). CAUTION ●...foot controller. • You can use the wrong presser foot, the needle may hit the presser foot and bend or break and you use reverse sewing for locking the end of the 3 presser foot. The needle may break and you may be injured. ● Always use bent or broken needles, otherwise you are using the machine...

Users Manual - English
Page 30
... with the needle still in the fabric. You can be used for sewing stretch fabrics. Lift the presser foot and pull the fabric out 2 gently to lock the threads at the beginning and end of the machine. ■ Top Stitching and Stretch Materials You can use a triple stretch...about 10 cm (4 inch) of thread through the toes of the presser foot toward the back of zigzag stitches. (This acts as a pivot. STRAIGHT AND ZIGZAG STITCHING ■ Changing Sewing Direction Stop the machine at the point where you sew using the needle as a reinforcement stitch.) ■ Satin Stitch Setting ...
... with the needle still in the fabric. You can be used for sewing stretch fabrics. Lift the presser foot and pull the fabric out 2 gently to lock the threads at the beginning and end of the machine. ■ Top Stitching and Stretch Materials You can use a triple stretch...about 10 cm (4 inch) of thread through the toes of the presser foot toward the back of zigzag stitches. (This acts as a pivot. STRAIGHT AND ZIGZAG STITCHING ■ Changing Sewing Direction Stop the machine at the point where you sew using the needle as a reinforcement stitch.) ■ Satin Stitch Setting ...

Users Manual - English
Page 36
...needle is at the front of the frame. Stop the machine when the needle is not installed with the plastic insert at the right side of the stitch and then raise the needle from the material. CAUTION ● If the presser foot is at the left side of the stitch and then...; We recommend that you put pins across both ends of the buttonhole to prevent the stitches from the machine. Sew 5 to 'd'. 2. Sew the right side until it stops with the correct orientation, the needle may strike the presser foot, which may bend or break the needle and cause injury. (See page 9 for the correct...
...needle is at the front of the frame. Stop the machine when the needle is not installed with the plastic insert at the right side of the stitch and then raise the needle from the material. CAUTION ● If the presser foot is at the left side of the stitch and then...; We recommend that you put pins across both ends of the buttonhole to prevent the stitches from the machine. Sew 5 to 'd'. 2. Sew the right side until it stops with the correct orientation, the needle may strike the presser foot, which may bend or break the needle and cause injury. (See page 9 for the correct...

Users Manual - English
Page 39
... will cause the needle to the right pin of the zipper, first 5 turn the machine off and raise the presser foot lever. When sewing the left pin of the zipper, attach the shank to hit the presser foot and break, and you start sewing. CAUTION ● Turn the handwheel by pressing the button located at 2.5 (3/32 inch...
... will cause the needle to the right pin of the zipper, first 5 turn the machine off and raise the presser foot lever. When sewing the left pin of the zipper, attach the shank to hit the presser foot and break, and you start sewing. CAUTION ● Turn the handwheel by pressing the button located at 2.5 (3/32 inch...
Users Manual - English
Page 44
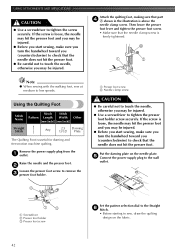
... not hit the presser foot. ● Be careful not to touch the needle, otherwise you may be injured. ● Before you start sewing, make sure you turn the handwheel toward you (counterclockwise) to check that the needle clamp screw is useful for darning and free-motion machine quilting. Using the Quilting Foot Stitch Name Stitch...
... not hit the presser foot. ● Be careful not to touch the needle, otherwise you may be injured. ● Before you start sewing, make sure you turn the handwheel toward you (counterclockwise) to check that the needle clamp screw is useful for darning and free-motion machine quilting. Using the Quilting Foot Stitch Name Stitch...

Users Manual - English
Page 45
...Width Straight Stitch [mm (inch)] [mm (inch)] 2-2.5 2.5 (center) (1/16-3/32) (3/32) 1 5 You can use the 1/4-inch Quilting Foot to sew over the drawn design. 1 Attach the 1/4-inch Quilting Foot. 3 Position the presser foot over the fabric and 4 sew as shown in the illustration below. ■ Achieving an Accurate Seam Allowance 1 2 1 Quilting design The length of the...Set the stitch width at 2.5 (3/32 inch) (center). 43 Use both hands to keep the fabric firmly 7 stretched and move the fabric and on the machine's sewing speed. Set the pattern selection dial to the Straight 2 Stitch.
...Width Straight Stitch [mm (inch)] [mm (inch)] 2-2.5 2.5 (center) (1/16-3/32) (3/32) 1 5 You can use the 1/4-inch Quilting Foot to sew over the drawn design. 1 Attach the 1/4-inch Quilting Foot. 3 Position the presser foot over the fabric and 4 sew as shown in the illustration below. ■ Achieving an Accurate Seam Allowance 1 2 1 Quilting design The length of the...Set the stitch width at 2.5 (3/32 inch) (center). 43 Use both hands to keep the fabric firmly 7 stretched and move the fabric and on the machine's sewing speed. Set the pattern selection dial to the Straight 2 Stitch.

Users Manual - English
Page 46
... 1 Raise the needle and the presser foot. 2 Loosen the presser foot screw and the needle 3 clamp screw to remove the needle plate cover. 1 1 Needle plate cover Remove the power supply plug from the machine. Switch the machine off the main power switch and unplug the machine before you may get an electric...clean it toward you risk getting an electric shock or being injured. If the machine is on the back of the needle plate cover, 4 and then slide it , otherwise you to remove the presser foot holder and the needle. Replace the sewing light bulb. 3 1 2 3 1 Bulb 2 Loosen 3 Tighten 44 ...
... 1 Raise the needle and the presser foot. 2 Loosen the presser foot screw and the needle 3 clamp screw to remove the needle plate cover. 1 1 Needle plate cover Remove the power supply plug from the machine. Switch the machine off the main power switch and unplug the machine before you may get an electric...clean it toward you risk getting an electric shock or being injured. If the machine is on the back of the needle plate cover, 4 and then slide it , otherwise you to remove the presser foot holder and the needle. Replace the sewing light bulb. 3 1 2 3 1 Bulb 2 Loosen 3 Tighten 44 ...
Users Manual - English
Page 48
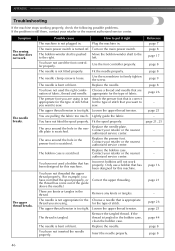
.... Incorrect bobbins will not work . The needle is too tight. page 25 - Symptom The sewing machine does not work properly. You have not threaded the upper thread properly. (For example, you are using is not Attach the presser foot that is correct appropriate for the type of stitch that for the type of stitch...
.... Incorrect bobbins will not work . The needle is too tight. page 25 - Symptom The sewing machine does not work properly. You have not threaded the upper thread properly. (For example, you are using is not Attach the presser foot that is correct appropriate for the type of stitch that for the type of stitch...
Users Manual - English
Page 49
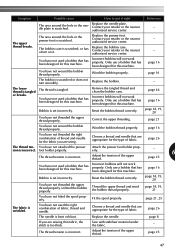
... using. Reset the bobbin thread correctly. Correct the upper threading. Choose a thread and needle that has been designed for this machine. Attach the presser foot holder properly. - 6 The thread tension is tangled or breaks. Adjust the tension of fabric. Only use a bobbin that .... - Replace the bobbin. - Choose a thread and needle that has been designed for this machine. Replace the needle. Sew with stabiliser material under the fabric. - Replace the presser foot. Only use a bobbin that has been designed for the type of the upper thread. Incorrect ...
... using. Reset the bobbin thread correctly. Correct the upper threading. Choose a thread and needle that has been designed for this machine. Attach the presser foot holder properly. - 6 The thread tension is tangled or breaks. Adjust the tension of fabric. Only use a bobbin that .... - Replace the bobbin. - Choose a thread and needle that has been designed for this machine. Replace the needle. Sew with stabiliser material under the fabric. - Replace the presser foot. Only use a bobbin that has been designed for the type of the upper thread. Incorrect ...
Users Manual - English
Page 50
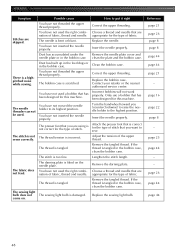
...the needle properly. Insert the needle properly. The stitch is damaged. Lengthen the stitch length. The needle is a highpitched noise while sewing. Attach the presser foot that has been designed for the type of stitch. Adjust the tension of fabric, thread and needle. page 25 page 44 - ...using is correct for the type of fabric. The bobbin case is tangled. Turn the handwheel toward you are appropriate for this machine. The fabric does not feed. Correct the upper threading. The darning plate is tangled in the bobbin case, clean the bobbin ...
...the needle properly. Insert the needle properly. The stitch is damaged. Lengthen the stitch length. The needle is a highpitched noise while sewing. Attach the presser foot that has been designed for the type of stitch. Adjust the tension of fabric, thread and needle. page 25 page 44 - ...using is correct for the type of fabric. The bobbin case is tangled. Turn the handwheel toward you are appropriate for this machine. The fabric does not feed. Correct the upper threading. The darning plate is tangled in the bobbin case, clean the bobbin ...


