
Users Manual - English
Page 2
...outlet immediately after using ." carrying the •mark, rating as threading the needle, changing the needle, threading the bobbin, or changing the presser foot. 15. WARNING: DO NOT CONNECT EITHER WIRE TO THEEARTHTERMINAL WHICHISMARKED WITH THE LETTER `E', BY THE EARTH SYMBOL OR COLORED GREEN OR YELLOW. The ... to break. 12. Never operate the sewing machine with same type rated 15 watts. Keep the ventilation openings of the sewing machine and foot controller free from the accumulation of the machine must be switched off , then remove plug from the supply by ASTA to break. 14....
...outlet immediately after using ." carrying the •mark, rating as threading the needle, changing the needle, threading the bobbin, or changing the presser foot. 15. WARNING: DO NOT CONNECT EITHER WIRE TO THEEARTHTERMINAL WHICHISMARKED WITH THE LETTER `E', BY THE EARTH SYMBOL OR COLORED GREEN OR YELLOW. The ... to break. 12. Never operate the sewing machine with same type rated 15 watts. Keep the ventilation openings of the sewing machine and foot controller free from the accumulation of the machine must be switched off , then remove plug from the supply by ASTA to break. 14....
Users Manual - English
Page 6
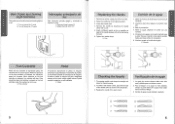
... , •CZ .C ' Main Power and Sewing Light Switches This switch turns the main power and sewing light on or off. (i) Turn on the foot controller when the machine is increased, the machine's speed will run at a low speed. Retire el enchufe de alimentacion de la toma de corriente. 2. ...Remove the power supply plug from the outlet. 2. Levante la barra de la aguja a su posicion mas alta. 3. cp Moneda KN • -35.3 Foot Controller When the foot controller is bent or dull. co Encender (hacia la marca "I " mark) C) Turn off (toward the "I ") Apagar (hacia la marca "0") (5)...
... , •CZ .C ' Main Power and Sewing Light Switches This switch turns the main power and sewing light on or off. (i) Turn on the foot controller when the machine is increased, the machine's speed will run at a low speed. Retire el enchufe de alimentacion de la toma de corriente. 2. ...Remove the power supply plug from the outlet. 2. Levante la barra de la aguja a su posicion mas alta. 3. cp Moneda KN • -35.3 Foot Controller When the foot controller is bent or dull. co Encender (hacia la marca "I " mark) C) Turn off (toward the "I ") Apagar (hacia la marca "0") (5)...
Users Manual - English
Page 10
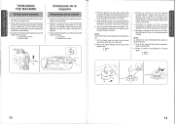
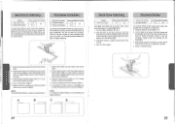
... spool pin and firmly hold it with a spool holder so that the spool of the thread, gently depress the foot controller to the bobbin mark. 2. Turn the bobbin clockwise, by depressing the foot controller. Continue winding the thread onto the bobbin by hand, until the spring on the shaft slides into the...
... spool pin and firmly hold it with a spool holder so that the spool of the thread, gently depress the foot controller to the bobbin mark. 2. Turn the bobbin clockwise, by depressing the foot controller. Continue winding the thread onto the bobbin by hand, until the spring on the shaft slides into the...
Users Manual - English
Page 12
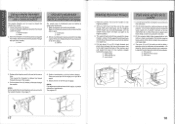
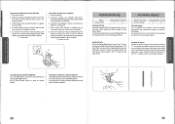
...Gufa 2. NOTA: Conalgunas combinaciones dehilo-aguja, nopuede utilizarse el enhebrador. Levante elprensatelasyla aguja a susposiciones mas elevadas. 2. Lower the presser foot lever. Mover elenhebradorhasta suposicion mas baja yguiarelhilopordebajo delgancho quepasapor el ojo de la aguja. ® Gancho 3 3. This causes the threader... to its lowest position and guide the thread under the guide. ® Needle threader O Guide 2. Raise the presser foot and the needle to thread the needle more easily. 1. The upper thread should have caught the lower thread in a large ...
...Gufa 2. NOTA: Conalgunas combinaciones dehilo-aguja, nopuede utilizarse el enhebrador. Levante elprensatelasyla aguja a susposiciones mas elevadas. 2. Lower the presser foot lever. Mover elenhebradorhasta suposicion mas baja yguiarelhilopordebajo delgancho quepasapor el ojo de la aguja. ® Gancho 3 3. This causes the threader... to its lowest position and guide the thread under the guide. ® Needle threader O Guide 2. Raise the presser foot and the needle to thread the needle more easily. 1. The upper thread should have caught the lower thread in a large ...
Users Manual - English
Page 15
... orilla del tejido. 5. Baje elprensatelas. 6. Stitch to its new direction using the needle as possible and lightly touch the foot controller. Lower the presser foot. 6. Release the Reverse Sewing Button and start sewing in as far as a turning point. 3. Levante el prensatelas y...en elsentido contrario alde las manecillas de un reloi)y tire los hilos superior e inferiorhacia la parte atras delprensatelas. 4. Lower the presser foot and start sewing in the fabric. 2. El retroceso sirve para finalizar una costura o reforzarla, tal como aparece a continuaci6n. 7. Suelte...
... orilla del tejido. 5. Baje elprensatelas. 6. Stitch to its new direction using the needle as possible and lightly touch the foot controller. Lower the presser foot. 6. Release the Reverse Sewing Button and start sewing in as far as a turning point. 3. Levante el prensatelas y...en elsentido contrario alde las manecillas de un reloi)y tire los hilos superior e inferiorhacia la parte atras delprensatelas. 4. Lower the presser foot and start sewing in the fabric. 2. El retroceso sirve para finalizar una costura o reforzarla, tal como aparece a continuaci6n. 7. Suelte...
Users Manual - English
Page 16
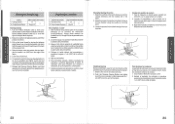
...The Satin Stitch can be used for the next seam, pull about 10 cm (4") of thread through the toes of the presser foot toward the back of the presser foot bar. 5. Top Stitching and Stretch Materials No. 2 (Straight Stitch) is used for top stitching and sewing lightweight fabrics. .... 5. It is set the stitch length in the "F" range and the stitch width. Seleccionelapuntada zigzag (3). Stop the machine. 2. Lift the presser foot and pull the fabric out gently to its highest position. 3. Pare la maquina. 2. Puntada de realce Cuando se define el largo de la puntada...
...The Satin Stitch can be used for the next seam, pull about 10 cm (4") of thread through the toes of the presser foot toward the back of the presser foot bar. 5. Top Stitching and Stretch Materials No. 2 (Straight Stitch) is used for top stitching and sewing lightweight fabrics. .... 5. It is set the stitch length in the "F" range and the stitch width. Seleccionelapuntada zigzag (3). Stop the machine. 2. Lift the presser foot and pull the fabric out gently to its highest position. 3. Pare la maquina. 2. Puntada de realce Cuando se define el largo de la puntada...
Users Manual - English
Page 17
... Stitch) Stitch Length Stitch Width F-2 3-5 F-1.5 The Blind Hem Stitch is useful for stretch fabrics. Sew the fabric on the bias, placing it under the presser foot so that the straight stitches are sewn on a lightweight fabric. 1. This stitch requires a tighter thread tension than normal. 4. A. C. 5. Luego, dele la vuelta tal como indica...
... Stitch) Stitch Length Stitch Width F-2 3-5 F-1.5 The Blind Hem Stitch is useful for stretch fabrics. Sew the fabric on the bias, placing it under the presser foot so that the straight stitches are sewn on a lightweight fabric. 1. This stitch requires a tighter thread tension than normal. 4. A. C. 5. Luego, dele la vuelta tal como indica...


