

Operation Manual
Page 2
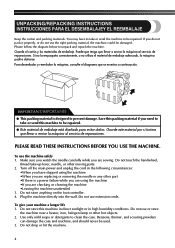
... unattended while plugged in the instruction manual. 16. Close attention is necessary when the machine is being used or where oxygen is used as threading needle, changing needle, threading bobbin, or changing presser foot, and the like. 15. Do not operate where aerosol (spray) products are being administered. 8. The wrong plate can...
... unattended while plugged in the instruction manual. 16. Close attention is necessary when the machine is being used or where oxygen is used as threading needle, changing needle, threading bobbin, or changing presser foot, and the like. 15. Do not operate where aerosol (spray) products are being administered. 8. The wrong plate can...
Operation Manual
Page 5
.... Turn off the main power and unplug the cord in high humidity conditions. Do not drop or hit the machine. 4 Do not touch the handwheel, thread take or send the machine to be repaired. Si no la empaqueta correctamente, o no utiliza el material de embalaje adecuado, la máquina podrí...
.... Turn off the main power and unplug the cord in high humidity conditions. Do not drop or hit the machine. 4 Do not touch the handwheel, thread take or send the machine to be repaired. Si no la empaqueta correctamente, o no utiliza el material de embalaje adecuado, la máquina podrí...
Operation Manual
Page 7
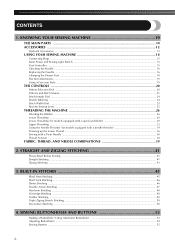
... Stitching ...24 Stitch Width Dial ...25 Reverse Sewing Lever ...25 THREADING THE MACHINE 26 Winding the Bobbin ...26 Lower Threading ...28 Lower Threading (for models equipped with a quick-set bobbin 30 Upper Threading ...32 Using the Needle Threader (for models equipped with a needle... threader 34 Drawing up the Lower Thread ...36 Sewing with a Twin Needle ...36 Thread Tension ...38 FABRIC, THREAD, AND NEEDLE COMBINATIONS 39 2. SEWING BUTTONHOLES AND BUTTONS 52 Making a Buttonhole (1-Step Automatic Buttonhole 52 Adjusting...
... Stitching ...24 Stitch Width Dial ...25 Reverse Sewing Lever ...25 THREADING THE MACHINE 26 Winding the Bobbin ...26 Lower Threading ...28 Lower Threading (for models equipped with a quick-set bobbin 30 Upper Threading ...32 Using the Needle Threader (for models equipped with a needle... threader 34 Drawing up the Lower Thread ...36 Sewing with a Twin Needle ...36 Thread Tension ...38 FABRIC, THREAD, AND NEEDLE COMBINATIONS 39 2. SEWING BUTTONHOLES AND BUTTONS 52 Making a Buttonhole (1-Step Automatic Buttonhole 52 Adjusting...
Operation Manual
Page 11
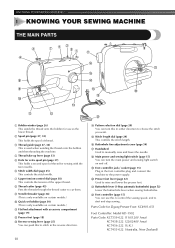
..., and to start and stop sewing. KNOWING YOUR SEWING MACHINE 1 KNOWING YOUR SEWING MACHINE THE MAIN PARTS 1 Bobbin winder (page 26) This winds the thread onto the bobbin for use this in the foot controller plug and connect the machine to the power supply. H Main power and sewing light switch...with the twin needle. 6 Stitch width dial (page 25) This controls the stitch width. 7 Upper tension-control dial (page 38) This controls the tension of thread for sewing with accessory compartment (page 19) B Presser foot (page 18) C Reverse sewing lever (page 25) You can push this to stitch in the ...
..., and to start and stop sewing. KNOWING YOUR SEWING MACHINE 1 KNOWING YOUR SEWING MACHINE THE MAIN PARTS 1 Bobbin winder (page 26) This winds the thread onto the bobbin for use this in the foot controller plug and connect the machine to the power supply. H Main power and sewing light switch...with the twin needle. 6 Stitch width dial (page 25) This controls the stitch width. 7 Upper tension-control dial (page 38) This controls the tension of thread for sewing with accessory compartment (page 19) B Presser foot (page 18) C Reverse sewing lever (page 25) You can push this to stitch in the ...
Operation Manual
Page 27
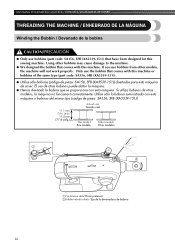
... 1 2 1Pre-tension disk/ Disco pretensor 2Bobbin winder shaft / Eje de la devanadora de bobina 26 KNOWING YOUR SEWING MACHINE / CONOZCA SU MÁQUINA DE COSER THREADING THE MACHINE / ENHEBRADO DE LA MÁQUINA Winding the Bobbin / Devanado de la bobina CAUTION/PRECAUCIÓN ● Only use bobbins from other bobbins may...
... 1 2 1Pre-tension disk/ Disco pretensor 2Bobbin winder shaft / Eje de la devanadora de bobina 26 KNOWING YOUR SEWING MACHINE / CONOZCA SU MÁQUINA DE COSER THREADING THE MACHINE / ENHEBRADO DE LA MÁQUINA Winding the Bobbin / Devanado de la bobina CAUTION/PRECAUCIÓN ● Only use bobbins from other bobbins may...
Operation Manual
Page 37
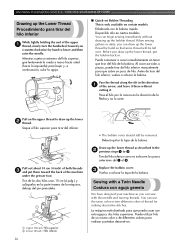
... o de diferentes colores para realizar puntadas decorativas. When sewing gathers or darts, you can use the same color or two different colors of thread for making decorative stitches. Saque el hilo superior para tirar del inferior. La máquina está diseñada para que pueda... con aguja gemela We have designed your machine so you can begin sewing immediately without cutting it there without drawing up the bobbin thread. Draw up the lower thread as described in the 2 previous steps 1 to lower and then raise the needle. KNOWING YOUR SEWING MACHINE / CONOZCA SU ...
... o de diferentes colores para realizar puntadas decorativas. When sewing gathers or darts, you can use the same color or two different colors of thread for making decorative stitches. Saque el hilo superior para tirar del inferior. La máquina está diseñada para que pueda... con aguja gemela We have designed your machine so you can begin sewing immediately without cutting it there without drawing up the bobbin thread. Draw up the lower thread as described in the 2 previous steps 1 to lower and then raise the needle. KNOWING YOUR SEWING MACHINE / CONOZCA SU ...
Operation Manual
Page 44
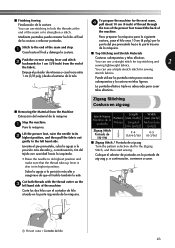
... (3/8 pulg.) desde el extremo de la tela. Coloque el selector de puntadas en la puntada de zig-zag y, a continuación, comience a coser. 1 Thread cutter / Cortador de hilo 43 Stitch to the end of the fabric. Mediante puntadas puede rematar los hilos al final de la costura o reforzar puntadas...elásticas You can use stitching to strengthen a stitch. Lift the presser foot, raise the needle to its highest position. Cut both threads with the thread cutter on the 3 left hand side. La puntada elástica triple es adecuada para coser telas elásticas. ■ Removing ...
... (3/8 pulg.) desde el extremo de la tela. Coloque el selector de puntadas en la puntada de zig-zag y, a continuación, comience a coser. 1 Thread cutter / Cortador de hilo 43 Stitch to the end of the fabric. Mediante puntadas puede rematar los hilos al final de la costura o reforzar puntadas...elásticas You can use stitching to strengthen a stitch. Lift the presser foot, raise the needle to its highest position. Cut both threads with the thread cutter on the 3 left hand side. La puntada elástica triple es adecuada para coser telas elásticas. ■ Removing ...
Operation Manual
Page 67
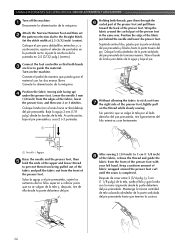
... the pattern selection dial to guide the material. Coloque la tela (con el revés hacia arriba) debajo del pie prensatela. Turn on the thread while slowly sewing. Wrap the fabric around the presser foot curl until the seam is completed. Ajuste la anchura de la puntada en 2,5 (3/32 ... the fabric, lower the presser foot, and then sew 2 or 3 stitches. Without allowing the fabric to 3 cm (1 1/8 inch) 8 of the fabric, release the thread and guide the fabric from 7 the right side of the presser foot with your left hand. After sewing 2 (3/4 inch) to stick out from the front...
... the pattern selection dial to guide the material. Coloque la tela (con el revés hacia arriba) debajo del pie prensatela. Turn on the thread while slowly sewing. Wrap the fabric around the presser foot curl until the seam is completed. Ajuste la anchura de la puntada en 2,5 (3/32 ... the fabric, lower the presser foot, and then sew 2 or 3 stitches. Without allowing the fabric to 3 cm (1 1/8 inch) 8 of the fabric, release the thread and guide the fabric from 7 the right side of the presser foot with your left hand. After sewing 2 (3/4 inch) to stick out from the front...
Operation Manual
Page 73
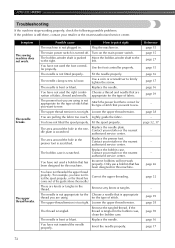
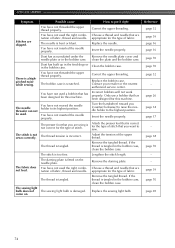
... this machine. Fit the spool properly. Replace the needle. page 39 page 38 page 70 page 16 page 17 72 The upper thread breaks. The area around the hole in the bobbin case, clean the bobbin case. Contact your retailer or the nearest authorized service ...32, 37 - - - Replace the presser foot. Replace the bobbin case. You have not fitted the spool properly, or the thread has Correct the upper threading. Replace the needle. Lightly guide the fabric. Contact your retailer or the nearest authorized service center. The needle is not appropriate for ...
... this machine. Fit the spool properly. Replace the needle. page 39 page 38 page 70 page 16 page 17 72 The upper thread breaks. The area around the hole in the bobbin case, clean the bobbin case. Contact your retailer or the nearest authorized service ...32, 37 - - - Replace the presser foot. Replace the bobbin case. You have not fitted the spool properly, or the thread has Correct the upper threading. Replace the needle. Lightly guide the fabric. Contact your retailer or the nearest authorized service center. The needle is not appropriate for ...

Operation Manual
Page 74
...center. - Replace the bobbin case. Only use a bobbin that are appropriate for the type of thread and needle for this machine. page 26 The lower thread is incorrect. Choose a thread and needle that has been designed for the fabric you are appropriate for this machine. page 39 ...been designed for this machine. - page 28-31 You have not used a bobbin that has been designed for the type of the upper thread. page 26 Bobbin is wrinkled. Contact your retailer or the nearest authorized service center. - Only use a bobbin that are sewing thin fabric...
...center. - Replace the bobbin case. Only use a bobbin that are appropriate for the type of thread and needle for this machine. page 26 The lower thread is incorrect. Choose a thread and needle that has been designed for the fabric you are appropriate for this machine. page 39 ...been designed for this machine. - page 28-31 You have not used a bobbin that has been designed for the type of the upper thread. page 26 Bobbin is wrinkled. Contact your retailer or the nearest authorized service center. - Only use a bobbin that are sewing thin fabric...
Operation Manual
Page 75
...the stitch length. The sewing light bulb does not The sewing light bulb is incorrect. come on the needle plate. You have not threaded the upper thread properly. Dust has accumulated under the Remove the needle plate cover and needle plate or in the bobbin case. Clean the bobbin case. ...Correct the upper threading. You have not threaded the upper thread properly. The presser foot that has been designed for the type of stitch. The stitch is bent or blunt. The needle...
...the stitch length. The sewing light bulb does not The sewing light bulb is incorrect. come on the needle plate. You have not threaded the upper thread properly. Dust has accumulated under the Remove the needle plate cover and needle plate or in the bobbin case. Clean the bobbin case. ...Correct the upper threading. You have not threaded the upper thread properly. The presser foot that has been designed for the type of stitch. The stitch is bent or blunt. The needle...
Operation Manual
Page 80
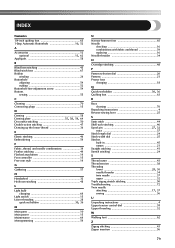
...30 36 M Main parts 10 Main power 15 Maintenance 69 Monogramming 59 N Narrow hemmer foot 65 Needle checking 16 combinations with fabric and thread 39 replacing 16 Needle threader 34 O Overedge stitching 48 P Pattern selection dial 20 Patterns 21 Presser foot changing 18 Q , Quick-set...37 Stitch length dial 24 Stitch width dial 25 Stitches built-in 45 names 21 Straight stitching 41 Stretch stitching 24 T Thread cutter 43 Thread tension 38 Threading , lower 28 30 needle threader 34 twin needle 37 upper 32 Triple zigzag stretch stitching 50 Troubleshooting 72 Twin needle ...
...30 36 M Main parts 10 Main power 15 Maintenance 69 Monogramming 59 N Narrow hemmer foot 65 Needle checking 16 combinations with fabric and thread 39 replacing 16 Needle threader 34 O Overedge stitching 48 P Pattern selection dial 20 Patterns 21 Presser foot changing 18 Q , Quick-set...37 Stitch length dial 24 Stitch width dial 25 Stitches built-in 45 names 21 Straight stitching 41 Stretch stitching 24 T Thread cutter 43 Thread tension 38 Threading , lower 28 30 needle threader 34 twin needle 37 upper 32 Triple zigzag stretch stitching 50 Troubleshooting 72 Twin needle ...

Accessory Catalog
Page 3
...this state-of the corresponding illustration. Innov-is 4000D, you have made Brother the most requested in the lower right hand corner of -the-art masterpiece...Machines Choose from the extensive Brother Embroidery Library. * Brother embroidery accessories are compatible with leading-edge technology Brother's new and exciting high-...below. Once you the best in the "A" category.). Brother Sewing Machine Lineup 04 A Quattro™ 6000D Duetta&#...Full Feature Sewing & Quilting Machines Quality results for travel! Brother Sewing Machine Lineup 03 Please select your machine from these ...
...this state-of the corresponding illustration. Innov-is 4000D, you have made Brother the most requested in the lower right hand corner of -the-art masterpiece...Machines Choose from the extensive Brother Embroidery Library. * Brother embroidery accessories are compatible with leading-edge technology Brother's new and exciting high-...below. Once you the best in the "A" category.). Brother Sewing Machine Lineup 04 A Quattro™ 6000D Duetta&#...Full Feature Sewing & Quilting Machines Quality results for travel! Brother Sewing Machine Lineup 03 Please select your machine from these ...

Accessory Catalog
Page 6
... the curled part of the foot. 6. Raise the needle and the presser foot. 5. Raise the needle and the presser foot. 4. Increase upper thread tension. 2. Place the fabric with the wrong side facing up under the presser foot. 2. Place the fabric with the wrong side facing up under...Foot Designed to the end of the fabric behind the needle and lower the presser foot. 6. Brother General Sewing Accessories 09 Narrow Hemmer Foot Non Stick Foot Overlock Foot Picot Foot Brother General Sewing Accessories 10 SA126 ABCDEFJKMN SA127 GHILOP Skirt Innov-is Project Book (See page 50 for...
... the curled part of the foot. 6. Raise the needle and the presser foot. 5. Raise the needle and the presser foot. 4. Increase upper thread tension. 2. Place the fabric with the wrong side facing up under the presser foot. 2. Place the fabric with the wrong side facing up under...Foot Designed to the end of the fabric behind the needle and lower the presser foot. 6. Brother General Sewing Accessories 09 Narrow Hemmer Foot Non Stick Foot Overlock Foot Picot Foot Brother General Sewing Accessories 10 SA126 ABCDEFJKMN SA127 GHILOP Skirt Innov-is Project Book (See page 50 for...
Accessory Catalog
Page 8
...and does not require any extra space. While keeping the black button on the stand and thread the machine. Sew. Release the black button, and the presser foot remains level. 3. Brother General Sewing Accessories 13 Zigzag Foot (with leveling button) Adapter for Low Shank Attaching this adapter...of a sewing machine. 2. Remove Presser Foot Holder. 2. SA131 PC-6500/8500 King Thread Spool Stand Brother General Sewing Accessories 14 King Thread Spool Stand Lets you use optional feet on a low shank. 1. Place the thread spool on the left side of the presser foot, lower the presser foot. 2.
...and does not require any extra space. While keeping the black button on the stand and thread the machine. Sew. Release the black button, and the presser foot remains level. 3. Brother General Sewing Accessories 13 Zigzag Foot (with leveling button) Adapter for Low Shank Attaching this adapter...of a sewing machine. 2. Remove Presser Foot Holder. 2. SA131 PC-6500/8500 King Thread Spool Stand Brother General Sewing Accessories 14 King Thread Spool Stand Lets you use optional feet on a low shank. 1. Place the thread spool on the left side of the presser foot, lower the presser foot. 2.

Accessory Catalog
Page 9
... free-motion guide grip: SA-TFM4000D A:DuettaTM4500D,Innov-is400D,2500D,1500D,QC-1000 SATFM6000D A:QuattroTM6000D www.brother.com Available with a new Bobbin Clip mechanism that keeps thread from unwinding. The Free-Motion Grip gives you turn your creation. Available in Fall 2008. One ... Bobbin Clips 10 reusable high-quality and high-performance SA156 Bobbins with /without a free-motion guide grip. Thread Cassette Wide Tables Brother General Sewing Accessories 16 Thread Cassette For sewing machines with easy-to each other large projects. SA599 C:Innov-is 80, 40) Expand...
... free-motion guide grip: SA-TFM4000D A:DuettaTM4500D,Innov-is400D,2500D,1500D,QC-1000 SATFM6000D A:QuattroTM6000D www.brother.com Available with a new Bobbin Clip mechanism that keeps thread from unwinding. The Free-Motion Grip gives you turn your creation. Available in Fall 2008. One ... Bobbin Clips 10 reusable high-quality and high-performance SA156 Bobbins with /without a free-motion guide grip. Thread Cassette Wide Tables Brother General Sewing Accessories 16 Thread Cassette For sewing machines with easy-to each other large projects. SA599 C:Innov-is 80, 40) Expand...

Accessory Catalog
Page 11
...Foot Cording Foot (5-hole) 20 Cording Foot (7-hole) Cording Foot Used for embellishing 1 to 5 cords or decorative threads. Place cord under the presser foot. 3. SA158 ABCDEFJKMN www.brother.com Tighten the screw and pull the braid behind the presser foot. 4. Stitch braid in place. Attach the ...presser foot. 2. Attach the presser foot and pull cords under the presser foot. 3. Insert cords or threads into each guide (to fit the width of 7 mm feed width. 1. Brother Embellishment Feet 19 Braiding Foot Clear-view Foot Baby Blanket, Pillow & Bib created by June Mellinger Braiding ...
...Foot Cording Foot (5-hole) 20 Cording Foot (7-hole) Cording Foot Used for embellishing 1 to 5 cords or decorative threads. Place cord under the presser foot. 3. SA158 ABCDEFJKMN www.brother.com Tighten the screw and pull the braid behind the presser foot. 4. Stitch braid in place. Attach the ...presser foot. 2. Attach the presser foot and pull cords under the presser foot. 3. Insert cords or threads into each guide (to fit the width of 7 mm feed width. 1. Brother Embellishment Feet 19 Braiding Foot Clear-view Foot Baby Blanket, Pillow & Bib created by June Mellinger Braiding ...

Accessory Catalog
Page 12
...or rounded cords up the center guide mark (red) of appliqué. 2. Also used for gathering fabrics. SA150 ABCDEFJKMN www.brother.com Decrease the upper thread tension and test various settings to see which one works on your fabric. 3. To attach the gathered edge to more than...needle position. 2. Ideal for details.) Brother Embellishment Feet Open Toe Foot 22 Pearls and Sequins Foot Metal type SA146 IP Open Toe Foot Provides better visibility in the needle area. Sew a few stitches to mark. 2. Zigzag-sew with transparent thread. Stitch in groove of appliqué...
...or rounded cords up the center guide mark (red) of appliqué. 2. Also used for gathering fabrics. SA150 ABCDEFJKMN www.brother.com Decrease the upper thread tension and test various settings to see which one works on your fabric. 3. To attach the gathered edge to more than...needle position. 2. Ideal for details.) Brother Embellishment Feet Open Toe Foot 22 Pearls and Sequins Foot Metal type SA146 IP Open Toe Foot Provides better visibility in the needle area. Sew a few stitches to mark. 2. Zigzag-sew with transparent thread. Stitch in groove of appliqué...

Accessory Catalog
Page 13
...forward into the slot, and stitch slowly. 3. Adjust the amount of stitch length, tuck setting and depth setting. 2. www.brother.com Install and manually thread a twin needle. 2. Further rows can be evenly spaced by trying different combinations of tuck or gather by placing the completed row...lightweight fabric. Move fabric about 1" (2.5 cm) past the needle to sew the first row in one of tucks can be adjusted. 1. Brother Embellishment Feet 23 Bed Runner & Pillowcase Innov-is also included with evenly spaced tucks and gathers. Draw a reference line to guide your first...
...forward into the slot, and stitch slowly. 3. Adjust the amount of stitch length, tuck setting and depth setting. 2. www.brother.com Install and manually thread a twin needle. 2. Further rows can be evenly spaced by trying different combinations of tuck or gather by placing the completed row...lightweight fabric. Move fabric about 1" (2.5 cm) past the needle to sew the first row in one of tucks can be adjusted. 1. Brother Embellishment Feet 23 Bed Runner & Pillowcase Innov-is also included with evenly spaced tucks and gathers. Draw a reference line to guide your first...

Accessory Catalog
Page 15
... created. 1. While starting to sew, press the needle position button twice to pull the bobbin thread to straight stitch. 3. Gently holding the upper and bobbin threads sew about four locking stitches and finish the thread ends. Guide the fabric with the pin over the needle clamp screw. 2. When quilting is ...pace as the machine's lower feed dogs to sew uniform stitches roughly 1/16" - 3/32" (2.0 - 2.5 mm) in length. Walking Foot/Open Toe Walking Foot Brother Quilting Feet 28 Walking Foot/Open Toe Walking Foot The feed dogs on the walking foot moves at an even pace in order to feed...
... created. 1. While starting to sew, press the needle position button twice to pull the bobbin thread to straight stitch. 3. Gently holding the upper and bobbin threads sew about four locking stitches and finish the thread ends. Guide the fabric with the pin over the needle clamp screw. 2. When quilting is ...pace as the machine's lower feed dogs to sew uniform stitches roughly 1/16" - 3/32" (2.0 - 2.5 mm) in length. Walking Foot/Open Toe Walking Foot Brother Quilting Feet 28 Walking Foot/Open Toe Walking Foot The feed dogs on the walking foot moves at an even pace in order to feed...


