

Operation Manual
Page 2
...burns, fire, electric shock, or injury to be used by the manufacturer as a toy. Return the machine to break. 12. This sewing machine is intended for its intended use the proper needle plate. Never drop or insert any object into water. To disconnect, turn it has been dropped or damaged..., or dropped into any adjustments in the needle area, such as described in the instruction manual. 16...
...burns, fire, electric shock, or injury to be used by the manufacturer as a toy. Return the machine to break. 12. This sewing machine is intended for its intended use the proper needle plate. Never drop or insert any object into water. To disconnect, turn it has been dropped or damaged..., or dropped into any adjustments in the needle area, such as described in the instruction manual. 16...
Operation Manual
Page 5
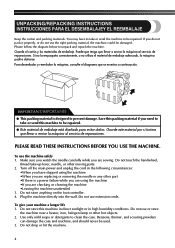
... 1. You may have stopped using the machine •If you are checking or cleaning the machine •Leaving the machine unattended 3. Make sure you watch the needle carefully while you are sewing. Plug the machine directly into the wall. Do not use the machine safely 1. Do not drop or hit the machine. 4 IMPORTANT/IMPORTANTE ● This packing material...
... 1. You may have stopped using the machine •If you are checking or cleaning the machine •Leaving the machine unattended 3. Make sure you watch the needle carefully while you are sewing. Plug the machine directly into the wall. Do not use the machine safely 1. Do not drop or hit the machine. 4 IMPORTANT/IMPORTANTE ● This packing material...
Operation Manual
Page 7
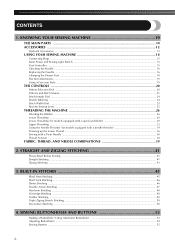
... THE MAIN PARTS ...10 ACCESSORIES ...12 Optional Accessories ...13 USING YOUR SEWING MACHINE 14 Connecting Plugs ...15 Main Power and Sewing Light Switch ...15 Foot Controller ...15 Checking the Needle ...16 Replacing the Needle ...16 Changing the Presser Foot ...18 Flat Bed Attachment ...19 Using a Free-arm Style ...19 THE CONTROLS ...20 Pattern Selection Dial...
... THE MAIN PARTS ...10 ACCESSORIES ...12 Optional Accessories ...13 USING YOUR SEWING MACHINE 14 Connecting Plugs ...15 Main Power and Sewing Light Switch ...15 Foot Controller ...15 Checking the Needle ...16 Replacing the Needle ...16 Changing the Presser Foot ...18 Flat Bed Attachment ...19 Using a Free-arm Style ...19 THE CONTROLS ...20 Pattern Selection Dial...
Operation Manual
Page 11
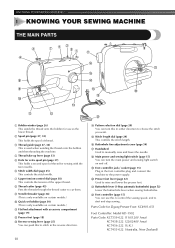
... Used to raise and lower the presser foot. H Main power and sewing light switch (page 15) You can turn this in either direction to choose the stitch you want. KNOWING YOUR SEWING MACHINE 1 KNOWING YOUR SEWING MACHINE THE MAIN PARTS 1 Bobbin winder (page 26) This winds the thread... Lower the buttonhole lever when sewing buttonholes. Parts Code for sewing with accessory compartment (page 19) B Presser foot (page 18) C Reverse sewing lever (page 25) You can push this to stitch in the foot controller plug and connect the machine to cut them. 9 Needle threader (page 34) (This...
... Used to raise and lower the presser foot. H Main power and sewing light switch (page 15) You can turn this in either direction to choose the stitch you want. KNOWING YOUR SEWING MACHINE 1 KNOWING YOUR SEWING MACHINE THE MAIN PARTS 1 Bobbin winder (page 26) This winds the thread... Lower the buttonhole lever when sewing buttonholes. Parts Code for sewing with accessory compartment (page 19) B Presser foot (page 18) C Reverse sewing lever (page 25) You can push this to stitch in the foot controller plug and connect the machine to cut them. 9 Needle threader (page 34) (This...
Operation Manual
Page 13
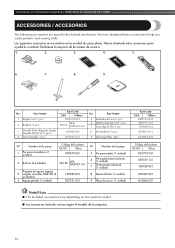
...1 Zipper foot (1 pc.) 2 Bobbin (3 pcs.) 3 Needle Pack (Regular Single Needle HAX130 (3 pcs.)) 4 Twin Needle (1 pc.) Part Code USA Others X59370-021 SA156 SFB: XA5539-151 129583-021 X57521-021 No. No. Part Name 5 Buttonhole Foot (1 pc.) 6 Button Sewing Foot (1 pc.) 7 Extra Spool Pin (1 pc.) 8... realizar fácilmente la mayoría de las tareas de costura. 1. 2. 3. 4. 5. 6. 7. 8. 9. KNOWING YOUR SEWING MACHINE / CONOZCA SU MÁQUINA DE COSER ACCESSORIES / ACCESORIOS The following accessories are stored in the flat bed attachment. Otros XD1792-031 ...
...1 Zipper foot (1 pc.) 2 Bobbin (3 pcs.) 3 Needle Pack (Regular Single Needle HAX130 (3 pcs.)) 4 Twin Needle (1 pc.) Part Code USA Others X59370-021 SA156 SFB: XA5539-151 129583-021 X57521-021 No. No. Part Name 5 Buttonhole Foot (1 pc.) 6 Button Sewing Foot (1 pc.) 7 Extra Spool Pin (1 pc.) 8... realizar fácilmente la mayoría de las tareas de costura. 1. 2. 3. 4. 5. 6. 7. 8. 9. KNOWING YOUR SEWING MACHINE / CONOZCA SU MÁQUINA DE COSER ACCESSORIES / ACCESORIOS The following accessories are stored in the flat bed attachment. Otros XD1792-031 ...
Operation Manual
Page 19
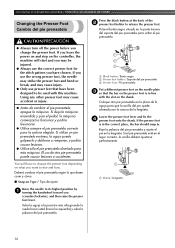
... / Botón negro 2 Presser foot holder / Soporte del pie prensatela 3 Presser Foot / Pie prensatela Put a different presser foot on the needle plate 3 so that have been designed to be injured. ● Always use the correct presser foot for the stitch pattern you have to change the...o romperse, y podría causar lesiones. ● Utilice sólo el pie prensatela diseñado para esta máquina. KNOWING YOUR SEWING MACHINE / CONOZCA SU MÁQUINA DE COSER Changing the Presser Foot Cambio del pie prensatela CAUTION/PRECAUCIÓN ● Always turn off the power before...
... / Botón negro 2 Presser foot holder / Soporte del pie prensatela 3 Presser Foot / Pie prensatela Put a different presser foot on the needle plate 3 so that have been designed to be injured. ● Always use the correct presser foot for the stitch pattern you have to change the...o romperse, y podría causar lesiones. ● Utilice sólo el pie prensatela diseñado para esta máquina. KNOWING YOUR SEWING MACHINE / CONOZCA SU MÁQUINA DE COSER Changing the Presser Foot Cambio del pie prensatela CAUTION/PRECAUCIÓN ● Always turn off the power before...
Operation Manual
Page 37
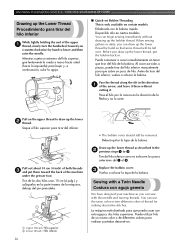
... la flecha y no lo corte. La máquina está diseñada para que pueda coser con esta aguja y dos hilos superiores. KNOWING YOUR SEWING MACHINE / CONOZCA SU MÁQUINA DE COSER Drawing up the lower thread, put them toward you can use the same color or two different colors of... 2 thread. Pull out about 10 cm (4 inch) of both threads 3 and put the bobbin back in the 2 previous steps 1 to lower and then raise the needle. Sewing with a Twin Needle Costura con aguja gemela We have designed your machine so you (counterclockwise) by hand so that some thread will be removed.
... la flecha y no lo corte. La máquina está diseñada para que pueda coser con esta aguja y dos hilos superiores. KNOWING YOUR SEWING MACHINE / CONOZCA SU MÁQUINA DE COSER Drawing up the lower thread, put them toward you can use the same color or two different colors of... 2 thread. Pull out about 10 cm (4 inch) of both threads 3 and put the bobbin back in the 2 previous steps 1 to lower and then raise the needle. Sewing with a Twin Needle Costura con aguja gemela We have designed your machine so you (counterclockwise) by hand so that some thread will be removed.
Operation Manual
Page 44
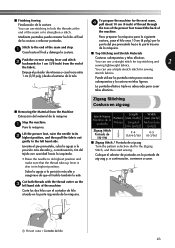
...225;quina. . You can use a triple stretch stitch for 1 cm (3/8 inch) from the Machine Extracción del material de la máquina Stop the machine. 1 Pare la máquina. Lift the presser foot, raise the needle to strengthen a stitch. Suba la aguja a la posición más alta y asegú...;rese de que el tirahilo también lo esté. Stitch to the Zigzag Stitch, and then start sewing. Empuje el ...
...225;quina. . You can use a triple stretch stitch for 1 cm (3/8 inch) from the Machine Extracción del material de la máquina Stop the machine. 1 Pare la máquina. Lift the presser foot, raise the needle to strengthen a stitch. Suba la aguja a la posición más alta y asegú...;rese de que el tirahilo también lo esté. Stitch to the Zigzag Stitch, and then start sewing. Empuje el ...
Operation Manual
Page 67
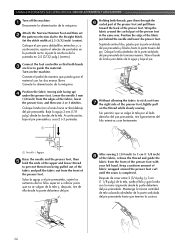
...allowing the fabric to stick out from the front of the presser foot, lightly pull on the machine. Sin permitir que se salga la tela por el lado derecho del pie prensatela, tire ligeramente ...del hilo mientras cose lentamente. 3 mm (1/8 inch) 3 mm (1/8 inch) 1 Needle / Aguja Raise the needle and the presser foot, then 5 hold the ends of the upper and lower thread to 3 cm...under the presser foot. Keep a uniform amount of the presser foot. Turn on the thread while slowly sewing. Baje la aguja 3 mm (1/8 pulg.) desde los bordes de la tela. Set the stitch width ...
...allowing the fabric to stick out from the front of the presser foot, lightly pull on the machine. Sin permitir que se salga la tela por el lado derecho del pie prensatela, tire ligeramente ...del hilo mientras cose lentamente. 3 mm (1/8 inch) 3 mm (1/8 inch) 1 Needle / Aguja Raise the needle and the presser foot, then 5 hold the ends of the upper and lower thread to 3 cm...under the presser foot. Keep a uniform amount of the presser foot. Turn on the thread while slowly sewing. Baje la aguja 3 mm (1/8 pulg.) desde los bordes de la tela. Set the stitch width ...
Operation Manual
Page 68
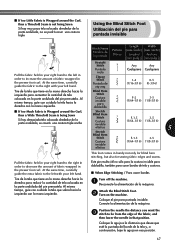
... 3-5 (1/64-1/16) (1/8-3/16) This foot comes in handy not only for blind hem stitching, but also for sewing fabric edges and seams. Este pie resulta útil no se podrá coser una costura triple Using the ...para reducir la cantidad de tela colocada en la parte ondulada del pie prensatela. Position the needle the distance you want the 3 stitch to the left hand. At the same time, ... fabric wrapped in the presser foot curl. Attach the Blind Stitch Foot. 2 Turn on the machine. Al mismo tiempo, guíe con cuidado la tela hacia la derecha con la mano izquierda...
... 3-5 (1/64-1/16) (1/8-3/16) This foot comes in handy not only for blind hem stitching, but also for sewing fabric edges and seams. Este pie resulta útil no se podrá coser una costura triple Using the ...para reducir la cantidad de tela colocada en la parte ondulada del pie prensatela. Position the needle the distance you want the 3 stitch to the left hand. At the same time, ... fabric wrapped in the presser foot curl. Attach the Blind Stitch Foot. 2 Turn on the machine. Al mismo tiempo, guíe con cuidado la tela hacia la derecha con la mano izquierda...
Operation Manual
Page 69
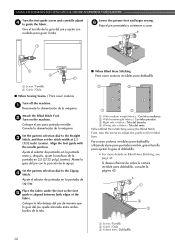
...de zig-zag. Lower the presser foot and begin sewing. 6 Baje el pie prensatela y comience a coser. 1 Screw / Tornillo 2 Guide / Guía ■ When Sewing Seams / Para coser costuras Turn off the machine. 1 Desconecte la alimentación de la má... el pie para puntada invisible, gire el tornillo para ajustar la guía al dobladillo. • For more details on the machine. Si desea información sobre la costura invisible para dobladillo, consulte la página 45. 1 2 3 1 Screw / Tornillo... cuidado para guiar la tela. Align the foot guide with the needle position.
...de zig-zag. Lower the presser foot and begin sewing. 6 Baje el pie prensatela y comience a coser. 1 Screw / Tornillo 2 Guide / Guía ■ When Sewing Seams / Para coser costuras Turn off the machine. 1 Desconecte la alimentación de la má... el pie para puntada invisible, gire el tornillo para ajustar la guía al dobladillo. • For more details on the machine. Si desea información sobre la costura invisible para dobladillo, consulte la página 45. 1 2 3 1 Screw / Tornillo... cuidado para guiar la tela. Align the foot guide with the needle position.
Operation Manual
Page 73
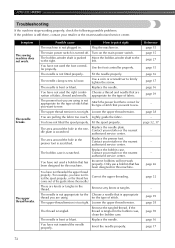
Possible cause How to put it right The machine is pushed Move the bobbin-winder shaft to the to sew. The bobbin-winder shaft is not plugged in the presser foot is too tight. The needle is bent or blunt. The needle is not fitted properly. The upper thread tension ...firmly tighten the screw. Loosen the upper thread tension. You have not fitted the spool properly. page 32, 37 - - - Symptom The sewing machine does not work properly. The presser foot you want to the right. You are nation of stitch that has been designed for the type ...
Possible cause How to put it right The machine is pushed Move the bobbin-winder shaft to the to sew. The bobbin-winder shaft is not plugged in the presser foot is too tight. The needle is bent or blunt. The needle is not fitted properly. The upper thread tension ...firmly tighten the screw. Loosen the upper thread tension. You have not fitted the spool properly. page 32, 37 - - - Symptom The sewing machine does not work properly. The presser foot you want to the right. You are nation of stitch that has been designed for the type ...

Operation Manual
Page 74
... incorrect. page 28-31 You have not used a bobbin that are sewing thin fabric, the stitch is set incorrectly. Choose a thread and needle that has been designed for this machine. page 32, 37 The fabric is bent or blunt. page 39 The needle is wrinkled. Contact your retailer or the nearest authorized service center...
... incorrect. page 28-31 You have not used a bobbin that are sewing thin fabric, the stitch is set incorrectly. Choose a thread and needle that has been designed for this machine. page 32, 37 The fabric is bent or blunt. page 39 The needle is wrinkled. Contact your retailer or the nearest authorized service center...

Accessory Catalog
Page 4
... or right. 3. Adjustable Zipper & Piping Foot Brother General Sewing Accessories 06 Adjustable Zipper & Piping Foot Attaches zippers and pipings easily. Requires Low Shank Adapter for ULT series, PC-6500, PC-8200 and PC-8500 sewing machines. Check the needle does not hit the presser foot, and then ...tighten the clamp screw with just right pressure. 1. SA161 All Brother home-use sewing machines www.brother.com Position the presser foot over the long feed dogs...
... or right. 3. Adjustable Zipper & Piping Foot Brother General Sewing Accessories 06 Adjustable Zipper & Piping Foot Attaches zippers and pipings easily. Requires Low Shank Adapter for ULT series, PC-6500, PC-8200 and PC-8500 sewing machines. Check the needle does not hit the presser foot, and then ...tighten the clamp screw with just right pressure. 1. SA161 All Brother home-use sewing machines www.brother.com Position the presser foot over the long feed dogs...

Accessory Catalog
Page 5
... foot. 4. Fasten metal stop at desired distance from the edge of the fabric and lower needle. 2. Joining two fabrics: 1. Position the needle at lower edge of the fabric and lower the needle and the presser foot. 3. Sew. Pin tucks: 1. SA184 All Brother home-use sewing machines Concealed Zipper Foot Allows you to the edge of the hem. 7.
... foot. 4. Fasten metal stop at desired distance from the edge of the fabric and lower needle. 2. Joining two fabrics: 1. Position the needle at lower edge of the fabric and lower the needle and the presser foot. 3. Sew. Pin tucks: 1. SA184 All Brother home-use sewing machines Concealed Zipper Foot Allows you to the edge of the hem. 7.
Accessory Catalog
Page 10
...decorative stitches. 1. Pull the tape from the rear of the bias tape. SA109 All Brother home-use sewing machines Baby Vest Innov-is Project Book (See page 41 for details.) www.brother.com Brother Embellishment Feet 17 Go decorative. Before attaching the presser foot, insert the bias tape into... the guide to the left or right. Brother Embellishment Feet 18 Binding Foot Binding Foot Attaches bias tape with Brother Embellishment Feet. Adjust the needle position so that the needle lines up to the guide side. 2. Hint: If the needle does not position properly on the bias tape...
...decorative stitches. 1. Pull the tape from the rear of the bias tape. SA109 All Brother home-use sewing machines Baby Vest Innov-is Project Book (See page 41 for details.) www.brother.com Brother Embellishment Feet 17 Go decorative. Before attaching the presser foot, insert the bias tape into... the guide to the left or right. Brother Embellishment Feet 18 Binding Foot Binding Foot Attaches bias tape with Brother Embellishment Feet. Adjust the needle position so that the needle lines up to the guide side. 2. Hint: If the needle does not position properly on the bias tape...

Accessory Catalog
Page 12
...loops to make or attach piping. Select a straight stitch, left needle position. 2. Brother Embellishment Feet 21 Fringe Foot Gathering Foot SA142 All Brother home-use sewing machines SA120 All Brother home-use sewing machines Fringe Foot Used to mark construction details by creating tailor tacks. ...Gathering Foot Used for details.) Brother Embellishment Feet Open Toe Foot 22 Pearls ...
...loops to make or attach piping. Select a straight stitch, left needle position. 2. Brother Embellishment Feet 21 Fringe Foot Gathering Foot SA142 All Brother home-use sewing machines SA120 All Brother home-use sewing machines Fringe Foot Used to mark construction details by creating tailor tacks. ...Gathering Foot Used for details.) Brother Embellishment Feet Open Toe Foot 22 Pearls ...

Accessory Catalog
Page 14
... foot. 3. The distance between the straight bar and the needle can be adjusted by Janice Ferguson and Suzanne Sawko 1/4" Piecing Foot 1/4" Piecing Foot with Guide Quilting Guide Brother Quilting Feet 26 SA125 All Brother home-use sewing machines SA185 All Brother home-use sewing machines SA132 All Brother home-use sewing machines 1/4" Piecing Foot Best for quilt and patchwork piecing with...
... foot. 3. The distance between the straight bar and the needle can be adjusted by Janice Ferguson and Suzanne Sawko 1/4" Piecing Foot 1/4" Piecing Foot with Guide Quilting Guide Brother Quilting Feet 26 SA125 All Brother home-use sewing machines SA185 All Brother home-use sewing machines SA132 All Brother home-use sewing machines 1/4" Piecing Foot Best for quilt and patchwork piecing with...

Accessory Catalog
Page 15
...the machine to the quilt top. 7. Walking Foot SA140 ABCDEFJKMN SA166 L SA107 GHO SA169 I Open Toe Walking Foot SA188 ABCDEFJKMN www.brother.com Lower the feed dogs. 3. Guide the fabric with the pin over the needle clamp screw. 2. Quilting Foot For darning, quilting, or free-motion. Sew. Brother Quilting... foot with the closed front for ULT series, PC-6500, PC-8200 and PC-8500 sewing machines. Attach the walking foot to sew uniform stitches roughly 1/16" - 3/32" (2.0 - 2.5 mm) in the needle area. Requires Low Shank Adapter for thick layers of the foot gives you wide visibility in...
...the machine to the quilt top. 7. Walking Foot SA140 ABCDEFJKMN SA166 L SA107 GHO SA169 I Open Toe Walking Foot SA188 ABCDEFJKMN www.brother.com Lower the feed dogs. 3. Guide the fabric with the pin over the needle clamp screw. 2. Quilting Foot For darning, quilting, or free-motion. Sew. Brother Quilting... foot with the closed front for ULT series, PC-6500, PC-8200 and PC-8500 sewing machines. Attach the walking foot to sew uniform stitches roughly 1/16" - 3/32" (2.0 - 2.5 mm) in the needle area. Requires Low Shank Adapter for thick layers of the foot gives you wide visibility in...

Accessory Catalog
Page 36
... convenient for PQ Series One package includes five metal bobbins. SA159 SA180B SA181 Needle Felting Attachment Felting Needle Brother Sewing Machine Attachments for PQ Series 70 Needle Felting Attachment Use this unique attachment to maintain contact with the feed dogs and can attach it . 1. Brother Sewing Machine Attachments for PQ Series 69 Heavyweight Foot Ver y Narrow Foot Bobbin for...
... convenient for PQ Series One package includes five metal bobbins. SA159 SA180B SA181 Needle Felting Attachment Felting Needle Brother Sewing Machine Attachments for PQ Series 70 Needle Felting Attachment Use this unique attachment to maintain contact with the feed dogs and can attach it . 1. Brother Sewing Machine Attachments for PQ Series 69 Heavyweight Foot Ver y Narrow Foot Bobbin for...


