Users Manual - English
Page 1
1 KNOWING YOUR SEWING MACHINE 2 STRAIGHT AND ZIGZAG STITCHING 3 BUILT-IN STITCHES 4 SEWING BUTTONHOLES AND BUTTONS 5 USING ATTACHMENTS AND APPLICATIONS 6 APPENDIX Operation Manual
1 KNOWING YOUR SEWING MACHINE 2 STRAIGHT AND ZIGZAG STITCHING 3 BUILT-IN STITCHES 4 SEWING BUTTONHOLES AND BUTTONS 5 USING ATTACHMENTS AND APPLICATIONS 6 APPENDIX Operation Manual
Users Manual - English
Page 2
.... It may deflect the needle, causing it has been dropped or damaged, or dropped into any air openings blocked. This sewing machine is intended for its intended use . SAVE THESE INSTRUCTIONS This machine is not intended for examination, repair, electrical or mechanical adjustment. 4. To unplug, grasp the plug, not the cord. 10. Do...
.... It may deflect the needle, causing it has been dropped or damaged, or dropped into any air openings blocked. This sewing machine is intended for its intended use . SAVE THESE INSTRUCTIONS This machine is not intended for examination, repair, electrical or mechanical adjustment. 4. To unplug, grasp the plug, not the cord. 10. Do...
Users Manual - English
Page 5
... BUTTONS 34 Making a Buttonhole ...34 Adjusting Buttonholes ...35 Sewing Buttons ...36 3 CONTENTS 1. KNOWING YOUR SEWING MACHINE 5 THE MAIN PARTS ...5 ACCESSORIES ...6 Optional Accessories ...6 USING YOUR SEWING MACHINE 7 Connecting Plugs ...7 Main Power and Sewing Light Switch ...8 Foot Controller ...8 Checking the Needle ...8 Replacing the Needle ... Stitch Names ...12 Stitch Length Dial ...14 Stretch Stitching ...15 Stitch Width Dial ...15 Reverse Sewing Lever ...15 THREADING THE MACHINE 16 Winding the Bobbin ...16 Lower Threading ...18 Lower Threading (for models equipped with a quick...
... BUTTONS 34 Making a Buttonhole ...34 Adjusting Buttonholes ...35 Sewing Buttons ...36 3 CONTENTS 1. KNOWING YOUR SEWING MACHINE 5 THE MAIN PARTS ...5 ACCESSORIES ...6 Optional Accessories ...6 USING YOUR SEWING MACHINE 7 Connecting Plugs ...7 Main Power and Sewing Light Switch ...8 Foot Controller ...8 Checking the Needle ...8 Replacing the Needle ... Stitch Names ...12 Stitch Length Dial ...14 Stretch Stitching ...15 Stitch Width Dial ...15 Reverse Sewing Lever ...15 THREADING THE MACHINE 16 Winding the Bobbin ...16 Lower Threading ...18 Lower Threading (for models equipped with a quick...
Users Manual - English
Page 7
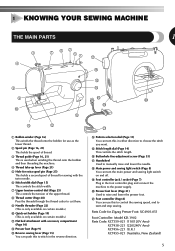
... to raise and lower the presser foot. K Foot controller (Page 8) You can turn this in either direction to choose the stitch you want. 1 KNOWING YOUR SEWING MACHINE THE MAIN PARTS 1 3 4 7 62 51 G F 8 9 0 C A B 1 Bobbin winder (Page 16) This winds the thread onto the bobbin...K D Pattern selection dial (Page 11) You can push this to control the sewing speed, and to start and stop sewing. E D H J I Foot controller jack / socket (Page 7) Plug in the foot controller plug and connect the machine to cut them. 9 Needle threader (Page 22) (This is only available on...
... to raise and lower the presser foot. K Foot controller (Page 8) You can turn this in either direction to choose the stitch you want. 1 KNOWING YOUR SEWING MACHINE THE MAIN PARTS 1 3 4 7 62 51 G F 8 9 0 C A B 1 Bobbin winder (Page 16) This winds the thread onto the bobbin...K D Pattern selection dial (Page 11) You can push this to control the sewing speed, and to start and stop sewing. E D H J I Foot controller jack / socket (Page 7) Plug in the foot controller plug and connect the machine to cut them. 9 Needle threader (Page 22) (This is only available on...
Users Manual - English
Page 8
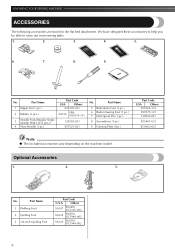
... pc.) Part Code USA Others X59370-021 SA156 SFB: XA5539-151 129583-021 X57521-021 No. KNOWING YOUR SEWING MACHINE ACCESSORIES The following accessories are stored in the flat bed attachment. Optional Accessories 1. 2. 3. No. Part Name 5 Buttonhole Foot (1 pc.) 6 Button... X59375-121 130920-021 X55467-021 XC6063-021 Note ● The included accessories vary depending on the machine model. We have designed these accessories to help you be able to carry out most sewing tasks. 1. 2. 3. 4. 5. 6. 7. 8. 9. Others SA107 F034N: XC2165-002 SA129 F005N...
... pc.) Part Code USA Others X59370-021 SA156 SFB: XA5539-151 129583-021 X57521-021 No. KNOWING YOUR SEWING MACHINE ACCESSORIES The following accessories are stored in the flat bed attachment. Optional Accessories 1. 2. 3. No. Part Name 5 Buttonhole Foot (1 pc.) 6 Button... X59375-121 130920-021 X55467-021 XC6063-021 Note ● The included accessories vary depending on the machine model. We have designed these accessories to help you be able to carry out most sewing tasks. 1. 2. 3. 4. 5. 6. 7. 8. 9. Others SA107 F034N: XC2165-002 SA129 F005N...
Users Manual - English
Page 9
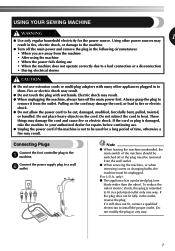
...from the outlet. If the cord or plug is damaged, take the machine to your authorized dealer for the power source. Connect the power supply plug to the 1 machine. USING YOUR SEWING MACHINE WARNING 1 ● Use only regular household electricity for repairs before continuing... use extension cords or multi-plug adapters with wet hands. Note ● When leaving the machine unattended, the main switch of time, ...
...from the outlet. If the cord or plug is damaged, take the machine to your authorized dealer for the power source. Connect the power supply plug to the 1 machine. USING YOUR SEWING MACHINE WARNING 1 ● Use only regular household electricity for repairs before continuing... use extension cords or multi-plug adapters with wet hands. Note ● When leaving the machine unattended, the main switch of time, ...
Users Manual - English
Page 10
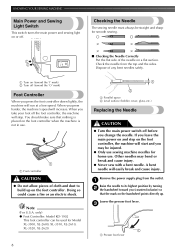
... mark on the foot controller. only) ● Foot Controller: Model KD-1902 This foot controller can be straight and sharp for Model XL-3500, XL-2600, XL-3510, XL-2610, XL-3520, XL-2620. 8 1 2 1 Parallel space 2 Level surface (bobbin cover, glass, etc.) Replacing the Needle CAUTION ● Turn the...of any bent needles safely. 1 Turn on or off. When you press harder, the machine's speed will increase. KNOWING YOUR SEWING MACHINE Main Power and Sewing Light Switch This switch turns the main power and sewing light on (toward the 'I' mark) 2 Turn off (toward you (counterclockwise) so ...
... mark on the foot controller. only) ● Foot Controller: Model KD-1902 This foot controller can be straight and sharp for Model XL-3500, XL-2600, XL-3510, XL-2610, XL-3520, XL-2620. 8 1 2 1 Parallel space 2 Level surface (bobbin cover, glass, etc.) Replacing the Needle CAUTION ● Turn the...of any bent needles safely. 1 Turn on or off. When you press harder, the machine's speed will increase. KNOWING YOUR SEWING MACHINE Main Power and Sewing Light Switch This switch turns the main power and sewing light on (toward the 'I' mark) 2 Turn off (toward you (counterclockwise) so ...
Users Manual - English
Page 11
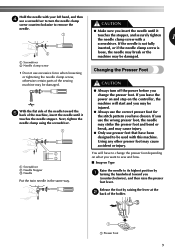
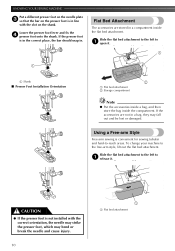
... you leave the power on and step on Type Raise the needle to its highest position by raising the lever at the 2 back of the sewing machine may cause injury. ● Only use presser feet that have been designed to be injured. ● Always use the correct presser foot for the ...of the holder. 1 1 Presser Foot 9 Changing the Presser Foot CAUTION With the flat side of the needle toward you want to sew and how. ■ Snap-on the controller, the machine will have chosen. Hold the needle with your left hand, and then 4 use a screwdriver to turn off the power before you...
... you leave the power on and step on Type Raise the needle to its highest position by raising the lever at the 2 back of the sewing machine may cause injury. ● Only use presser feet that have been designed to be injured. ● Always use the correct presser foot for the ...of the holder. 1 1 Presser Foot 9 Changing the Presser Foot CAUTION With the flat side of the needle toward you want to sew and how. ■ Snap-on the controller, the machine will have chosen. Hold the needle with your left hand, and then 4 use a screwdriver to turn off the power before you...
Users Manual - English
Page 12
... 1 Flat bed attachment 2 Storage compartment Note ● Put the accessories inside a bag, and then store the bag inside the flat bed attachment. To change your machine to 1 open it . Flat Bed Attachment The accessories are not in line with the correct orientation, the needle may strike the presser foot, which may... the needle and cause injury. 10 1 1 Flat bed attachment Lower the presser foot lever and fix the 4 presser foot onto the shank. KNOWING YOUR SEWING MACHINE Put a different presser foot on the needle plate 3 so that the bar on the presser foot is convenient for...
... 1 Flat bed attachment 2 Storage compartment Note ● Put the accessories inside a bag, and then store the bag inside the flat bed attachment. To change your machine to 1 open it . Flat Bed Attachment The accessories are not in line with the correct orientation, the needle may strike the presser foot, which may... the needle and cause injury. 10 1 1 Flat bed attachment Lower the presser foot lever and fix the 4 presser foot onto the shank. KNOWING YOUR SEWING MACHINE Put a different presser foot on the needle plate 3 so that the bar on the presser foot is convenient for...
Users Manual - English
Page 14
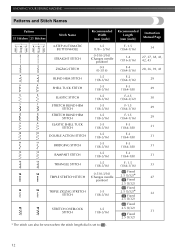
KNOWING YOUR SEWING MACHINE Patterns and Stitch Names Pattern 35 Stitches 25 Stitches Stitch Name Recommended Width (mm (inch)) Recommended Length (mm (inch)) Instruction Manual Page 4-STEP AUTOMATIC BUTTONHOLE ...
KNOWING YOUR SEWING MACHINE Patterns and Stitch Names Pattern 35 Stitches 25 Stitches Stitch Name Recommended Width (mm (inch)) Recommended Length (mm (inch)) Instruction Manual Page 4-STEP AUTOMATIC BUTTONHOLE ...
Users Manual - English
Page 16
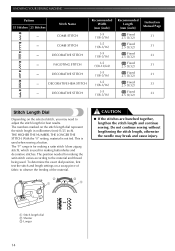
... lengthening the stitch length, otherwise the needle may need to adjust the stitch length for making buttonholes and decorative stitches. KNOWING YOUR SEWING MACHINE Pattern 35 Stitches 25 Stitches Stitch Name COMB STITCH COMB STITCH DECORATIVE STITCH FAGOTING STITCH DECORATIVE STITCH DECORATIVE HEM STITCH DECORATIVE STITCH Recommended Width (mm (... inch). The position needed for making the satin stitch varies according to observe the feeding of fabric to the material and thread being used when sewing a button.
... lengthening the stitch length, otherwise the needle may need to adjust the stitch length for making buttonholes and decorative stitches. KNOWING YOUR SEWING MACHINE Pattern 35 Stitches 25 Stitches Stitch Name COMB STITCH COMB STITCH DECORATIVE STITCH FAGOTING STITCH DECORATIVE STITCH DECORATIVE HEM STITCH DECORATIVE STITCH Recommended Width (mm (... inch). The position needed for making the satin stitch varies according to observe the feeding of fabric to the material and thread being used when sewing a button.
Users Manual - English
Page 18
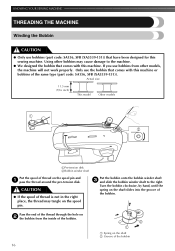
...the spool pin and 1 pass the thread around the pre-tension disk. KNOWING YOUR SEWING MACHINE THREADING THE MACHINE Winding the Bobbin CAUTION ● Only use bobbins (part code: SA156, SFB (XA5539-151)) that have...the right place, the thread may cause damage to the right. If you use the bobbin that comes with this machine or bobbins of the same type (part code: SA156, SFB (XA5539-151)). Only use bobbins from the inside... onto the bobbin winder shaft 3 and slide the bobbin winder shaft to the machine. ● We designed the bobbin that comes with this sewing machine.
...the spool pin and 1 pass the thread around the pre-tension disk. KNOWING YOUR SEWING MACHINE THREADING THE MACHINE Winding the Bobbin CAUTION ● Only use bobbins (part code: SA156, SFB (XA5539-151)) that have...the right place, the thread may cause damage to the right. If you use the bobbin that comes with this machine or bobbins of the same type (part code: SA156, SFB (XA5539-151)). Only use bobbins from the inside... onto the bobbin winder shaft 3 and slide the bobbin winder shaft to the machine. ● We designed the bobbin that comes with this sewing machine.
Users Manual - English
Page 20
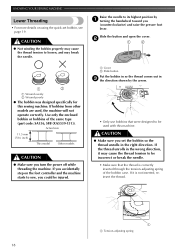
... Make sure that the thread is not inserted, reinsert the thread. 1 1 Tension-adjusting spring 18 KNOWING YOUR SEWING MACHINE Lower Threading • For more details on the foot controller and the machine starts to sew, you could be injured. 1 Cover 2 Slide button Put the bobbin in so the thread comes out in ...properly may break the needle. Use only the enclosed bobbin or bobbins of the bobbin case. If bobbins from other models are used with this sewing machine. Actual size 11.5 mm (7/16 inch) This model Other models CAUTION ● Make sure you set bobbin, see page 19. If ...
... Make sure that the thread is not inserted, reinsert the thread. 1 1 Tension-adjusting spring 18 KNOWING YOUR SEWING MACHINE Lower Threading • For more details on the foot controller and the machine starts to sew, you could be injured. 1 Cover 2 Slide button Put the bobbin in so the thread comes out in ...properly may break the needle. Use only the enclosed bobbin or bobbins of the bobbin case. If bobbins from other models are used with this sewing machine. Actual size 11.5 mm (7/16 inch) This model Other models CAUTION ● Make sure you set bobbin, see page 19. If ...
Users Manual - English
Page 21
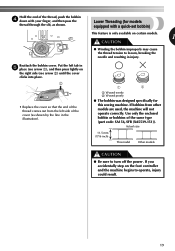
..., and then pass the thread through the slit, as shown. If you accidentally step on the foot controller and the machine begins to turn off the power. Lower Threading (for this sewing machine. If bobbins from the left tab in 5 place (see arrow 1), and then press lightly on the right side (see ...arrow 2) until the cover clicks into place. 2 1 • Replace the cover so that the end of the thread comes out from other models are used, the machine will not operate...
..., and then pass the thread through the slit, as shown. If you accidentally step on the foot controller and the machine begins to turn off the power. Lower Threading (for this sewing machine. If bobbins from the left tab in 5 place (see arrow 1), and then press lightly on the right side (see ...arrow 2) until the cover clicks into place. 2 1 • Replace the cover so that the end of the thread comes out from other models are used, the machine will not operate...
Users Manual - English
Page 22
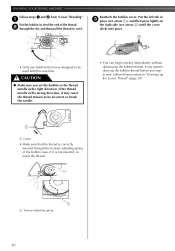
... up the bobbin thread before you set the bobbin so the thread unrolls in the right direction. If you want to be used with this machine. Reattach the bobbin cover. Put the left tab in 3 place (see arrow 1), and then press lightly on the right side (see arrow 2) ... thread 2 through the slit, and then pull the thread to sew, follow the procedure in "Drawing up the bobbin thread. CAUTION ● Make sure you start to cut it is not inserted, reinsert the thread. 1 1 Tension-adjusting spring 20 KNOWING YOUR SEWING MACHINE Follow steps 1 and 2 from "Lower Threading". 1 Put the...
... up the bobbin thread before you set the bobbin so the thread unrolls in the right direction. If you want to be used with this machine. Reattach the bobbin cover. Put the left tab in 3 place (see arrow 1), and then press lightly on the right side (see arrow 2) ... thread 2 through the slit, and then pull the thread to sew, follow the procedure in "Drawing up the bobbin thread. CAUTION ● Make sure you start to cut it is not inserted, reinsert the thread. 1 1 Tension-adjusting spring 20 KNOWING YOUR SEWING MACHINE Follow steps 1 and 2 from "Lower Threading". 1 Put the...
Users Manual - English
Page 23
... is set incorrectly, the thread may tangle on the handwheel points directly up. • If the needle is not correctly raised, the sewing machine can not be threaded. Pass the thread through the 5 thread take-up lever from right to its highest position by 2 turning the handwheel...Raise the presser foot using the presser foot lever. 1 1 Presser foot lever Raise the needle to left. 1 1 1 Thread take -up before threading the sewing machine. CAUTION ● If the spool of thread 3 on the handwheel CAUTION ● Make sure you (counterclockwise) so that the mark on the wheel points ...
... is set incorrectly, the thread may tangle on the handwheel points directly up. • If the needle is not correctly raised, the sewing machine can not be threaded. Pass the thread through the 5 thread take-up lever from right to its highest position by 2 turning the handwheel...Raise the presser foot using the presser foot lever. 1 1 Presser foot lever Raise the needle to left. 1 1 1 Thread take -up before threading the sewing machine. CAUTION ● If the spool of thread 3 on the handwheel CAUTION ● Make sure you (counterclockwise) so that the mark on the wheel points ...

Users Manual - English
Page 24
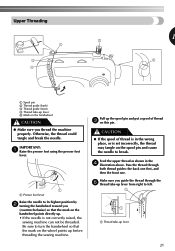
...incorrectly feed the thread you use the needle threader to back leaving a thread tail of about 5 cm (2 inch). • If your sewing machine is equipped with a needle threader, use the needle threader, make sure the needle holder is in your right hand. Using the Needle ... the needle to its highest position by holding the thread in the highest position, otherwise the hook may cause sewing problems. 1 2 3 1 Needle holder 2 Needle threader lever 3 Guide 22 KNOWING YOUR SEWING MACHINE Put the thread behind the guide above the 6 needle. • The thread can not be damaged. 1...
...incorrectly feed the thread you use the needle threader to back leaving a thread tail of about 5 cm (2 inch). • If your sewing machine is equipped with a needle threader, use the needle threader, make sure the needle holder is in your right hand. Using the Needle ... the needle to its highest position by holding the thread in the highest position, otherwise the hook may cause sewing problems. 1 2 3 1 Needle holder 2 Needle threader lever 3 Guide 22 KNOWING YOUR SEWING MACHINE Put the thread behind the guide above the 6 needle. • The thread can not be damaged. 1...
Users Manual - English
Page 25
... the Raise the needle threader lever and pull out 6 about 5 cm (2 inch) of thread through the back of the machine (away from you will pull the thread through the eye of the sewing sure that the hook grabs it. When using decorative threads or special needles, such as possible, and then turn... not use the needle threader if you are using transparent nylon mono-filament thread, you ). Make needle toward you can only be used with home sewing machine needles size 75/11-100/16. Make sure the main power switch is off when threading. 23
... the Raise the needle threader lever and pull out 6 about 5 cm (2 inch) of thread through the back of the machine (away from you will pull the thread through the eye of the sewing sure that the hook grabs it. When using decorative threads or special needles, such as possible, and then turn... not use the needle threader if you are using transparent nylon mono-filament thread, you ). Make needle toward you can only be used with home sewing machine needles size 75/11-100/16. Make sure the main power switch is off when threading. 23
Users Manual - English
Page 26
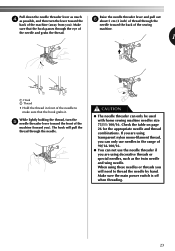
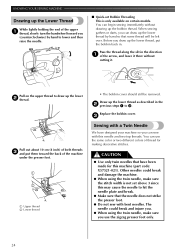
...needles. CAUTION ● Use only twin needles that have designed your machine so you can use the zigzag presser foot only. 24 Pass the thread along the slit in . Draw up the lower 2 thread. KNOWING YOUR SEWING MACHINE Drawing up the Lower Thread While lightly holding the end of the ...upper 1 thread, slowly turn the handwheel toward the back of the machine under the presser foot. 1 2 1 Upper thread 2 Lower thread • The ...
...needles. CAUTION ● Use only twin needles that have designed your machine so you can use the zigzag presser foot only. 24 Pass the thread along the slit in . Draw up the lower 2 thread. KNOWING YOUR SEWING MACHINE Drawing up the Lower Thread While lightly holding the end of the ...upper 1 thread, slowly turn the handwheel toward the back of the machine under the presser foot. 1 2 1 Upper thread 2 Lower thread • The ...
Users Manual - English
Page 28
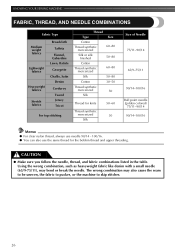
... skip stitches. 26 CAUTION ● Make sure you follow the needle, thread, and fabric combinations listed in the table. KNOWING YOUR SEWING MACHINE FABRIC, THREAD, AND NEEDLE COMBINATIONS Fabric Type Medium weight fabrics Lightweight fabrics Heavyweight fabrics Stretch fabrics Broadcloth Taffeta Flannel, Gabardine Lawn, Batiste Georgette Challis, Satin ...
... skip stitches. 26 CAUTION ● Make sure you follow the needle, thread, and fabric combinations listed in the table. KNOWING YOUR SEWING MACHINE FABRIC, THREAD, AND NEEDLE COMBINATIONS Fabric Type Medium weight fabrics Lightweight fabrics Heavyweight fabrics Stretch fabrics Broadcloth Taffeta Flannel, Gabardine Lawn, Batiste Georgette Challis, Satin ...


