
Users Manual - English
Page 6
APPENDIX ...44 MAINTENANCE ...44 Changing the Light Bulb ...44 Cleaning ...44 Troubleshooting ...46 INDEX ...49 4 USING ATTACHMENTS AND APPLICATIONS 37 Zipper Insertion ...37 Gathering ...38 Darning ...38 Appliqués ...39 Monogramming and Embroidering ...39 OPTIONAL ACCESSORIES 41 Using the Walking Foot ...41 Using the Quilting Foot ...42 Using the 1/4-inch Quilting Foot ...43 6. 5.
APPENDIX ...44 MAINTENANCE ...44 Changing the Light Bulb ...44 Cleaning ...44 Troubleshooting ...46 INDEX ...49 4 USING ATTACHMENTS AND APPLICATIONS 37 Zipper Insertion ...37 Gathering ...38 Darning ...38 Appliqués ...39 Monogramming and Embroidering ...39 OPTIONAL ACCESSORIES 41 Using the Walking Foot ...41 Using the Quilting Foot ...42 Using the 1/4-inch Quilting Foot ...43 6. 5.
Users Manual - English
Page 8
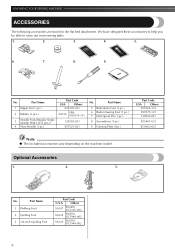
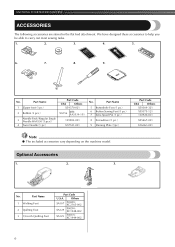
...F034N: XC2165-002 SA129 F005N: XC1948-002 SA125 F001N: XC1944-002 6 Optional Accessories 1. 2. 3. Part Name 1 Walking Foot 2 Quilting Foot 3 1/4-inch Quilting Foot Part Code U.S.A. Part Name 1 Zipper foot (1 pc.) 2 Bobbin (3 pcs.) 3 Needle Pack (Regular Single Needle HAX130 (3 pcs.)) 4 Twin Needle (1 pc...KNOWING YOUR SEWING MACHINE ACCESSORIES The following accessories are stored in the flat bed attachment. No. Part Name 5 Buttonhole Foot (1 pc.) 6 Button Sewing Foot (1 pc.) 7 Extra Spool Pin (1 pc.) 8 Screwdriver (1 pc.) 9 Darning Plate (1pc.) Part Code USA...
...F034N: XC2165-002 SA129 F005N: XC1948-002 SA125 F001N: XC1944-002 6 Optional Accessories 1. 2. 3. Part Name 1 Walking Foot 2 Quilting Foot 3 1/4-inch Quilting Foot Part Code U.S.A. Part Name 1 Zipper foot (1 pc.) 2 Bobbin (3 pcs.) 3 Needle Pack (Regular Single Needle HAX130 (3 pcs.)) 4 Twin Needle (1 pc...KNOWING YOUR SEWING MACHINE ACCESSORIES The following accessories are stored in the flat bed attachment. No. Part Name 5 Buttonhole Foot (1 pc.) 6 Button Sewing Foot (1 pc.) 7 Extra Spool Pin (1 pc.) 8 Screwdriver (1 pc.) 9 Darning Plate (1pc.) Part Code USA...
Users Manual - English
Page 43
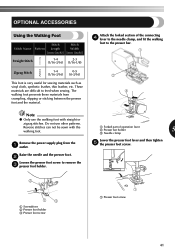
... 41 Raise the needle and the presser foot. 2 Loosen the presser foot screw to remove the 3 presser foot holder. 1 Forked part of the connecting 4 lever to the needle clamp, and fit the walking foot to feed when sewing. Do not use the walking foot with the walking foot. OPTIONAL ACCESSORIES Using the Walking Foot Stitch Stitch Stitch Name Pattern Length Width...
... 41 Raise the needle and the presser foot. 2 Loosen the presser foot screw to remove the 3 presser foot holder. 1 Forked part of the connecting 4 lever to the needle clamp, and fit the walking foot to feed when sewing. Do not use the walking foot with the walking foot. OPTIONAL ACCESSORIES Using the Walking Foot Stitch Stitch Stitch Name Pattern Length Width...
Users Manual - English
Page 44
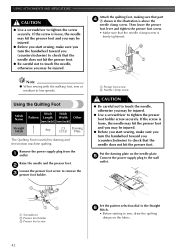
...● Use a screwdriver to sew, draw the quilting design on the fabric. 42 If the screw is loose, the needle may hit the presser foot and you may be injured. ● Before you start sewing, make sure you turn the handwheel toward you may be injured. ● Use ...32) Plate The Quilting Foot is above the needle clamp screw. Then lower the presser foot lever and tighten the presser foot screw. • Make sure that part 4 A shown in the illustration is useful for darning and free-motion machine quilting. A 1 2 Note ● When sewing with the walking foot, sew at medium to...
...● Use a screwdriver to sew, draw the quilting design on the fabric. 42 If the screw is loose, the needle may hit the presser foot and you may be injured. ● Before you start sewing, make sure you turn the handwheel toward you may be injured. ● Use ...32) Plate The Quilting Foot is above the needle clamp screw. Then lower the presser foot lever and tighten the presser foot screw. • Make sure that part 4 A shown in the illustration is useful for darning and free-motion machine quilting. A 1 2 Note ● When sewing with the walking foot, sew at medium to...
Users Manual - English
Page 51
... 31 Drawing up the lower thread 24 E Elastic stitching 30 Embroidering 39 F Fabric, thread, and needle combinations 26 Feather stitching 32 Flat bed attachment 10 Foot controller 8 Free-arm style 10 G Gathering 38 H Handwheel 21 L Light bulb changing 44 Light switch 8 Lower threading 18 , quick-set bobbin 19 24 M Main parts... upper 21 Triple zigzag stretch stitching 32 Troubleshooting 46 Twin needle , attaching 9 25 sewing 24 U Unpacking instructions 2 Upper tension control dial 25 Upper threading 21 W Walking foot 41 Z Zigzag stitching 28 Zipper insertion 37 49
... 31 Drawing up the lower thread 24 E Elastic stitching 30 Embroidering 39 F Fabric, thread, and needle combinations 26 Feather stitching 32 Flat bed attachment 10 Foot controller 8 Free-arm style 10 G Gathering 38 H Handwheel 21 L Light bulb changing 44 Light switch 8 Lower threading 18 , quick-set bobbin 19 24 M Main parts... upper 21 Triple zigzag stretch stitching 32 Troubleshooting 46 Twin needle , attaching 9 25 sewing 24 U Unpacking instructions 2 Upper tension control dial 25 Upper threading 21 W Walking foot 41 Z Zigzag stitching 28 Zipper insertion 37 49

Owner's Manual (Español) - Spanish
Page 6
USING ATTACHMENTS AND APPLICATIONS 37 Zipper Insertion ...37 Gathering ...38 Darning ...38 Appliqués ...39 Monogramming and Embroidering ...39 OPTIONAL ACCESSORIES 41 Using the Walking Foot ...41 Using the Quilting Foot ...42 Using the 1/4-inch Quilting Foot ...43 6. APPENDIX ...44 MAINTENANCE ...44 Changing the Light Bulb ...44 Cleaning ...44 Troubleshooting ...46 INDEX ...49 4 5.
USING ATTACHMENTS AND APPLICATIONS 37 Zipper Insertion ...37 Gathering ...38 Darning ...38 Appliqués ...39 Monogramming and Embroidering ...39 OPTIONAL ACCESSORIES 41 Using the Walking Foot ...41 Using the Quilting Foot ...42 Using the 1/4-inch Quilting Foot ...43 6. APPENDIX ...44 MAINTENANCE ...44 Changing the Light Bulb ...44 Cleaning ...44 Troubleshooting ...46 INDEX ...49 4 5.
Owner's Manual (Español) - Spanish
Page 8
... Twin Needle (1 pc.) Part Code USA Others X59370-021 SA156 SFB: XA5539-151 129583-021 X57521-021 No. Part Name 1 Walking Foot 2 Quilting Foot 3 1/4-inch Quilting Foot Part Code U.S.A. Others SA107 F034N: XC2165-002 SA129 F005N: XC1948-002 SA125 F001N: XC1944-002 6 Part Name 5 Buttonhole... Foot (1 pc.) 6 Button Sewing Foot (1 pc.) 7 Extra Spool Pin (1 pc.) 8 Screwdriver (1 pc.) 9 Darning Plate (1pc.) Part Code USA Others X59369-321 X59375-...
... Twin Needle (1 pc.) Part Code USA Others X59370-021 SA156 SFB: XA5539-151 129583-021 X57521-021 No. Part Name 1 Walking Foot 2 Quilting Foot 3 1/4-inch Quilting Foot Part Code U.S.A. Others SA107 F034N: XC2165-002 SA129 F005N: XC1948-002 SA125 F001N: XC1944-002 6 Part Name 5 Buttonhole... Foot (1 pc.) 6 Button Sewing Foot (1 pc.) 7 Extra Spool Pin (1 pc.) 8 Screwdriver (1 pc.) 9 Darning Plate (1pc.) Part Code USA Others X59369-321 X59375-...

Owner's Manual (Español) - Spanish
Page 43
... the forked section of operation lever 2 Presser bar holder 5 3 Needle clamp Lower the presser foot lever and then tighten 5 the presser foot screw. 2 13 1 Screwdriver 2 Presser foot holder 3 Presser foot screw 1 1 Presser foot screw 41 Do not use the walking foot with the walking foot. These materials are difficult to the presser bar. 1 2 3 Note ● Only use other patterns...
... the forked section of operation lever 2 Presser bar holder 5 3 Needle clamp Lower the presser foot lever and then tighten 5 the presser foot screw. 2 13 1 Screwdriver 2 Presser foot holder 3 Presser foot screw 1 1 Presser foot screw 41 Do not use the walking foot with the walking foot. These materials are difficult to the presser bar. 1 2 3 Note ● Only use other patterns...

Owner's Manual (Español) - Spanish
Page 44
...the handwheel toward you (counterclockwise) to touch the needle, otherwise you (counterclockwise) to check that the needle does not hit the presser foot. ● Be careful not to check that the needle clamp screw is firmly tightened. If the screw is useful for darning and ...free-motion machine quilting. Then lower the presser foot lever and tighten the presser foot screw. • Make sure that the needle does not hit the presser foot. A 1 2 Note ● When sewing with the walking foot, sew at medium to tighten the screw securely. USING ATTACHMENTS AND...
...the handwheel toward you (counterclockwise) to touch the needle, otherwise you (counterclockwise) to check that the needle does not hit the presser foot. ● Be careful not to check that the needle clamp screw is firmly tightened. If the screw is useful for darning and ...free-motion machine quilting. Then lower the presser foot lever and tighten the presser foot screw. • Make sure that the needle does not hit the presser foot. A 1 2 Note ● When sewing with the walking foot, sew at medium to tighten the screw securely. USING ATTACHMENTS AND...
Owner's Manual (Español) - Spanish
Page 51
... 31 Drawing up the lower thread 24 E Elastic stitching 30 Embroidering 39 F Fabric, thread, and needle combinations 26 Feather stitching 32 Flat bed attachment 10 Foot controller 8 Free-arm style 10 G Gathering 38 H Handwheel 21 L Light bulb changing 44 Light switch 8 Lower threading 18 , quick-set bobbin 19 24 M Main parts... upper 21 Triple zigzag stretch stitching 32 Troubleshooting 46 Twin needle , attaching 9 25 sewing 24 U Unpacking instructions 2 Upper tension control dial 25 Upper threading 21 W Walking foot 41 Z Zigzag stitching 28 Zipper insertion 37 49
... 31 Drawing up the lower thread 24 E Elastic stitching 30 Embroidering 39 F Fabric, thread, and needle combinations 26 Feather stitching 32 Flat bed attachment 10 Foot controller 8 Free-arm style 10 G Gathering 38 H Handwheel 21 L Light bulb changing 44 Light switch 8 Lower threading 18 , quick-set bobbin 19 24 M Main parts... upper 21 Triple zigzag stretch stitching 32 Troubleshooting 46 Twin needle , attaching 9 25 sewing 24 U Unpacking instructions 2 Upper tension control dial 25 Upper threading 21 W Walking foot 41 Z Zigzag stitching 28 Zipper insertion 37 49


