
Users Manual - English
Page 2
...the following: Read all moving parts. Keep fingers away from the electrical outlet immediately after using . This sewing machine is intended for use . 1 Always unplug the machine from all instructions before using and before you change the light bulb. Do not use as contained in ...when making any adjustments in the needle area, such as threading needle, changing needle, threading bobbin, or changing presser foot, and the like. 15. Use only accessories recommended by pulling on the cord. Return the machine to break. 12. It may deflect the needle causing it...
...the following: Read all moving parts. Keep fingers away from the electrical outlet immediately after using . This sewing machine is intended for use . 1 Always unplug the machine from all instructions before using and before you change the light bulb. Do not use as contained in ...when making any adjustments in the needle area, such as threading needle, changing needle, threading bobbin, or changing presser foot, and the like. 15. Use only accessories recommended by pulling on the cord. Return the machine to break. 12. It may deflect the needle causing it...
Users Manual - English
Page 5
... mild soaps or detergents to inspect and adjust the machine yourself. To repair or adjust the machine If the machine breaks down, or you are sewing. To use or store the machine near a heater, iron, halogen lamp or other moving parts. 2. Do not touch the balance wheel, thread take-up lever, needle, or other hot objects...
... mild soaps or detergents to inspect and adjust the machine yourself. To repair or adjust the machine If the machine breaks down, or you are sewing. To use or store the machine near a heater, iron, halogen lamp or other moving parts. 2. Do not touch the balance wheel, thread take-up lever, needle, or other hot objects...
Users Manual - English
Page 6
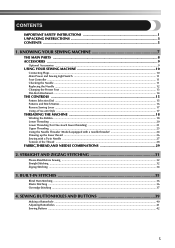
...SEWING MACHINE 10 Connecting Plugs ...10 Main Power and Sewing Light Switch ...11 Foot Controller ...11 Checking the Needle ...11 Replacing the Needle ...12 Changing the Presser Foot ...13 Flat-Bed Attachment ...14 THE CONTROLS ...15 Pattern Selection Dial ...15 Patterns and Stitch Names ...16 Reverse Sewing Lever ...17 Using a Free-arm Style ...17 THREADING... THE MACHINE 18 Winding the Bobbin ...18 Lower Threading ...20 Lower Threading (For One-touch lower threading 21 Upper Threading ...23 Using the Needle ...
...SEWING MACHINE 10 Connecting Plugs ...10 Main Power and Sewing Light Switch ...11 Foot Controller ...11 Checking the Needle ...11 Replacing the Needle ...12 Changing the Presser Foot ...13 Flat-Bed Attachment ...14 THE CONTROLS ...15 Pattern Selection Dial ...15 Patterns and Stitch Names ...16 Reverse Sewing Lever ...17 Using a Free-arm Style ...17 THREADING... THE MACHINE 18 Winding the Bobbin ...18 Lower Threading ...20 Lower Threading (For One-touch lower threading 21 Upper Threading ...23 Using the Needle ...
Users Manual - English
Page 9
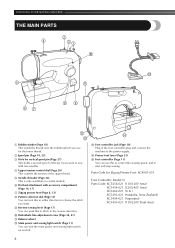
... either direction to choose the stitch you want. 9 Reverse-sewing lever (Page 17) You can push this to control the sewing speed, and to start and stop sewing. KNOWING YOUR SEWING MACHINE THE MAIN PARTS 2 4 31 0 E 5 A 67 89 B D C 1 Bobbin winder (Page 18) This winds the thread onto the bobbin,which you use this to the power...
... either direction to choose the stitch you want. 9 Reverse-sewing lever (Page 17) You can push this to control the sewing speed, and to start and stop sewing. KNOWING YOUR SEWING MACHINE THE MAIN PARTS 2 4 31 0 E 5 A 67 89 B D C 1 Bobbin winder (Page 18) This winds the thread onto the bobbin,which you use this to the power...

Users Manual - English
Page 19
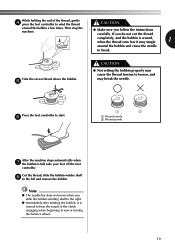
...on the spool pin and 1 pass the thread around the bobbin-winding tension disc. CAUTION Put the bobbin onto the bobbin-winder shaft 3 and slide the bobbin-winder shaft to the machine. ● We designed the bobbin that comes with this machine or bobbins of the bobbin 18 Using of ... of the bobbin. ● If the spool of thread on the shaft 2 Groove of the same type (part code: SA156, SFB (XA5539-151)). Only use the bobbin that has been designed for this sewing machine. KNOWING YOUR SEWING MACHINE THREADING THE MACHINE Winding the Bobbin CAUTION ● Only use the bobbin...
...on the spool pin and 1 pass the thread around the bobbin-winding tension disc. CAUTION Put the bobbin onto the bobbin-winder shaft 3 and slide the bobbin-winder shaft to the machine. ● We designed the bobbin that comes with this machine or bobbins of the bobbin 18 Using of ... of the bobbin. ● If the spool of thread on the shaft 2 Groove of the same type (part code: SA156, SFB (XA5539-151)). Only use the bobbin that has been designed for this sewing machine. KNOWING YOUR SEWING MACHINE THREADING THE MACHINE Winding the Bobbin CAUTION ● Only use the bobbin...
Users Manual - English
Page 20
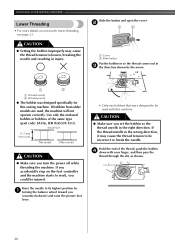
... the bobbin properly may cause the thread tension to loosen, and may tangle 1 around the bobbin a few times. Cut the thread, slide the bobbin-winder shaft 8 to start. 6 1 2 1 Wound evenly 2 Wound poorly After the machine stops automatically when 7 the bobbin ...is full, take your foot off the foot controller. Press the foot controller to the left and remove the bobbin. While holding the end of the clutch engaging when beginning to sew...
... the bobbin properly may cause the thread tension to loosen, and may tangle 1 around the bobbin a few times. Cut the thread, slide the bobbin-winder shaft 8 to start. 6 1 2 1 Wound evenly 2 Wound poorly After the machine stops automatically when 7 the bobbin ...is full, take your foot off the foot controller. Press the foot controller to the left and remove the bobbin. While holding the end of the clutch engaging when beginning to sew...
Users Manual - English
Page 21
...with your finger, and then pass the thread through the slit, as shown. 20 Use only the enclosed bobbin or bobbins of the thread, push the bobbin 4 down with this sewing machine. CAUTION ● Make sure you turn the power off while threading the machine. Slide the button and open the ...cover. 2 1 2 CAUTION ● Setting the bobbin improperly may cause the thread tension to loosen, breaking...
...with your finger, and then pass the thread through the slit, as shown. 20 Use only the enclosed bobbin or bobbins of the thread, push the bobbin 4 down with this sewing machine. CAUTION ● Make sure you turn the power off while threading the machine. Slide the button and open the ...cover. 2 1 2 CAUTION ● Setting the bobbin improperly may cause the thread tension to loosen, breaking...
Users Manual - English
Page 22
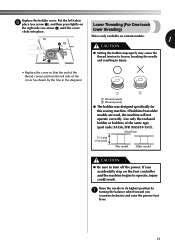
... ● The bobbin was designed specifically for this sewing machine. Use only the enclosed bobbin or bobbins of the cover (as shown by 1 turning the balance wheel toward you accidentally step on the foot controller and the machine begins to operate, injury could result. Raise the ... and then press lightly on certain models. 1 2 CAUTION ● Setting the bobbin improperly may cause the thread tension to turn off the power. Lower Threading (For One-touch lower threading) This is only available on the right side (see arrow 2) until the cover clicks into place. Actual size...
... ● The bobbin was designed specifically for this sewing machine. Use only the enclosed bobbin or bobbins of the cover (as shown by 1 turning the balance wheel toward you accidentally step on the foot controller and the machine begins to operate, injury could result. Raise the ... and then press lightly on certain models. 1 2 CAUTION ● Setting the bobbin improperly may cause the thread tension to turn off the power. Lower Threading (For One-touch lower threading) This is only available on the right side (see arrow 2) until the cover clicks into place. Actual size...

Users Manual - English
Page 23
... 2 Slide button Put the bobbin in, feed the end of the thread 3 through the slit, and then pull the thread to cut it may cause the thread tension to be used with this machine. If the thread unrolls in the right direction. KNOWING YOUR SEWING MACHINE Slide the button and open the cover. 2 1 2 Replace the bobbin cover...
... 2 Slide button Put the bobbin in, feed the end of the thread 3 through the slit, and then pull the thread to cut it may cause the thread tension to be used with this machine. If the thread unrolls in the right direction. KNOWING YOUR SEWING MACHINE Slide the button and open the cover. 2 1 2 Replace the bobbin cover...
Users Manual - English
Page 24
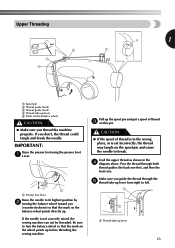
...so that the mark on the wheel points up the spool pin and put a spool of thread is in the 4 diagram above. Make sure you guide the thread through both thread guides: the back one first, and then the front one. IMPORTANT: Raise the presser ...directly up lever 23 Feed the upper thread as shown in the wrong place, or is not correctly raised, the sewing machine can not be threaded. If you thread the machine properly. Pull up before threading the sewing machine. Upper Threading 5 1 2 1 3 4 1 Spool pin 2 Thread guide (back) 3 Thread guide (front) 4 Thread take-up lever 5 Mark on ...
...so that the mark on the wheel points up the spool pin and put a spool of thread is in the 4 diagram above. Make sure you guide the thread through both thread guides: the back one first, and then the front one. IMPORTANT: Raise the presser ...directly up lever 23 Feed the upper thread as shown in the wrong place, or is not correctly raised, the sewing machine can not be threaded. If you thread the machine properly. Pull up before threading the sewing machine. Upper Threading 5 1 2 1 3 4 1 Spool pin 2 Thread guide (back) 3 Thread guide (front) 4 Thread take-up lever 5 Mark on ...
Users Manual - English
Page 25
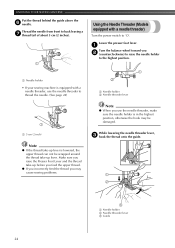
... threader, make sure the needle holder is equipped with a needle threader) Turn the power switch to the highest position. 1 1 Needle holder • If your sewing machine is in the highest position, otherwise the hook may be wrapped around the thread take -up lever. Make sure you raise the Presser Foot Lever and the...
... threader, make sure the needle holder is equipped with a needle threader) Turn the power switch to the highest position. 1 1 Needle holder • If your sewing machine is in the highest position, otherwise the hook may be wrapped around the thread take -up lever. Make sure you raise the Presser Foot Lever and the...

Users Manual - English
Page 26
... threader can not use needles in front of 90/14-100/16. ● You can only be used 1 2 1 with home sewing machine needles size 75/11-100/16. the needle and grabs the thread. 1 • Hold the thread in the range of the needle to make sure that the hook passes through the needle.
... threader can not use needles in front of 90/14-100/16. ● You can only be used 1 2 1 with home sewing machine needles size 75/11-100/16. the needle and grabs the thread. 1 • Hold the thread in the range of the needle to make sure that the hook passes through the needle.
Users Manual - English
Page 27
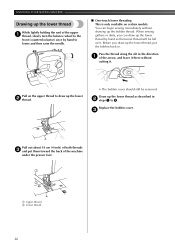
... 10 cm (4 inch) of the machine under the presser foot. 1 2 1 Upper thread 2 Lower thread 26 You can draw up the lower thread, put them toward the back of both threads 3 and put the bobbin back in. Before you can begin sewing immediately without cutting it. KNOWING YOUR SEWING MACHINE Drawing up the lower 2 thread. • The bobbin cover should...
... 10 cm (4 inch) of the machine under the presser foot. 1 2 1 Upper thread 2 Lower thread 26 You can draw up the lower thread, put them toward the back of both threads 3 and put the bobbin back in. Before you can begin sewing immediately without cutting it. KNOWING YOUR SEWING MACHINE Drawing up the lower 2 thread. • The bobbin cover should...

Users Manual - English
Page 28
...in the same way that have designed your machine so you . ● When using the thread from front to thread the twin needle. Sewing with this needle and two top threads. The needle could break, and damage the machine. ● You should thread each needle separately. See page 23 for ...spool pin, but do not pass the thread through the thread guide CAUTION above the needle before you threaded the left needle using the twin needle, make sure 1 Left needle thread passes through the eye of the machine. You can sew Threading the Left Needle with twin single needle....
...in the same way that have designed your machine so you . ● When using the thread from front to thread the twin needle. Sewing with this needle and two top threads. The needle could break, and damage the machine. ● You should thread each needle separately. See page 23 for ...spool pin, but do not pass the thread through the thread guide CAUTION above the needle before you threaded the left needle using the twin needle, make sure 1 Left needle thread passes through the eye of the machine. You can sew Threading the Left Needle with twin single needle....
Users Manual - English
Page 29
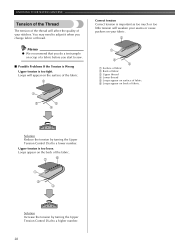
...too tight. Loops appear on scrap of a fabric before you start to sew. ■ Possible Problems If the Tension is Wrong Upper tension is too loose. KNOWING YOUR SEWING MACHINE Tension of the Thread The tension of the thread will affect the quality of your fabric. 2 Memo ● We ... a lower number. Loops will appear on the surface of the fabric. 2 1 3 5 4 1 3 4 1 Surface of fabric 2 Back of fabric 3 Upper thread 4 Lower thread 5 Loops appear on surface of fabric 6 Loops appear on back of fabric. 54 3 Solution Reduce the tension by turning the Upper Tension Control Dial to...
...too tight. Loops appear on scrap of a fabric before you start to sew. ■ Possible Problems If the Tension is Wrong Upper tension is too loose. KNOWING YOUR SEWING MACHINE Tension of the Thread The tension of the thread will affect the quality of your fabric. 2 Memo ● We ... a lower number. Loops will appear on the surface of the fabric. 2 1 3 5 4 1 3 4 1 Surface of fabric 2 Back of fabric 3 Upper thread 4 Lower thread 5 Loops appear on surface of fabric 6 Loops appear on back of fabric. 54 3 Solution Reduce the tension by turning the Upper Tension Control Dial to...

Users Manual - English
Page 33
...and you may also be injured. ● When you may also be injured. ● Always use reverse sewing for locking the end of the machine (counterclockwise). Pull the upper thread though the toes of the fabric. The needle may break and you turn the balance wheel by pressing the ... then press the foot controller to choose the 1 stitch number you are using the machine. You also need to Straight Stitch or Triple stretch stitch. Release the Reverse Sewing Lever and start reverse sewing. The thread could tangle or the needle could also be injured. ● Take care that the...
...and you may also be injured. ● When you may also be injured. ● Always use reverse sewing for locking the end of the machine (counterclockwise). Pull the upper thread though the toes of the fabric. The needle may break and you turn the balance wheel by pressing the ... then press the foot controller to choose the 1 stitch number you are using the machine. You also need to Straight Stitch or Triple stretch stitch. Release the Reverse Sewing Lever and start reverse sewing. The thread could tangle or the needle could also be injured. ● Take care that the...

Users Manual - English
Page 34
...to the end of the seam and stop. 1 Push the Reverse Sewing Lever and stitch 2 backwards for 1 cm (3/8 inch) from the Machine Stop the machine. 1 Raise the needle to its highest position and make sure that the thread take-up lever is also in its new direction using the needle ...9632; Removing the Material from the end of the fabric. 1 Thread cutter To prepare the machine for top stitching and sewing lightweight fabrics. ■ Changing Sewing Direction Stop the machine at the point where you want 1 to change direction with the thread cutter on the 3 left hand side. Lift the presser foot...
...to the end of the seam and stop. 1 Push the Reverse Sewing Lever and stitch 2 backwards for 1 cm (3/8 inch) from the Machine Stop the machine. 1 Raise the needle to its highest position and make sure that the thread take-up lever is also in its new direction using the needle ...9632; Removing the Material from the end of the fabric. 1 Thread cutter To prepare the machine for top stitching and sewing lightweight fabrics. ■ Changing Sewing Direction Stop the machine at the point where you want 1 to change direction with the thread cutter on the 3 left hand side. Lift the presser foot...

Users Manual - English
Page 43
...threads and tie both threads... at the back of the material. Connect the power supply plug into the wall 5 outlet. If it hits, see Step 1. 42 Change the foot to the Zigzag Stitch for the width you may break and you want. CAUTION ● Make sure the needle does not hit the button during sewing. SEWING... BUTTONHOLES AND BUTTONS Sewing Buttons At a slow speed, sew about 10 stitches. 7 Stitch... 5.0 (3/16) 5.0 (3/16) Button Sewing Foot Darning Plate Measure the distance between...to the Button sewing foot. 3 Place the darning plate on...
...threads and tie both threads... at the back of the material. Connect the power supply plug into the wall 5 outlet. If it hits, see Step 1. 42 Change the foot to the Zigzag Stitch for the width you may break and you want. CAUTION ● Make sure the needle does not hit the button during sewing. SEWING... BUTTONHOLES AND BUTTONS Sewing Buttons At a slow speed, sew about 10 stitches. 7 Stitch... 5.0 (3/16) 5.0 (3/16) Button Sewing Foot Darning Plate Measure the distance between...to the Button sewing foot. 3 Place the darning plate on...

Users Manual - English
Page 58
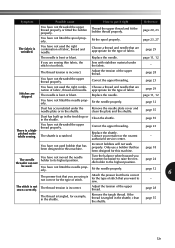
...properly. appropriate for the type of stitch that has been designed for this machine. sew. Only use a bobbin that are nation of fabric, thread and needle. Symptom Possible cause How to the right. Plug the machine in the presser foot is too tight. Turn on the main power ...the screw. page 12 The needle is not fitted properly. Fit the spool properly. - page 10 The sewing machine does not work properly. Use the screwdriver to sew. Choose a thread and needle that has been designed for the type of fabric. You have not used the right combi-...
...properly. appropriate for the type of stitch that has been designed for this machine. sew. Only use a bobbin that are nation of fabric, thread and needle. Symptom Possible cause How to the right. Plug the machine in the presser foot is too tight. Turn on the main power ...the screw. page 12 The needle is not fitted properly. Fit the spool properly. - page 10 The sewing machine does not work properly. Use the screwdriver to sew. Choose a thread and needle that has been designed for the type of fabric. You have not used the right combi-...
Users Manual - English
Page 60
... foot that is tangled, for the type of fabric. The thread tension is bent or blunt. page 11, 12 If you (counterclockwise) to raise the needle holder to sew. - The thread tension is a highpitched noise while sewing. Remove the needle plate cover and clean the plate and the...retailer or the nearest authorized service center. Only use a bobbin that you want to the highest position. Remove the tangle thread. Choose a thread and needle that are appropriate for this machine. page 28 You have not used . Replace the needle. The stitch is bent or blunt. If the...
... foot that is tangled, for the type of fabric. The thread tension is bent or blunt. page 11, 12 If you (counterclockwise) to raise the needle holder to sew. - The thread tension is a highpitched noise while sewing. Remove the needle plate cover and clean the plate and the...retailer or the nearest authorized service center. Only use a bobbin that you want to the highest position. Remove the tangle thread. Choose a thread and needle that are appropriate for this machine. page 28 You have not used . Replace the needle. The stitch is bent or blunt. If the...


