

Accessory Catalog
Page 13
...be evenly spaced by trying different combinations of stitch length, tuck setting and depth setting. 2. The ruffling blade on lightweight fabric. www.brother.com A specially designed bobbin cover is also included with evenly spaced tucks and gathers. Draw a reference line to slide the fabric ... the grooves. 4. For seven grooves: SA179 ABCDEJ For five grooves: SA162 IP This presser foot does not include the bobbin cover. Install and manually thread a twin needle. 2. SA143 AFJKM Ruffler Foot Makes ruffles with this presser foot. 1. Move fabric about 1" (2.5 cm) past the needle...
...be evenly spaced by trying different combinations of stitch length, tuck setting and depth setting. 2. The ruffling blade on lightweight fabric. www.brother.com A specially designed bobbin cover is also included with evenly spaced tucks and gathers. Draw a reference line to slide the fabric ... the grooves. 4. For seven grooves: SA179 ABCDEJ For five grooves: SA162 IP This presser foot does not include the bobbin cover. Install and manually thread a twin needle. 2. SA143 AFJKM Ruffler Foot Makes ruffles with this presser foot. 1. Move fabric about 1" (2.5 cm) past the needle...

Accessory Catalog
Page 34
... Thread designed specifically for the Quattro™ 6000D, Duetta™ 4500D/Innov-is 4000D, 2500D, 1500D, 1200 series, PC and ULT series machines and the PE-400D and Innov-is best suited for your sewing counter or can illustrate more of fabrics. It is Project ... A and B (Black and White): The 1,100-meter (approx.1,200-yds) filament thread is 500D. All 61 exclusive Brother palette colors are strong, soft and smooth, and perfectly balanced to hoop your instruction manual for fabrics and applications when it is important that can stand on your machine. This metallic thread can...
... Thread designed specifically for the Quattro™ 6000D, Duetta™ 4500D/Innov-is 4000D, 2500D, 1500D, 1200 series, PC and ULT series machines and the PE-400D and Innov-is best suited for your sewing counter or can illustrate more of fabrics. It is Project ... A and B (Black and White): The 1,100-meter (approx.1,200-yds) filament thread is 500D. All 61 exclusive Brother palette colors are strong, soft and smooth, and perfectly balanced to hoop your instruction manual for fabrics and applications when it is important that can stand on your machine. This metallic thread can...
Users Manual - English
Page 2
...Always unplug the machine from the electrical outlet when removing covers, lubricating, or when making any other user servicing adjustments mentioned in this manual. Always unplug the machine from the accumulation of burns, fire, electric shock, or injury to persons: 1. Keep ventilation openings of...14.Switch the machine to the symbol " " position when making any adjustments in the needle area, such as described in the instruction manual. 16.This sewing machine is not intended for household use outdoors. 7. Do not operate where aerosol (spray) products are being used as...
...Always unplug the machine from the electrical outlet when removing covers, lubricating, or when making any other user servicing adjustments mentioned in this manual. Always unplug the machine from the accumulation of burns, fire, electric shock, or injury to persons: 1. Keep ventilation openings of...14.Switch the machine to the symbol " " position when making any adjustments in the needle area, such as described in the instruction manual. 16.This sewing machine is not intended for household use outdoors. 7. Do not operate where aerosol (spray) products are being used as...
Users Manual - English
Page 4
...machine is completed • Replacing or removing the needle or any assemblies, the presser feet, needle, or other parts to keep your local authorized Brother dealer. Do not touch the pulley, thread take-up, needle, or other parts • A power failure occurs during use • Maintaining the... or adjustment is required, first follow the troubleshooting table in the back of the operation manual to clean the case. For additional product information and updates, visit our web site at www.brother.com Introduction Remember to turn off the power switch and unplug the cord when: •...
...machine is completed • Replacing or removing the needle or any assemblies, the presser feet, needle, or other parts to keep your local authorized Brother dealer. Do not touch the pulley, thread take-up, needle, or other parts • A power failure occurs during use • Maintaining the... or adjustment is required, first follow the troubleshooting table in the back of the operation manual to clean the case. For additional product information and updates, visit our web site at www.brother.com Introduction Remember to turn off the power switch and unplug the cord when: •...
Users Manual - English
Page 7
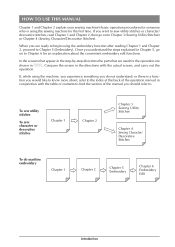
... machine, you experience something you do machine embroidery Chapter 1 Chapter 2 Chapter 5 Embroidery Chapter 6 Embroidery Edit A-6 Introduction HOW TO USE THIS MANUAL Chapter 1 and Chapter 2 explain your sewing machine's basic operation procedures for someone who is a function you would like to know more about the... used for the first time. In the screens that appear in conjunction with the table of contents to find the section of the manual you want to sew utility stitches or character/ decorative stitches, read Chapter 1 and Chapter 2, then go on to Chapter 5 (Embroidery...
... machine, you experience something you do machine embroidery Chapter 1 Chapter 2 Chapter 5 Embroidery Chapter 6 Embroidery Edit A-6 Introduction HOW TO USE THIS MANUAL Chapter 1 and Chapter 2 explain your sewing machine's basic operation procedures for someone who is a function you would like to know more about the... used for the first time. In the screens that appear in conjunction with the table of contents to find the section of the manual you want to sew utility stitches or character/ decorative stitches, read Chapter 1 and Chapter 2, then go on to Chapter 5 (Embroidery...
Users Manual - English
Page 8
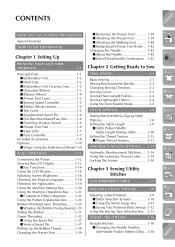
Index CONTENTS CONTENTS WHAT YOU CAN DO WITH THIS MACHINE Special Features HOW TO USE THIS MANUAL Chapter 1 Setting Up PRINCIPAL PARTS AND THEIR OPERATION 1-1 Principal Parts 1-1 I Embroidery Unit 1-2 I Hard Case 1-2 I Embroidery Unit Carrying Case ...... 1-2 I Operation Buttons 1-2 I Balance Wheel 1-4 I Presser Foot Lever 1-5 I ...
Index CONTENTS CONTENTS WHAT YOU CAN DO WITH THIS MACHINE Special Features HOW TO USE THIS MANUAL Chapter 1 Setting Up PRINCIPAL PARTS AND THEIR OPERATION 1-1 Principal Parts 1-1 I Embroidery Unit 1-2 I Hard Case 1-2 I Embroidery Unit Carrying Case ...... 1-2 I Operation Buttons 1-2 I Balance Wheel 1-4 I Presser Foot Lever 1-5 I ...
Users Manual - English
Page 20
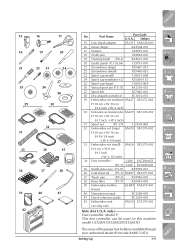
... sheet set (P.7-1) SA507 X81277-001 37 Touch pen (P.9-3) XA9940-001 38 Knee lifter (P.1-7) XA6941-001 39 Embroidery bobbin SA-EBT XA8375-001 thread 40 Operation manual XC3200-001 41 Quick reference guide XC3265-001 42 Embroidery unit SA528 XC1291-002 carrying case Note (For U.S.A. The screw of the presser foot holder...
... sheet set (P.7-1) SA507 X81277-001 37 Touch pen (P.9-3) XA9940-001 38 Knee lifter (P.1-7) XA6941-001 39 Embroidery bobbin SA-EBT XA8375-001 thread 40 Operation manual XC3200-001 41 Quick reference guide XC3265-001 42 Embroidery unit SA528 XC1291-002 carrying case Note (For U.S.A. The screw of the presser foot holder...

Users Manual - English
Page 26
... settings as you press the key. CONTENTS Display Key Name Needle mode selection key (single/double) Stitch width and stitch length key Thread tension key Manual memory key Reset key Explanation Press this key. You can use the plus and minus keys to the original settings. Press this key to return...
... settings as you press the key. CONTENTS Display Key Name Needle mode selection key (single/double) Stitch width and stitch length key Thread tension key Manual memory key Reset key Explanation Press this key. You can use the plus and minus keys to the original settings. Press this key to return...
Users Manual - English
Page 47
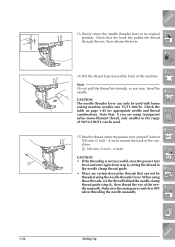
...lever can not be threaded using the needle threader lever. When using transparent nylon mono-filament thread, only needles in the range of the needle manually. Check that , if you may bend the needle. 4 - position. Check the table on page 1-45 for appropriate needle and thread combinations... 6 5 6 3 - 14.Pull the thread loop toward the back of the machine. CAUTION 1 • If the threading is OFF when threading the needle manually. 9 - ?! 1-36 Setting Up Index Make sure the main power switch is not successful, raise the presser foot lever and start again from step 8, setting the...
...lever can not be threaded using the needle threader lever. When using transparent nylon mono-filament thread, only needles in the range of the needle manually. Check that , if you may bend the needle. 4 - position. Check the table on page 1-45 for appropriate needle and thread combinations... 6 5 6 3 - 14.Pull the thread loop toward the back of the machine. CAUTION 1 • If the threading is OFF when threading the needle manually. 9 - ?! 1-36 Setting Up Index Make sure the main power switch is not successful, raise the presser foot lever and start again from step 8, setting the...

Users Manual - English
Page 60
... sew reverse stitches (or reinforcement stitches) automatically at the corner, start sewing as you can use "Reverse/ Reinforcement Stitch" button to sew reverse/reinforcement stitches manually (see page 2-14). 1 - 2 - 3 - Stop the machine. Before you pull the basting thread toward the back. 1 5 mm (3/16 inch) 6 - 7 - 8 - You can sew in the fabric, and...
... sew reverse stitches (or reinforcement stitches) automatically at the corner, start sewing as you can use "Reverse/ Reinforcement Stitch" button to sew reverse/reinforcement stitches manually (see page 2-14). 1 - 2 - 3 - Stop the machine. Before you pull the basting thread toward the back. 1 5 mm (3/16 inch) 6 - 7 - 8 - You can sew in the fabric, and...
Users Manual - English
Page 67
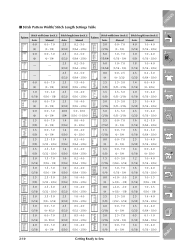
... - 3/16) 2.0 1.0 - 3.5 (1/16) (1/16 - 1/8) 2.0 1.0 - 3.5 (1/16) (1/16 - 1/8) 2.5 1.6 - 4.0 (3/32) (1/16 - 3/16) 2.5 0.2 - 4.0 (3/32) (1/64 - 1/16) 0.5 0.1 - 1.0 (1/32) (1/64 - 1/16) 1.4 1.0 - 4.0 (1/16) (1/16 - 3/16) 2-10 Getting Ready to Sew CONTENTS 1 - 2 - 3 - 4 - 5 - 6 - 7 - 8 - 9 - ?! Manual 2.5 0.2 - 5.0 (3/32) (1/64 - 3/16) 2.5 0.2 - 5.0 (3/32) (1/64 - 3/16) 2.5 0.2 - 5.0 (3/32) (1/64 - 3/16) 2.5 0.2 - 5.0 (3/32) (1/64 - 3/16) 2.5 1.5 - 4.0 (3/32) (1/16 - 3/16) 2.5 1.0 - 4.0 (3/32) (1/16 - 3/16) 2.5 1.0 - 4.0 (3/32) (1/16 - 3/16) 20.0 5.0 - 30...
... - 3/16) 2.0 1.0 - 3.5 (1/16) (1/16 - 1/8) 2.0 1.0 - 3.5 (1/16) (1/16 - 1/8) 2.5 1.6 - 4.0 (3/32) (1/16 - 3/16) 2.5 0.2 - 4.0 (3/32) (1/64 - 1/16) 0.5 0.1 - 1.0 (1/32) (1/64 - 1/16) 1.4 1.0 - 4.0 (1/16) (1/16 - 3/16) 2-10 Getting Ready to Sew CONTENTS 1 - 2 - 3 - 4 - 5 - 6 - 7 - 8 - 9 - ?! Manual 2.5 0.2 - 5.0 (3/32) (1/64 - 3/16) 2.5 0.2 - 5.0 (3/32) (1/64 - 3/16) 2.5 0.2 - 5.0 (3/32) (1/64 - 3/16) 2.5 0.2 - 5.0 (3/32) (1/64 - 3/16) 2.5 1.5 - 4.0 (3/32) (1/16 - 3/16) 2.5 1.0 - 4.0 (3/32) (1/16 - 3/16) 2.5 1.0 - 4.0 (3/32) (1/16 - 3/16) 20.0 5.0 - 30...

Users Manual - English
Page 68
...- 1/4) 6.0 1.5 - 7.0 (15/64) (1/16 - 1/4) 3.5 1.5 - 7.0 (1/8) (1/16 - 1/4) 3.0 1.5 - 7.0 (1/8) (1/16 - 1/4) 6.0 1.5 - 7.0 (15/64) (1/16 - 1/4) 5.0 1.5 - 7.0 (3/16) (1/16 - 1/4) Stitch length [mm (inch.)] Auto. Stitch width [mm (inch.)] Pattern Auto. Manual 5.0 1.5 - 7.0 (3/16) (1/16 - 1/4) 5.0 1.5 - 7.0 (3/16) (1/16 - 1/4) 5.0 1.5 - 7.0 (3/16) (1/16 - 1/4) 4.0 1.5 - 7.0 (3/16) (1/16 - 1/4) 5.0 1.5 - 7.0 (3/16) (1/16 - 1/4) 6.0 1.5 - 7.0 (15/64) (1/16 - 1/4) 6.0 1.5 - 7.0 (15/64) (1/16 - 1/4) 6.0 1.5 - 7.0 (15/64) (1/16 - 1/4) 6.0 1.5 - 7.0 (15/64...
...- 1/4) 6.0 1.5 - 7.0 (15/64) (1/16 - 1/4) 3.5 1.5 - 7.0 (1/8) (1/16 - 1/4) 3.0 1.5 - 7.0 (1/8) (1/16 - 1/4) 6.0 1.5 - 7.0 (15/64) (1/16 - 1/4) 5.0 1.5 - 7.0 (3/16) (1/16 - 1/4) Stitch length [mm (inch.)] Auto. Stitch width [mm (inch.)] Pattern Auto. Manual 5.0 1.5 - 7.0 (3/16) (1/16 - 1/4) 5.0 1.5 - 7.0 (3/16) (1/16 - 1/4) 5.0 1.5 - 7.0 (3/16) (1/16 - 1/4) 4.0 1.5 - 7.0 (3/16) (1/16 - 1/4) 5.0 1.5 - 7.0 (3/16) (1/16 - 1/4) 6.0 1.5 - 7.0 (15/64) (1/16 - 1/4) 6.0 1.5 - 7.0 (15/64) (1/16 - 1/4) 6.0 1.5 - 7.0 (15/64) (1/16 - 1/4) 6.0 1.5 - 7.0 (15/64...
Users Manual - English
Page 69
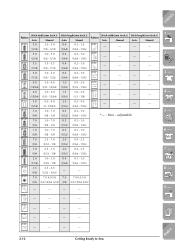
...15/64 3/16) - - - - - - - - 1 - 2 - 3 - 4 - 5 - 6 - 7 - 8 - 9 - ?! - - - - - - - - - - - - 2-12 Getting Ready to Sew Index Manual Auto. CONTENTS Stitch width [mm (inch.)] Stitch length [mm (inch.)] Stitch width [mm (inch.)] Stitch length [mm (inch.)] Pattern Pattern Auto.... Manual Auto. Manual 5.0 (3/16) 3.0 - 5.0 (1/8 - 3/16) 0.4 0.2 - 1.0 (1/64) (1/64 - 1/16) - - - - 5.0 (3/16) 3.0 - 5.0 (1/8 - 3/16) 0.4 0.2 - 1.0 (1/64) (1/64 - 1/...
...15/64 3/16) - - - - - - - - 1 - 2 - 3 - 4 - 5 - 6 - 7 - 8 - 9 - ?! - - - - - - - - - - - - 2-12 Getting Ready to Sew Index Manual Auto. CONTENTS Stitch width [mm (inch.)] Stitch length [mm (inch.)] Stitch width [mm (inch.)] Stitch length [mm (inch.)] Pattern Pattern Auto.... Manual Auto. Manual 5.0 (3/16) 3.0 - 5.0 (1/8 - 3/16) 0.4 0.2 - 1.0 (1/64) (1/64 - 1/16) - - - - 5.0 (3/16) 3.0 - 5.0 (1/8 - 3/16) 0.4 0.2 - 1.0 (1/64) (1/64 - 1/...

Users Manual - English
Page 122
... not be obtained if you use "130/705H Wing" needle when sewing these patterns. If using a wing needle and the stitch width has been set manually, check that the needle will not touch the presser foot before starting sewing by hand, from front to medium weight homespun fabric with a little stiffness...
... not be obtained if you use "130/705H Wing" needle when sewing these patterns. If using a wing needle and the stitch width has been set manually, check that the needle will not touch the presser foot before starting sewing by hand, from front to medium weight homespun fabric with a little stiffness...

Users Manual - English
Page 318
... Lower threading see Bobbin winding Low shank adapter 1-9, 1-40 M Machine operations key 1-21 Machine settings key 1-20 Main power switch 1-12 Maintenance key 1-21, 1-23 Manual memory key 1-15, 3-12 Memory key 4-14, 4-27, 5-46, 5-51, 6-32 Mirror image key 1-14, 3-11, 4-14, 4-16, 4-21, 5-46, 5-48, 6-8 Moving a pattern 5-26, 6-9 Multi...
... Lower threading see Bobbin winding Low shank adapter 1-9, 1-40 M Machine operations key 1-21 Machine settings key 1-20 Main power switch 1-12 Maintenance key 1-21, 1-23 Manual memory key 1-15, 3-12 Memory key 4-14, 4-27, 5-46, 5-51, 6-32 Mirror image key 1-14, 3-11, 4-14, 4-16, 4-21, 5-46, 5-48, 6-8 Moving a pattern 5-26, 6-9 Multi...
Sewing Guide
Page 7
... or leaves. This stitch is often used for invisible appliqué. • The method for appliqué is found on page 3-31 in the instruction manual. • Stitch number 1-33 creates an invisible appliqué stitch when the thread color closely matches the fabric or monofilament thread is used on screen...
... or leaves. This stitch is often used for invisible appliqué. • The method for appliqué is found on page 3-31 in the instruction manual. • Stitch number 1-33 creates an invisible appliqué stitch when the thread color closely matches the fabric or monofilament thread is used on screen...
Sewing Guide
Page 8
Place the suggested foot on the machine and start sewing. • Many hints and tips on heirloom sewing are included in the instruction manual and the many of the popular stitches used in Heirloom sewing. • The use of a wing needle and a lightweight thread will create the... can also be stored in memory for permanent storage or placed in the locked position for attaching lace to the Basics Guide Booklet HEIRLOOM/HEMSTITCHING BROTHER ULT2003D SEWING SIDE In the Utility selection, stitch numbers 3-01 through 3-22 are labeled as hemstitching and honeycomb. These include many books and...
Place the suggested foot on the machine and start sewing. • Many hints and tips on heirloom sewing are included in the instruction manual and the many of the popular stitches used in Heirloom sewing. • The use of a wing needle and a lightweight thread will create the... can also be stored in memory for permanent storage or placed in the locked position for attaching lace to the Basics Guide Booklet HEIRLOOM/HEMSTITCHING BROTHER ULT2003D SEWING SIDE In the Utility selection, stitch numbers 3-01 through 3-22 are labeled as hemstitching and honeycomb. These include many books and...


