

Accessory Catalog
Page 13
... placing the completed row in the center position. 3. Install and manually thread a twin needle. 2. For seven grooves: SA179 ABCDEJ For five grooves: SA162 IP This presser foot does not include the bobbin cover. www.brother.com Brother Embellishment Feet 23 Bed Runner & Pillowcase Innov-is Project Book ... fabric about 1" (2.5 cm) past the needle to get started. The intervals of tucks can be adjusted. 1. Sew slowly for details.) Brother Embellishment Feet Pin Tuck Foot 24 Ruffler Foot Pin Tuck Foot This presser foot has 7 grooves and produces perfect pin tucks and corded pin ...
... placing the completed row in the center position. 3. Install and manually thread a twin needle. 2. For seven grooves: SA179 ABCDEJ For five grooves: SA162 IP This presser foot does not include the bobbin cover. www.brother.com Brother Embellishment Feet 23 Bed Runner & Pillowcase Innov-is Project Book ... fabric about 1" (2.5 cm) past the needle to get started. The intervals of tucks can be adjusted. 1. Sew slowly for details.) Brother Embellishment Feet Pin Tuck Foot 24 Ruffler Foot Pin Tuck Foot This presser foot has 7 grooves and produces perfect pin tucks and corded pin ...

Accessory Catalog
Page 34
...14-Pack: MTPK14 Metallic Threads 14 different metallic colors, 100% polyester thread developed and made for Brother Embroidery machines, but compatible with straight, zig zag or decorative stitches. Designed for high speed ... the most intricate designs. Handles a variety of the proper stabilizer helps to hoop your instruction manual for advice on Backing Stabilizer 11" x 1 yd. (3 Pieces) SA5810 Tear-Away Medium...; 6000D, Duetta™ 4500D/Innov-is 4000D, 2500D, 1500D, 1200 series, PC and ULT series machines and the PE-400D and Innov-is best suited for our embroidery only machines,...
...14-Pack: MTPK14 Metallic Threads 14 different metallic colors, 100% polyester thread developed and made for Brother Embroidery machines, but compatible with straight, zig zag or decorative stitches. Designed for high speed ... the most intricate designs. Handles a variety of the proper stabilizer helps to hoop your instruction manual for advice on Backing Stabilizer 11" x 1 yd. (3 Pieces) SA5810 Tear-Away Medium...; 6000D, Duetta™ 4500D/Innov-is 4000D, 2500D, 1500D, 1200 series, PC and ULT series machines and the PE-400D and Innov-is best suited for our embroidery only machines,...
Users Manual - English
Page 2
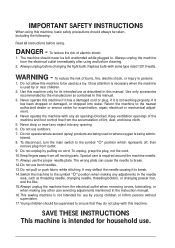
... then remove plug from outlet. 9. istered. 8. To disconnect, turn the main switch to break. 12.Do not use as described in this manual. 3. To unplug, grasp the plug, not the cord. 10.Keep fingers away from the electrical outlet immediately after using and before cleaning. 2.... only accessories recommended by young children or infirm persons without supervision. 17.Young children should be left unattended while plugged in this manual. Keep ventilation openings of the machine and foot control free from the electrical outlet when removing covers, lubricating, or when making any...
... then remove plug from outlet. 9. istered. 8. To disconnect, turn the main switch to break. 12.Do not use as described in this manual. 3. To unplug, grasp the plug, not the cord. 10.Keep fingers away from the electrical outlet immediately after using and before cleaning. 2.... only accessories recommended by young children or infirm persons without supervision. 17.Young children should be left unattended while plugged in this manual. Keep ventilation openings of the machine and foot control free from the electrical outlet when removing covers, lubricating, or when making any...

Users Manual - English
Page 4
... life 1. Do not drop or hit the machine. 4. Always consult the operation manual when replacing or installing any other hot objects. 2. For additional product information and updates, visit our web site at www.brother.com Introduction A-3 If the problem persists, please consult your eye on the foot... scouring pow- CONGRATULATIONS ON CHOOSING OUR MACHINE Your machine is required, first follow the troubleshooting table in the back of the operation manual to inspect and adjust the machine yourself. Do not store anything on the needle while sewing. Do not use or store the machine...
... life 1. Do not drop or hit the machine. 4. Always consult the operation manual when replacing or installing any other hot objects. 2. For additional product information and updates, visit our web site at www.brother.com Introduction A-3 If the problem persists, please consult your eye on the foot... scouring pow- CONGRATULATIONS ON CHOOSING OUR MACHINE Your machine is required, first follow the troubleshooting table in the back of the operation manual to inspect and adjust the machine yourself. Do not store anything on the needle while sewing. Do not use or store the machine...
Users Manual - English
Page 7
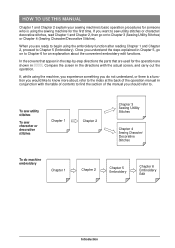
... in operation. . If you should refer to Chapter 6 for an explanation about , refer to the index at the back of the operation manual in the directions with the actual screen, and carry out the If, while using the sewing machine for the operation are used for the first... Chapter 2 Chapter 5 Embroidery Chapter 6 Embroidery Edit A-6 Introduction Compare the screen in conjunction with the table of contents to find the section of the manual you want to sew utility stitches or character/ decorative stitches, read Chapter 1 and Chapter 2, then go on to Chapter 5 (Embroidery).
... in operation. . If you should refer to Chapter 6 for an explanation about , refer to the index at the back of the operation manual in the directions with the actual screen, and carry out the If, while using the sewing machine for the operation are used for the first... Chapter 2 Chapter 5 Embroidery Chapter 6 Embroidery Edit A-6 Introduction Compare the screen in conjunction with the table of contents to find the section of the manual you want to sew utility stitches or character/ decorative stitches, read Chapter 1 and Chapter 2, then go on to Chapter 5 (Embroidery).

Users Manual - English
Page 8
CONTENTS WHAT YOU CAN DO WITH THIS MACHINE Special Features HOW TO USE THIS MANUAL Chapter 1 Setting Up PRINCIPAL PARTS AND THEIR OPERATION 1-1 Principal Parts 1-1 s Embroidery Unit 1-2 s Hard Case 1-2 s Embroidery Unit Storage Case ........ 1-2 s Operation Buttons 1-3 s Balance Wheel 1-4 s Presser Foot Lever 1-4 s ...
CONTENTS WHAT YOU CAN DO WITH THIS MACHINE Special Features HOW TO USE THIS MANUAL Chapter 1 Setting Up PRINCIPAL PARTS AND THEIR OPERATION 1-1 Principal Parts 1-1 s Embroidery Unit 1-2 s Hard Case 1-2 s Embroidery Unit Storage Case ........ 1-2 s Operation Buttons 1-3 s Balance Wheel 1-4 s Presser Foot Lever 1-4 s ...
Users Manual - English
Page 20
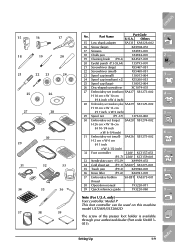
... sheet set (P.7-1) SA507 X81277-001 35 Touch pen (P.9-3) XA9940-001 36 Knee lifter (P.1-6) XA6941-001 37 Embroidery bobbin SA-EBT XA8375-001 thread 38 Operation manual 193220-011 39 Quick reference guide 193220-060 Note (For U.S.A. The screw of the presser foot holder is available through your authorized dealer (Part code...
... sheet set (P.7-1) SA507 X81277-001 35 Touch pen (P.9-3) XA9940-001 36 Knee lifter (P.1-6) XA6941-001 37 Embroidery bobbin SA-EBT XA8375-001 thread 38 Operation manual 193220-011 39 Quick reference guide 193220-060 Note (For U.S.A. The screw of the presser foot holder is available through your authorized dealer (Part code...

Users Manual - English
Page 26
... setting of the currently selected stitch pattern. Display Key Name Needle mode selection key (single/double) Stitch width and stitch length key Thread tension key Manual memory key Reset key Explanation Press this key to change the thread tension settings. Change the stitch pattern settings as you press the key. The...
... setting of the currently selected stitch pattern. Display Key Name Needle mode selection key (single/double) Stitch width and stitch length key Thread tension key Manual memory key Reset key Explanation Press this key to change the thread tension settings. Change the stitch pattern settings as you press the key. The...
Users Manual - English
Page 47
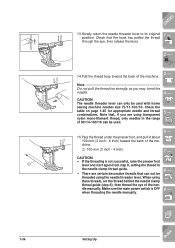
CAUTION The needle threader lever can only be used with home sewing machine needles size 75/11-100/16. dle manually. Check the table on page 1-45 for appropriate needle and thread combinations. Check that can be used . 5 - 5 6 15.Pass the thread under the presser foot, ... are using these threads, set the thread behind the needle clamp thread guide (step 8), then thread the eye of the machine. when threading the needle manually. ?! 1-36 Setting Up Index
CAUTION The needle threader lever can only be used with home sewing machine needles size 75/11-100/16. dle manually. Check the table on page 1-45 for appropriate needle and thread combinations. Check that can be used . 5 - 5 6 15.Pass the thread under the presser foot, ... are using these threads, set the thread behind the needle clamp thread guide (step 8), then thread the eye of the machine. when threading the needle manually. ?! 1-36 Setting Up Index
Users Manual - English
Page 60
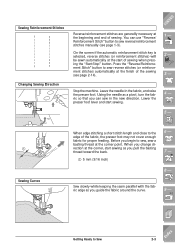
... guide the fabric around the curve. 9 - ?! Sew slowly while keeping the seam parallel with the fabric edge as you begin to sew reverse/reinforcement stitches manually (see page 2-14). Leave the needle in the new direction. On the screen if the automatic reinforcement stitch key is selected, reverse stitches (or reinforcement...
... guide the fabric around the curve. 9 - ?! Sew slowly while keeping the seam parallel with the fabric edge as you begin to sew reverse/reinforcement stitches manually (see page 2-14). Leave the needle in the new direction. On the screen if the automatic reinforcement stitch key is selected, reverse stitches (or reinforcement...

Users Manual - English
Page 67
... 3/16) 2.0 1.0 - 3.5 (1/16) (1/16 - 1/8) 2.0 1.0 - 3.5 (1/16) (1/16 - 1/8) 2.5 1.6 - 4.0 (3/32) (1/16 - 3/16) 2.5 0.2 - 4.0 (3/32) (1/64 - 1/16) 0.5 0.1 - 1.0 (1/32) (1/64 - 1/16) 1.4 1.0 - 4.0 (1/16) (1/16 - 3/16) 2-10 Getting Ready to Sew 1 - 2 - 3 - 4 - 5 - 6 - 7 - 8 - 9 - ?! Index Manual 2.5 0.2 - 5.0 (3/32) (1/64 - 3/16) 2.5 0.2 - 5.0 (3/32) (1/64 - 3/16) 2.5 0.2 - 5.0 (3/32) (1/64 - 3/16) 2.5 0.2 - 5.0 (3/32) (1/64 - 3/16) 2.5 1.5 - 4.0 (3/32) (1/16 - 3/16) 2.5 1.0 - 4.0 (3/32) (1/16 - 3/16) 2.5 1.0 - 4.0 (3/32) (1/16 - 3/16) 20.0 5.0 - 30...
... 3/16) 2.0 1.0 - 3.5 (1/16) (1/16 - 1/8) 2.0 1.0 - 3.5 (1/16) (1/16 - 1/8) 2.5 1.6 - 4.0 (3/32) (1/16 - 3/16) 2.5 0.2 - 4.0 (3/32) (1/64 - 1/16) 0.5 0.1 - 1.0 (1/32) (1/64 - 1/16) 1.4 1.0 - 4.0 (1/16) (1/16 - 3/16) 2-10 Getting Ready to Sew 1 - 2 - 3 - 4 - 5 - 6 - 7 - 8 - 9 - ?! Index Manual 2.5 0.2 - 5.0 (3/32) (1/64 - 3/16) 2.5 0.2 - 5.0 (3/32) (1/64 - 3/16) 2.5 0.2 - 5.0 (3/32) (1/64 - 3/16) 2.5 0.2 - 5.0 (3/32) (1/64 - 3/16) 2.5 1.5 - 4.0 (3/32) (1/16 - 3/16) 2.5 1.0 - 4.0 (3/32) (1/16 - 3/16) 2.5 1.0 - 4.0 (3/32) (1/16 - 3/16) 20.0 5.0 - 30...

Users Manual - English
Page 68
... (1/16 - 3/16) 2.5 1.6 - 4.0 (3/32) (1/16 - 3/16) 3.5 1.6 - 4.0 (1/8) (1/16 - 3/16) 3.0 1.5 - 4.0 (1/8) (1/16 - 3/16) 3.5 1.6 - 4.0 (1/8) (1/16 - 3/16) Stitch width [mm (inch.)] Pattern Auto. CONTENTS Stitch width [mm (inch.)] Pattern Auto. Manual 3.5 1.5 - 4.0 (1/8) (1/16 - 3/16) 3.5 1.6 - 4.0 (1/8) (1/16 - 3/16) 4.0 1.5 - 4.0 (3/16) (1/16 - 3/16) 2.5 1.5 - 4.0 (3/32) (1/16 - 3/16) 2.5 1.0 - 4.0 (3/32) (1/16 - 3/16) 3.5 1.5 - 4.0 (1/8) (1/16 - 3/16) 1.6 1.0 - 4.0 (1/16) (1/16 - 3/16) 3.0 1.5 - 4.0 (1/8) (1/16 - 3/16) 4.0 1.5 - 4.0 (3/16) (1/16 - 3/16...
... (1/16 - 3/16) 2.5 1.6 - 4.0 (3/32) (1/16 - 3/16) 3.5 1.6 - 4.0 (1/8) (1/16 - 3/16) 3.0 1.5 - 4.0 (1/8) (1/16 - 3/16) 3.5 1.6 - 4.0 (1/8) (1/16 - 3/16) Stitch width [mm (inch.)] Pattern Auto. CONTENTS Stitch width [mm (inch.)] Pattern Auto. Manual 3.5 1.5 - 4.0 (1/8) (1/16 - 3/16) 3.5 1.6 - 4.0 (1/8) (1/16 - 3/16) 4.0 1.5 - 4.0 (3/16) (1/16 - 3/16) 2.5 1.5 - 4.0 (3/32) (1/16 - 3/16) 2.5 1.0 - 4.0 (3/32) (1/16 - 3/16) 3.5 1.5 - 4.0 (1/8) (1/16 - 3/16) 1.6 1.0 - 4.0 (1/16) (1/16 - 3/16) 3.0 1.5 - 4.0 (1/8) (1/16 - 3/16) 4.0 1.5 - 4.0 (3/16) (1/16 - 3/16...

Users Manual - English
Page 69
...) (1/64 - 1/16) 7.0 2.5 - 7.0 2.0 0.4 - 2.5 (1/4) (3/32 - 1/4) (1/16) (1/64 - 1/16) 2.0 1.0 - 3.0 0.4 0.3 - 1.0 (1/16) (1/16 - 1/8) (1/64) (1/64 - 1/16) 3.5 2.5 - 4.5 - - (1/8) (3/32 - 3/16) 7.0 7.0 6.0 5.0 7.0 7.0 6.0 5.0 (1/4) (1/4 15/64 3/16) (1/4) (1/4 15/64 3/16) - - - - - - - - 1 - 2 - 3 - 4 - 5 - 6 - 7 - 8 - 9 - ?! - - - - - - - - - - - - 2-12 Getting Ready to Sew Index Manual Auto. CONTENTS Stitch width [mm (inch.)] Stitch length [mm (inch.)] Stitch width [mm (inch.)] Stitch length [mm (inch.)] Pattern Pattern Auto.
...) (1/64 - 1/16) 7.0 2.5 - 7.0 2.0 0.4 - 2.5 (1/4) (3/32 - 1/4) (1/16) (1/64 - 1/16) 2.0 1.0 - 3.0 0.4 0.3 - 1.0 (1/16) (1/16 - 1/8) (1/64) (1/64 - 1/16) 3.5 2.5 - 4.5 - - (1/8) (3/32 - 3/16) 7.0 7.0 6.0 5.0 7.0 7.0 6.0 5.0 (1/4) (1/4 15/64 3/16) (1/4) (1/4 15/64 3/16) - - - - - - - - 1 - 2 - 3 - 4 - 5 - 6 - 7 - 8 - 9 - ?! - - - - - - - - - - - - 2-12 Getting Ready to Sew Index Manual Auto. CONTENTS Stitch width [mm (inch.)] Stitch length [mm (inch.)] Stitch width [mm (inch.)] Stitch length [mm (inch.)] Pattern Pattern Auto.

Users Manual - English
Page 122
... not be obtained if you use "130/705H Wing" needle when sewing these patterns. If using a wing needle and the stitch width has been set manually, check that the needle will not touch the presser foot before starting sewing by hand, from front to medium weight homespun fabric with a little stiffness...
... not be obtained if you use "130/705H Wing" needle when sewing these patterns. If using a wing needle and the stitch width has been set manually, check that the needle will not touch the presser foot before starting sewing by hand, from front to medium weight homespun fabric with a little stiffness...
Users Manual - English
Page 316
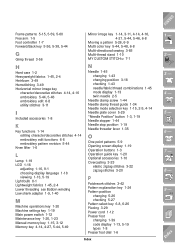
..., 2-4 Lower threading see Bobbin winding Low shank adapter 1-9, 1-40 M Machine operations key 1-20 Machine settings key 1-19 Main power switch 1-12 Maintenance key 1-20, 1-23 Manual memory key 1-15, 3-12 Memory key 4-14, 4-27, 5-44, 5-49 N Needle 1-45 changing 1-43 changing position 3-18 checking 1-43 needle/fabric/thread combinations 1-45 mode...
..., 2-4 Lower threading see Bobbin winding Low shank adapter 1-9, 1-40 M Machine operations key 1-20 Machine settings key 1-19 Main power switch 1-12 Maintenance key 1-20, 1-23 Manual memory key 1-15, 3-12 Memory key 4-14, 4-27, 5-44, 5-49 N Needle 1-45 changing 1-43 changing position 3-18 checking 1-43 needle/fabric/thread combinations 1-45 mode...


